ubuntu安装python3.5+pycharm+anaconda+opencv+docker+nvidia-docker+tensorflow+pytorch+Cmake3.8
一,切换python版本为3.5
装好ubuntu,python版本是2.7的
我自己安装并更改打开为python3.5
sudo apt-get install python3.5
设置优先级和默认环境:
sudo update-alternatives --install /usr/bin/python python /usr/bin/python2 100
sudo update-alternatives --install /usr/bin/python python /usr/bin/python3 150
切换版本:
update-alternatives --config python
可看见python已经为3.5了。
二,安装pycharm:
pycharm官网
三,安装anaconda
下载python3.5对应的版本
https://repo.anaconda.com/archive/
然后:
~$ cd 下载
~/下载$ bash Anaconda2-4.2.0-Linux-x86_64.sh
这里需要一直按Enter,直到出现需要输入yes or no 。输入yes后,会显示Anaconda将要安装到哪个目录下,可以自行修改,这里我选择默认的路径,直接回车。最后会提示添加环境变量,输入yes后,安装完成。
pycharm中更改解释器路径。
ok,,结束。
在~/.bashrc添加
export PATH="/home/fzh/anaconda2/bin:$PATH"(注意py3是anaconda3)
在source一下
创建虚拟环境
conda create -n your_env_name python=x.x激活进入
source activate your_env_name
卸载anaconda
首先直接删除整个anaconda文件夹,在vim ~/.bashrc
注释掉# export PATH="/home/fzh/anaconda2/bin:$PATH"
最后在source ~/.bashrc
重启终端
更换conda源
将以上配置文件写在~/.condarc中
vim ~/.condarc
channels:
  - https://mirrors.ustc.edu.cn/anaconda/pkgs/main/
  - https://mirrors.ustc.edu.cn/anaconda/cloud/conda-forge/
  - https://mirrors.tuna.tsinghua.edu.cn/anaconda/pkgs/free/
  - defaults
show_channel_urls: true
安装opencv
pip install opencv-contrib-python
pip install opencv-python
四,安装docker
docker/nvidia-docker 操作指南
https://www.dongliwu.com/archives/61/#directory0824639160743786413
若先前有安装docker需要先卸载(若没有安装过则无需执行),执行命令:
sudo apt-get remove docker docker-engine docker.io
Docker的安装有多个方式,这里以最常见的方式为例。首先依次执行以下命令,把docker仓库加进到apt里.
sudo apt-get update
sudo apt-get install apt-transport-https ca-certificates curl software-properties-common
curl -fsSL https://download.docker.com/linux/ubuntu/gpg | sudo apt-key add -
sudo apt-key fingerprint 0EBFCD88
sudo add-apt-repository "deb [arch=amd64] https://download.docker.com/linux/ubuntu $(lsb_release -cs) stable"
正式安装docker:
sudo apt-get update
sudo apt-get install docker-ce
apt-cache madison docker-ce
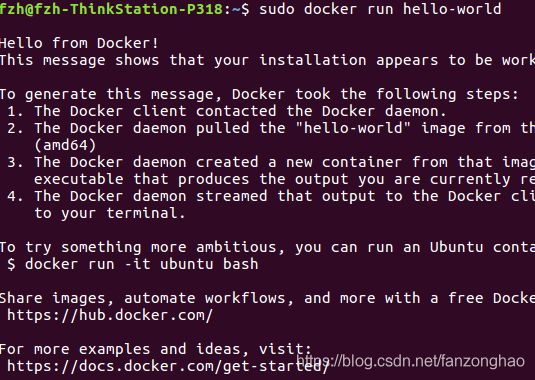
sudo docker run hello-world
最后一个命令是验证docker是否安装成功,它会下载并执行hello-world镜像。如果安装正确,应该可以正确执行。如果提示找不到,多重复几次即可.
五,安装nvidia-docker
# 清理以前的。If you have nvidia-docker 1.0 installed: we need to remove it and all existing GPU containers
sudo docker volume ls -q -f driver=nvidia-docker | xargs -r -I{} -n1 docker ps -q -a -f volume={} | xargs -r docker rm -f
sudo apt-get purge -y nvidia-docker
sudo apt autoremove
# 执行命令。Add the package repositories
# command 1
curl -s -L https://nvidia.github.io/nvidia-docker/gpgkey | \
sudo apt-key add -
# command 2
distribution=$(. /etc/os-release;echo $ID$VERSION_ID)
# command 3
curl -s -L https://nvidia.github.io/nvidia-docker/$distribution/nvidia-docker.list | \
sudo tee /etc/apt/sources.list.d/nvidia-docker.list
sudo apt-get update
# 正式安装。Install nvidia-docker2 and reload the Docker daemon configuration
sudo apt-get install -y nvidia-docker2
sudo pkill -SIGHUP dockerd
# 测试一下。 Test nvidia-smi with the latest official CUDA image
sudo docker run --runtime=nvidia --rm nvidia/cuda:9.0-base nvidia-smi
sudo systemctl daemon-reload
sudo systemctl restart docker
我利用有驱动的官方镜像安装其他环境,首先把docker跑起来
sudo nvidia-docker run -it nvidia/cuda:9.0-baseapt-get update
apt-get upgrade
接下来,完善此镜像。安装完整的cuda-toolkit:
官方的镜像不完整,这一步很关键
apt install cuda-toolkit-9-0apt-get install python3
apt-get install python3-pip
然后按照这个链接去装cuda和cudnn即可.
https://blog.csdn.net/fanzonghao/article/details/89707519
想要更新原来的镜像,比如上述都安转好了,用commit命令,adaf25712ec8是原有镜像的id,chaos_gpu是新镜像的名字,用docker images即可查看新的镜像
commit后面是ps出来的容器ID,后面跟自己想要保存的名字,我这里是chaos_gpu
sudo nvidia-docker commit adaf25712ec8 chaos_gpu保持镜像到本地:
https://www.runoob.com/docker/docker-save-command.html
将镜像 runoob/ubuntu:v3 生成 my_ubuntu_v3.tar 文档
docker save -o my_ubuntu_v3.tar runoob/ubuntu:v3
载入本地镜像:
docker load -i tf_torch_gpu.tar
进入镜像 docker run --runtime nvidia -it ufoym/deepo:tensorflow-py36 bash
用Dockerfile创建镜像
1.1示例
#进入代码文件夹目录
1.vim Dockerfile (配置Dockerfile)
FROM fzh_image:torch_0.4_tf_1.12
COPY ./ /pcb_API (相对路径更好,绝对路径会出错)
LABEL maintainer="[email protected]"

ENV LC_ALL C.UTF-8
ENV LANG C.UTF-8

RUN sed -i 's/^\(deb\|deb-src\) \([^ ]*\) \(.*\)/\1 http:\/\/mirrors.aliyun.com\/ubuntu \3/' /etc/apt/sources.list && \
    apt update && apt install -y --no-install-recommends libsm6 libxrender1 libxext6 libgtk2.0-dev && \
    apt clean && rm -rf /var/lib/apt/lists/*


RUN pip install h5py torch==0.4.0 requests bs4 flask opencv-python pillow numpy pandas -i https://pypi.tuna.tsinghua.edu.cn/simple

RUN mkdir /root/.torch /root/.torch/models
RUN cp -r /pcb_API/models/densenet/densenet169-b2777c0a.pth /root/.torch/models/

WORKDIR /pcb_API

ENTRYPOINT ["python","/pcb_API/manage_API.py"]
1.2带有字体的dockerfile
FROM daxin-docker:1.0
COPY ./ /

LABEL maintainer="[email protected]"

ENV LC_ALL C.UTF-8
ENV LANG C.UTF-8

RUN echo "ttf-mscorefonts-installer msttcorefonts/accepted-mscorefonts-eula select true" | debconf-set-selections

RUN apt-get update && apt-get install -y --no-install-recommends poppler-data ttf-mscorefonts-installer fontconfig
RUN mkdir /usr/share/fonts/myfonts
RUN cp -r /FONT/* /usr/share/fonts/myfonts/
RUN fc-cache -fv
RUN chmod -R 777 /usr/share/fonts/myfonts

RUN pip install imutils opencv-python==3.4.2.16 sqlalchemy_utils -i https://pypi.tuna.tsinghua.edu.cn/simple
WORKDIR /src

ENTRYPOINT ["python","manage_pdf.py"]
1.3 pull mysql镜像
拉mysql镜像
docker pull mysql:5.7.26
docker images|grep mysql
docker tag mysql:5.7.26 xunzhenhan/mysql:5.7.26
docker save xunzhenhan/mysql:5.7.26 > xunzhenhan-mysql-5.7.26.tar
1.4 用dockerfile创建mysql镜像,并设置账号密码
FROM hub.youedata.com/new_dataos_deploy/mysql:5.7

#设置账号密码登录
ENV MYSQL_ROOT_PASSWORD Admin_2018
#将所需文件放到容器中
#COPY setup.sh /mysql/setup.sh
#COPY schema.sql /mysql/schema.sql
#COPY privileges.sql /mysql/privileges.sql

#设置容器启动时执行的命令
CMD ["sh", "/mysql/setup.sh"]
2.docker bulid
docker build -t pcb_docker . --rm (得到镜像)3.建容器
run -d就后台挂起
nvidia-docker run -it -p 5112:6006 pcb_api_docker:latest

nvidia-docker run -it -p 5112:6006 --entrypoint bash pcb_api_docker:latest(不执行Dockerfile里的python /pcb_API/manage_API.py用做调试)
4.批量删除none的docker镜像
docker images|grep none|awk '{print $3}'|xargs docker rmi
5.docker的一些命令
docker inspect id 查看docker的一些相关信息,对于组件可以查看config.py
docker logs id >xxx.txt 将docker日志输出为txt
docker cp
将主机/www/runoob目录拷贝到容器96f7f14e99ab的/www目录下。
docker cp /www/runoob 96f7f14e99ab:/www/将容器96f7f14e99ab的/www目录拷贝到主机的/tmp目录中。
docker cp 96f7f14e99ab:/www /tmp/6.将用户添加进docker用户组
1. 创建docker用户组
sudo groupadd docker
2. 将用户添加到docker用户组
sudo usermod -aG docker USER_NAME
3. 重启docker服务
sudo systemctl restart docker
7.docker: Error response from daemon: Unknown runtime specified nvidia.
sudo systemctl daemon-reload
sudo systemctl restart docker
六.下载使用TensorFlow镜像
根据需要的版本下载tensorflow镜像并开启tensorflow容器:
https://github.com/alibaba/x-deeplearning/wiki/%E7%BC%96%E8%AF%91%E5%AE%89%E8%A3%85?from=singlemessage
七.安装tensorflow
pip3 install tensorflow-gpu==1.12.0
import tensorflow as tf
a=tf.constant(1)
with tf.Session() as sess:
    print(sess.run(a))
八.安装pytorch
https://pytorch.org/get-started/locally/
安装torch官网根据cuda版本来安装
conda install pytorch torchvision cudatoolkit=9.0 -c pytorch
其中,-c pytorch参数指定了conda获取pytorch的channel,在此指定为conda自带的pytorch仓库。
因此,只需要将-c pytorch语句去掉,就可以使用清华镜像源快速安装pytorch了。
若要安装指定版本的pytorch
pip install torch==0.4.0
import torch
print(torch.version.cuda)
print(torch.cuda.is_available())
print(torch.__version__)
如果出现fasle,去检查cuda是否装好
最终挂载本地与docker同步命令
nvidia-docker run -it -v ~/AI/:/AI -w /AI/ --name=fzh_tf_torch_py3 -p 2111:22 -p 2112:6006 -p 2113:8888 tf_pytorch_gpu:1.12.0_1.1.0 bash
九,安装Cmake3.8
官网下载cmake https://cmake.org/files/v3.8/
vim ~/.bashrc 添加环境变量
![]()
source ~/.bashrc
cmake --version
参考:
https://blog.csdn.net/WannaSeaU/article/details/88427010


