手动实现一个神经网络-从理论到实战
一、神经网络理论
1. 背景:
1.1 以人脑中的神经网络为启发,历史上出现过很多不同版本
1.2 最著名的算法是1980年的 backpropagation
2. 多层向前神经网络(Multilayer Feed-Forward Neural Network)
2.1 Backpropagation被使用在多层向前神经网络上
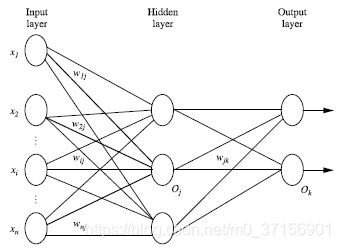
2.2 多层向前神经网络由以下部分组成:
输入层(input layer), 隐藏层 (hidden layers), 输入层 (output layers)
2.3 每层由单元(units)组成
2.4 输入层(input layer)是由训练集的实例特征向量传入
2.5 经过连接结点的权重(weight)传入下一层,一层的输出是下一层的输入
2.6 隐藏层的个数可以是任意的,输入层有一层,输出层有一层
2.7 每个单元(unit)也可以被称作神经结点,根据生物学来源定义
2.8 以上成为2层的神经网络(输入层不算)
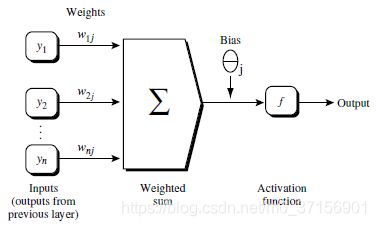
2.8 一层中加权的求和,然后根据非线性方程转化输出
2.9 作为多层向前神经网络,理论上,如果有足够多的隐藏层(hidden layers) 和足够大的训练集, 可以模
拟出任何方程
3. 设计神经网络结构
3.1 使用神经网络训练数据之前,必须确定神经网络的层数,以及每层单元的个数
3.2 特征向量在被传入输入层时通常被先标准化(normalize)到0和1之间 (为了加速学习过程)
3.3 离散型变量可以被编码成每一个输入单元对应一个特征值可能赋的值
比如:特征值A可能取三个值(a0, a1, a2), 可以使用3个输入单元来代表A。
如果A=a0, 那么代表a0的单元值就取1, 其他取0;
如果A=a1, 那么代表a1de单元值就取1,其他取0,以此类推
3.4 神经网络即可以用来做分类(classification)问题,也可以解决回归(regression)问题
3.4.1 对于分类问题,如果是2类,可以用一个输出单元表示(0和1分别代表2类)
如果多余2类,每一个类别用一个输出单元表示
所以输入层的单元数量通常等于类别的数量
3.4.2 没有明确的规则来设计最好有多少个隐藏层
3.4.2.1 根据实验测试和误差,以及准确度来实验并改进
4. 交叉验证方法(Cross-Validation)
K-fold cross validation
5. Backpropagation算法
5.1 通过迭代性的来处理训练集中的实例
5.2 对比经过神经网络后输入层预测值(predicted value)与真实值(target value)之间
5.3 反方向(从输出层=>隐藏层=>输入层)来以最小化误差(error)来更新每个连接的权重(weight)
5.4 算法详细介绍
输入:D:数据集,l 学习率(learning rate), 一个多层前向神经网络
输入:一个训练好的神经网络(a trained neural network)
X = np.atleast_2d(X)
		# 定义和数据集X 行数一样,列数比X多一列,用于bias偏向赋值
        temp = np.ones([X.shape[0], X.shape[1]+1])
		# adding the bias unit to the input layer
		# 完成了数据偏移量的赋值,全为 1
        temp[:, 0:-1] = X
        X = temp
        y = np.array(y)
5.4.1 初始化权重(weights)和偏向(bias): 随机初始化在-1到1之间,或者-0.5到0.5之间,每个单元有
一个偏向
self.weights = []

        for i in range(1, len(layers) - 1):
            self.weights.append((2*random((layers[i - 1] + 1, layers[i] + 1)) - 1)*0.25)
            self.weights.append((2*random((layers[i] + 1, layers[i + 1] + 1)) - 1)*0.25)
        # print(self.weights)
5.4.2 对于每一个训练实例X,执行以下步骤:
5.4.2.1: 由输入层向前传送
![]()
# 随机抽取一行进行参数的更新
            i = np.random.randint(X.shape[0])
            a = [X[i]]

            # 接下来进行更新训练操作
			#going forward network, for each layer
			for l in range(len(self.weights)):
				# Computer the node value for each layer (O_i) using activation function
				# 到这里已经完成了所有层的正向遍历,完成了权重相乘相加偏移量再经过激活函数的操作
                a.append(self.activation(np.dot(a[l], self.weights[l])))
            #Computer the error at the top layer
			# a 是所有的计算过后的神经元
			error = y[i] - a[-1]
			#For output layer, Err calculation (delta is updated error)
            deltas = [error * self.activation_deriv(a[-1])]
5.4.2.2 根据误差(error)反向传送
对于输出层:![]()
对于隐藏层:![]()
             # 根据误差反向传送
			#Staring backprobagation
			# we need to begin at the second to last layer
            # len(a) - 2:不算出、入层,从0第一次到-1最后一层回溯遍历
			for l in range(len(a) - 2, 0, -1):
               deltas.append(deltas[-1].dot(self.weights[l].T)*self.activation_deriv(a[l]))
            deltas.reverse()
            for i in range(len(self.weights)):
                layer = np.atleast_2d(a[i])
				# delta:对应权重更新
				# deltas:存储所有层更新过后的误差
                delta = np.atleast_2d(deltas[i])
                self.weights[i] += learning_rate * layer.T.dot(delta)
5.4.3 终止条件
5.4.3.1 权重的更新低于某个阈值
5.4.3.2 预测的错误率低于某个阈值
5.4.3.3 达到预设一定的循环次数
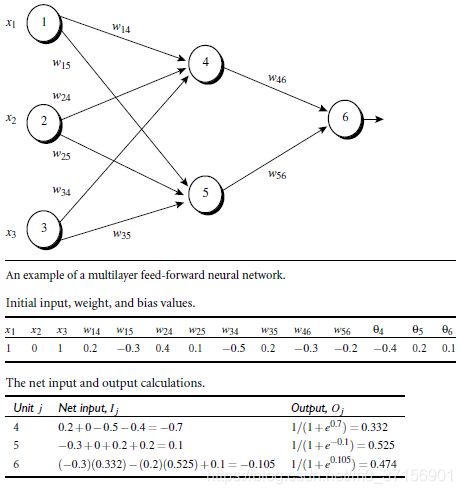
6. Backpropagation 算法举例
对于输出层:![]()
对于隐藏层:![]()
二、手写神经网络模型
1.先了解激活函数tanh
2.1 神经网络的实现代码
import numpy as np

# 双曲函数
def tanh(x):
    return np.tanh(x)

# 更新权重 要求导数
def tanh_deriv(x):
    return 1.0 - np.tanh(x)*np.tanh(x)

# 定义逻辑函数表达式
def logistic(x):
    return 1/(1 + np.exp(-x))

# 逻辑函数求导之后的导数
def logistic_derivative(x):
    return logistic(x)*(1-logistic(x))

# 类的写法
class NeuralNetwork:
	# 实例化构造函数
	# self - this,  - 指向当前类的指针
	# layers : list :[10,2,2,4,5]:几每层里面有多少个神经元(输入层不算层数)
    # activation: 让用户指定使用的参数,默认值
	def __init__(self, layers, activation='tanh'):
        """
        :param layers: A list containing the number of units in each layer.
        Should be at least two values
        :param activation: The activation function to be used. Can be
        "logistic" or "tanh"
        """
		# 判断用户输入选择
        if activation == 'logistic':
            self.activation = logistic
            self.activation_deriv = logistic_derivative
        elif activation == 'tanh':
            self.activation = tanh
            self.activation_deriv = tanh_deriv
		# 在这个时候就已经初始化了一个成员变量
        self.weights = []
		# 【1】从第二层开始,【len(layers) - 1】去掉了输出层,它没有权重
		# 权重是两个神经元之间的一条线,所以会有两次赋值操作
        for i in range(1, len(layers) - 1):
			# 对第 i 层和 i-1 层之间的权重赋 -0.25 ~ 0.25之间的值
            self.weights.append((2*np.random.random((layers[i - 1] + 1, layers[i] + 1))-1)*0.25)
			# 对第 i 层和 i+1 层之间的权重赋 -0.25 ~ 0.25之间的值
            self.weights.append((2*np.random.random((layers[i] + 1, layers[i + 1]))-1)*0.25)

	# fit来回改变参数的训练过程
    # X: 输入集 :二维矩阵:每一行对应一个实例,每一列对应多少维度特征值
	# y:标记【0,1】 【1,2,3,4,5,6,7】
	# learning_rate=0.2:对应学习率
	# epochs=10000 : 循环次数:训练时不使用全部数据,而是随机取一部分训练,取一次就是epochs-对应三个终止条件最后一个
	def fit(self, X, y, learning_rate=0.2, epochs=10000):
        # 确定其至少是一个二维的矩阵
		X = np.atleast_2d(X)
		# 定义和数据集X 行数一样,列数比X多一列,用于bias偏向赋值
        temp = np.ones([X.shape[0], X.shape[1]+1])
		# adding the bias unit to the input layer
		# 完成了数据偏移量的赋值,全为 1
        temp[:, 0:-1] = X
        X = temp
        y = np.array(y)

		# 抽样的次数,随机抽取一行
        for k in range(epochs):
			# 随机抽取一行进行参数的更新
            i = np.random.randint(X.shape[0])
            a = [X[i]]

            # 接下来进行更新训练操作
			#going forward network, for each layer
			for l in range(len(self.weights)):
				# Computer the node value for each layer (O_i) using activation function
				# 到这里已经完成了所有层的正向遍历,完成了权重相乘相加偏移量再经过激活函数的操作
                a.append(self.activation(np.dot(a[l], self.weights[l])))
            #Computer the error at the top layer
			# a 是所有的计算过后的神经元
			error = y[i] - a[-1]
			#For output layer, Err calculation (delta is updated error)
            deltas = [error * self.activation_deriv(a[-1])]

            # 根据误差反向传送
			#Staring backprobagation
			# we need to begin at the second to last layer
            # len(a) - 2:不算出、入层,从0第一次到-1最后一层回溯遍历
			for l in range(len(a) - 2, 0, -1):
                #Compute the updated error (i,e, deltas) for each node going from top layer to input layer
                deltas.append(deltas[-1].dot(self.weights[l].T)*self.activation_deriv(a[l]))
            deltas.reverse()
            for i in range(len(self.weights)):
                layer = np.atleast_2d(a[i])
				# delta:对应权重更新
				# deltas:存储所有层更新过后的误差
                delta = np.atleast_2d(deltas[i])
                self.weights[i] += learning_rate * layer.T.dot(delta)

    # 已经更新训练完毕, 进行预测

	# 和训练前部分一样只是不需要保存每一层的状态
	def predict(self, x):
        x = np.array(x)
        temp = np.ones(x.shape[0]+1)
        temp[0:-1] = x
        a = temp
        for l in range(0, len(self.weights)):
            a = self.activation(np.dot(a, self.weights[l]))
        return a
2.2 测试代码
from NN01 import NeuralNetwork
import numpy as np

nn = NeuralNetwork([2,2,1], 'tanh')
x = np.array([[0,0],[0,1],[1,0],[1,1]])
y = np.array([0,1,1,0])

nn.fit(x,y)
for i in [[0,0],[0,1],[1,0],[1,1]]:
    print(i, nn.predict(i))
2.3使用自己的神经网络实现手写数字识别
# from sklearn.datasets import load_digits
#
# digits = load_digits()
# print(digits.data.shape)
#
# import pylab as pl
# pl.gray()
# pl.matshow(digits.images[9])
# pl.show()


#!/usr/bin/python
# -*- coding:utf-8 -*-

# 每个图片8x8  识别数字:0,1,2,3,4,5,6,7,8,9
# 1797,64 : 对应1797张图片, 每张图片8x8 = 64维度


import numpy as np
# 数据集
from sklearn.datasets import load_digits
# 通过简单矩阵的简单明了显示预测对错的包
from sklearn.metrics import confusion_matrix, classification_report
# 不接受012345, 转化为二维数字的结构,one-hot编码类似
from sklearn.preprocessing import LabelBinarizer
# from NN01 import NeuralNetwork
from NeuralNetwork import NeuralNetwork
# 交叉验证的拆分数据的
# from sklearn.cross_validation import train_test_split
from sklearn.model_selection import train_test_split
# 先下载数据
digits = load_digits()
# 赋值数据标签
X = digits.data
y = digits.target
# normalize the values to bring them into the range 0-1
# 神经网络算法的要求,标准化
X -= X.min()
X /= X.max()

# layers层数
# 64个像素点对应网络中的一个神经元输入,10对应输出标签的个数
nn = NeuralNetwork([64, 100, 10], 'logistic')
# 切分数据集
X_train, X_test, y_train, y_test = train_test_split(X, y)
# one-hot编码
labels_train = LabelBinarizer().fit_transform(y_train)
labels_test = LabelBinarizer().fit_transform(y_test)
print("start fitting")

# 开始训练模型
nn.fit(X_train, labels_train, epochs=3000)
predictions = []
for i in range(X_test.shape[0]):
    o = nn.predict(X_test[i])
    predictions.append(np.argmax(o))
print(confusion_matrix(y_test, predictions))
print(classification_report(y_test, predictions))
2.4结果解释
start fitting

# confusion_matrix 10 X 10的矩阵,
# 横向和纵向分别表示真实值和预测值
# 对角线44 说明:我们预测对了43个0
# 第一行第五列:1预测错了, 原本是4, 我们预测成了0

[[44  0  0  0  1  0  0  0  0  0]
 [ 0 40  0  0  1  0  0  0  5  5]
 [ 0  1 47  0  0  0  0  0  0  0]
 [ 0  3  0 33  0  1  0  3  2  0]
 [ 0  0  0  0 41  0  0  2  1  0]
 [ 0  0  0  0  0 40  0  0  0  0]
 [ 0  0  0  0  0  0 43  0  1  0]
 [ 0  0  0  0  0  0  0 53  0  1]
 [ 0  2  0  0  0  1  0  0 45  0]
 [ 0  0  0  0  1  0  0  0  0 33]]

# precision: 有这么多个0, 我们对少个是预测对了。预测对的百分比是多少?
# recall: 正好反过来,所有真实值是0的数字,我们有多少预测它为0了,

              precision    recall  f1-score   support

           0       1.00      0.98      0.99        45
           1       0.87      0.78      0.82        51
           2       1.00      0.98      0.99        48
           3       1.00      0.79      0.88        42
           4       0.93      0.93      0.93        44
           5       0.95      1.00      0.98        40
           6       1.00      0.98      0.99        44
           7       0.91      0.98      0.95        54
           8       0.83      0.94      0.88        48
           9       0.85      0.97      0.90        34

   micro avg       0.93      0.93      0.93       450
   macro avg       0.93      0.93      0.93       450
weighted avg       0.93      0.93      0.93       450


