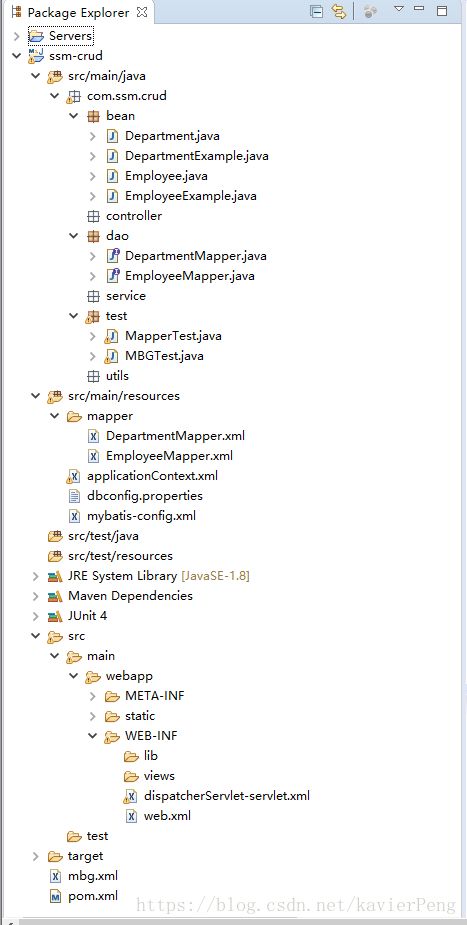
ssm(spring + Springmvc + mybatis)框架整合 · 笔记
一、环境配置
材料准备:
- JDK1.8
- Maven
- Tomcat7
- Eclipse
- MySQL
1、下载完后的maven配置:
(1)配置本地仓库 :打开conf文件夹中的 settings.xml 将蓝下滑线中的内容复制出来填写自己的本地仓库地址

目标位置( 例:D:\myProject\myRepository )
(2)配置阿里云镜像源 :在
    alimaven
    central
    aliyun maven
    http://maven.aliyun.com/nexus/content/repositories/central/
(3)配置创建工程时的 jdk依赖的版本 :在
	jdk-1.8

		true
		1.8


		1.8
		1.8
		1.8
2、Eclipse配置:
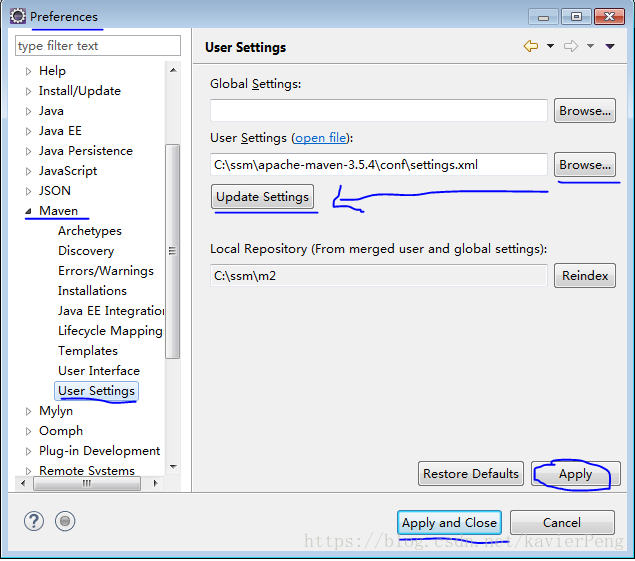
(1)配置maven
配置你的settings.xml文件位置,update 之后,确定就好了
(2)配置tomcat
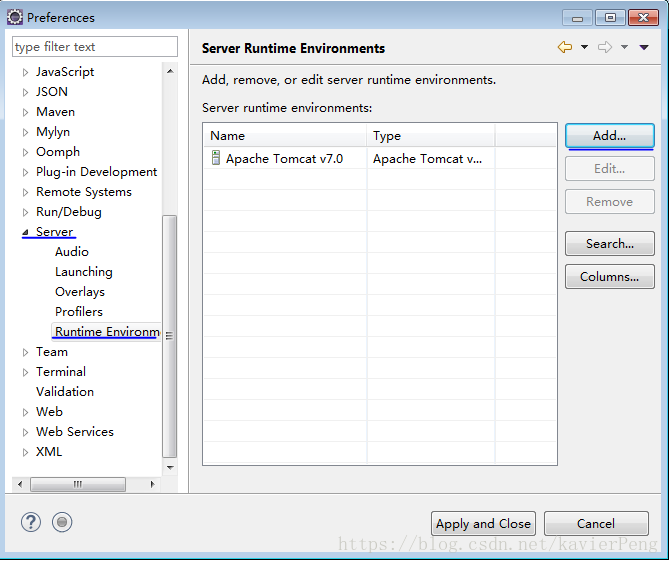
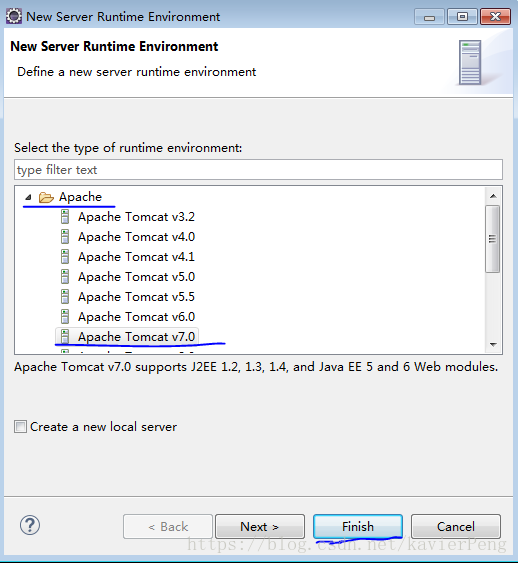
然后会发现多了新创建的tomcat服务

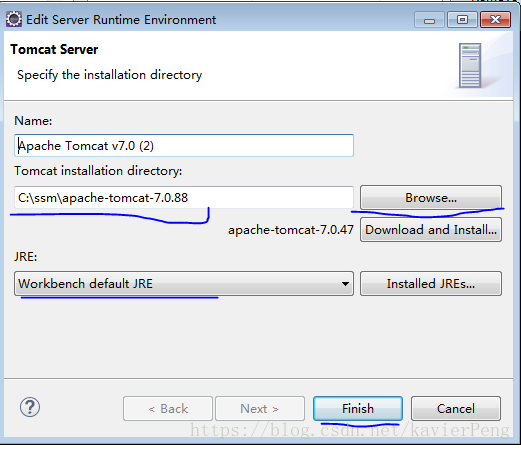
选中,再点击旁边的edit按钮,选择自己的tomcat位置,和jre版本
二、创建工程,导包
maven中央仓库
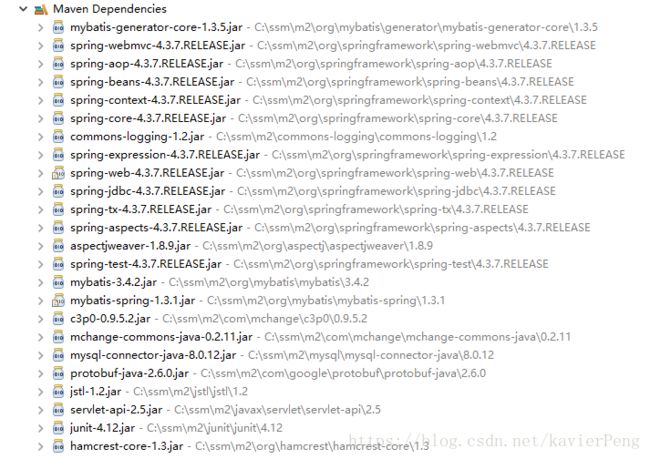
导入的包有:
- spring-webmvc、spring jdbc、spring-aspects
- mybatis
- mybatis-spring
- c3p0、mysql-connector-java
- junit、servlet-api、jstl
pom.xml 内容
			org.springframework
			spring-webmvc
			4.3.7.RELEASE


			org.springframework
			spring-jdbc
			4.3.7.RELEASE


			org.springframework
			spring-aspects
			4.3.7.RELEASE


		    org.mybatis
		    mybatis
		    3.4.2


		    org.mybatis
		    mybatis-spring
		    1.3.1


		    c3p0
		    c3p0
		    0.9.1.2


		    mysql
		    mysql-connector-java
		    5.1.41


		    jstl
		    jstl
		    1.2


		    javax.servlet
		    servlet-api
		    2.5
		    provided


		    junit
		    junit
		    4.12
		    test
其余要使用的包,在使用时再导入
三、写配置文件
web.xml
        contextConfigLocation
        classpath:applicationContext.xml


        org.springframework.web.context.ContextLoaderListener


        dispatcherServlet
        org.springframework.web.servlet.DispatcherServlet
        1


        dispatcherServlet
        /


        CharacterEncodingFilter
        org.springframework.web.filter.CharacterEncodingFilter

			encoding
			UTF-8


			forceRequestEncoding
			true


			forceRseponseEncoding
			true


        CharacterEncodingFilter
        /*


        HiddenHttpMethodFilter
        org.springframework.web.filter.HiddenHttpMethodFilter


        HiddenHttpMethodFilter
        /*
springMVC的配置:dispatcherServlet-servlet.xml
引入了使用 aop 和 tx 功能,spring配置文件头:(spring配置文件头解析)
...
(为什么在Spring的配置里,最好不要配置xsd文件的版本号?)
可查看这篇博文 点击这里
spring配置文件:aplicationContext.xml
mybatis全局配置:mybatis-config.xml
四、Mybatis逆向工程
安装数据库 >>
创建表 create…
1、逆向工程配置和使用:
mybatis generater手册
导入逆向工程使用的 jar 包
    org.mybatis.generator
    mybatis-generator-core
    1.3.5
逆向工程的配置文件:mbg.xml
使用 java代码+配置文件的方式来跑逆向工程:
MBGTest.java
package com.ssm.crud.test;

import java.io.File;
import java.util.ArrayList;
import java.util.List;
import org.mybatis.generator.exception.*;
import org.mybatis.generator.internal.*;
import org.mybatis.generator.api.MyBatisGenerator;
import org.mybatis.generator.config.*;
import org.mybatis.generator.config.xml.ConfigurationParser;

public class MBGTest {

	public static void main(String[] args) throws Exception {
        List warnings = new ArrayList();
        boolean overwrite = true;
        File configFile = new File("mbg.xml");
        ConfigurationParser cp = new ConfigurationParser(warnings);
        Configuration config = cp.parseConfiguration(configFile);
        DefaultShellCallback cellback = new DefaultShellCallback(overwrite);
        MyBatisGenerator myBatisGenerator = new MyBatisGenerator(config, cellback, warnings);
	    myBatisGenerator.generate(null);
	}

}
(运行java代码,生成的文件还需要修改以适应自己开发所需的业务逻辑)
注意:要重新生成代码一定要删掉之前生成的,避免重复
逆向工程可能出现的问题:
1.数据库版本8之后与之前所使用的身份验证插件不一样(身份验证插件 caching_sha2_password)
使用8.0.9或更高版本的数据库连接驱动jar包
新老驱动路径:
老:driverClass="com.mysql.jdbc.Driver"
新:driverClass="com.mysql.cj.jdbc.Driver"
2.时间格式问题,就在jdbc连接的url后面加上参数
connectionURL="jdbc:mysql://localhost:3306/ssm_crud?useUnicode=true&characterEncoding=utf8&serverTimezone=GMT%2B8&useSSL=false&"
五、测试
后面有测试可能出现的问题和解决方法
1、测试插入
Department t1 = new Department();
t1.setDeptId(null);
t1.setDeptName("信息部");
Department t2 = new Department();
t2.setDeptId(null);
t2.setDeptName("技术部");

departmentMapper.insertSelective(t1);
departmentMapper.insertSelective(t2);
//这里插入两条数据
2、测试批量操作
添加批量操作:applicationContext.xml 添加以下内容
java代码
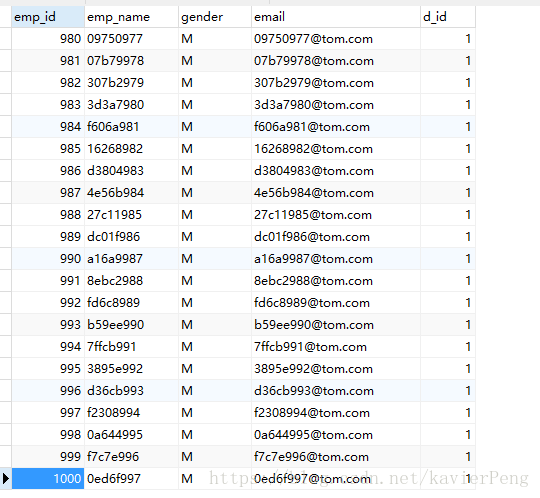
    //批量插入1000条信息
    EmployeeMapper mapper = sqlSession.getMapper(EmployeeMapper.class);
	for (int i = 0; i < 1000; i++) {
		String name = UUID.randomUUID().toString().substring(0, 5) + i;

		Employee e1 = new Employee();
		e1.setdId(1);
		e1.setEmail(name + "@tom.com");
		e1.setEmpName(name);
		e1.setGender("M");

		mapper.insertSelective(e1);
	}
测试过程出现的问题:
1、找不到com.mchange.v2.c3p0.ComboPooledDataSource
更换高版本的 c3p0 解决问题


    com.mchange
    c3p0
    0.9.5.2
2、Public Key Retrieval is not allowed 错误:mysql链接添加
allowPublicKeyRetrieval=true
