Linux云计算架构-使用LAMP搭建ecshop电商平台,并测试网站所能承受并发数
文章目录
- Linux云计算架构-使用LAMP搭建ecshop电商平台
- 1. YUM快速搭建LAMP环境
- 2. mariadb安全安装
- 3. 搭建ecshop电商平台
- 4. 配置虚拟主机实现域名访问
- 5. 使用压测软件测试新搭建网站所能承受的并发数
Linux云计算架构-使用LAMP搭建ecshop电商平台
1. YUM快速搭建LAMP环境
[root@master ~]# rpm -q httpd mariadb-server mariadb php php-mysql php-gd php-mbstring
未安装软件包 httpd
未安装软件包 mariadb-server
未安装软件包 mariadb
未安装软件包 php
未安装软件包 php-mysql
未安装软件包 php-gd
未安装软件包 php-mbstring

# 安装软件包
[root@master ~]# yum install -y httpd mariadb-server mariadb php php-mysql php-gd php-mbstring
已安装:
  httpd.x86_64 0:2.4.6-93.el7.centos
  mariadb.x86_64 1:5.5.65-1.el7
  mariadb-server.x86_64 1:5.5.65-1.el7
  php.x86_64 0:5.4.16-48.el7
  php-gd.x86_64 0:5.4.16-48.el7
  php-mbstring.x86_64 0:5.4.16-48.el7
  php-mysql.x86_64 0:5.4.16-48.el7

作为依赖被安装:
  httpd-tools.x86_64 0:2.4.6-93.el7.centos
  libzip.x86_64 0:0.10.1-8.el7
  mailcap.noarch 0:2.1.41-2.el7
  perl-DBD-MySQL.x86_64 0:4.023-6.el7
  php-cli.x86_64 0:5.4.16-48.el7
  php-common.x86_64 0:5.4.16-48.el7
  php-pdo.x86_64 0:5.4.16-48.el7
  t1lib.x86_64 0:5.1.2-14.el7

作为依赖被升级:
  mariadb-libs.x86_64 1:5.5.65-1.el7
# 查看下httpd、mariadb、php的版本信息
[root@master ~]# httpd -v
Server version: Apache/2.4.6 (CentOS)
Server built:   Apr  2 2020 13:13:23
[root@master ~]# mysql -V
mysql  Ver 15.1 Distrib 5.5.65-MariaDB, for Linux (x86_64) using readline 5.1
[root@master ~]# php -v
PHP 5.4.16 (cli) (built: Apr  1 2020 04:07:17)
Copyright (c) 1997-2013 The PHP Group
Zend Engine v2.4.0, Copyright (c) 1998-2013 Zend Technologies
# 修改apache相应的配置文件
[root@master ~]# vim /etc/httpd/conf/httpd.conf
 95 ServerName localhost:80
 164     DirectoryIndex index.html index.php
# 启动httpd服务,并设置开机自启
[root@master ~]# systemctl start httpd
[root@master ~]# systemctl enable httpd
[root@master ~]# systemctl status httpd
● httpd.service - The Apache HTTP Server
   Loaded: loaded (/usr/lib/systemd/system/httpd.service; enabled; vendor preset: disabled)
   Active: active (running) since 一 2020-07-06 20:35:16 CST; 18min ago
     Docs: man:httpd(8)
           man:apachectl(8)
 Main PID: 20561 (httpd)
   Status: "Total requests: 0; Current requests/sec: 0; Current traffic:   0 B/sec"
   CGroup: /system.slice/httpd.service
           ├─20561 /usr/sbin/httpd -DFOREGROUND
           ├─20563 /usr/sbin/httpd -DFOREGROUND
           ├─20564 /usr/sbin/httpd -DFOREGROUND
           ├─20565 /usr/sbin/httpd -DFOREGROUND
           ├─20567 /usr/sbin/httpd -DFOREGROUND
           └─20570 /usr/sbin/httpd -DFOREGROUND

7月 06 20:35:10 master systemd[1]: Starting The Apache HTTP Server...
7月 06 20:35:15 master httpd[20561]: AH00558: httpd: Could not reli...e
7月 06 20:35:16 master systemd[1]: Started The Apache HTTP Server.
Hint: Some lines were ellipsized, use -l to show in full.

# 启动数据库服务并设置开机自启
[root@master ~]# systemctl start mariadb
[root@master ~]# systemctl enable mariadb
[root@master ~]# systemctl status mariadb
● mariadb.service - MariaDB database server
   Loaded: loaded (/usr/lib/systemd/system/mariadb.service; enabled; vendor preset: disabled)
   Active: active (running) since 一 2020-07-06 20:52:48 CST; 11s ago
 Main PID: 21496 (mysqld_safe)
   CGroup: /system.slice/mariadb.service
           ├─21496 /bin/sh /usr/bin/mysqld_safe --basedir=/usr
           └─21658 /usr/libexec/mysqld --basedir=/usr --datadir=/var/...

7月 06 20:52:46 master systemd[1]: Starting MariaDB database server...
7月 06 20:52:46 master mariadb-prepare-db-dir[21460]: Database Maria...
7月 06 20:52:46 master mariadb-prepare-db-dir[21460]: If this is not...
7月 06 20:52:46 master mysqld_safe[21496]: 200706 20:52:46 mysqld_sa...
7月 06 20:52:46 master mysqld_safe[21496]: 200706 20:52:46 mysqld_sa...
7月 06 20:52:48 master systemd[1]: Started MariaDB database server.
Hint: Some lines were ellipsized, use -l to show in full.
2. mariadb安全安装
# mysql数据库的安全安装,可以提高mysql库的安全性
# 使用于mysql、mariadb
# 其实就是回答几个问题
①输入当前root的密码,没有就按回车键
②是否设置root用户密码
③是否移除匿名用户
④是否禁止root用户远程登录
⑤是否移除测试数据库
⑥当前设置是否立即生效
[root@master ~]# mysql_secure_installation

NOTE: RUNNING ALL PARTS OF THIS SCRIPT IS RECOMMENDED FOR ALL MariaDB
      SERVERS IN PRODUCTION USE!  PLEASE READ EACH STEP CAREFULLY!

In order to log into MariaDB to secure it, we'll need the current
password for the root user.  If you've just installed MariaDB, and
you haven't set the root password yet, the password will be blank,
so you should just press enter here.

Enter current password for root (enter for none):
OK, successfully used password, moving on...

Setting the root password ensures that nobody can log into the MariaDB
root user without the proper authorisation.

Set root password? [Y/n] y
New password:
Re-enter new password:
Password updated successfully!
Reloading privilege tables..
 ... Success!


By default, a MariaDB installation has an anonymous user, allowing anyone
to log into MariaDB without having to have a user account created for
them.  This is intended only for testing, and to make the installation
go a bit smoother.  You should remove them before moving into a
production environment.

Remove anonymous users? [Y/n] y
 ... Success!

Normally, root should only be allowed to connect from 'localhost'.  This
ensures that someone cannot guess at the root password from the network.

Disallow root login remotely? [Y/n] y
 ... Success!

By default, MariaDB comes with a database named 'test' that anyone can
access.  This is also intended only for testing, and should be removed
before moving into a production environment.

Remove test database and access to it? [Y/n] y
 - Dropping test database...
 ... Success!
 - Removing privileges on test database...
 ... Success!

Reloading the privilege tables will ensure that all changes made so far
will take effect immediately.

Reload privilege tables now? [Y/n] y
 ... Success!

Cleaning up...

All done!  If you've completed all of the above steps, your MariaDB
installation should now be secure.

Thanks for using MariaDB!
# 连接数据库
[root@master ~]# mysql -uroot -p123456
Welcome to the MariaDB monitor.  Commands end with ; or \g.
Your MariaDB connection id is 10
Server version: 5.5.65-MariaDB MariaDB Server

Copyright (c) 2000, 2018, Oracle, MariaDB Corporation Ab and others.

Type 'help;' or '\h' for help. Type '\c' to clear the current input statement.

MariaDB [(none)]> show databases;
+--------------------+
| Database           |
+--------------------+
| information_schema |
| mysql              |
| performance_schema |
+--------------------+
3 rows in set (0.00 sec)

MariaDB [(none)]> exit
Bye
# 测试LAMP架构是否搭建成功
# 测试是否支持php
# 编写php页面
[root@master ~]# vim /var/www/html/index.php
[root@master ~]# cat /var/www/html/index.php
<?php
  phpinfo();
?>
[root@master ~]# systemctl restart httpd
# 开放80端口号
[root@master ~]# firewall-cmd --permanent --zone=public --add-port=80/tcp
success
[root@master ~]# firewall-cmd --reload
success
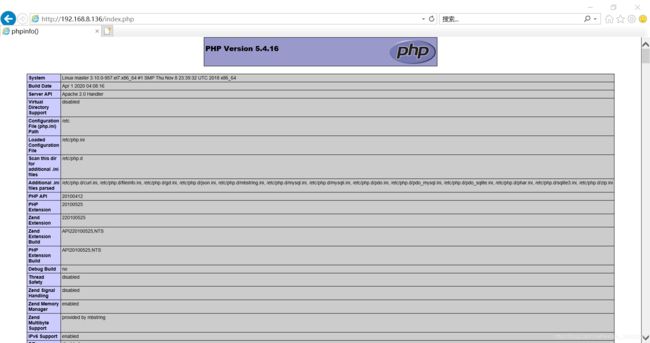
访问下:http://192.168.8.136/index.php
3. 搭建ecshop电商平台
# 上传并解压ecshop源码包
[root@master ~]# ll /usr/local/src/ecshop.zip
-rw-r--r--. 1 root root 65163191 7月   5 20:51 /usr/local/src/ecshop.zip
# 解压到/var/www/html/目录下
[root@master ~]# unzip /usr/local/src/ecshop.zip -d /var/www/html/
# 查看用来运行httpd服务的apache用户是否存在,没有则需要创建,rpm包安装的apache都会存在的。
[root@master ~]# id apache
uid=48(apache) gid=48(apache) 组=48(apache)
# 对网站数据目录进行权限配置,设置所有者和所属组为apache,权限为755
[root@master ~]# chown -R apache:apache /var/www/html/
[root@master ~]# chmod -R 755 /var/www/html/
[root@master ~]# ll -d /var/www/html/
drwxr-xr-x. 3 apache apache 37 7月   7 19:29 /var/www/html/
# 以下selinux设置可以类似转换为ftp、mysql、dns
# 对/var/www/html/目录设置selinxu安全上下文,使得该目录可写
# 若不设置可写,即便权限为777,也不能对该文件的内容进行写入
# public_content_t 可读
# public_content_rw_t 可写
[root@master ~]# chcon -R -t public_content_rw_t /var/www/html/
# 设置匿名用户也可写入
[root@master ~]# setsebool -P allow_httpd_anon_write on
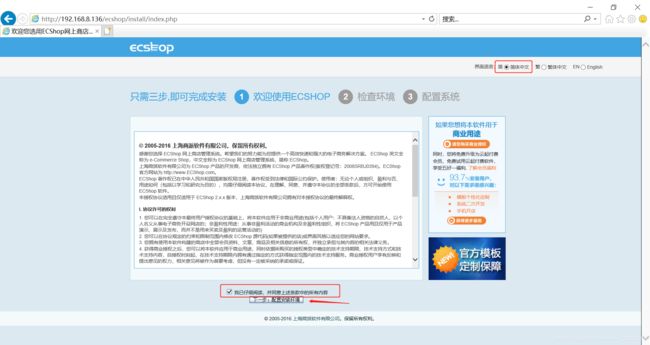
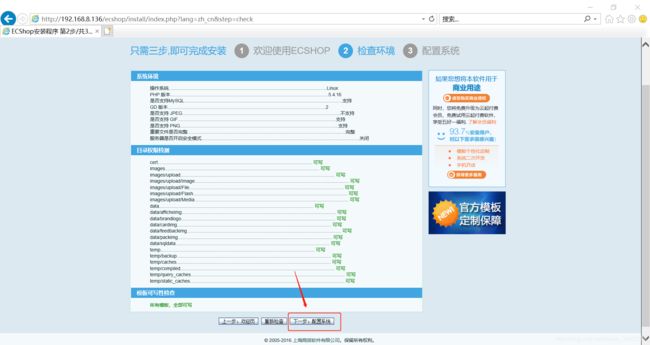
进入到ecshop安装页面进行安装配置
ecshop安装页面:http://192.168.8.136/ecshop/install/index.php
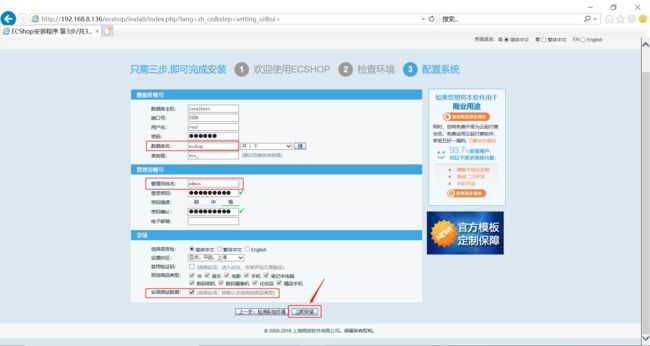

打开ecshop首页:http://192.168.8.136/ecshop/

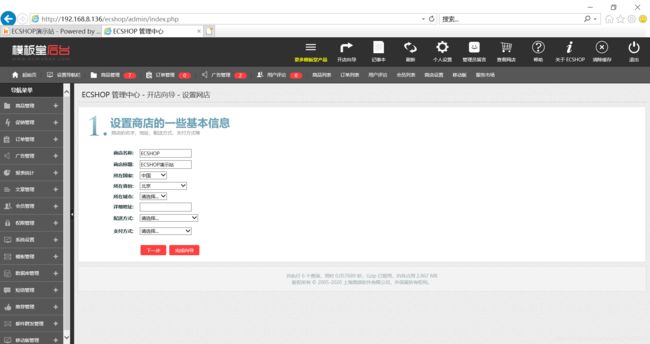
打开ecshop后台管理系统:http://192.168.8.136/ecshop/admin
可以看到,ecshop电商平台已经搭建成功了。
登录后台:
# 为了安全性,删除install和demo目录
[root@master ~]# ll -d /var/www/html/ecshop/install
drwxr-xr-x. 9 apache apache 162 5月  24 2018 /var/www/html/ecshop/install
[root@master ~]# ll -d /var/www/html/ecshop/demo
drwxr-xr-x. 13 apache apache 4096 5月  24 2018 /var/www/html/ecshop/demo
[root@master ~]# rm -rf /var/www/html/ecshop/install
[root@master ~]# rm -rf /var/www/html/ecshop/demo
4. 配置虚拟主机实现域名访问
# 复制一份虚拟主机模板,并进行修改
[root@master ~]# cp /usr/share/doc/httpd-2.4.6/httpd-vhosts.conf /etc/httpd/conf.d/
[root@master ~]# vim /etc/httpd/conf.d/httpd-vhosts.conf
<VirtualHost *:80>
    DocumentRoot "/var/www/html/ecshop/"
    ServerName www.abong.com
</VirtualHost>
<VirtualHost *:80>
    DocumentRoot "/var/www/html/ecshop/admin/"
    ServerName www.abong_admin.com
</VirtualHost>
# 重启httpd服务
[root@master ~]# systemctl restart httpd
# 修改本地电脑的域名解析结果
C:\Windows\System32\drivers\etc\hosts
# 用记事本估计不能修改,用Notepad++修改。
192.168.8.136 www.abong.com
192.168.8.136 www.admin.abong.com
使用域名访问:
5. 使用压测软件测试新搭建网站所能承受的并发数
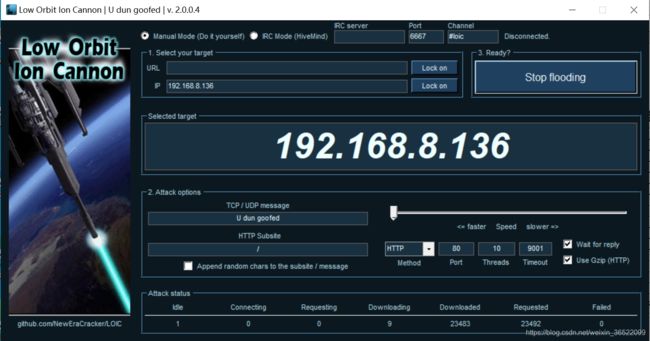
Low Orbit Ion Cannon,通常简称LOIC,它是一款强大的网站压力测试工具。
打开的时候可能需要关闭杀毒软件。

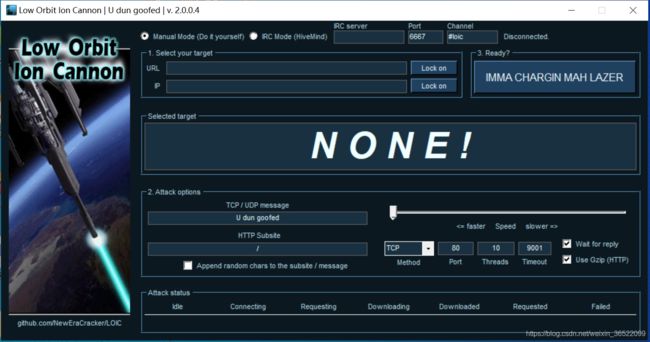
配置IP地址及其相关参数,进行攻击。
URL 链接地址
IP IP地址
Lock on 锁定
Method 攻击方式
Port 攻击端口号
Threads  攻击线程数
Timeout 超时时间
IMMA CHARGIN MAH LAZER   开始攻击
Attack status 攻击状态
Downloaded  下载数
Requested  请求数
Failed  请求失败数
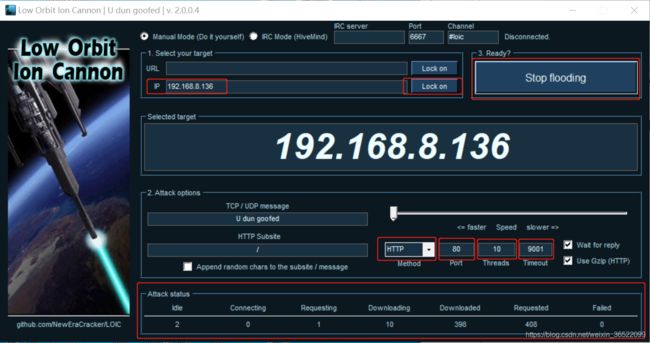
使用命令top | grep apache查看apache进程的资源占用情况。可以看到cpu使用百分比还是挺高的,可以说明负载较高了。
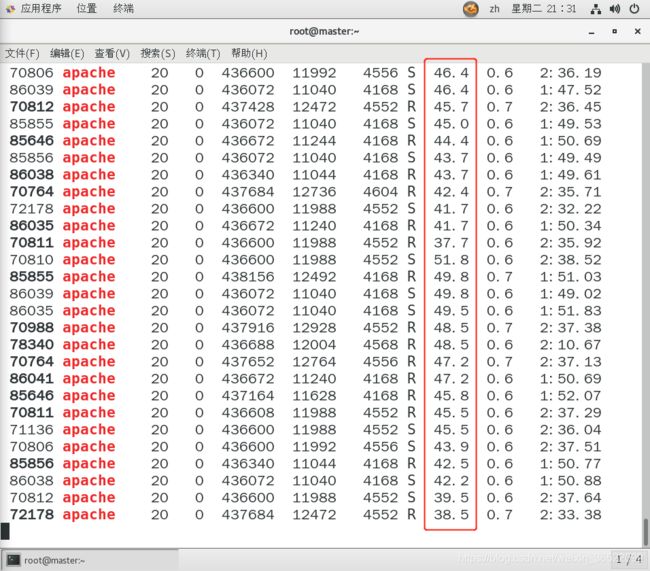

我这里测试了下,超过10个线程就会丢包了。
