初识View-SIX
开篇短叙
做开发很久了,却一直没有真正的去面对自定义View这一块蛋糕。平时,在github或者博客上自学了很多这方面的知识,但是一直不是很系统,总是在真正使用的时候发现,自己在这方面的知识储备显得-很“笨拙”,只能应对一些简单的!!借着最近项目不紧张,再次进行View的系统学习,并在这里记录一下自己的学习过程.
摘要
- 自定义容器控件,思路解析;
- 自定义ViewPager控件,思路解析;
自定义容器控件-思路
先贴出完整的代码,
/**
 * Created by YJH on 2017/12/12.
 * 功能:自定义-类容器功能控件
 */

@RemoteViews.RemoteView
public class LoveGroup extends ViewGroup {
    ArrayList> mViewLines;

    public LoveGroup(Context context) {
        this(context, null);
    }

    public LoveGroup(Context context, AttributeSet attrs) {
        this(context, attrs, 0);
    }

    public LoveGroup(Context context, AttributeSet attrs, int defStyleAttr) {
        super(context, attrs, defStyleAttr);
    }


    @Override
    protected LayoutParams generateDefaultLayoutParams() {
        return new LayoutParams(LayoutParams.MATCH_PARENT, LayoutParams.MATCH_PARENT);
    }

    @Override
    protected ViewGroup.LayoutParams generateLayoutParams(ViewGroup.LayoutParams p) {
        return new LayoutParams(p);
    }

    @Override
    protected boolean checkLayoutParams(ViewGroup.LayoutParams p) {
        return p instanceof LayoutParams;
    }

    /**
     * 功能:由于自定义view的子View都会带 margin ,因此重新这个方法就能获得 margin 的值,便于计算。
     *
     * @param attrs
     * @return
     */
    @Override
    public LayoutParams generateLayoutParams(AttributeSet attrs) {
        return new LoveLayoutParam(getContext(), attrs);
    }


    private int iWithSize;

    /**
     * 功能:自定义view的三步走
     * 第一步:测量
     *
     * @param widthMeasureSpec
     * @param heightMeasureSpec
     */
    @Override
    protected void onMeasure(int widthMeasureSpec, int heightMeasureSpec) {
        super.onMeasure(widthMeasureSpec, heightMeasureSpec);
        mViewLines = new ArrayList<>();
        //获取 spec 模式
        int iWithMode = MeasureSpec.getMode(widthMeasureSpec);
        int iHeightMode = MeasureSpec.getMode(heightMeasureSpec);

        //获取 spec 尺寸
        iWithSize = MeasureSpec.getSize(widthMeasureSpec);
        int iHeightSize = MeasureSpec.getSize(heightMeasureSpec);

        int measureWith = 0;
        int measureHeight = 0;

        if (iWithMode == MeasureSpec.EXACTLY && iHeightMode == MeasureSpec.EXACTLY) {

            measureWith = iWithSize;
            measureHeight = iHeightSize;
        } else {

            int curLineW = 0;// 当前行所有的View所占据的水平空间宽度
            int curLineH = 0;// 当前行的View所占据的竖直空间高度
            int curMaxW = 0;//存储当前所有行最宽
            ArrayList lineViews = new ArrayList<>();//一行封装了多少的view
            final int childCount = getChildCount();
            for (int i = 0; i < childCount; i++) {
                View child = getChildAt(i);
                measureChildWithMargins(child, widthMeasureSpec, 0, heightMeasureSpec, 0);
//                //通过方法 generateLayoutParams的重写,实现对子View的 margin值获取。
                final LoveLayoutParam params = (LoveLayoutParam) child.getLayoutParams();
//                //从而获取子View 的实际宽、高的空间值
                int widthSpace = child.getMeasuredWidth() + params.rightMargin + params.leftMargin;
                int heightSpace = child.getMeasuredHeight() + params.rightMargin + params.leftMargin;

                /**
                 * 如果 当前行所有的View所占据的水平空间宽度 + 尝试放置一个新的View宽度 > ViewGroup 自身的宽度
                 * 这样,就要换行了
                 */
                if (curLineW + widthSpace > iWithSize) {

                    //记录下一行所处的行高 view.top
                    curLineH += heightSpace;
                    curMaxW = Math.max(curMaxW, curLineW);//存储当前所有行最宽
                    curLineW = 0;//换行归0
                    mViewLines.add(lineViews);//行-容器 加入了一行view

                    lineViews = new ArrayList<>();
                    lineViews.add(child);
                    curLineW += widthSpace;

                } else {
                    //放入一个新的view,记录下目前当前行所有view的所占据的水平空间值
                    curLineW += widthSpace;
                    lineViews.add(child);//view-容器 加入了一个view
                }


            }

            measureHeight = curLineH;
            measureWith = curMaxW;

        }


        //measureWith这里有一个bug measureWith必须要传入所有行中最宽的那个值
        //保存自己尺寸
        setMeasuredDimension(measureWith, measureHeight);

    }

    /**
     * 功能:自定义view的三步走
     * 第二步:归位(安置排放)
     *
     * @param b
     * @param i
     * @param i1
     * @param i2
     * @param i3
     */
    @Override
    protected void onLayout(boolean b, int i, int i1, int i2, int i3) {
        /**
         * 目前进行到这里,已经给view分过行了,每行有多少的view,已经封装到mViewLines中了。
         * 而现在要做的就是给每一行,每行的每个view放置。
         */

        final int lineSize = mViewLines.size();
        Log.e("打印==>>", "输出子view的行==>" + lineSize);
        for (int j = 0; j < lineSize; j++) {
            ArrayList lineViews = mViewLines.get(j);//获取有多少行封装了view的容器
            Log.e("打印==>>", "输出子view的行中的view数==>" + lineViews.size());
            int iLineViewWidth = 0;//当前行中已经存在的View,他们在水平方向所占据的空间
            int iLineViewHeight = 0;//当前行中已经存在的View,他们在竖直方向所占据的空间


            for (int k = 0; k < lineViews.size(); k++) {
                View childView = lineViews.get(k);//获取每行的view
//                //通过方法 generateLayoutParams的重写,实现对子View的 margin值获取。
//                MarginLayoutParams params = (MarginLayoutParams) childView.getLayoutParams();
//                //从而获取子View 的实际宽、高的空间值
//                int widthSpace = childView.getMeasuredWidth() + params.rightMargin + params.leftMargin;
//                int heightSpace = childView.getMeasuredHeight() + params.topMargin + params.bottomMargin;

                int widthSpace = childView.getMeasuredWidth();
                int heightSpace = childView.getMeasuredHeight();

                iLineViewWidth += widthSpace;
                iLineViewHeight = (j + 1) * heightSpace;
                int curLeft = iLineViewWidth - widthSpace;
                int curRight = iLineViewWidth;
                int curTop = iLineViewHeight - heightSpace;
                int curBottom = iLineViewHeight;

//                int curLeft = iLineViewWidth - (childView.getMeasuredWidth() + params.rightMargin);
//                int curRight = iLineViewWidth;
//                int curTop = iLineViewHeight - (childView.getMeasuredHeight() + params.bottomMargin);
//                int curBottom = iLineViewHeight;


                Log.e("打印==>>j=" + j, "curLeft=" + curLeft + "curTop=" + curTop + "curRight=" + curRight + "curBottom=" + curBottom);
                childView.layout(curLeft, curTop, curRight, curBottom);
            }


        }
    }

    /**
     * 功能:自定义view的三步走
     * 第三步:绘制
     *
     * @param canvas
     */
    @Override
    protected void onDraw(Canvas canvas) {
        super.onDraw(canvas);

    }

}
然后切片进行代码的分析:当然google官网更详细
这个方法作用是,测量容器自身的尺寸大小,先通过代码measureChildWithMargins(child, widthMeasureSpec, 0, heightMeasureSpec, 0); 测量子View尺寸。 然后通过代码setMeasuredDimension(measureWith, measureHeight); 保存自身的尺寸值。其中的参数,是根据此容器中的所有子view的 child.getMeasuredWidth() 和 child.getMeasuredHeight() 并根据我们所设计容器特性,从而得出符合我们需求的容器尺寸大小。
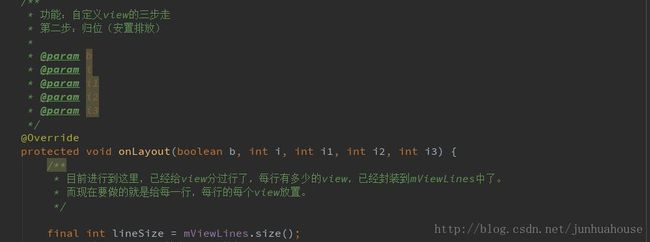
这个方法作用是,安放容器的子View控件位置,通过方法 layout(curLeft, curTop, curRight, curBottom); 左上右下坐标精确放置。
自定义ViewPager控件-思路
先贴出完整的代码,
public class ViewpagerImplActivity extends AppCompatActivity {

    Drawable[] dras = null;
    ViewPagerImpl pager;

    @Override
    protected void onCreate(Bundle savedInstanceState) {
        super.onCreate(savedInstanceState);
        setContentView(R.layout.activity_viewpager_impl);

        dras = new Drawable[]{
                ContextCompat.getDrawable(this, R.mipmap.fslj1),
                ContextCompat.getDrawable(this, R.mipmap.fs2),
                ContextCompat.getDrawable(this, R.mipmap.fs3),
                ContextCompat.getDrawable(this, R.mipmap.fs4),
                ContextCompat.getDrawable(this, R.mipmap.fs5)};

        pager = (ViewPagerImpl) findViewById(R.id.pager);

        for (int i = 0; i < dras.length; i++) {
            ImageView img = new ImageView(this);
            img.setImageDrawable(dras[i]);

            pager.addView(img);
        }
    }
}
/**
* Created by YJH on 2017/12/14.
* 功能:自定义-类ViewPager功能控件
*/
public class ViewPagerImpl extends ViewGroup {
private Context mContext;
private GestureDetector gestureDetector;
public ViewPagerImpl(Context context) {
this(context, null);
}
public ViewPagerImpl(Context context, AttributeSet attrs) {
this(context, attrs, 0);
}
public ViewPagerImpl(Context context, AttributeSet attrs, int defStyleAttr) {
super(context, attrs, defStyleAttr);
mContext = context;
gestureDetector = new GestureDetector(mContext, new InnerSimpleGesture());
}
@Override
protected void onLayout(boolean b, int i, int i1, int i2, int i3) {
int imgCount = getChildCount();
for (int j = 0; j < imgCount; j++) {
getChildAt(j).layout(j * getWidth(), 0, (j + 1) * getWidth(), getHeight());
}
}
//在手指滑动viewpager前,所处的位置index
int oldIndex = 0;
@Override
public boolean onTouchEvent(MotionEvent ev) {
gestureDetector.onTouchEvent(ev);
int action = ev.getAction();
switch (action) {
case MotionEvent.ACTION_UP:
float disX = getScrollX();
//在手指滑动viewpager之后,所处的位置index
int index = (int) (disX / getWidth());
//手指滑动,拉动内容的偏移量
int offSet = (int) (disX % getWidth());
//如果是手指向右滑动,并且偏移位置大于屏幕宽度的1/4,则跳至下一页。
if (oldIndex == index && offSet - getWidth() / 4 > 0) {
index++;
}
//如果是手指向左滑动,并且偏移位置小于屏幕宽度的1/4,则保持滑动前的页面不变。
if(oldIndex > index && offSet - 3*getWidth()/4 > 0){
index++;
}
if (index > getChildCount() - 1) {
index = getChildCount() - 1;
}
if (index < 0) {
index = 0;
}
oldIndex = index;
scrollTo(index * getWidth(), 0);
break;
}
return true;
}
class InnerSimpleGesture extends GestureDetector.SimpleOnGestureListener {
@Override
public boolean onScroll(MotionEvent e1, MotionEvent e2, float distanceX, float distanceY) {
scrollBy((int) distanceX, 0);
return true;
}
}
}然后切片进行代码的分析:
这段代码意思是,new 出几个ImageView控件并设置自己的图片显示,然后被逐个添加到自定义的ViewPager这个大容器中。
这段代码意思是,对我们自定义的这个容器viewpager中的子View,进行排列安放。当然根据代码看,安放的方式是把所有的子View(ImageView)水平的逐个排列,成一行。而且每个子View所占据的宽高都和手机屏幕尺寸相同。能明白吧?嗯,继续。
此时,所有的图片已经排列完毕,我们运行的时候只能看到第一张(即第一屏),其他的都被隐藏掉了。我们此时要仿照ViewPager的功能,有手势,有页面滑动。因此,需要借助手势识别器GestureDetector。
初始化创建手势对象:

手势识别器要想使用,需要把touch事件委托给手势识别器来处理:

实现GestureDetector中的静态内部类,重写手势滚动方法:

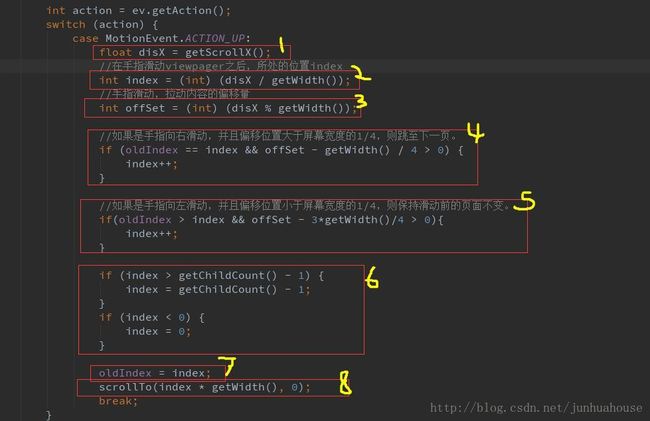
接下来就是在 onTouchEvent方法中实现手势的姿势逻辑处理:
逻辑是这样的——该容器可以类似ViewPager一样,通过手势滑动进行页面的切换。页面切换的敏感度在所滑动屏幕尺寸的1/4;超过这个值就会执行页面的切换,反之,依然停留在原来页面。并且在第一个页面以及最后一个页面,不允许继续切换到空白页!
看代码分析,

我在上面分别标注了黄色的数字1-2-3-4-5-6-7-8. 看下数字7,这行代码目的是为了记录每次在你MotionEvent.ACTION_UP 操作之后的ViewPager-Index 索引。目的是为了作为判断用户的手势是在屏幕的左方向还是右方向滑动。在算法上可以根据数字4和数字5的代码内容得到验证。
先通一下操作程序,假如说,现在的Viewpager-index 索引是1,说明屏幕显示的是第二张图片。假如手指在屏幕上向左滑动,滑动图片就像你在抽纸一样向左拉,把屏幕右边的图片拉到屏幕中央。这个过程,getScrollX(); 这行代码的值在不断增大。但是滑动过程所增加的值,必定小于屏幕的宽度。因此在手指从开始滑动,到最后抬起手指触发MotionEvent.ACTION_UP 时,Viewpager-index 索引还必定是1(可以通过数字2代码得出,而手指滑动导致的偏移量则通过数字3得出)。即索引值前后并不会变化!
反之,如果手指向右滑动,这个过程,getScrollX(); 这行代码的值在不断减小。抬起手指触发MotionEvent.ACTION_UP 时,Viewpager-index 索引还必定是0.因为在抬起手指那刻,可通过数字2得出结果。
由此可以得出结论,当手指向左滑动,Viewpager的下标索引值不变(因此出现了数字4代码的判断);当手指向右滑动,Viewpager的下标索引值减1(因此出现了数字5代码的判断);
针对数字5的作为判断的逻辑代码offSet - 3*getWidth()/4 > 0 ,需要特别解释下。这句代码针对的是向右滑动的手势。向右滑动,getScrollX() 会逐渐减小,譬如从第二页到第一页手机尺寸(1080*1920),这时偏移量变化:1080–>0。所以若让切换敏感度在 getWidth()/4 就必须让偏移量大小在范围(getWidth()/4, 3*getWidth()/4)。
当然,上面所实现的滑动会觉得尴尬,不太流畅!为实现更加流畅的效果,我们使用Scroller缓慢移动效果!!
参考推荐:View的绘制流程 View的事件分发机制


