锁屏View附着点源码解析
文章目录
- 同样入口都是SystemService
- SystemUIService到SystemUIApplication启动"服务",实际上是初始化SystemUI类
- SystemBars关注这个类,是手机的状态栏
- 到PhoneStatusBar这里的start
- StatusBarKeyguardViewManager
- KeyguardBouncer,可以看到锁屏的View是建立在解锁的View上面而解锁的View又是建立在状态栏内
- 锁屏是建立在哪个Context上面的
参考链接
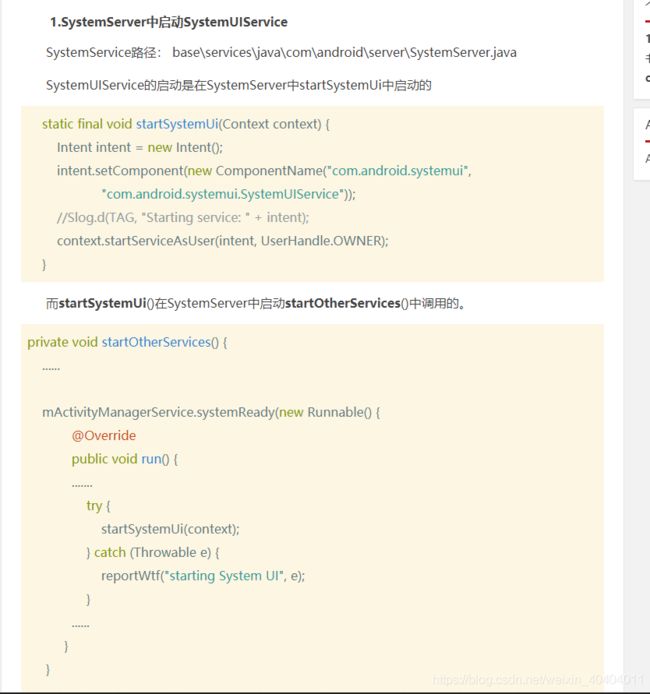
同样入口都是SystemService
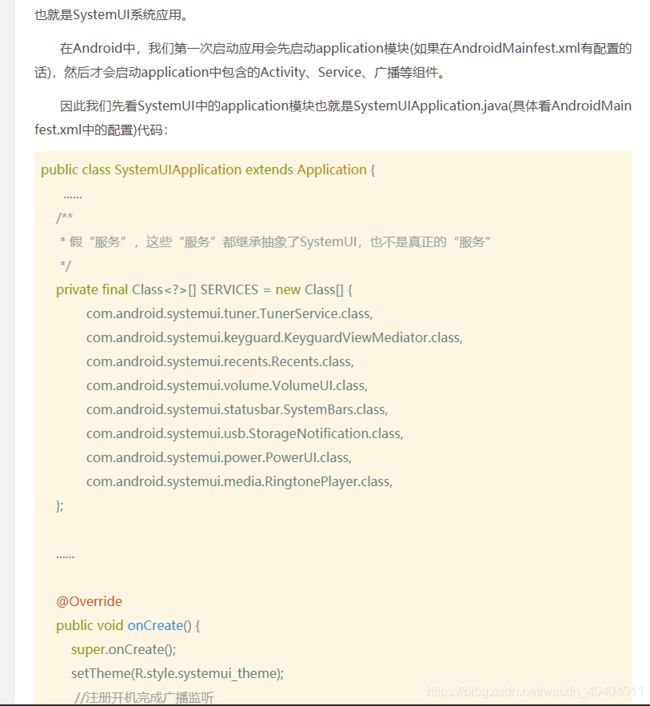
SystemUIService到SystemUIApplication启动"服务",实际上是初始化SystemUI类
SystemBars关注这个类,是手机的状态栏
public class SystemBars extends SystemUI implements ServiceMonitor.Callbacks {
    ......
    //start()方法是再启动中调用的额方法
    @Override
    public void start() {
        if (DEBUG) Log.d(TAG, "start");
        //这里会启动ServiceMonitor,并调用其的start(),重点看注释“如果没有远程服务,就会回调onNoService()方法”
        mServiceMonitor = new ServiceMonitor(TAG, DEBUG,
                mContext, Settings.Secure.BAR_SERVICE_COMPONENT, this);
        mServiceMonitor.start();  // will call onNoService if no remote service is found
    }

    @Override
    public void onNoService() {
        if (DEBUG) Log.d(TAG, "onNoService");
        createStatusBarFromConfig();  // fallback to using an in-process implementation
    }
    ......

	//第一次启动时,远程服务没有被启动,因此会回调onNoService()方法,然后调用createStatusBarFromConfig()方法,继续
 private void createStatusBarFromConfig() {
        if (DEBUG) Log.d(TAG, "createStatusBarFromConfig");
        //根据xml中的配置,是一个应用包名路径,这里就是“com.android.systemui.statusbar.phone.PhoneStatusBar”
        //然后根据包名路径并启动
        final String clsName = mContext.getString(R.string.config_statusBarComponent);
        if (clsName == null || clsName.length() == 0) {
            throw andLog("No status bar component configured", null);
        }
        Class<?> cls = null;
        try {
            cls = mContext.getClassLoader().loadClass(clsName);
        } catch (Throwable t) {
            throw andLog("Error loading status bar component: " + clsName, t);
        }
        try {
            mStatusBar = (BaseStatusBar) cls.newInstance();
        } catch (Throwable t) {
            throw andLog("Error creating status bar component: " + clsName, t);
        }
        mStatusBar.mContext = mContext;
        mStatusBar.mComponents = mComponents;
        //这里调用mStausBar就是“PhoneStatusBar”实例,并调用start()方法
        mStatusBar.start();
        if (DEBUG) Log.d(TAG, "started " + mStatusBar.getClass().getSimpleName());
    }
}
到PhoneStatusBar这里的start
public class PhoneStatusBar extends BaseStatusBar implements DemoMode,
        DragDownHelper.DragDownCallback, ActivityStarter, OnUnlockMethodChangedListener,
        HeadsUpManager.OnHeadsUpChangedListener {

        ......

        @Override
        public void start() {
        ......

        super.start(); // calls createAndAddWindows(),在这里把状态栏的View加到WindowManager,初始化View,顶部状态栏,和底部导航栏

        ......

        addNavigationBar();

        // Lastly, call to the icon policy to install/update all the icons.
        mIconPolicy = new PhoneStatusBarPolicy(mContext, mCastController, mHotspotController,
                mUserInfoController, mBluetoothController);
        mIconPolicy.setCurrentUserSetup(mUserSetup);

        ......
        startKeyguard(); //启动屏锁

        ......
    }
        ......
    @Override
    public void createAndAddWindows() {
        addStatusBarWindow();
    }

    private void addStatusBarWindow() {
        makeStatusBarView();//*-这里先生成View
        mStatusBarWindowManager = new StatusBarWindowManager(mContext);
        mRemoteInputController = new RemoteInputController(mStatusBarWindowManager,
                mHeadsUpManager);
				//由这里就可知,无论是锁屏View、导航栏View、通知栏View都是基于这个状态栏ViewGroup
				//这样就避免了多个Window层级不好管理,转向好管理的ViewGroup
        mStatusBarWindowManager.add(mStatusBarWindow, getStatusBarHeight());//*-在这里加入WindowManager
    }

    /**
     * Adds the status bar view to the window manager.
     *
     * @param statusBarView The view to add.
     * @param barHeight The height of the status bar in collapsed state.
     */
    public void add(View statusBarView, int barHeight) {

        // Now that the status bar window encompasses the sliding panel and its
        // translucent backdrop, the entire thing is made TRANSLUCENT and is
        // hardware-accelerated.
        mLp = new WindowManager.LayoutParams(
                ViewGroup.LayoutParams.MATCH_PARENT,
                barHeight,
                WindowManager.LayoutParams.TYPE_STATUS_BAR,
                WindowManager.LayoutParams.FLAG_NOT_FOCUSABLE
                        | WindowManager.LayoutParams.FLAG_TOUCHABLE_WHEN_WAKING
                        | WindowManager.LayoutParams.FLAG_SPLIT_TOUCH
                        | WindowManager.LayoutParams.FLAG_WATCH_OUTSIDE_TOUCH
                        | WindowManager.LayoutParams.FLAG_DRAWS_SYSTEM_BAR_BACKGROUNDS,
                PixelFormat.TRANSLUCENT);
        mLp.flags |= WindowManager.LayoutParams.FLAG_HARDWARE_ACCELERATED;
        mLp.gravity = Gravity.TOP;
        mLp.softInputMode = WindowManager.LayoutParams.SOFT_INPUT_ADJUST_RESIZE;
        mLp.setTitle("StatusBar");
        mLp.packageName = mContext.getPackageName();
        mStatusBarView = statusBarView;
        mBarHeight = barHeight;
        mWindowManager.addView(mStatusBarView, mLp);
        mLpChanged = new WindowManager.LayoutParams();
        mLpChanged.copyFrom(mLp);
    }


	//接下来看看锁屏View是怎么出现的
    protected void startKeyguard() {
        Trace.beginSection("PhoneStatusBar#startKeyguard");
		//关注这个类
        KeyguardViewMediator keyguardViewMediator = getComponent(KeyguardViewMediator.class);
        mFingerprintUnlockController = new FingerprintUnlockController(mContext,
                mStatusBarWindowManager, mDozeScrimController, keyguardViewMediator,
                mScrimController, this);
		//关注这个类
        mStatusBarKeyguardViewManager = keyguardViewMediator.registerStatusBar(this,
                getBouncerContainer(), mStatusBarWindowManager, mScrimController,
                mFingerprintUnlockController);
        mKeyguardIndicationController.setStatusBarKeyguardViewManager(
                mStatusBarKeyguardViewManager);
        mFingerprintUnlockController.setStatusBarKeyguardViewManager(mStatusBarKeyguardViewManager);
        mIconPolicy.setStatusBarKeyguardViewManager(mStatusBarKeyguardViewManager);
        mRemoteInputController.addCallback(mStatusBarKeyguardViewManager);

        mRemoteInputController.addCallback(new RemoteInputController.Callback() {
            @Override
            public void onRemoteInputSent(Entry entry) {
                if (FORCE_REMOTE_INPUT_HISTORY && mKeysKeptForRemoteInput.contains(entry.key)) {
                    removeNotification(entry.key, null);
                } else if (mRemoteInputEntriesToRemoveOnCollapse.contains(entry)) {
                    // We're currently holding onto this notification, but from the apps point of
                    // view it is already canceled, so we'll need to cancel it on the apps behalf
                    // after sending - unless the app posts an update in the mean time, so wait a
                    // bit.
                    mHandler.postDelayed(() -> {
                        if (mRemoteInputEntriesToRemoveOnCollapse.remove(entry)) {
                            removeNotification(entry.key, null);
                        }
                    }, REMOTE_INPUT_KEPT_ENTRY_AUTO_CANCEL_DELAY);
                }
            }
        });

        mKeyguardViewMediatorCallback = keyguardViewMediator.getViewMediatorCallback();
        mLightStatusBarController.setFingerprintUnlockController(mFingerprintUnlockController);
        Trace.endSection();
    }
}
StatusBarKeyguardViewManager
    public void registerStatusBar(PhoneStatusBar phoneStatusBar,
            ViewGroup container, StatusBarWindowManager statusBarWindowManager,
            ScrimController scrimController,
            FingerprintUnlockController fingerprintUnlockController) {
        mPhoneStatusBar = phoneStatusBar;
		//注意这个ViewGroup,就是状态栏
        mContainer = container;
        mStatusBarWindowManager = statusBarWindowManager;
        mScrimController = scrimController;
        mFingerprintUnlockController = fingerprintUnlockController;
		//他把这个ViewGroup继续传递给解锁界面
        mBouncer = SystemUIFactory.getInstance().createKeyguardBouncer(mContext,
                mViewMediatorCallback, mLockPatternUtils, mStatusBarWindowManager, container);
    }
KeyguardBouncer,可以看到锁屏的View是建立在解锁的View上面而解锁的View又是建立在状态栏内
    protected void inflateView() {
        removeView();
        mRoot = (ViewGroup) LayoutInflater.from(mContext).inflate(R.layout.keyguard_bouncer, null);
        mKeyguardView = (KeyguardHostView) mRoot.findViewById(R.id.keyguard_host_view);
        mKeyguardView.setLockPatternUtils(mLockPatternUtils);
        mKeyguardView.setViewMediatorCallback(mCallback);
        mContainer.addView(mRoot, mContainer.getChildCount());
        mRoot.setVisibility(View.INVISIBLE);
    }
锁屏是建立在哪个Context上面的
回顾锁屏启动流程图,从KeyguardService开始,在开启这个服务的时候onCreate方法中获取了一个SystemUIApplication,这个Application是个关键
    @Override
    public void onCreate() {
        ((SystemUIApplication) getApplication()).startServicesIfNeeded();
        mKeyguardViewMediator =
                ((SystemUIApplication) getApplication()).getComponent(KeyguardViewMediator.class);
    }
SystemUIApplication
	//这里是指与SystemUI有关的类数组
    private final Class<?>[] SERVICES = new Class[] {
            com.android.systemui.tuner.TunerService.class,
            com.android.systemui.keyguard.KeyguardViewMediator.class,
            com.android.systemui.recents.Recents.class,
            com.android.systemui.volume.VolumeUI.class,
            Divider.class,
            com.android.systemui.statusbar.SystemBars.class,
            com.android.systemui.usb.StorageNotification.class,
            com.android.systemui.power.PowerUI.class,
            com.android.systemui.media.RingtonePlayer.class,
            com.android.systemui.keyboard.KeyboardUI.class,
            com.android.systemui.tv.pip.PipUI.class,
            com.android.systemui.shortcut.ShortcutKeyDispatcher.class,
            com.android.systemui.VendorServices.class
    };


    /**
     * Hold a reference on the stuff we start.
     */
    private final SystemUI[] mServices = new SystemUI[SERVICES.length];//SystemUI集合
    private boolean mServicesStarted;
    private boolean mBootCompleted;
    private final Map<Class<?>, Object> mComponents = new HashMap<>();//注意这个HashMap


    @Override
    public void onCreate() {
        super.onCreate();
        // Set the application theme that is inherited by all services. Note that setting the
        // application theme in the manifest does only work for activities. Keep this in sync with
        // the theme set there.
        setTheme(R.style.systemui_theme);

		//这个Application在onCreate的时候把自己的Context传递给了SystemUIFactory,可以说是所有继承了SystemUI的Context的由来
        SystemUIFactory.createFromConfig(this);

        if (Process.myUserHandle().equals(UserHandle.SYSTEM)) {
            IntentFilter filter = new IntentFilter(Intent.ACTION_BOOT_COMPLETED);
            filter.setPriority(IntentFilter.SYSTEM_HIGH_PRIORITY);
            registerReceiver(new BroadcastReceiver() {
                @Override
                public void onReceive(Context context, Intent intent) {
                    if (mBootCompleted) return;

                    if (DEBUG) Log.v(TAG, "BOOT_COMPLETED received");
                    unregisterReceiver(this);
                    mBootCompleted = true;
                    if (mServicesStarted) {
                        final int N = mServices.length;
                        for (int i = 0; i < N; i++) {
                            mServices[i].onBootCompleted();
                        }
                    }
                }
            }, filter);
        } else {
            // For a secondary user, boot-completed will never be called because it has already
            // been broadcasted on startup for the primary SystemUI process.  Instead, for
            // components which require the SystemUI component to be initialized per-user, we
            // start those components now for the current non-system user.
            startServicesIfNeeded(SERVICES_PER_USER);
        }
    }

    private void startServicesIfNeeded(Class<?>[] services) {
        if (mServicesStarted) {
            return;
        }

        if (!mBootCompleted) {
            // check to see if maybe it was already completed long before we began
            // see ActivityManagerService.finishBooting()
            if ("1".equals(SystemProperties.get("sys.boot_completed"))) {
                mBootCompleted = true;
                if (DEBUG) Log.v(TAG, "BOOT_COMPLETED was already sent");
            }
        }

        Log.v(TAG, "Starting SystemUI services for user " +
                Process.myUserHandle().getIdentifier() + ".");
        final int N = services.length;
        for (int i=0; i<N; i++) {
            Class<?> cl = services[i];
            if (DEBUG) Log.d(TAG, "loading: " + cl);
            try {
				//刚刚那个HashMap中的Object在这里统统实例化
                Object newService = SystemUIFactory.getInstance().createInstance(cl);
                mServices[i] = (SystemUI) ((newService == null) ? cl.newInstance() : newService);
            } catch (IllegalAccessException ex) {
                throw new RuntimeException(ex);
            } catch (InstantiationException ex) {
                throw new RuntimeException(ex);
            }
			//并且获取了Context
            mServices[i].mContext = this;
            mServices[i].mComponents = mComponents;
            if (DEBUG) Log.d(TAG, "running: " + mServices[i]);
            mServices[i].start();

            if (mBootCompleted) {
                mServices[i].onBootCompleted();
            }
        }
        mServicesStarted = true;
    }


    @SuppressWarnings("unchecked")
    public <T> T getComponent(Class<T> interfaceType) {
		//这就是Service调用的方法,通过类名得到一个已经实例化好了的类,带有Context
        return (T) mComponents.get(interfaceType);
    }
由于KeyguardService中创建的KeyguardViewMediator得到了解释,现在看KeyguardViewMediator这个类是怎么传递Context的
    private void setupLocked() {
	        mStatusBarKeyguardViewManager =
                SystemUIFactory.getInstance().createStatusBarKeyguardViewManager(mContext,
                        mViewMediatorCallback, mLockPatternUtils);
	}
StatusBarKeyguardViewManager,构造方法中得到了Context
    public StatusBarKeyguardViewManager(Context context, ViewMediatorCallback callback,
            LockPatternUtils lockPatternUtils) {
        mContext = context;
        mViewMediatorCallback = callback;
        mLockPatternUtils = lockPatternUtils;
    }


    public void registerStatusBar(PhoneStatusBar phoneStatusBar,
            ViewGroup container, StatusBarWindowManager statusBarWindowManager,
            ScrimController scrimController,
            FingerprintUnlockController fingerprintUnlockController) {
        mPhoneStatusBar = phoneStatusBar;
        mContainer = container;
        mStatusBarWindowManager = statusBarWindowManager;
        mScrimController = scrimController;
        mFingerprintUnlockController = fingerprintUnlockController;
		//流程图中的解锁界面同理
        mBouncer = SystemUIFactory.getInstance().createKeyguardBouncer(mContext,
                mViewMediatorCallback, mLockPatternUtils, mStatusBarWindowManager, container);
    }
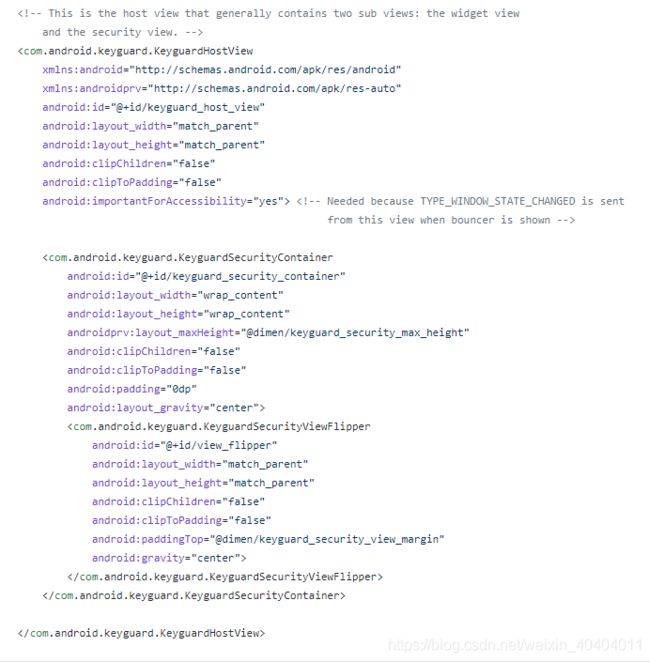
KeyguardHostView,注意这个类的说明,这是最基本的锁屏View
/**
 * Base class for keyguard view.  {@link #reset} is where you should
 * reset the state of your view.  Use the {@link KeyguardViewCallback} via
 * {@link #getCallback()} to send information back (such as poking the wake lock,
 * or finishing the keyguard).
 *
 * Handles intercepting of media keys that still work when the keyguard is
 * showing.
 */
锁屏的View布局
![]()


