5分钟搭建hexo+gitee博客
5分钟搭建hexo+gitee博客
我是在Linux服务器上搭建的
环境准备
安装git和nodejs
安装git
[root@localhost ~]# yum -y install git
Loaded plugins: fastestmirror
Determining fastest mirrors
base                                                                                       | 3.6 kB  00:00:00
epel                                                                                       | 4.7 kB  00:00:00
extras                                                                                     | 2.9 kB  00:00:00
updates                                                                                    | 2.9 kB  00:00:00
(1/5): epel/x86_64/group_gz                                                                |  95 kB  00:00:00
(2/5): epel/x86_64/updateinfo                                                              | 1.0 MB  00:00:00
(3/5): extras/7/x86_64/primary_db                                                          | 206 kB  00:00:00
(4/5): epel/x86_64/primary_db                                                              | 6.9 MB  00:00:00
(5/5): updates/7/x86_64/primary_db                                                         | 4.5 MB  00:00:00
Package git-1.8.3.1-23.el7_8.x86_64 already installed and latest version
Nothing to do

安装nodejs
下载二进制文件,我的是 12.18.3版本的(目前长期支持版本)
[root@iZbp1098qx0mbltjlw3l1zZ ~]# wget https://nodejs.org/dist/v12.18.3/node-v12.18.3-linux-x64.tar.xz
--2020-09-05 13:48:24--  https://nodejs.org/dist/v12.18.3/node-v12.18.3-linux-x64.tar.xz
Resolving nodejs.org (nodejs.org)... 104.20.22.46, 104.20.23.46, 2606:4700:10::6814:162e, ...
Connecting to nodejs.org (nodejs.org)|104.20.22.46|:443... connected.
HTTP request sent, awaiting response... 200 OK
Length: 14700900 (14M) [application/x-xz]
Saving to: ‘node-v12.18.3-linux-x64.tar.xz’

100%[========================================================================>] 14,700,900   348KB/s   in 30s

2020-09-05 13:48:57 (471 KB/s) - ‘node-v12.18.3-linux-x64.tar.xz’ saved [14700900/14700900]

解压文件,我习惯性的解压到/usr/local/下
[root@iZbp1098qx0mbltjlw3l1zZ ~]# tar xf node-v12.18.3-linux-x64.tar.xz  -C /usr/local/
[root@iZbp1098qx0mbltjlw3l1zZ ~]# cd /usr/local/node-v12.18.3-linux-x64/
[root@iZbp1098qx0mbltjlw3l1zZ node-v12.18.3-linux-x64]# ls
bin  CHANGELOG.md  include  lib  LICENSE  README.md  share
检查版本,因为Node官网已经把 linux下载版本更改为已编译好的版本了,我们直接下载解压后就可以使用
[root@iZbp1098qx0mbltjlw3l1zZ node-v12.18.3-linux-x64]# ./bin/node -v
v12.18.3
设置软连接(或者在环境变量中添加node的bin目录到path中也可以,就是方便使用这两个命令)
[root@iZbp1098qx0mbltjlw3l1zZ node-v12.18.3-linux-x64]# ln -s /usr/local/node-v12.18.3-linux-x64/bin/npm /usr/local/bin/
[root@iZbp1098qx0mbltjlw3l1zZ node-v12.18.3-linux-x64]# ln -s /usr/local/node-v12.18.3-linux-x64/bin/node /usr/local/bin/
开始安装hexo
1.安装hexo
[root@localhost ~]# npm install -g hexo
/usr/local/node-v12.18.3-linux-x64/bin/hexo -> /usr/local/node-v12.18.3-linux-x64/lib/node_modules/hexo/bin/hexo
npm WARN optional SKIPPING OPTIONAL DEPENDENCY: fsevents@~2.1.2 (node_modules/hexo/node_modules/chokidar/node_modules/fsevents):
npm WARN notsup SKIPPING OPTIONAL DEPENDENCY: Unsupported platform for [email protected]: wanted {
     "os":"darwin","arch":"any"} (current: {
     "os":"linux","arch":"x64"})

+ [email protected]
added 88 packages from 348 contributors in 59.674s
设置软连接
[root@localhost ~]# ln -s /usr/local/node-v12.18.3-linux-x64/bin/hexo /usr/local/bin/
2.初始化hexo
创建一个文件夹,并进入到文件夹内,初始化hexo
[root@localhost ~]# mkdir /blog
[root@localhost ~]# cd /blog
[root@localhost blog]# hexo init
INFO  Cloning hexo-starter https://github.com/hexojs/hexo-starter.git
Submodule 'themes/landscape' (https://github.com/hexojs/hexo-theme-landscape.git) registered for path 'themes/landscape'
Cloning into 'themes/landscape'...
remote: Enumerating objects: 28, done.
remote: Counting objects: 100% (28/28), done.
remote: Compressing objects: 100% (25/25), done.
remote: Total 1106 (delta 9), reused 13 (delta 2), pack-reused 1078
Receiving objects: 100% (1106/1106), 3.23 MiB | 30.00 KiB/s, done.
Resolving deltas: 100% (595/595), done.
Submodule path 'themes/landscape': checked out '73a23c51f8487cfcd7c6deec96ccc7543960d350'
INFO  Install dependencies
added 183 packages from 420 contributors and audited 189 packages in 19.021s

8 packages are looking for funding
  run `npm fund` for details

found 0 vulnerabilities

INFO  Start blogging with Hexo!
3.修改_config.yml对博客进行基础配置
[root@localhost blog]# vim _config.yml
# Site
title: zhangxiaoxing  #博客名字
subtitle: ''
description: ''
keywords:
author: zhangxiaoxing  #作者名
language: en
timezone: ''


# Extensions
## Plugins: https://hexo.io/plugins/
## Themes: https://hexo.io/themes/
theme: landscape  #主题名
4.启动
编译项目,输入命令:hexo g
运行项目,输入命令:hexo s
[root@localhost blog]# hexo g
INFO  Validating config
INFO  Start processing
INFO  Files loaded in 131 ms
INFO  Generated: archives/index.html
INFO  Generated: archives/2020/index.html
INFO  Generated: archives/2020/09/index.html
INFO  Generated: index.html
INFO  Generated: img/favicon.png
INFO  Generated: img/logo.png
INFO  Generated: photoswipe/default-skin/default-skin.png
INFO  Generated: js/typed.js
INFO  Generated: 2020/09/05/hello-world/index.html
INFO  Generated: photoswipe/photoswipe-ui-default.min.js
INFO  Generated: photoswipe/photoswipe.css
INFO  Generated: photoswipe/default-skin/default-skin.css
INFO  Generated: css/diaspora.css
INFO  Generated: photoswipe/default-skin/default-skin.svg
INFO  Generated: photoswipe/default-skin/preloader.gif
INFO  Generated: js/diaspora.js
INFO  Generated: photoswipe/photoswipe-ui-default.js
INFO  Generated: photoswipe/photoswipe.min.js
INFO  Generated: js/plugin.js
INFO  Generated: img/cover.jpg
INFO  Generated: img/welcome-cover.jpg
INFO  Generated: js/jquery.min.js
INFO  Generated: photoswipe/photoswipe.js
INFO  23 files generated in 40 ms
[root@localhost blog]# hexo s
INFO  Validating config
INFO  Start processing
INFO  Hexo is running at http://localhost:4000 . Press Ctrl+C to stop.
这时候就可以访问http://localhost:4000看一下基本样子了,如果是云上服务器要先开安全组
部署hexo到码云
gitee账号创建已经提前创建好了,创建直接在官网创建就好了
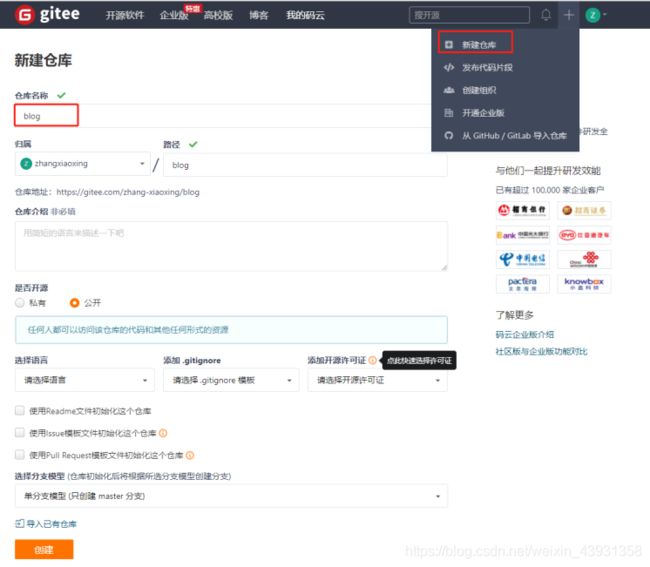
1.新建仓库
在gitee右上角,找到+号,点击新建仓库
输入名称,选择公开
点击创建就好了

创建好后 复制项目地址
2.在_config.yml中配置Git
[root@localhost blog]# vim _config.yml
deploy:
  type: git
  repo: https://gitee.com/zhang-xiaoxing/blog.git
  branch: master
3.发布到码云上
安装自动部署发布工具
[root@localhost blog]# npm install hexo-deployer-git --save
在配置文件中增加博客地址
[root@localhost blog]# vim _config.yml
url: https://gitee.com/zhang-xiaoxing/blog
root: /blog
发布博客
[root@localhost blog]# hexo clean && hexo g && hexo d
首次发布需要在shell中输入账号和密码
4.Gitee Pages设置
稍等一会后,就可以访问了
https://zhang-xiaoxing.gitee.io/blog/
到这里简单的博客就搭建好了


