MongoDB分片
MongoDB分片概述
- 什么是分片
MongoDB分片是使用多个服务器存储数据的方法,以支持巨大的数据存储和对数据进行操作。
当一台MongoDB不足以存储海量数据或不足以提供可接受的读写吞吐量时,就可以通过在多台服务器上分隔数据,是的数据库系统能存储和处理更多的数据。
- MongoDB分片的优势
使用分片减少了每个分片需要处理的请求数,通过水平扩展,群集可以提高自己的存储容量和吞吐量
使用分片减少了每个分片存储的数据
分片的优势在于提供类似线性增长的架构,提高数据可用性,提供大型数据库查询服务器的性能
- MongoDB分片群集的组成
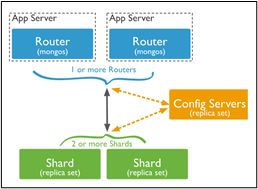
MongoDB分片群集主要有如下三个主要组件:
 shard :分片服务器,用于存储实际的数据块,实际生产环境中一个shard server角色可以由几台服务器组成一个replicaset承担,防止主机单点故障
 config server :配置服务器,存储了整个分片群集的配置信息,其中包括chunk信息
 routers :前端路由,客户端由此接入,且让整个群集看起来像单一数据库,前端应用可以透明使用
组成如下图所示:
部署MongoDB分片群集
环境准备
12个实例:
shard节点:
shard1:27017-27010 (一主两从一仲裁)
shard2:27021-27024 (一主两从一仲裁)
configserver:
37017-37019 (1主两从)
mongos:47017
分片服务器复制集搭建
- 准备额外11台实例
[root@localhost ~]# cp /etc/mongod.conf /etc/mongod{1..11}.conf
[root@localhost ~]# mkdir /var/lib/mongo{1..10}
[root@localhost ~]# chmod 777 /var/lib/mongo*
[root@localhost ~]# touch /var/log/mongodb/mongod{1..11}.log
[root@localhost ~]# chmod 777 /var/log/mongodb/*.log
- shard1复制集的搭建
修改配置文件mongod.conf
[root@localhost ~]# vi /etc/mongod.conf
systemLog:
  destination: file
  logAppend: true
  path: /var/log/mongodb/mongod.log
storage:
  dbPath: /var/lib/mongo
  journal:
    enabled: true
processManagement:
  fork: true  # fork and run in background
  pidFilePath: /var/run/mongodb/mongod.pid  # location of pidfile
net:
  port: 27017
  bindIp: 127.0.0.1  # Listen to local interface only, comment to listen on all interfaces.
#security:
#  authorization: enabled
#  keyFile: /data/mongodb/testKeyFile.file
replication:
  oplogSizeMB: 2048
  replSetName: shard1
sharding: 			//分片配置,需要启用才能做群集
  clusterRole: shardsvr				//群集角色为分片服务器
另外三个实例只需在上面的基础上配置路径、修改端口即可
[root@localhost ~]# mongod -f /etc/mongod.conf
[root@localhost ~]# mongod -f /etc/mongod1.conf
[root@localhost ~]# mongod -f /etc/mongod2.conf
[root@localhost ~]# mongod -f /etc/mongod3.conf
[root@localhost ~]# mongo --port 27017
> use admin
> config={
     _id:"shard1",members:[{
     _id:0,host:"127.0.0.1:27017",priority:100},{
     _id:1,host:"127.0.0.1:27018",priority:100},{
     _id:2,host:"127.0.0.1:27019",priority:0},{
     _id:3,host:"127.0.0.1:27020",arbiterOnly:true}]}
> rs.initiate(config)
> shard1:OTHER>
> shard1:PRIMARY> rs.status()
- shard2复制集的搭建
[root@localhost ~]# vi /etc/mongod4.conf
  path: /var/log/mongodb/mongod4.log
  dbPath: /var/lib/mongo4
  pidFilePath: /var/run/mongodb/mongod4.pid  # location of pidfile
  port: 27021
replication:
  oplogSizeMB: 2048
  replSetName: shard2
sharding:
  clusterRole: shardsvr
  其他三台同理
......
[root@localhost ~]# mongod -f /etc/mongod4.conf
[root@localhost ~]# mongod -f /etc/mongod5.conf
[root@localhost ~]# mongod -f /etc/mongod6.conf
[root@localhost ~]# mongod -f /etc/mongod7.conf
[root@localhost ~]# mongo --port 27021
> use admin
> config={
     _id:"shard2",members:[{
     _id:0,host:"127.0.0.1:27021",priority:100},{
     _id:1,host:"127.0.0.1:27022",priority:100},{
     _id:2,host:"127.0.0.1:27023",priority:0},{
     _id:3,host:"127.0.0.1:27024",arbiterOnly:true}]}
> rs.initiate(config)
> shard2:OTHER>
> shard2:PRIMARY> rs.status()
- config服务器节点配置
- config服务器配置文件修改
config服务器节点包括三台实例,配置文件分别为mongod8.conf,mongod9.conf,mongod10.conf。端口分别为:37017,37018,37019
[root@localhost ~]# vi /etc/mongod8.conf
  path: /var/log/mongodb/mongod8.log
  dbPath: /var/lib/mongo8
  pidFilePath: /var/run/mongodb/mongod8.pid  # location of pidfile
  port: 37017
replication:
  oplogSizeMB: 2048
  replSetName: configReplSet
sharding:
  clusterRole: configsvr						//群集角色为配置服务器
- 启动实例并配置复制集
[root@localhost ~]# mongod -f /etc/mongod8.conf
[root@localhost ~]# mongod -f /etc/mongod9.conf
[root@localhost ~]# mongod -f /etc/mongod10.conf
    0.0.0.0:*               LISTEN
[root@localhost ~]# mongo --port 37017
> use admin
> config={
     _id:"configReplSet",members:[{
     _id:0,host:"127.0.0.1:37017"}, {
     _id:1,host:"127.0.0.1:37018"},{
     _id:2,host:"127.0.0.1:37019"}]}
> rs.initiate(config)
configReplSet:OTHER>
configReplSet:PRIMARY> rs.status()
- mongos服务器节点配置
- 路由服务器配置文件修改
注意路由节点上需要将存储路径的配置注释或者删除,否则不能启动mongos服务
[root@localhost ~]# vi /etc/mongod11.conf
systemLog:
  destination: file
  path: /var/log/mongodb/mongo11.log
  logAppend: true
# Where and how to store data.
#storage:
#  dbPath: /var/lib/mongo11
#  journal:
#    enabled: true
net:
  bindIp: 127.0.0.1
  port: 47017
sharding:							//分片设置,指向配置服务器
  configDB: configReplSet/127.0.0.1:37017,127.0.0.1:37018,127.0.0.1:37019
processManagement:
  fork: true
- 启动mongos,为分片群集添加节点
[root@localhost ~]# mongos -f /etc/mongod11.conf	    //启动路由mongos
mongos> use admin
switched to db admin
mongos> db.runCommand({
     addshard:"shard1/127.0.0.1:27017,127.0.0.1:27018,127.0.0.1:27019",name:"shard1"})
{
      "shardAdded" : "shard1", "ok" : 1 }
mongos> db.runCommand({
     addshard:"shard2/127.0.0.1:27021,127.0.0.1:27022,127.0.0.1:27023",name:"shard2"})
mongos> db.runCommand({
     listshards:1})
#列出分片信息
mongos> db.runCommand({
     listshards:1})
{

	"shards" : [
		{

			"_id" : "shard1",
			"host" : "shard1/127.0.0.1:27017,127.0.0.1:27018,127.0.0.1:27019",
			"state" : 1
		},
		{

			"_id" : "shard2",
			"host" : "shard2/127.0.0.1:27021,127.0.0.1:27022,127.0.0.1:27023",
			"state" : 1
		}
	],
	"ok" : 1
}
mongos> sh.status()
#整体状态查看
mongos> sh.status()
--- Sharding Status ---
  sharding version: {

  	"_id" : 1,
  	"minCompatibleVersion" : 5,
  	"currentVersion" : 6,
  	"clusterId" : ObjectId("5f0574f7fe0c76b475e50326")
  }
  shards:
        {
       "_id" : "shard1",  "host" : "shard1/127.0.0.1:27017,127.0.0.1:27018,127.0.0.1:27019",  "state" : 1 }
        {
       "_id" : "shard2",  "host" : "shard2/127.0.0.1:27021,127.0.0.1:27022,127.0.0.1:27023",  "state" : 1 }
  active mongoses:
        "3.4.24" : 1
  autosplit:
        Currently enabled: yes
  balancer:
        Currently enabled:  yes
        Currently running:  no
NaN
        Failed balancer rounds in last 5 attempts:  0
        Migration Results for the last 24 hours:
                No recent migrations
  databases:


激活分片功能:
mongos> db
admin
mongos> db.runCommand({
     enablesharding:"test"})
{
      "ok" : 1 }

指定分片键对集合分片
第一步:创建索引 :优化查询的重要手段
mongos> use test
switched to db test
mongos> db
test
mongos> db.stu.ensureIndex({
     id:1})
第二步:开启分片
mongos> use admin
switched to db admin
mongos> db.runCommand({
     shardcollection:"test.stu",key:{
     id:1}})
{
      "collectionsharded" : "test.stu", "ok" : 1 }
- 集合分片验证
第一步:产生大量数据
mongos> use test;
switched to db test
mongos> for(var i=1;i<=10000000;i++){
     db.stu.insert({
     'id':i,'name':'Alice'});}
第二步:Shard实例查看数据
shard1:PRIMARY> show dbs
admin  0.000GB
local  0.127GB
test   0.058GB
shard2:PRIMARY> show dbs
admin  0.000GB
local  0.094GB
test   0.089GB
注意:注意路由节点上需要将存储路径的配置注释或者删除,否则不能启动mongos服务
