一、MySQL安装(同LAMP里面的安装方法)
参考网址:http://sxct168.blog.51cto.com/824373/1661366
二、php安装
1、进入/usr/local/src/目录下
[root@mysql ~]# cd /usr/local/src/
2、下载php包
wget http://cn2.php.net/distributions/php-5.4.37.tar.bz2
3、解压
tar jxf php-5.4.37.tar.bz2
4、创建一个php-fpm用户,并且禁止登陆
useradd -s /sbin/nologin php-fpm
5、配置php参数
cd php-5.4.37
./configure --prefix=/usr/local/php --with-config-file-path=/usr/local/php/etc --enable-fpm --with-fpm-user=php-fpm --with-fpm-group=php-fpm --with-mysql=/usr/local/mysql --with-mysql-sock=/tmp/mysql.sock --with-libxml-dir --with-gd --with-jpeg-dir --with-png-dir --with-freetype-dir --with-iconv-dir --with-zlib-dir --with-mcrypt --enable-soap --enable-gd-native-ttf --enable-ftp --enable-mbstring --enable-exif --disable-ipv6 --with-curl
--prefix=:后面跟的是安装路径
--with-config-file-path=:后面跟配置文件的路径
1)这一步如果报错,需要安装gcc
安装:[root@mysql php-5.4.37]# yum install gcc
2)配置php时遇到的错误,需要用到yum扩展源来搜索所需要的包,但是需要安装yum扩展源
安装yum扩展源:yum install -y epel-release
配置php时遇到的错误:
1)error: xml2-config not found. Please check your libxml2 installation.
# yum install -y libxml2-devel
2)error: Please reinstall the libcurl distribution -
easy.h should be in
# yum -y install curl-devel
3)error: jpeglib.h not found.
# yum install -y libjpeg-devel
4)error: png.h not found.
# yum install -y libpng libpng-devel
5) error: freetype-config not found.
# yum install -y freetype-devel
6) error: mcrypt.h not found. Please reinstall libmcrypt.
# yum install -y libmcrypt-devel
解决了以上6个错误之后,在进行./configure配置时,没有出现错误,出现Thank you for using PHP,
出现这个就说明配置成功了,如下图所示:
最后还是要使用echo $?来检测一下是否OK啊
[root@mysql php-5.4.37]# echo $?
0 #这里提示数字0的话,就说明刚才的配置没有问题
7)使用ls查看/usr/local/php/目录下,已经出现了安装目录
[root@mysql php-5.4.37]# ls /usr/local/php/
6、编译php
make
7、安装php
make install
8、修改配置文件
1)在当前目录下(/usr/local/src/php-5.4.37目录下)拷贝php.ini-production配置文件到/usr/local/php/etc/目录下,并且改名为php.ini
cp php.ini-production /usr/local/php/etc/php.ini
2) 在/usr/local/src/php-5.4.37目录下有两个配置文件
php.ini-development:这个是配置文件是在开发环境是使用的
php.ini-production:这个是实际生产环境中使用的
3)拷贝启动脚本到/etc/init.d/目下,并且命名为php-fpm
cp /usr/local/src/php-5.4.37/sapi/fpm/init.d.php-fpm /etc/init.d/php-fpm
[root@mysql php-5.4.37]# cp /usr/local/src/php-5.4.37/sapi/fpm/init.d.php-fpm /etc/init.d/php-fpm
4)移动配置文件,并且重命名
mv /usr/local/php/etc/php-fpm.conf.default /usr/local/php/etc/php-fpm.conf
5)给php-fpm目录赋予可执行权限
chmod 755 /etc/init.d/php-fpm
6)加入到启动列表
chkconfig --add php-fpm
7)设置默认启动
chkconfig php-fpm on
8)启动php
service php-fpm start
三、安装nginx
1、进入/usr/local/src/目录
cd /usr/local/src/
2、下载nginx包
wget http://nginx.org/download/nginx-1.6.2.tar.gz
3、解压
tar zxvf nginx-1.6.2.tar.gz
4、配置nginx文件
cd nginx-1.6.2
./configure --prefix=/usr/local/nginx --with-pcre
这个错误"./configure: error: the HTTP rewrite module requires the PCRE library."提示是没有安装PCRE库
安装PCRE库:
[root@mysql nginx-1.6.2]# yum install -y pcre-devel
5、编译
make
6、安装
make install
7、安装完成之后,使用ls查看/usr/local/nginx/目录,目录下会生成4个目录文件
|
1
2
3
4
|
[root@mysql
nginx-1.6.2]# ls /usr/local/nginx/
conf
html logs sbin #生成的目录文件
|
8、启动nginx:
/usr/local/nginx/sbin/nginx
|
1
2
3
4
5
6
7
8
9
10
11
12
13
|
[root@mysql
nginx-1.6.2]# ps aux |grep nginx
root 7271
0.0 0.0 19836
604 ? Ss 08:38
0:00 nginx: master process /usr/local/nginx/sbin/nginx
nobody 7272
0.0 0.1 20260
1196 ? S 08:38
0:00 nginx: worker process
root 7276
0.0 0.0 103248 872 pts/0
S+ 08:38 0:00 grep nginx
|
1)启动失败,如果端口占用,需要把进程杀死。
killall [进程名称]
2)然后在重启nginx
/usr/local/nginx/sbin/nginx -s reload
四、编写nginx启动脚本
1、在/etc/init.d/目录下创建一个nginx文件,加入以下内容
vim /etc/init.d/nginx
加入如下内容:
|
1
2
3
4
5
6
7
8
9
10
11
12
13
14
15
16
17
18
19
20
21
22
23
24
25
26
27
28
29
30
31
32
33
34
35
36
37
38
39
40
41
42
43
44
45
46
47
48
49
50
51
52
53
54
55
56
57
58
59
60
61
62
63
64
65
66
67
68
69
70
71
72
73
74
75
76
77
|
#!/bin/bash
# chkconfig: - 30
21 #定义了启动在那个级别中,30是启动顺序,21是关闭顺序
# description: http
service.
# Source Function
Library
.
/etc/init.d/functions
# Nginx Settings
NGINX_SBIN="/usr/local/nginx/sbin/nginx"
NGINX_CONF="/usr/local/nginx/conf/nginx.conf"
NGINX_PID="/usr/local/nginx/logs/nginx.pid"
RETVAL=0
prog="Nginx"
start() {
echo -n $"Starting $prog: "
mkdir -p /dev/shm/nginx_temp
daemon $NGINX_SBIN -c $NGINX_CONF
RETVAL=$?
echo
return $RETVAL
}
stop() {
echo -n $"Stopping $prog: "
killproc -p $NGINX_PID $NGINX_SBIN
-TERM
rm -rf /dev/shm/nginx_temp
RETVAL=$?
echo
return $RETVAL
}
reload(){
echo -n $"Reloading $prog: "
killproc -p $NGINX_PID $NGINX_SBIN -HUP
RETVAL=$?
echo
return $RETVAL
}
restart(){
stop
start
}
configtest(){
$NGINX_SBIN -c $NGINX_CONF -t
return 0
}
case "$1"
in
start)
start
;;
stop)
stop
;;
reload)
reload
;;
restart)
restart
;;
configtest)
configtest
;;
*)
echo $"Usage: $0
{start|stop|reload|restart|configtest}"
RETVAL=1
esac
exit $RETVAL
|
2、保存后,执行
1)chmod a+x /etc/init.d/nginx
或者
chmod 755 /etc/init.d/nginx
2)chkconfig --add nginx #加入到启动列表
3)chkconfig nginx on #设定为开机启动
3、chkconfig --list nginx
查看在哪些级别是关闭和开启的
4、启动nginx命令
service nginx start
1) 如果启动失败,提示有进程占用了80端口,查询是那个进程占用了80端口
netstat -lnp |grep 80
2) 杀死占用的80端口的进程,然后在启动,当然如果你使用上面的步骤已经把nginx启动了,那么你现在使用service nginx start来启动nginx也会失败的,也会提示你80端口被占用,所以你需要service nginx stop先停止nginx,然后在启动就OK
killall 进程名称
五、配置解析php
1、nginx的配置文件位置
/usr/local/nginx/conf/nginx.conf
vim /usr/local/nginx/conf/nginx.conf //把下面的配置,前面的#删除,并更改fastcgi_param SCRIPT_FILENAME 那一行
具体如图:
需要修改的文件:
location ~ \.php$ {
root html;
fastcgi_pass 127.0.0.1:9000;
fastcgi_index index.php;
fastcgi_param SCRIPT_FILENAME /usr/local/nginx/html$fastcgi_script_name;
include fastcgi_params;
}
2、配置完成后检查配置文件有没有错误
/usr/local/nginx/sbin/nginx -t
|
1
2
3
4
5
6
|
[root@mysql ~]#
/usr/local/nginx/sbin/nginx -t
nginx: the
configuration file /usr/local/nginx/conf/nginx.conf syntax is ok
nginx: configuration
file /usr/local/nginx/conf/nginx.conf test is successful
|
有这个提示就说明配置是正确的
3、重新加载
/usr/local/nginx/sbin/nginx-s reload
或者一下都可以
[root@mysql ~]# /etc/init.d/nginx reload
4、测试
1)在nginx目录下编写一个php脚本测试
vim /usr/local/nginx/html/1.php
增加
|
1
2
3
|
phpinfo();
?>
|
2)在Linux系统测试:
curl localhost/1.php
或者127.0.0.1/1.php -I都是一样的
|
1
2
3
4
5
6
7
8
9
10
11
12
|
[root@mysql ~]# curl
localhost/1.php -I
HTTP/1.1 200 OK #出现200k就证件节气解析成功
Server: nginx/1.6.2
Date: Sat, 20 Jun
2015 03:06:20 GMT
Content-Type:
text/html
Connection:
keep-alive
X-Powered-By:
PHP/5.4.37
|
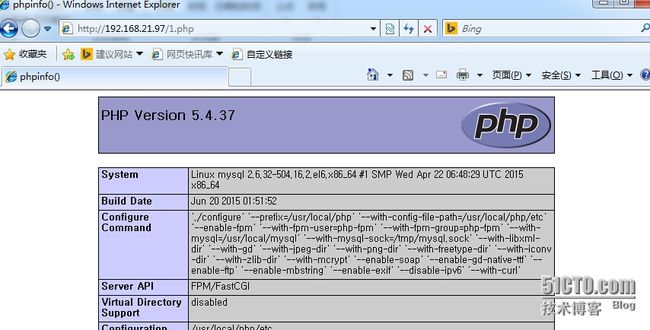
3)在浏览器测试,如下图


