pytorch入坑前言 | 最新0.4及其介绍
首先,pytorch是什么呢?它是一个python的包,它有以下两个特征
-
- 类numpy的张量计算与利用GPU加速
- 建立在自动微分系统的深度神经网络
除此之外,你也可以利用你喜欢的python包,比如numpy, scipy 和Cython来进行拓展,下表是pytorch的核心库。

Pytorch的特点:
- GPU支持的张量库
如果你之前用过numpy,那么你一定知道张量,张量就是多维度的矩阵,Pytorch 为张量的计算提供CPU和GPU两种模式,在GPU模式下能极大地加速计算。而Numpy只有CPU计算。

同numpy类似,pytorch提供大量的张量数学计算,比如切分,检索,和数学操作如线性代数等,最大限度的来适应你的科学计算需求
- 动态神经网络:
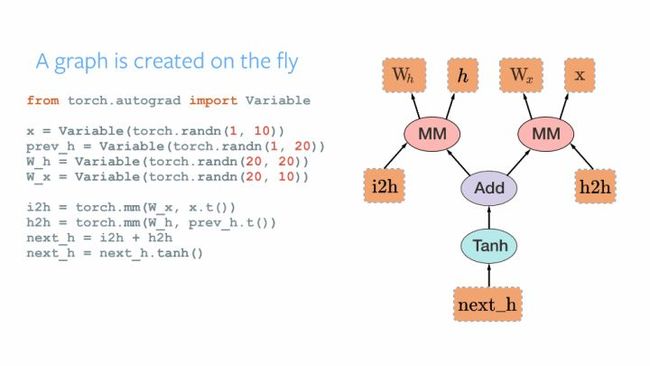
Pytorch 有独特建立神经网络的机制,大多数的框架如 Tensorflow, Theano, Caffe 和CNTK 对于神经网络的建立都是静态的,这意味着每次建立为完一个神经网络图,这些框架会重复使用网络图,改变网络图的行为需要重头来建立网络。在pytorch中,使用自动求微分系统,能允许你使用一些属性改变网络图的行为
从我的理解上来看: tensorflow 会建立一个完整的图,每次向前传播的时候可以选择执行图的某个部分,前提是图需要包含每个分支,pytorch则是根据判断来动态的建立图,每次反向传播都会释放,所以每次都可以不一样。
当你使用这些pytorch的特征,它可以给你的研究赋予最快的速度和灵活性

- Python优先:
Pytorch不是单独和c++框架捆绑在一起的,这是一个和Python深度结合的框架,你可以自然的使用numpy/scipy/scikit-learn等等, 你也可以使用python写出神经网络层,可以使用你喜欢的库来扩展,比如用CPython来加速等等
- 直观的体验:
Pytorch 在设计上是直观化,线性,和容易使用的。当你执行一条语句时,它不是异步执行的,当你进行调试,收到错误信息时和堆栈追踪时,理解它们是可以直观体现的,每个错误追踪点都会直接指向你所定义的代码, 它希望你在debugging的时候能花费最少的时间
- 快速和简洁
Pytorch 有最简洁的结构,pytorch通过集合 Intel MKL 和 NVIDIA的库来实现速度上的优化,所以不管在大网络还是小网络都可以跑的很快。
- 便于拓展:
你可以很容易写出新的网络模型,可以为你的网络层写出c/c++的扩展等等
所以什么人适合使用pytorch呢?如果你在寻找一个能使用GPU加速的类numpy的库,或者一个能提供最大扩展性和速度的深度学习研究的平台,那么快来加入pytorch的怀抱吧!!!!
在介绍完pytorch后,我们终于迎来了最新的0.4 release版本,0.4开始官方支持windows平台,这里我参考官方的指南给出新版本的总结:

合并Tensor 和 Variable
Variable 仍然像以前一样工作,只不过返回的是 Tensor . 这意味着我们使用的时候只需要声明Tensor 就好了,更详细的,torch.tensor可以像旧的Variable一样对计算历史进行追踪了,你再也不用到处声明Variable了
- 参数 requires_grad:
变量 requires_grad, Tensor 可以直接使用 requires_grad, 当任何 tensor 的操作有requires_grad = True, 自动微分系统就开始记录,如下例:
>>> x = torch.ones(1) # 创建一个tensor默认requires_grad=False (default)
>>> x.requires_grad
False
>>> y = torch.ones(1) # 创建另一个tensor 默认requires_grad=False
>>> z = x + y
>>> z.requires_grad # 由于输入的requires_grad都为false, 所以结果为false
False
>>> z.backward() # 这样自动微分系统是不会计算的.验证一下!
RuntimeError: element 0 of tensors does not require grad and
does not have a grad_fn
>>> w = torch.ones(1, requires_grad=True) # 现在创建一个tensor使得requires_grad=True
>>> w.requires_grad
True
>>> total = w + z       # 现在创建一个tensor使得requires_grad=True
>>> total.requires_grad #求和处理,由于有一个grad=True,所以结果为
True
>>> total.backward()    #可以进行反向传播
>>> w.grad
tensor([ 1.])
>>> # and no computation is wasted to compute
gradients for x, y and z, which don't require grad
>>> z.grad == x.grad == y.grad == None
True
- in-place 操作 x.requires_grad_()
使用 x.requires_grad_() 这样的 in-place 操作来直接设置 requires_grad 的属性,
>>> existing_tensor.requires_grad_()
>>> existing_tensor.requires_grad
True
- 舍弃volatile
Variable 中的 volatile 已经没有作用了,已经被torch.no_grad(), torch.set_grad_ena ble (grad_mode) 等其他代替了.下面是几种使用方法:
>>> x = torch.zeros(1, requires_grad=True)
>>> with torch.no_grad():
... y = x * 2
>>> y.requires_grad #False
-----------------------------------------------------------------------------
>>> is_train = False
>>> with torch.set_grad_enabled(is_train):
... y = x * 2
>>> y.requires_grad #False
----------------------------------------------------------------------------
>>> torch.set_grad_enabled(True) # 能作为函数使用
>>> y = x * 2
>>> y.requires_grad #True
>>> torch.set_grad_enabled(False)
>>> y = x * 2
>>> y.requires_grad #False
- Type()的变化
type() 不再返回数据类型只返回 class, 建议使用 isinstance() 或 x.type()
>>> x = torch.DoubleTensor([1, 1, 1])
>>> print(type(x)) # 0.31版本 返回 ‘’torch.DoubleTensor‘’
""
>>> print(x.type()) # 同0.31版本一样,返回 'torch.DoubleTensor'
'torch.DoubleTensor'
>>> print(isinstance(x, torch.DoubleTensor)) # OK: True
True
- .data 与 .detach()
.data 仍保留,但建议使用 .detach(), 区别在于 .data 返回和 x 的相同数据 tensor, 但不会加入到x的计算历史里,且require s_grad = False, 这样有些时候是不安全的, 因为 x.data 不能被 autograd 追踪求微分 。 .detach() 返回相同数据的 tensor ,且 requires_grad=False ,但能通过 in-place 操作报告给 autograd 在进行反向传播的时候.
data例子:
>>> a = torch.tensor([1,2,3.], requires_grad =True)
>>> out = a.sigmoid()
>>> c = out.data
>>> c.zero_()
tensor([ 0., 0., 0.])

>>> out                   #  out的数值被c.zero_()修改
tensor([ 0., 0., 0.])

>>> out.sum().backward()  #  反向传播
>>> a.grad                #  这个结果很严重的错误,因为out已经改变了
tensor([ 0., 0., 0.])
detach()例子
>>> a = torch.tensor([1,2,3.], requires_grad =True)
>>> out = a.sigmoid()
>>> c = out.detach()
>>> c.zero_()
tensor([ 0., 0., 0.])

>>> out                   #  out的值被c.zero_()修改 !!
tensor([ 0., 0., 0.])

>>> out.sum().backward()  #  需要原来out得值,但是已经被c.zero_()覆盖了,结果报错
RuntimeError: one of the variables needed for gradient
computation has been modified by an
支持 0 维 的张量tensor
- 统一tensor返回值
在之前的版本中,一维的 tensor 和 Variable 在检索和降维操作上会有不同,比如 tensor 的检索返回 python number, 但 Variable 返回size为 (1,) 的 variable 向量, 同样的情况出现在 tensor.sum() 上。
- Tensor.tensor() 直接生成0维张量
另外新版本中可以使用 torch.tensor() 直接生成0维的张量,最好理解是将 torch.tensor看做是numpy.array
- .item() 获得 python number
由于统一返回值,tensor 返回都为 tensor , 为了获得 python number 现在需要通过.item()来实现,考虑到之前的 loss 累加为 total_loss +=loss.data[0], 由于现在 loss 为0维张量, 0维检索是没有意义的,所以应该使用 total_loss+=loss.item(),通过.item() 从张量中获得 python number.
需要注意的是, 如果你的 loss 不转为 python number 再累加,你可能会发现你的内存消耗一直在增加。这是因为0维张量会增加梯度的计算历史。
>>> torch.tensor(3)        # 直接生成0维张量,0.3版本中会生成torch.size([3])的张量
tensor(3)
>>> torch.tensor(3).size() # 张量为0维
torch.Size([])
>>> vector = torch.arange(2, 6) #  生成一个向量
>>> vector[3]                   #  检索返回张量, 0.31版本直接返回python
number
tensor(5.)
>>> vector[3].item()                    #  通过.item()返回python number
5.0
>>> mysum = torch.tensor([2, 3]).sum()   # .sum()等操作也同意返回张量
>>> mysum
tensor(5)
>>> mysum.size()
torch.Size([])
dtypes, devices 和 类numpy 生成函数
在前作的版本中, 我们需要对于数据类型, 设备和分布情况 (密集和稀疏) 在' tensor type' 里, 比如 torch.cuda.sparse.DoubleTensor 是double的tensor类型。
在新版本中,我们引入 torch.dtype, torch.device 和torch.layout 类来分别管理这些特性
- Torch.dtype
下面是完整的 dtype 列表,张量的 dtype 可以通过其 dtype 属性来获得

- Torch.device
Torch.device 包含了一个设备类型('cpu'或者'cuda') 和一个可选的该设备的序列号 (id) 可以被初始化为 torch.device('{device_type}') 或 torch.device('{device_type}:{device_ or dinal}' 如果设备的序列号没有被定义,那么默认使用当前的设备,比如 torch.device('cuda' ) 等于 torch.device('cuda:X') ,其中 X 是 torch.cuda.current_device( ) 的返回值
对于张量的设备类型可以通过其 device 属性获得
- Torch.layout
Torch.layout 代表了数据分布类型,目前支持 torch.strided 和 torch.sparse_coo 类型
张量的 layout 情况可以通过其 layout 属性获得
创建Tensors
在新版本中,创建一个 tensors 可以特别指明 dtype,device, layout 和 requires_grad 来返回特定的 tensor, 如果 dtype 类型未指明,pytorch 会给数据赋予最合适的类型,比如:
>>> x = torch.randn(3, 3, dtype=torch.float64,
device=device)
tensor([[-0.6344, 0.8562,-1.2758],
        [ 0.8414, 1.7962, 1.0589],
        [-0.1369, -1.0462,-0.4373]], dtype=torch.float64, device='cuda:1')
>>> torch.tensor([1, 2.3]).dtype # type inferece
torch.float32
>>> torch.tensor([1, 2]).dtype # type inferece
torch.int64
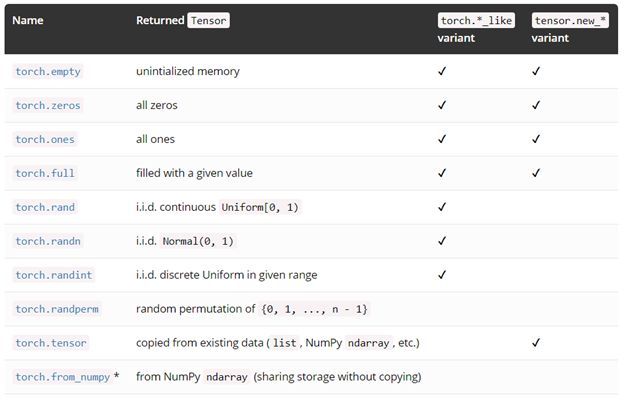
另外更多的建立 tensor 的方法,其中有些拥有 torch.*_like 和 tensor.new_* 的方法
- torch.*_like
利用tensor作为输入而不是 tesnor.size(), 会返回一个指定数据并具有与输入相同属性的tensor
>>> x = torch.randn(3, dtype=torch.float64)
>>>
torch.zeros_like(x)
tensor([ 0., 0., 0.], dtype=torch.float64)
- torch.new_*
同样返回一个与输入具有相同属性的 tensor, 但输入需要指定张量形状
>>> x = torch.randn(3, dtype=torch.float64)
>>>
x.new_ones(2)
tensor([ 1., 1.], dtype=torch.float64)
指定生成特殊张量,你可以利用元组或变量作为参数,如 torch.zeros((2,3))和torch.zero(2,3)

设备判断:
前一个版本 pytorch 很难写代码去判断设备无关等,Pytorch 0.4.0做了下面两个调整:
- device 属性适用于所有 tensor 的 tensor.device
- to 方法可以轻松的将目标从一个设备转移到另一个设备(比如从 cpu 到 cuda )
Pytorch 推荐如下代码来实现
# at beginning of the script
device = torch.device("cuda:0" if
torch.cuda.is_available() else "cpu")

...

# then whenever you get a new Tensor or Module
# this won't copy if they are already on the desired device
input = data.to(device)
model = MyModule(...).to(device)
最后
下面的代码将前面的全部集合,代码如下,让我们happy pytorch-ing
0.3.1 (old):
model = MyRNN()
if use_cuda:
    model = model.cuda()

# train
total_loss = 0
for input, target in train_loader:
    input, target = Variable(input), Variable(target)
    hidden =Variable(torch.zeros(*h_shape)) # inithidden
    if use_cuda:
        input, target, hidden = input.cuda(), target.cuda(), hidden.cuda()
     ... # get loss and optimize
    total_loss +=loss.data[0]

# evaluate
for input, target in test_loader:
    input = Variable(input, volatile=True)
    if use_cuda:
       ...
    ...
0.4.0 (new):
# torch.device object used throughout this script
device = torch.device("cuda" if use_cuda else "cpu")

model = MyRNN().to(device)

# train
total_loss = 0
for input, target in train_loader:
    input, target = input.to(device), target.to(device)
    hidden = input.new_zeros(*h_shape) # has the same device & dtype as `input`
    ... # get loss and optimize
    total_loss += loss.item() # get Python number from 1-element Tensor

# evaluate
with torch.no_grad(): # operations inside don't track history
    for input, target in test_loader:
        ...
请支持原创,本博客纯属个人兴趣爱好!
原文出处: pytorch入坑前言 | 最新0.4及其介绍