Hadoop3.2.0 源码分析: ResourceManager启动
概述
相信开始看源码的你,正在一点点的进入知识的殿堂,一起挖掘吧.
ResourceManager 是Yarn 的资源调度中心,很重要,所有的资源申请都需要通过ResourceManager来调度.
The ResourceManager is the main class that is a set of components.
"I am the ResourceManager. All your resources belong to us..."
这是开头,代码注释的几句话,蛮有意思,就摘抄了一下.
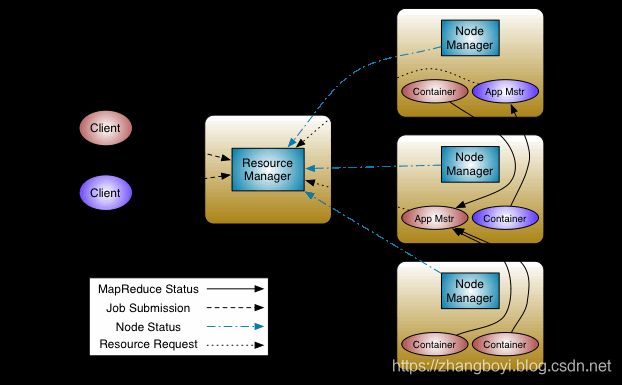
架构图:
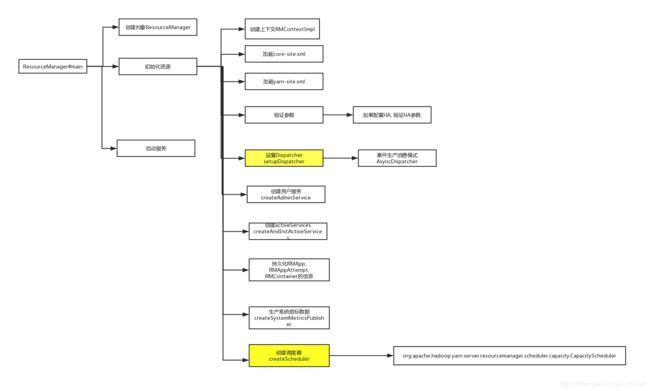
启动流程图:
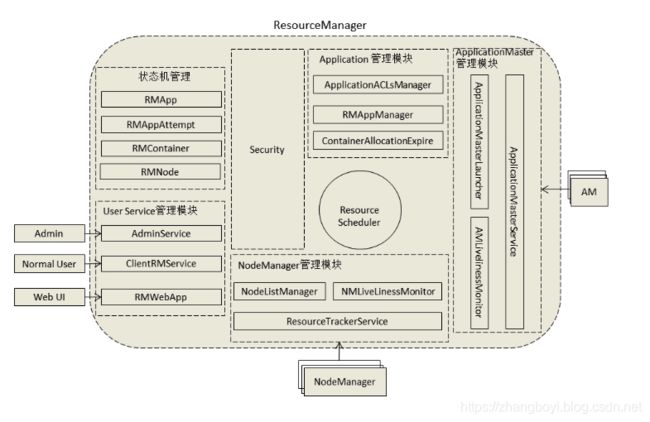
结构图
类图
缩略版
完整版:
代码:
在启动ResourceManager的时候,需要执行脚本: yarn-daemon.sh start resourcemanager
其实就是调用:
org.apache.hadoop.yarn.server.resourcemanager.ResourceManager#main 方法 (无参)
直接查看main 方法:
这里最核心的其实就是, 资源初始化, 与启动服务.
我们看一下,资源初始化操作
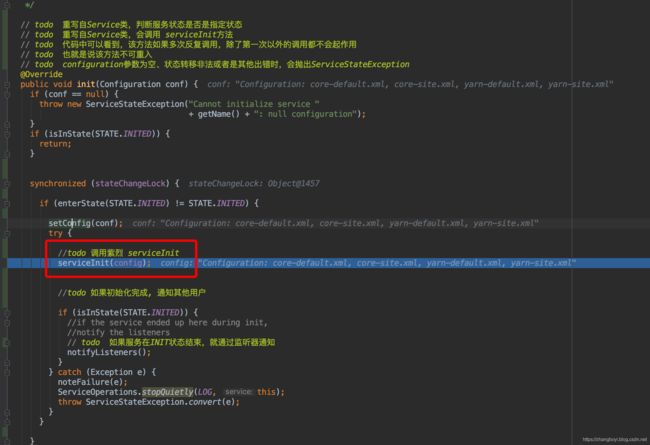
resourceManager.init(conf);
在这里,主要关注core-default.xml , core-site.xml , yarn-default.xml , yarn-site.xml 四个配置文件.
其实就是读取这里面的内容,加载到配置里面.
接下来,看初始化方法:
org.apache.hadoop.yarn.server.resourcemanager#serviceInit
@Override
protected void serviceInit(Configuration conf) throws Exception {
  this.conf = conf;
  // todo  RM上下文,存有RM的许多重要成员
  this.rmContext = new RMContextImpl();
  rmContext.setResourceManager(this);

  // todo 配置管理初始化
  this.configurationProvider =
      ConfigurationProviderFactory.getConfigurationProvider(conf);

  this.configurationProvider.init(this.conf);
  rmContext.setConfigurationProvider(configurationProvider);

  // todo load core-site.xml
  loadConfigurationXml(YarnConfiguration.CORE_SITE_CONFIGURATION_FILE);

  // Do refreshSuperUserGroupsConfiguration with loaded core-site.xml
  // Or use RM specific configurations to overwrite the common ones first
  // if they exist
  // todo  从已加载的 core-site.xml文件中获取 用户<->组 的映射表
  RMServerUtils.processRMProxyUsersConf(conf);
  ProxyUsers.refreshSuperUserGroupsConfiguration(this.conf);

  // todo load yarn-site.xml
  loadConfigurationXml(YarnConfiguration.YARN_SITE_CONFIGURATION_FILE);

  //todo 验证
  validateConfigs(this.conf);

  // todo Set HA configuration should be done before login
  // todo  填充是否配置了RM 高可用
  this.rmContext.setHAEnabled(HAUtil.isHAEnabled(this.conf));
  if (this.rmContext.isHAEnabled()) {
    // todo 如果确认配置了RM高可用,就需要验证现有配置的参数是否支持高可用,验证不通过就抛出异常
    HAUtil.verifyAndSetConfiguration(this.conf);
  }

  // Set UGI and do login
  // If security is enabled, use login user
  // If security is not enabled, use current user
  this.rmLoginUGI = UserGroupInformation.getCurrentUser();
  try {
    doSecureLogin();
  } catch(IOException ie) {
    throw new YarnRuntimeException("Failed to login", ie);
  }

  // todo register the handlers for all AlwaysOn services using setupDispatcher().
  // todo  注册一个异步Dispatcher,有一个单独的线程来处理所有持续开启的服务的各种EventType。
  // todo  Yarn中采用了事件驱动的编程模型,后面很多不同的事件都用了这个dispatcher来处理。后面会详细说
  rmDispatcher = setupDispatcher();

  // todo  将rmDispatcher放到CompositeService的serviceList
  addIfService(rmDispatcher);

  // todo  并放入RM上下文中
  rmContext.setDispatcher(rmDispatcher);

  // The order of services below should not be changed as services will be
  // started in same order
  // As elector service needs admin service to be initialized and started,
  // first we add admin service then elector service

  // todo  注册管理员服务
  // todo  AdminService为管理员提供了一套独立的服务接口,以防止大量的普通用户的请求使得管理员发送的管理命令饿死。
  // todo  管理员可以通过这些接口命令管理集群,比如动态更新节点列表,更新ACL列表,更新队列信息等
  adminService = createAdminService();
  addService(adminService);
  rmContext.setRMAdminService(adminService);

  // elector must be added post adminservice
  if (this.rmContext.isHAEnabled()) {
    // If the RM is configured to use an embedded leader elector,
    // initialize the leader elector.
    if (HAUtil.isAutomaticFailoverEnabled(conf)
        && HAUtil.isAutomaticFailoverEmbedded(conf)) {
      EmbeddedElector elector = createEmbeddedElector();
      addIfService(elector);
      rmContext.setLeaderElectorService(elector);
    }
  }

  rmContext.setYarnConfiguration(conf);

  //todo 创建activeServices
  createAndInitActiveServices(false);

  webAppAddress = WebAppUtils.getWebAppBindURL(this.conf,
                    YarnConfiguration.RM_BIND_HOST,
                    WebAppUtils.getRMWebAppURLWithoutScheme(this.conf));


  // todo  持久化RMApp, RMAppAttempt, RMContainer的信息
  RMApplicationHistoryWriter rmApplicationHistoryWriter =
      createRMApplicationHistoryWriter();
  addService(rmApplicationHistoryWriter);
  rmContext.setRMApplicationHistoryWriter(rmApplicationHistoryWriter);

  // initialize the RM timeline collector first so that the system metrics
  // publisher can bind to it
  if (YarnConfiguration.timelineServiceV2Enabled(this.conf)) {
    RMTimelineCollectorManager timelineCollectorManager =
        createRMTimelineCollectorManager();
    addService(timelineCollectorManager);
    rmContext.setRMTimelineCollectorManager(timelineCollectorManager);
  }

  // todo  生产系统指标数据
  SystemMetricsPublisher systemMetricsPublisher =
      createSystemMetricsPublisher();
  addIfService(systemMetricsPublisher);
  rmContext.setSystemMetricsPublisher(systemMetricsPublisher);

  registerMXBean();

  // todo  接着调用父类CompositeService的serviceInit方法,将他管理的服务全部初始化
  super.serviceInit(this.conf);
}
代码比较长, 我挑重点讲解一下.
读取core-default.xml , core-site.xml , yarn-default.xml , yarn-site.xml 这四个文件参数.我就不细说了.
核心 : setupDispatcher , createScheduler(下一篇文章讲解)
实际上就是通过createDispatcher()方法创建了一个 AsyncDispatcher 实例,代码如下:
/**
 * Register the handlers for alwaysOn services
 */
private Dispatcher setupDispatcher() {
  //todo 设置Dispatcher
  //todo 实际上就是通过createDispatcher()方法创建了一个 AsyncDispatcher 实例,代码如下:
  Dispatcher dispatcher = createDispatcher();

  dispatcher.register(RMFatalEventType.class,
      new ResourceManager.RMFatalEventDispatcher());

  return dispatcher;
}
在这里需要对 AsyncDispatcher 进行分析 , 代码其实就是一个事件类型的生产者消费者模型.
架构图如下:
我罗列一下重点常量:
private static final Log LOG = LogFactory.getLog(AsyncDispatcher.class);

// todo 待调度处理事件阻塞队列
// todo 调用有参构造函数的时候初始化,传入线程安全的链式阻塞队列LinkedBlockingQueue实例
private final BlockingQueue eventQueue;

private volatile int lastEventQueueSizeLogged = 0;

// todo AsyncDispatcher是否停止的标志位
private volatile boolean stopped = false;

// Configuration flag for enabling/disabling draining dispatcher's events on
// stop functionality.
// todo 在stop功能中开启/禁用流尽分发器事件的配置标志位
private volatile boolean drainEventsOnStop = false;

// Indicates all the remaining dispatcher's events on stop have been drained
// and processed.
// todo stop功能中所有剩余分发器事件已经被处理或流尽的标志位
private volatile boolean drained = true;


// todo drained的等待锁
private final Object waitForDrained = new Object();

// For drainEventsOnStop enabled only, block newly coming events into the
// queue while stopping.
// todo 在AsyncDispatcher停止过程中阻塞新近到来的事件进入队列的标志位,仅当drainEventsOnStop启用(即为true)时有效
private volatile boolean blockNewEvents = false;

// todo 事件处理器实例
private final EventHandler handlerInstance = new GenericEventHandler();

private Thread eventHandlingThread;

// todo  类型为: HashMap, EventHandler>();
protected final Map, EventHandler> eventDispatchers;


// todo 标志位:确保调度程序崩溃,但不做系统退出system-exit
private boolean exitOnDispatchException = true;
BlockingQueue
然后有队列了, 就需要生产者和消费者.
先看消费者: createThread 这个方法,就说明了如何消费队列中的数据.
这里面有个点要说明一下, 当服务停止的时候,并不是立马中断. 而是要干两件事.
1.停止接受新的任务.
2.等待队列中的任务处理,完成. 最大等待时间 5min.
@Override
protected void serviceStart() throws Exception {
  //start all the components
  super.serviceStart();

  // todo 创建事件处理调度线程 eventHandlingThread
  // todo createThread !!!!!!!!!!!!!
  eventHandlingThread = new Thread(createThread());
  // todo 设置线程名为AsyncDispatcher event handler
  eventHandlingThread.setName(dispatcherThreadName);
  // todo 启动事件处理调度线程eventHandlingThread
  eventHandlingThread.start();
}
Runnable createThread() {
  return new Runnable() {
    @Override
    public void run() {
      //todo 如果不是停止, 或者当前线程不被中断.

      while (!stopped && !Thread.currentThread().isInterrupted()) {

        //todo  判断事件调度队列eventQueue是否为空,并赋值给标志位drained
        drained = eventQueue.isEmpty();

        // blockNewEvents is only set when dispatcher is draining to stop,
        // adding this check is to avoid the overhead of acquiring the lock
        // and calling notify every time in the normal run of the loop.

        // todo 如果停止过程中阻止新的事件加入待处理队列,即标志位blockNewEvents为true
        if (blockNewEvents) {
          //todo 在这里面有锁
          synchronized (waitForDrained) {
            if (drained) {
              // todo 如果待处理队列中的事件都已调度完毕,调用waitForDrained的notify()方法通知等待者
              waitForDrained.notify();
            }
          }
        }
        Event event;
        try {
          //todo 获取事件
          // todo 从事件调度队列eventQueue中取出一个事件
          // todo take()方法为取走BlockingQueue里排在首位的对象,若BlockingQueue为空,阻塞进入等待状态直到  BlockingQueue有新的数据被加入
          event = eventQueue.take();
        } catch(InterruptedException ie) {
          if (!stopped) {
            LOG.warn("AsyncDispatcher thread interrupted", ie);
          }
          return;
        }

        // todo 如果取出待处理事件event,即不为null
        if (event != null) {

          //todo 调度事件event 调用dispatch()方法进行分发
          dispatch(event);
        }
      }
    }
  };
}
在这里,拿到事件之后会调用 dispatch 方法.
其实就是根据传入时间的类型, 去内存中寻找对应类型的事件处理方法.进行处理.
//todo  这个是事件调度方法 dispatch
@SuppressWarnings("unchecked")
protected void dispatch(Event event) {
  //all events go thru this loop
  if (LOG.isDebugEnabled()) {
    LOG.debug("Dispatching the event " + event.getClass().getName() + "."
        + event.toString());
  }

  // todo 根据事件event获取事件类型枚举类type
  Class type = event.getType().getDeclaringClass();

  try{
    //todo 获取事件类型所对应的Handler
    EventHandler handler = eventDispatchers.get(type);
    if(handler != null) {
      //todo 调用对应的 handler 来处理事件.
      handler.handle(event);
    } else {
      // todo 否则抛出异常,提示针对事件类型type的事件处理器handler没有注册
      throw new Exception("No handler for registered for " + type);
    }
  } catch (Throwable t) {
    //TODO Maybe log the state of the queue
    LOG.fatal("Error in dispatcher thread", t);
    // If serviceStop is called, we should exit this thread gracefully.
    if (exitOnDispatchException
        && (ShutdownHookManager.get().isShutdownInProgress()) == false
        && stopped == false) {
      stopped = true;
      Thread shutDownThread = new Thread(createShutDownThread());
      shutDownThread.setName("AsyncDispatcher ShutDown handler");
      shutDownThread.start();
    }
  }
}
接下来是消费者: GenericEventHandler , 就是向队列中添加事件而已.
// todo 事件处理器实例
private final EventHandler handlerInstance = new GenericEventHandler();
//todo 默认的通用事件处理 --产生数据
class GenericEventHandler implements EventHandler {
  public void handle(Event event) {
    // todo 如果blockNewEvents为true,即AsyncDispatcher服务停止过程正在发生,
    // todo 且阻止新的事件加入待调度处理事件队列eventQueue,直接返回
    if (blockNewEvents) {
      return;
    }

    // todo 标志位drained设置为false,说明队列中尚有事件需要调度
    drained = false;

    /* all this method does is enqueue all the events onto the queue */
    // todo 获取队列eventQueue大小qSize
    int qSize = eventQueue.size();

    // todo 每隔1000记录一条info级别日志信息,比如:Size of event-queue is 2000
    if (qSize != 0 && qSize % 1000 == 0
        && lastEventQueueSizeLogged != qSize) {
      lastEventQueueSizeLogged = qSize;
      LOG.info("Size of event-queue is " + qSize);
    }

    // todo 获取队列eventQueue剩余容量remCapacity

    int remCapacity = eventQueue.remainingCapacity();
    // todo 如果剩余容量remCapacity小于1000,记录warn级别日志信息,
    //  比如:Very low remaining capacity in the event-queue:  888
    if (remCapacity < 1000) {
      LOG.warn("Very low remaining capacity in the event-queue: "
          + remCapacity);
    }


    try {
      // todo 队列eventQueue中添加事件event
      eventQueue.put(event);

    } catch (InterruptedException e) {
      if (!stopped) {
        LOG.warn("AsyncDispatcher thread interrupted", e);
      }
      // Need to reset drained flag to true if event queue is empty,
      // otherwise dispatcher will hang on stop.
      drained = eventQueue.isEmpty();
      throw new YarnRuntimeException(e);
    }
  };
}
服务初始化完成之后,就需要启动服务.
resourceManager.start();
在这里面核心的是: serviceStart 方法. 我直接罗列父类的方法. 其实就是循环启动服务而已.
子类有自定义的方法, 单最终都会调用父类的方法.有时间,可以自己去看,
//todo  获取所有的服务 其实就是一个 ArrayList
List services = getServices();
if (LOG.isDebugEnabled()) {
  LOG.debug(getName() + ": starting services, size=" + services.size());
}
for (Service service : services) {
  // start the service. If this fails that service
  // will be stopped and an exception raised

  //todo 循环启动
  service.start();
}
super.serviceStart();
然后坐等服务启动完成.
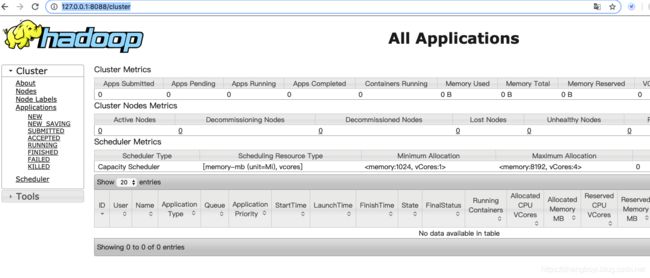
http://127.0.0.1:8088/cluster
如果有不正确的地方, 请指正,不胜感激................
