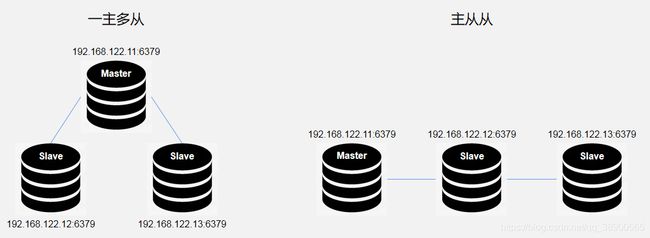
Ansible部署Redis集群(主从从、一主多从、哨兵)
| 角色 | 实例IP | 实例端口 |
|---|---|---|
| master | 192.168.122.11 | 6379 |
| slave01 | 192.168.122.12 | 6379 |
| slave02 | 192.168.122.13 | 6379 |
0、安装配置集群管理工具Ansible
[root@redis01 ~]# wget https://mirrors.aliyun.com/epel/7/x86_64/Packages/e/epel-release-7-12.noarch.rpm
[root@redis01 ~]# rpm -Uvh epel-release-7-12.noarch.rpm
[root@redis01 ~]# yum install -y ansible
[root@redis01 ~]# echo '
[redis]
192.168.122.[11:13] ansible_ssh_user="root" ansible_ssh_pass="a" ansible_su_pass="a"
' >> /etc/ansible/hosts
测试: ansible redis -m command -a 'who'
1、带认证的主从从
redis批量部署
[root@redis01 ~]# wget http://download.redis.io/releases/redis-6.0.6.tar.gz
[root@redis01 ~]# ansible redis -m copy -a 'src=/root/redis-6.0.6.tar.gz dest=/root/redis-6.0.6.tar.gz owner=root group=root mode=0644'
[root@redis01 ~]# ansible redis -m command -a 'tar xzf /root/redis-6.0.6.tar.gz && cd /root/redis-6.0.6 && make'
[root@redis01 ~]# ansible redis -m command -a "sed -i 's/^daemonize no/daemonize yes/p' /root/redis-6.0.6/redis.conf"
[root@redis01 ~]# ansible redis -m command -a "/root/redis-6.0.6/src/redis-server /root/redis-6.0.6/redis.conf"
!停止服务
[root@redis01 redis-6.0.6]# netstat -anultp | grep redis |awk '{print $7}'| awk -F/ '{print $1}' |xargs kill
!修改配置文件
[root@redis01 redis-6.0.6]# diff redis.conf.bak redis.conf
69c69
< bind 127.0.0.1
---
> #bind 127.0.0.1
786c786
< # requirepass foobared
---
> requirepass 123456
!启动服务
[root@redis01 redis-6.0.6]# src/redis-server redis.conf
1.2 从节点[redis02]配置
!停止服务
[root@redis02 redis-6.0.6]# netstat -anultp | grep redis |awk '{print $7}'| awk -F/ '{print $1}' |xargs kill
!修改配置文件
[root@redis02 redis-6.0.6]# diff redis.conf.bak redis.conf
69c69
< bind 127.0.0.1
---
> #bind 127.0.0.1
88c88
< protected-mode yes
---
> protected-mode no
385c385
< # replicaof
---
> replicaof 192.168.122.11 6379
392c392
< # masterauth 1.3 从从节点[redis03]配置
!停止服务
[root@redis03 redis-6.0.6]# netstat -anultp | grep redis |awk '{print $7}'| awk -F/ '{print $1}' |xargs kill
!修改配置文件
[root@redis03 redis-6.0.6]# diff redis.conf.bak redis.conf
69c69
< bind 127.0.0.1
---
> #bind 127.0.0.1
385c385
< # replicaof
---
> replicaof 192.168.122.12 6379
!启动服务
[root@redis01 redis-6.0.6]# src/redis-server redis.conf
1.4、带认证的主从从测试
!检查主节点信息
192.168.122.11> info replication
role:master
connected_slaves:1
slave0:ip=192.168.122.12,port=6379,state=online,offset=2338,lag=1
!检查从节点信息
192.168.122.12> info replication
role:slave
master_host:192.168.122.11
master_port:6379
connected_slaves:1
slave0:ip=192.168.122.13,port=6379,state=online,offset=90748,lag=1
!检查从从节点信息
192.168.122.13> info replication
role:slave
master_host:192.168.122.12
master_port:6379
!主节点存数据
192.168.122.11> set name golang
OK
!从节点查数据
192.168.122.12> get name
golang
!从从节点查数据
192.168.122.13> get name
golang
2、带认证的一主多从
2.1 redis01、redis02不改动
2.2 redis03配置
!停止服务
[root@redis03 redis-6.0.6]# netstat -anultp | grep redis |awk '{print $7}'| awk -F/ '{print $1}' |xargs kill
!修改配置文件
[root@redis03 redis-6.0.6]# diff redis.conf.bak redis.conf
69c69
< bind 127.0.0.1
---
> #bind 127.0.0.1
88c88
< protected-mode yes
---
> protected-mode no
385c385
< # replicaof
---
> replicaof 192.168.122.11 6379
392c392
< # masterauth 2.3、带认证的一主多从测试
!检查主节点信息
192.168.122.11> info replication
role:master
connected_slaves:2
slave0:ip=192.168.122.12,port=6379,state=online,offset=90983,lag=1
slave1:ip=192.168.122.13,port=6379,state=online,offset=90997,lag=0
!检查从节点信息
192.168.122.12> info replication
role:slave
master_host:192.168.122.11
master_port:6379
!检查从从节点信息
192.168.122.13> info replication
role:slave
master_host:192.168.122.11
master_port:6379
!主节点存数据
192.168.122.11> set age 12
OK
!从节点查数据
192.168.122.12> get age
12
!从从节点查数据
192.168.122.13> get age
12
3、主从从
3.0 以上需要自行切换主库,为解决该问题引入哨兵
3.1 从库监控主库的存活,当发现主库挂机后,自动切换升级主库。所以只需要在从库配置哨兵
3.2 redis02开启哨兵模式
[root@redis02 redis-6.0.6]# echo "sentinel monitor redis01 192.168.122.11 6379 1" > /etc/redis/sentinel.conf
[root@redis02 redis-6.0.6]# echo "sentinel auth-pass redis01 123456" >> /etc/redis/sentinel.conf
[root@redis02 redis-6.0.6]# src/redis-sentinel /etc/redis/sentinel.conf
3.2 关闭master
[root@redis01 redis-6.0.6]# src/redis-cli -h 192.168.122.11 -p 6379 -a "123456" shutdown
虽然能够切换主库,但是操作的IP是不变,如何实现切换主库的使用,客户端也自动连接到新的主库?
【KeepAlived实现HA】原理:使用VIP代理RIP


