lamp压测与xcache
0 目录
- 目录
- 环境与目的
- 1 环境
- 2 目的
- ab命令结果
- 1 结果说明
- 2 使用ab的注意事项
- xcache
- 1 压测动态资源效果
- 2 编译安装xcache
- 3 xcache配置文件
- 4 效果
1 环境与目的
1.1 环境
本篇在CentOS 7主机192.168.0.175上搭建lamp环境。php作为httpd的模块安装1。
搭建方式见 http://blog.csdn.net/wangzhenyu177/article/details/78537884 本篇不再赘述搭建方式。
httpd的DocumentRoot为/var/www/php,有动态资源phpMyAdmin和文本文件message(由/var/log/messages复制而来,因为这个文件比较大,方便与动态资源对比):
[root@Node5 php]% ll
total 856
-rw-r--r-- 1 root root 856994 Nov 23 00:54 messages                 # 注意要给messages读权限,默认是只有属主能读
drwxr-xr-x 9 root root   4096 Nov 23 00:56 phpMyAdmin-4.0.10.20-all-languages
lrwxrwxrwx 1 root root     34 Nov 23 01:09 pma -> phpMyAdmin-4.0.10.20-all-languages
-rw-r--r-- 1 root root     19 Nov 23 00:52 test.html
-rw-r--r-- 1 root root     41 Nov 20 03:02 test.php
[root@Node5 php]% systemctl start httpd.service
[root@Node5 php]% systemctl start mariadb.service压测前确保两个资源均能访问:
1.2 目的
1、压测命令ab的执行结果说明。
2、分别访问动态资源phpMyAdmin,和文本文档(静态资源),以验证动静态资源响应速度。
3、php的扩展xcache,用于提升php资源的响应速度。编译安装xcache以验证
2 ab命令、结果
ab命令有很多选项,本篇主要看测试效果。用到的选项只有:
- -n,指定模拟请求总数
- -c,指定每次并发数
所以ab -c 100 -n 1000就表示共模拟1000此请求,每次并发100个。
2.1 结果说明
以messages为例,ab结果:
[root@Node5 php]% ab -c 100 -n 1000 http://192.168.0.175/messages
This is ApacheBench, Version 2.3 <$Revision: 1430300 $>
Copyright 1996 Adam Twiss, Zeus Technology Ltd, http://www.zeustech.net/
Licensed to The Apache Software Foundation, http://www.apache.org/

Benchmarking 192.168.0.175 (be patient)
Completed 100 requests
Completed 200 requests
Completed 300 requests
Completed 400 requests
Completed 500 requests
Completed 600 requests
Completed 700 requests
Completed 800 requests
Completed 900 requests
Completed 1000 requests
Finished 1000 requests


Server Software:        Apache/2.4.6
Server Hostname:        192.168.0.175
Server Port:            80

Document Path:          /messages
Document Length:        856994 bytes

Concurrency Level:      100
Time taken for tests:   0.336 seconds
Complete requests:      1000
Failed requests:        0
Write errors:           0
Total transferred:      857232000 bytes
HTML transferred:       856994000 bytes
Requests per second:    2977.71 [#/sec] (mean)
Time per request:       33.583 [ms] (mean)
Time per request:       0.336 [ms] (mean, across all concurrent requests)
Transfer rate:          2492766.01 [Kbytes/sec] received

Connection Times (ms)
              min  mean[+/-sd] median   max
Connect:        0    1   1.5      0       6
Processing:     8   31   4.0     32      38
Waiting:        1   29   4.1     29      36
Total:         15   32   3.0     32      42

Percentage of the requests served within a certain time (ms)
  50%     32
  66%     33
  75%     33
  80%     33
  90%     34
  95%     35
  98%     37
  99%     39
 100%     42 (longest request)
结果说明:
1、很多字段只是属性信息,并且见名知意。重要指标:
| 指标 | 意义 |
|---|---|
| Requests per second | 平均每秒响应的请求数。这是最重要的指标 |
| Time per request | 响应每(一波)请求所需时间。这里指的是-c指定的数量,以上例来说,是响应100个请求所需的时间 |
| Time per request | 响应每(一个)请求所需时间。这是真正的响应每个请求所需时间,以上例来说就是第一个Time per request除以100 |
2、其后分别列出了连接的不同状态的消耗时间:
- Connect,客户端与服务端用于建立连接消耗的时间(三次握手等)
- 这个数值如过大,可能是带宽、服务端已达到最大并发数从而无法立即建立连接,等问题引起
- Processing,服务端用于从磁盘获取所请求的资源、运行资源(对于动态资源来说需运行)、构建响应报文所消耗的时间
- 这个数值如过大,可能是服务器性能导致
- Waiting,客户端等待响应报文所消耗的时间
- 这个数值如过大,可能是带宽、客户端接收能力等问题引起
3、最后是所有请求按百分比,分别列出是在多少毫秒内响应完成的。
以上述结果来说:
50%的请求是在32毫秒内完成的,依次类推。最后是100%的请求是在42毫秒内响应完成的。所以本次测试最长的请求响应完成时间是42毫秒
2.2 使用ab的注意事项
ab测试需注意:
1、一般来讲不应仅测1次,测3次以上,基本可以看出上述各指标稳定在某一数值。
2、真正的测试,要考虑带宽问题,使用远程客户端测试。因为有的服务器性能是可以的,瓶颈是在带宽。笔者是用虚拟机测试的,无法测出网络带宽的限制。
3、不能以ab测试的每秒响应请求数,设置为服务端的并发数。因为ab测出的每秒响应请求数是服务端满载时的数量,如果把这个作为服务端的并发数,服务端虽然能响应,但无法按时响应每个请求2。一般是把ab测试结果的每秒响应数的60%~80%作为实际的指标。
4、可根据响应请求的百分比(就是结果的最后一段),估算服务端并发请求数。比如在”ab -c 100 -n 1000”的情况下,60%的请求是在1000ms内响应的。而如果对服务端的要求就是1000ms,则100*60%就是60个并发,所以给该服务端设置最大并发60,就能保证响应时长在1000ms左右以内。
3 xcache
xcache是php的一个加速器,通过将数据缓存在内存,避免重复编译,从而提高响应速度。
xcache是php的一个扩展3。
3.1 压测动态资源效果
首先看下对于phpMyAdmin页面的压测结果,响应速度比上述的messages文件要差得多:
[root@Node5 php]% ab -c 100 -n 1000 http://192.168.0.175/pma/index.php
This is ApacheBench, Version 2.3 <$Revision: 1430300 $>
Copyright 1996 Adam Twiss, Zeus Technology Ltd, http://www.zeustech.net/
Licensed to The Apache Software Foundation, http://www.apache.org/

Benchmarking 192.168.0.175 (be patient)
Completed 100 requests
Completed 200 requests
Completed 300 requests
Completed 400 requests
Completed 500 requests
Completed 600 requests
Completed 700 requests
Completed 800 requests
Completed 900 requests
Completed 1000 requests
Finished 1000 requests


Server Software:        Apache/2.4.6
Server Hostname:        192.168.0.175
Server Port:            80

Document Path:          /pma/index.php
Document Length:        8713 bytes

Concurrency Level:      100
Time taken for tests:   24.786 seconds
Complete requests:      1000
Failed requests:        0
Write errors:           0
Total transferred:      10100000 bytes
HTML transferred:       8713000 bytes
Requests per second:    40.34 [#/sec] (mean)
Time per request:       2478.631 [ms] (mean)
Time per request:       24.786 [ms] (mean, across all concurrent requests)
Transfer rate:          397.93 [Kbytes/sec] received

Connection Times (ms)
              min  mean[+/-sd] median   max
Connect:        0    0   0.8      0       3
Processing:    61 2450 687.1   2362    7700
Waiting:       55 2314 649.7   2242    7700
Total:         61 2450 687.0   2363    7700

Percentage of the requests served within a certain time (ms)
  50%   2363
  66%   2691
  75%   2895
  80%   3005
  90%   3372
  95%   3613
  98%   3834
  99%   4049
 100%   7700 (longest request)
可以看到,同样的并发请求、请求总数,messages的每秒响应数接近3000,而phpMyAdmin只有40左右。
这里差得过多可能是phpMyAdmin的页面过大,不过实际使用中,动态资源响应速度是静态资源的5%~10%也很正常。
3.2 编译安装xcache
epel的yum源中有xcache(包名是php-xcache),或许是因为rpm包制作时的参数问题,使用yum安装的xcache有时会不起作用(在CentOS 7上)。这里使用编译安装。
1、在官网上下载xcache3.2.0。而且编译需要php-devel也要先装好。
2、在xcache目录下:
[root@Node5 tmp]% cd xcache-3.2.0

[root@Node5 xcache-3.2.0]% ls
AUTHORS     COPYING             INSTALL             mod_cacher        mod_optimizer   tests     xcache_globals.h
bin         devel               lib                 mod_coverager     NEWS            THANKS    xcache.h
ChangeLog   gen_structinfo.awk  Makefile.frag       mod_decoder       processor       util      xcache.ini
config.m4   htdocs              Makefile.frag.deps  mod_disassembler  README          xcache    xcache-test.ini
config.w32  includes.c          mod_assembler       mod_encoder       run-xcachetest  xcache.c  xcache-zh-gb2312.ini
其中INSTALL文件说明了安装步骤:
Installtion:

    $ phpize --clean && phpize
    $ ./configure --help
    $ CFLAGS='your cflags' ./configure --enable-xcache --enable...
    $ make
    $ su
    # make install
        (update php.ini, restart php)

……其中,phpize是php用于扩展模块的,要在源码目录下运行phpize后才会生成configure文件。
3、运行phpize:
[root@Node5 xcache-3.2.0]% phpize
Configuring for:
PHP Api Version:         20100412
Zend Module Api No:      20100525
Zend Extension Api No:   220100525
4、运行./configure:
[root@Node5 xcache-3.2.0]% ./configure --enable-xcache --with-php-config=/bin/php-config- –enable-xcache,表示编译完成后,启用php的xcache扩展
- –with-php-config=PATH,用于指定php-config文件的路径。
php-config是一个脚本文件,内容是php的配置信息。安装php扩展时需要指定php-config文件的路径。
php-config是由php-devel包提供的,使用rpm包安装的话,php-config默认在/bin目录下(本文的php-devel就是yum安装的)。
此外,xcache是php的一个扩展,所以不要用–prefix指定安装路径。
5、make && make install
6、xcache源码包下提供了xcache的样例配置文件(样例默认的配置就能用),复制到/etc/php.d目录下,xcache才能生效:
[root@Node5 xcache-3.2.0]% cp xcache.ini /etc/php.d/而且如果想让xcache不生效,除了卸载,也正是将其配置文件移到其他位置即可,让php读不到,xcache也就不会生效了。
7、重启httpd(因为本篇php是作为httpd的一个模块的)。
3.3 xcache配置文件
只是看下几个字段的意义,使用默认的就行。
extension = xcache.so # 表示有xcache扩展xcache.size = 60M # 定义使用多大内存作为缓存xcache.ttl = 0 # 默认定义为0表示缓存的内容不按一定时间清除,而是按其他一些算法来清除(比如最近最少使用算法,不知道这里用的什么)其他不赘述了。
3.4 效果
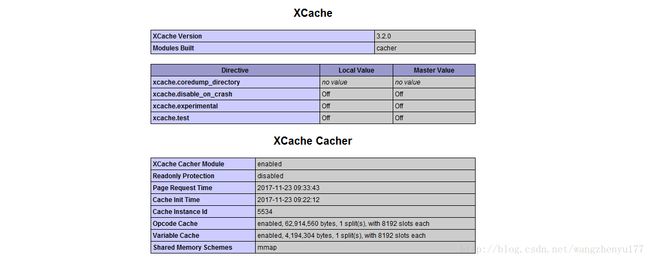
[root@Node5 ~]% systemctl restart httpd.service # 重启httpd使xcache生效此时在phpinfo页面中,就可以看到xcache信息了:
重点在于测试效果,和上述同样数量的并发和请求总数,测试效果:
[root@Node5 ~]% ab -c 100 -n 1000 http://192.168.0.175/pma/index.php
This is ApacheBench, Version 2.3 <$Revision: 1430300 $>
Copyright 1996 Adam Twiss, Zeus Technology Ltd, http://www.zeustech.net/
Licensed to The Apache Software Foundation, http://www.apache.org/

Benchmarking 192.168.0.175 (be patient)
Completed 100 requests
Completed 200 requests
Completed 300 requests
Completed 400 requests
Completed 500 requests
Completed 600 requests
Completed 700 requests
Completed 800 requests
Completed 900 requests
Completed 1000 requests
Finished 1000 requests


Server Software:        Apache/2.4.6
Server Hostname:        192.168.0.175
Server Port:            80

Document Path:          /pma/index.php
Document Length:        8713 bytes

Concurrency Level:      100
Time taken for tests:   4.313 seconds
Complete requests:      1000
Failed requests:        0
Write errors:           0
Total transferred:      10100000 bytes
HTML transferred:       8713000 bytes
Requests per second:    231.88 [#/sec] (mean)
Time per request:       431.262 [ms] (mean)
Time per request:       4.313 [ms] (mean, across all concurrent requests)
Transfer rate:          2287.07 [Kbytes/sec] received

Connection Times (ms)
              min  mean[+/-sd] median   max
Connect:        0    0   1.0      0       4
Processing:    29  399  73.2    409     543
Waiting:       29  398  72.9    409     543
Total:         32  399  72.4    409     543

Percentage of the requests served within a certain time (ms)
  50%    409
  66%    418
  75%    425
  80%    430
  90%    450
  95%    467
  98%    488
  99%    503
 100%    543 (longest request)
可以看到效果比xcache启用之前提升了5倍左右。
(完)
- 本篇只是验证xcache的效果。所以无所谓php使用哪种模式。实际上fastCGI模式比php作为httpd的一个模块,响应速度要好一些 ↩
- 用户对服务端响应的时长也是有要求的,而不是仅仅能得到响应就行 ↩
- 类似httpd的模块,只不过在php中叫做扩展 ↩


