java自定义注解开发_开发自定义Java模块
在你开始前
本教程描述了为TFIM 6.2开发自定义Java™插件的过程。 特别是,本教程将指导您完成自定义安全令牌服务(STS)模块的开发。 它是为具有强大Java开发技能的高级TFIM用户设计的,他们希望学习如何利用TFIM 6.2中引入的OSGi扩展点的功能。
关于本教程
TFIM 6.2引入了一种新方法,使客户可以扩展产品的功能。 TFIM使用与Eclipse平台相同的OSGi运行时模型,公开了几个“扩展点”,这些扩展点允许用户开发自己的自定义代码以在TFIM中运行。 这些扩展点之一(STSModule)允许开发用于信任服务(也称为安全令牌服务或STS)模块的自定义插件。 本教程将带您完成基本自定义信任服务映射模块的完整设计/开发/部署周期。 通过遵循本教程中的步骤,您将学习如何为Tivoli Federated Identity Manager(TFIM)6.2创建定制信任服务插件。 此处描述的示例模块也可通过本教程下载。
目标
在本教程中,您将学习如何为TFIM 6.2开发和部署自定义插件,该插件实现TFIM 6.2中提供的com.tivoli.am.fim.trustserver.sts.STSModule扩展点。 您将学习如何根据需要设计自定义插件,以及如何使用适当的开发环境来创建模块。 本教程中始终使用Rational Application Developer 7.0,但是Eclipse 3.2或更高版本也是创建这些基于OSGi的插件的可行开发平台。 本教程还说明了如何部署和测试已开发到TFIM 6.2运行时环境中的插件jar文件。
先决条件
本教程是为对身份管理概念有高级了解的人员而写的。 您应该具有Tivoli Federated Identity Manager的先前经验,并且对包括TFIM安全令牌服务(STS)和信任服务模块在内的相关概念有很好的理解。 还期望对Java编程语言有深入的了解。
系统要求
要遍历本教程中的示例,您将需要一个合适的开发环境来创建模块:Rational®Application Developer 7或Eclipse 3.2(或更高版本)。 您还将需要TFIM 6.2运行时环境来部署和测试模块(并收集jar来设置开发环境)。
开发,部署和测试自定义模块
本教程描述了为TFIM 6.2环境开发新的自定义Java™插件的分步过程。 它包括部署代码,创建新模块的实例以及通过TFIM控制台将其包含在信任链中的过程。 在本教程末尾还将详细介绍测试和调试过程。
介绍
TFIM 6.2运行时环境使用开放服务网关倡议(OSGi)和Eclipse扩展。 FIM插件现在打包为实现扩展的OSGi捆绑包(以jar文件的形式)。 这些插件可以安装,启动,停止或更新,而无需重新启动JVM。 在TFIM环境中,这些插件安装在
com.tivoli.am.fim.trustserver.sts.STSModule是STS模块必须实现的扩展点接口类。 在TFIM中,术语“模块”和“插件”是同义词,在本教程中将互换使用。
本教程的主要目的是教您有关为TFIM 6.2开发插件的过程,并且以示例方式实现该过程-为TFIM 6.2开发基本的自定义映射模块。 我们创建的模块将允许对STSUniversalUser(STSUU)进行操作。 在“地图”模式下运行时,创建的插件将允许用户配置要包含在输出STSUU中的额外属性和值。 这样做的代码非常基础-重点是了解开发和部署模块所需的过程。
本教程提供了一个可下载的jar文件,作为预期输出的示例。 该jar文件可以作为Eclipse项目直接导入到开发环境中,并且可以用作开发自己的其他STSModule的起点。
本教程还说明了如何在TFIM 6.2环境中部署和测试自定义模块。 为简单起见,映射模块包含在基本信任链中,该链由默认STSUU实例以“验证” STSUU,然后是自定义映射模块以添加额外的属性,最后是另一个默认STSUU实例以“发出”令牌。 “部署”部分将更详细地描述此信任链的创建。 重要的是要注意,本教程中创建的自定义模块可以在任何链中使用。 选择本教程中描述的链是因为其简单性,以演示自定义模块的行为。 我们将使用一个简单的命令行实用工具来驱动自定义链的测试,以将请求发送到Trust Service的SOAP接口。
关键概念
TFIM安全令牌服务
TFIM实现了WS-Trust定义的安全令牌服务(STS)。 STS接收RequestSecurityToken(RST)消息,并返回RequestSecurityTokenResponse(RSTR)消息。 WS-Trust客户端可以访问此服务(通常通过SOAP),并提供了一种方法,通过该方法可以针对不同的令牌类型或值来验证和/或交换身份令牌。 STS执行的实际任务取决于对STS的请求中的参数(RequestSecurityToken或RST),以及TFIM STS中配置的信任链映射与该请求相匹配。 信任链映射将传入的请求映射到信任链。 信任链是执行特定任务的模块的配置列表。 这些任务包括:
- 验证传入令牌
- 将一个身份令牌映射到另一种令牌类型
- 身份令牌中各种值的映射
- 授权书
- 稽核
STS任务的一个示例是获取传入的SAML 1.0令牌并将其交换为LTPA令牌。 为实现此目的而配置的信任链可能是3个模块:
- 验证传入的SAML 1.0令牌(在验证模式下与SAML 1.0令牌模块一起完成)
- 将参数从SAML 1.0令牌映射到可以作为LTPA令牌发布的格式(在映射模式下通过映射模块完成,例如XSLT映射模块)
- 发行新的LTPA令牌(在发行模式下与LTPA令牌模块一起完成)
TFIM STS的模块支持多种现成的令牌类型,但也可以扩展。 如果需要当前不可用的令牌类型,则可以编写模块以支持该令牌类型并将其添加到当前模块中。
如上所述,STS配置包含两个主要构建块:
- 一组信任模块链。 链是信任模块实例的列表,它们构成了处理请求的工作流程。
- 一组信任链映射。 每个映射都将一组链选择标准从传入请求映射到特定的信任模块链。 多个映射可能指向同一条链。 但是,每个映射可能具有链模块的唯一配置参数。
每个WS-Trust请求都包含一个或多个众所周知的参数值(即选择标准),这些参数值必须与TFIM STS中链映射之一的配置相匹配(否则无法处理该请求)。 这些参数的详细信息在表1中描述。
表1. WS-Trust服务请求参数
| 参数 | 描述 |
|---|---|
| 请求类型 | 使用几个规范定义的值之一描述一个请求系列的标识符,例如http://schemas.xmlsoap.org/ws/2005/02/trust/Validate |
| 适用于 | WS-Trust请求涉及的服务或所要求的安全令牌在什么范围内的表示。 通常为URL格式,可以指定为正则表达式。 例如http://finance.itso.ibm.com/CreditService |
| 发行人 | 发出WS-Trust请求的服务组件的实体或类型。 通常为格式。 例如urn:itfim:wesb |
| 令牌类型 | 可选URI,用于描述在对WS-Trust请求的响应中请求的令牌的类型。 例如http://docs.oasis-open.org/wss/oasis-wss-saml-token-profile-1.1#SAMLV2.0 |
信任模块链由一系列模块实例组成。 每个链中的第一个模块负责解析和验证其本机格式的令牌,并将其转换为链中所有其他模块共享的内部XML表示形式。 此XML表示形式称为STSUniversalUser(STSUU)。 来自WS-Trust请求的数据也存储在STS通用用户(STSUU)中。 然后,将STSUU文档在信任模块链中的模块之间传递。 中间模块转换数据,并且链中的最后一个模块负责将数据从STSUU转换为结果所需的令牌类型(必须为XML)。 该令牌作为WS-Trust响应的一部分返回。
图1. WS-Trust令牌请求
可以以几种不同的模式配置模块实例以适合业务需求。 这些模式包括验证,映射,发布,验证,授权等。 验证模式下的模块负责验证身份令牌的真实性。 处于映射模式的人员(例如,使用XSL转换)对通过信任模块链的数据进行转换。 同时,处于发布模式的模块将根据通过信任模块链的数据生成身份令牌。 “其他”是一般的处理模式,例如执行授权。 最低配置的信任模块链可能会将模块配置为验证-映射-发行模式。 可以选择在地图模块之前或之后插入授权模块。 图1显示了具有验证-授权-映射-发行模块的信任模块链。 在需要从多个数据源检索用于标识映射过程的数据的情况下,可能还需要多个地图模块。
TFIM STS支持多种身份令牌类型,包括:
- 用户名
- SAML断言(版本1.0、1.1和2.0)
- RACF门票
- LTPA
- 的Kerberos
- X.509证书
- STSUniversalUser
如果需要,可以使用Java对其他令牌模块进行编码。 代表身份令牌类型的模块通常在验证或发布模式下配置。
图形用户界面
GUIXML描述了STS模块的配置数据。 TFIM控制台使用GUIXML来显示配置面板,包括标签,文本输入字段,复选框,下拉列表等。这允许STSModule的开发人员自描述该模块所需的配置参数,并且TFIM控制台将当在信任链中使用模块时,提示您输入那些配置参数! TFIM不仅会提示您配置参数,还将它们存储在WebSphere配置存储库中,并自动将配置传播到集群环境中的所有节点,这样您的模块就不必担心任何标准配置参数的存储。
本教程末尾有一个参考部分,描述了一组可用的GUIXML小部件 。
在TFIM的早期版本中,GUIXML始终需要java.util.ListResourceBundle 。 在TFIM 6.2,这仍然可以使用,但是,如果该模块是一种语言的标题和说明可以作为使用“titleText”和“titleDescription” <的PageTitle>字符串简单的文本串提供仅使用。
当无法检索ResourceBundle字符串时,将使用“ titleText”和“ titleDescription” 代替或将其作为默认值 。 清单1中显示了示例GUIXML结构。
如果需要国际化,则在TFIM 6.2中更容易包装。 TFIM 6.2不需要为java.util.ListResourceBundle类提供单独的 jar文件(以前的版本中必须将其复制到控制台的安装目录中),TFIM 6.2允许将资源包类与以下文件打包在同一jar文件中STS插件。
清单1. GUIXML示例
	resourceBundleClass="...some Resource Bundle Class"

	titleDescriptionKey="KEY to Resource Bundle Description String"

	titleKey="Key to Resource Bundle Title String"
titleText="This is the text string for the title of this page"
titleDescription="This is the text string for the description of this page"/>
使用OSGi插件框架,更为方便的是,不必手动编写GUIXML-Eclipse开发环境将允许您使用插件开发编辑器来构建GUIXML。
设计模块
定制模块设计
我们将在本教程中构建的自定义模块将被设计为处理STSUU对象。 该模块将具有自我描述的配置(使用GUIXML指定),以收集要添加到STSUU的新属性的名称和值。 如先前在GUIXML关键概念部分所述,GUIXML允许令牌模块描述其自己的配置窗口小部件和参数名称。 在TFIM信任链中使用此映射模块的实例时,将要求用户提供所需的属性名称和值对。
在信任链中使用此自定义模块的实例时,需要配置要添加到STSUU对象的属性的所需名称和值。 在创建链的过程中将提示您执行此配置(如下图2所示)。
图2.配置模块(由GUIXML指定)
与上面的示例配置一样,可以将已部署的信任链中模块的实例配置为向STSUU添加名称为“ testName”和值为“ testValue”的新属性。 注意:这仅是示例属性,每当在链中配置定制模块的实例时,可以将属性名称和值设置为任何值。
图3说明了应用映射模块(带有示例配置)时STSUU对象的操作。
图3.通过自定义模块的实例添加到STSUU的示例属性
开发模块
定制模块开发
本教程的这一部分描述了用于创建自定义模块的开发过程。 它包括准备开发环境,编写代码并将模块打包到一个jar文件中的步骤,这些文件准备好部署到TFIM中。
搭建开发环境
在开始开发定制模块之前,需要适当地配置开发环境。 如前所述,在为TFIM 6.2开发新的插件时,可以使用Eclipse 3.2(或更高版本)或Rational Application Developer 7(RAD 7)。 在本教程中,使用RAD 7环境。
首先,您需要将c:\plugins 。
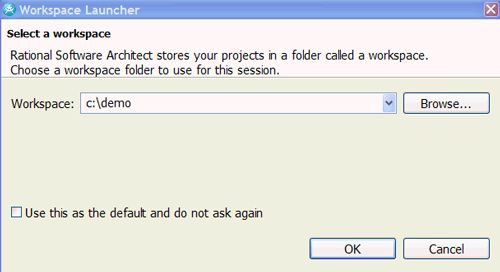
现在您可以启动RAD。 系统将提示您选择一个工作区, 如图4所示。 输入您选择的路径,然后选择确定。
图4.选择工作区
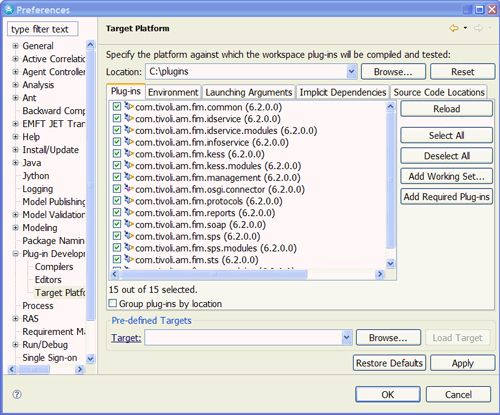
关闭出现的欢迎屏幕。 接下来,我们需要配置IDE目标平台(用于插件开发),以根据在上一步中在本地目录中可用的插件jar文件进行编译。 选择Windows->首选项。 将出现一个“首选项”窗口。 从左侧菜单中选择Plug-in Development-> Target Platform, 如图5所示 。 单击浏览... ,将位置值设置为包含插件的文件夹。 选择确定。
图5.设置目标平台
现在,环境已准备就绪,可以开始开发自定义模块了。
开发定制模块
要创建扩展可用的STS模块扩展点的新插件项目,请选择文件->新建->项目。 “新建项目”向导将启动(请参见下面的图6 )。 选择“插件项目”,然后单击“下一步”继续完成向导。
图6.项目向导
输入com.tivoli.am.fim.demo.map的“项目名称”,并确保正确设置了“项目设置”和所选的“目标平台”, 如图7所示 。 然后,您可以单击下一步继续。
图7.为新的插件项目设置属性
将显示“插件内容”页面,其中包含已配置的“插件属性”, 如图8所示。 您应先取消选中两个“插件选项”,再单击“下一步”。
图8.插件内容向导
下一个屏幕提示您决定是否使用可用模板之一。 我们将在不使用模板的情况下开发自定义模块。 取消选中使用模板的选项, 如图9所示 ,然后单击Finish以完成向导。
图9.模板向导
RAD将提示您打开“插件开发”透视图( 如图10所示)。 点击“是”。
图10.切换透视图
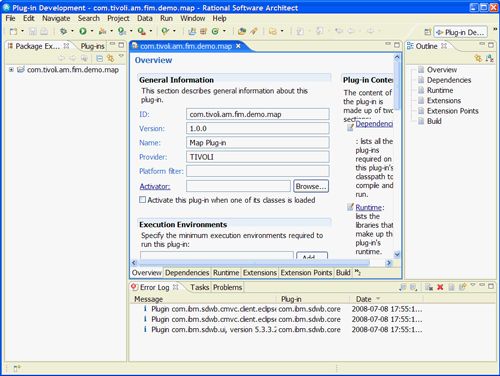
在IDE中打开该项目的新程序包。 Overview选项卡将最初显示在中央面板中(请参阅图11 )
图11.插件清单编辑器
选择“ 依赖关系”选项卡,然后单击“添加”(必需的插件)。 将打开图12中显示的“插件选择”框,并允许您浏览可用的插件。 您需要指定新模块将依赖的软件包。 浏览找到并选择:com.tivoli.am.fim.common(6.2.0.0)和com.tivoli.am.fim.sts(6.2.0.0)。 单击确定。
注意:这两个插件包含在开发扩展STS模块扩展点的新插件时最少需要的密钥类。
图12.选择依赖项
图13显示了更新的Dependencies面板,该面板现在将在Required Plug-ins列表中显示两个选定的插件。
图13.插件清单编辑器
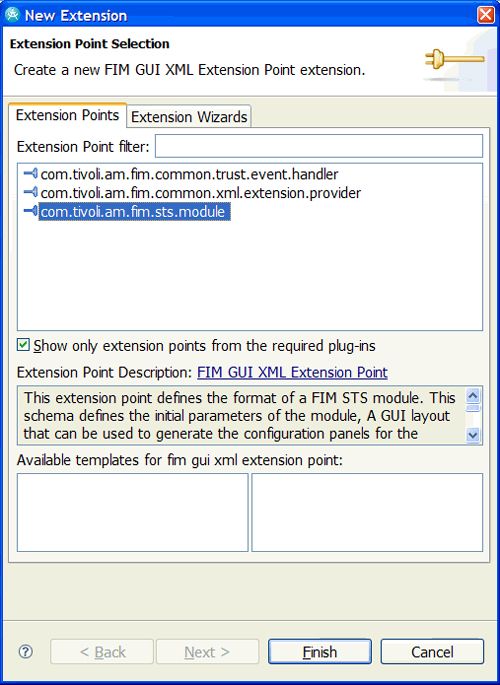
切换到扩展选项卡,然后单击“添加”以创建新的扩展点。 出现New Extension窗口(请参阅图14 )。 选择com.tivoli.am.fim.sts.module (表明我们正在创建一个扩展程序,它将扩展STS模块扩展点,即实现STSModule接口。)单击“完成”。
图14.选择一个扩展点
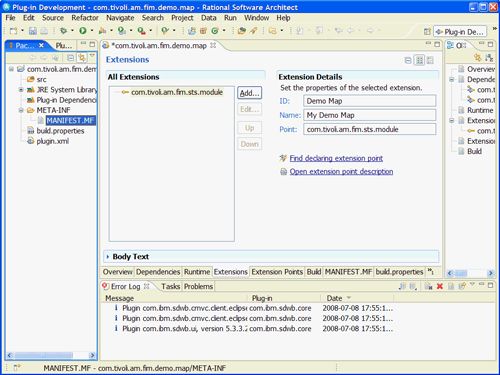
添加的扩展点显示在“扩展”面板中。 现在,您可以设置新扩展名的属性。 输入扩展名的ID和Name的值,如下图15所示。
图15.设置扩展细节
现在,我们可以使用插件编辑器的环境来指定我们的模块配置,包括GUIXML,它将自行描述模块的配置。 创建一个新模块, 如图16所示 。 也就是说,右键单击com.tivoli.am.fim.sts.module扩展,然后选择New-> Module。
图16.创建一个模块
如图17所示,设置以下属性:
- 将暴露类设置为com.tivoli.am.fim.demo.map.DemoMap
- 将版本设置为1.0.0
- 设置supportedModes以映射
- 将legacyModule设置为false
com.tivoli.am.fim.demo.map.DemoMap类将是包含新插件功能的主类,因此将实现STSModule接口。 该类的代码在本教程后面的清单2中显示。
图17.设置模块属性
在开始对定制模块的实现进行编码之前,我们需要为项目创建一个新的Java™包。 右键单击“插件透视图”左侧“程序包资源管理器”中显示的src文件夹。 选择New-> Package(请参阅图18 )。
图18.创建一个新的Java包
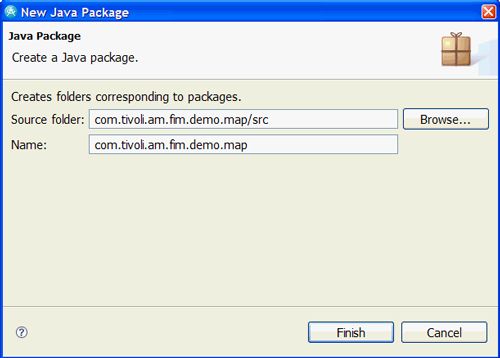
New Java Package向导将启动。 输入软件包详细信息, 如图19所示,然后单击Finish。
图19.新的Java包属性
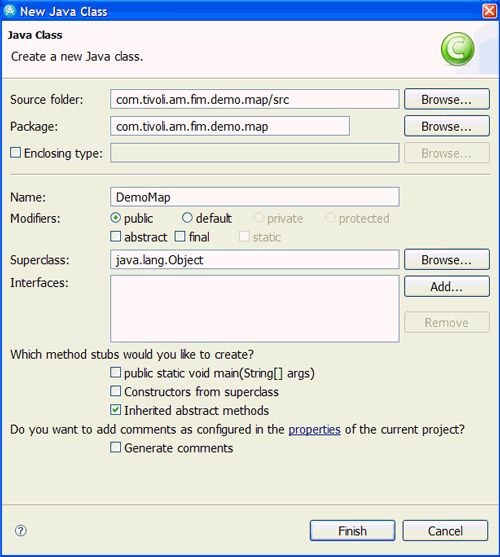
在Package Explorer中右键单击新创建的Java软件包,然后选择New-> Class。 出现如图20所示的New Java Class向导。 输入班级详细信息, 如图20所示。
图20.新的Java类详细信息
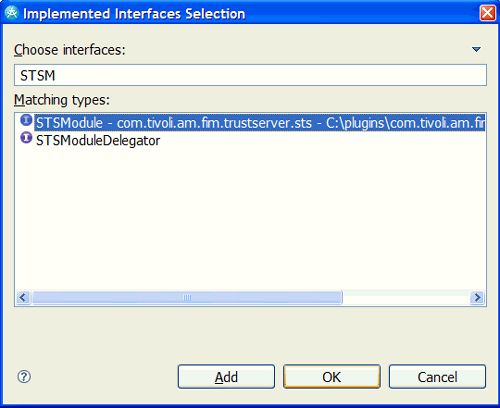
点击“添加”按钮添加一个界面。 将出现“已实现的接口选择”框(请参阅图21 ),以供您选择将由该新类实现的接口。 由于DemoMap将是该插件的主要类,因此您应该选择STSModule接口,然后单击“确定”。 单击完成以完成“新建Java类”向导。
图21.选择已实现的接口
如先前在GUI XML部分中所述,在TFIM 6.2中,您可以将java.util.ListResourceBundle类包括在自定义java模块程序包中,以描述GUIXML消息。 对于本教程中正在开发的插件,我们将其称为ListResourceBundle类DemoMapMessages 。
重复上述过程,以在com.tivoli.am.fim.demo包中创建另一个名为DemoMapMessages新Java类。 确保在“新Java类”屏幕上java.util.ListResourceBundle类设置为java.util.ListResourceBundle并选择“继承抽象方法”。
清单2. DemoMap类
package com.tivoli.am.fim.demo.map;

import java.util.Map;
import java.util.logging.Level;
import java.util.logging.Logger;

import com.tivoli.am.fim.trustserver.sts.STSGroupMembership;
import com.tivoli.am.fim.trustserver.sts.STSMode;
import com.tivoli.am.fim.trustserver.sts.STSModule;
import com.tivoli.am.fim.trustserver.sts.STSModuleException;
import com.tivoli.am.fim.trustserver.sts.STSRequest;
import com.tivoli.am.fim.trustserver.sts.STSResponse;
import com.tivoli.am.fim.trustserver.sts.STSUniversalUser;
import com.tivoli.am.fim.trustserver.sts.uuser.Attribute;

public class DemoMap implements STSModule {

  final static String CLASS = DemoMap.class.getName();

  final static String CONFIG_ATTRIBUTE_NAME = "mymap.attribute.name";

  final static String CONFIG_ATTRIBUTE_VALUE = "mymap.attribute.value";

  final static String ATTR_TYPE = "";

  Logger _log = Logger.getLogger(CLASS);

  public void destroy() throws STSModuleException {
    // nothing to do here
  }

  public void init(Map arg0) throws STSModuleException {
    // nothing to do here
  }

  public boolean invoke(STSMode mode, STSRequest request, STSResponse response)
    throws STSModuleException {
    String methodName = "invoke";
    _log.entering(CLASS, methodName);

    try {
      if (STSMode.MAP == mode) {
        doMap(request, response);
      }
    } finally {
      _log.exiting(CLASS, methodName);
    }
    return true;
  }

  void doMap(STSRequest request, STSResponse response)
    throws STSModuleException {
    String methodName = "doMap";
    _log.entering(CLASS, methodName);

    try {
      //get configuration
      STSGroupMembership config = request.getRequestGroupMembership();
      String attributeName = config.getSelfProperty(CONFIG_ATTRIBUTE_NAME);
      String attributeValue = config.getSelfProperty(CONFIG_ATTRIBUTE_VALUE);

      // access the STSUU that we intend to update
      STSUniversalUser uuser = response.getSTSUniversalUser();

      // trace
      _log.logp(Level.FINEST, CLASS, methodName, "Starting user: "
        + uuser.toString());
      _log.logp(Level.FINEST, CLASS, methodName, "Adding attribute ("
        + attributeName + "," + ATTR_TYPE + "," + "{"
        + attributeValue + "}");

      // create a new attribute and add it
      Attribute a = new Attribute(attributeName, ATTR_TYPE,
        new String[] { attributeValue });
      uuser.addAttribute(a);

      // more trace
      _log.logp(Level.FINEST, CLASS, methodName, "Final user: "
        + uuser.toString());
    } finally {
      _log.exiting(CLASS, methodName);
    }
  }
}
这时值得看一下实现代码的一些细节。 特别是, com.tivoli.am.fim.trustserver.sts.STSModule接口中包含三种方法:
- init(Map params) -该模块被调用一次。 如果您有用于“初始”配置参数的配置页面,则这些参数的值将在映射中传递。 映射是String-> String [],因为每个参数都可以支持值数组。 在我们的示例中,我们将没有任何init参数,因此init方法无需执行任何操作。
- invoke(STSMode模式,STSRequest请求,STSResponse响应) -此方法是模块的主要工作,只要执行使用我们模块的信任链,就会调用此方法。 该模式代表模块的调用模式,将成为我们先前定义的模块支持的模式之一 (请参见图17中的Supported Modes参数)。 request对象将使您可以访问有关传入请求的各种属性,包括访问
doMap()方法中演示的配置参数。 响应对象用于设置响应属性,特别是在此演示中,它允许访问STSUU。 - destroy() -当模块的生命周期结束时,将为模块调用一次此方法。
DemoMapMessages类存根将包含从ListResourceBundle超类继承的getContents()方法。
清单3. DemoMapMessages类
package com.tivoli.am.fim.demo.map;

import java.util.ListResourceBundle;

public class DemoMapMessages extends ListResourceBundle {

  protected Object[][] getContents() {
    return contents;
  }

  static final Object[][] contents = {
    {"DEMO_TITLE", "My Map Configuration"},
    {"DEMO_DESCRIPTION", "Please enter the configuration parameters for My Map"},
    {"TITLE_ATTRIBUTE_NAME", "The name of the attribute to add to the STSUniversalUser"},
    {"TITLE_ATTRIBUTE_VALUE", "The value of the attribute to add to the STSUniversalUser"}
  };
}
如清单3所示 ,我们添加了代码以返回一个多维数组,该多维数组实质上包含“名称/值”对的列表,GUIXML可以通过该数组来对模块的自我描述的配置进行访问。 本节的其余部分详细介绍如何在RAD中创建模块的GUIXML配置。
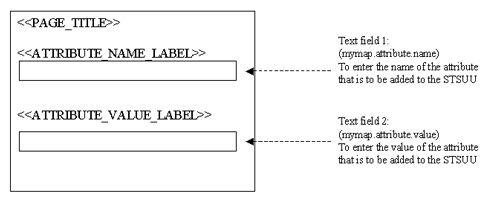
您可以在扩展选项卡中为自定义模块描述所需的GUI配置页面。 对于我们正在创建的插件,我们只需要一个具有适当标题的Page元素和一个包含两个文本字段的PageLayout容器,即可输入要添加到STSUU的属性的详细信息。
图22展示了针对我们的自定义模块的GUI进行配置的拟议设计草图:
图22.演示地图模块的示例GUI设计
第一步是创建Page元素。 单击您之前添加的扩展名以突出显示它。 右键单击并选择新建->页面。 然后,您可以右键单击出现在All Extensions面板中的新Page,并选择创建一个新的PageInfo元素, 如图23所示。
图23.创建PageInfo
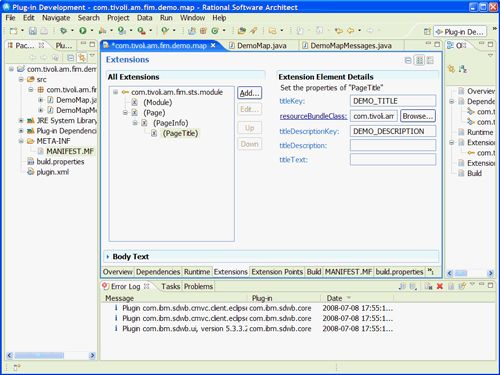
现在,您应该向刚创建的PageInfo元素添加PageTitle。 我们希望模块使用的ResourceBundle类是我们创建的DemoMapMessages类,用于描述新插件的消息。 即,为resourceBundleClass输入值com.tivoli.am.fim.demo.map.DemoMapMessages 。 同时, titleKey和titleDescriptionKey值应分别设置为DEMO_TITLE和DEMO_DESCRIPTION。 注意:这两个键在DemoMapMessages类中的getContents()方法返回的多维数组中可用。
图24.页面标题属性
下一步是将PageLayouts容器添加到Page中(右键单击Page并选择New-> PageLayouts)。 然后,可以将PageLayout元素添加到刚创建的PageLayouts容器中, 如图25所示。
图25.创建一个PageLayout
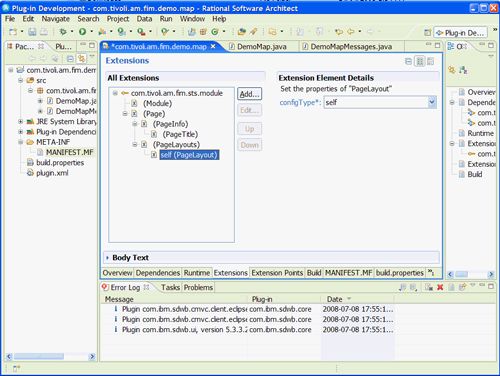
您应该在可用的下拉框中将configType更改为“ self”(请参阅图26 )。
注意:有三种可用的页面布局模式:“ init”,“ self”和“ partner”。 不论模块实例在哪个链上使用,“ init”都将被使用一次。模块在特定于模块的情况下使用“ self”和“ partner”模式,即模块代码决定何时何地从中查找它们。 由于在STS链中将某些模块用于联合单点登录的方式不同,因此“自我”与“合作伙伴”之间存在逻辑上的分隔。 创建模块实例时,TFIM控制台将提示您输入“ init”属性。 当模块构建到链中时,它将提示输入“ self”和“ partner”属性。
图26.创建一个“自我” PageLayout
下一步是定义我们要添加到PageLayout的小部件。 对于我们的自定义模块设计,我们想向PageLayout添加两个带有适当组件标签的文本字段。 这些文本框将允许用户配置属性详细信息(名称和值),在地图模式下,我们的自定义插件应将其添加到STSUU中。
您添加到PageLayout的每个小部件都允许您指定“模式”值。 “ modes”值用作过滤器,并应在此参数指示(以逗号分隔的列表中)为您的模块配置的一种或多种调用模式(例如,验证,映射,发布,交换,授权等)。是必需的。 如果以此列表中指定的模式配置模块,则在配置过程中将提示输入参数。 如果未以“模式”列表中指定的模式配置模块,则假定在该模式下不需要此参数,并且控制台不会提示您输入该参数。
对于我们的项目,在配置模块时,我们将选择“ map”作为模式,这应该是自自定义插件以来要添加的每个文本字段在“ modes”字段中使用的模式。设计为仅在映射模式下运行。
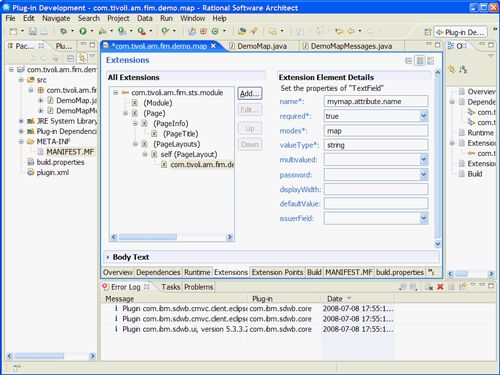
我们创建的两个文本字段都将被指定为带有字符串值的必填字段。 要创建第一个文本字段,请右键单击刚创建的self(PageLayout)元素,然后选择New-> TextField。 设置“名称”,“必需”,“模式”和“ valueType”的值, 如图27所示。
图27.为属性名称添加一个TextField
现在可以将组件标签添加到此“ mymap.attribute.name”文本字段。 右键单击textField并选择New-> ComponentLabel。 输入以下值:
- textLabel:属性名称
- ResourceBundleClass: com.tivoli.am.fim.demo.map.DemoMapMessages
- ResourceBundleKey: TITLE_ATTRIBUTE_NAME
图28显示了mymap.attribute.name文本字段的ComponentLabel的配置。
图28.添加组件标签
现在,我们需要创建第二个textField,以配置属性值。 使用以下值在PageLayout上创建另一个textField:
- 名称: mymap.attribute.value
- 必填: true
- 模式:地图
- valueType:字符串
使用以下配置将组件标签添加到此mymap.attribute.value TextField:
- textLabel:属性值
- ResourceBundleClass: com.tivoli.am.fim.demo.map.DemoMapMessages
- ResourceBundleKey: TITLE_ATTRIBUTE_VALUE
这样就完成了插件的开发,包括所有必需的源代码。 从本质上讲,我们已经开发了一个plugin.xml文件(包含模块的所有配置,包括GUIXML)和两个Java类DemoMap (包含模块的实际Java代码)和DemoMapMessages (包含国际化字符串)。
包装模块
定制模块包装
现在,我们已经完成了自定义模块的开发,我们需要将其打包到一个jar文件中,该文件可以部署到我们的TFIM 6.2环境中。 我们将插件项目导出到jar文件中。
在Package Explorer面板中的项目上单击鼠标右键,然后选择“导出”。 导出向导将启动, 如图29所示。 选择Java™-> JAR文件,然后单击下一步。
图29.导出一个罐子
定义应将哪些资源导出到JAR中,并输入适当的导出目的地, 如图30所示 。 单击下一步转到下一个屏幕。
注意:建议使用以下命名约定:
图30. Jar导出属性
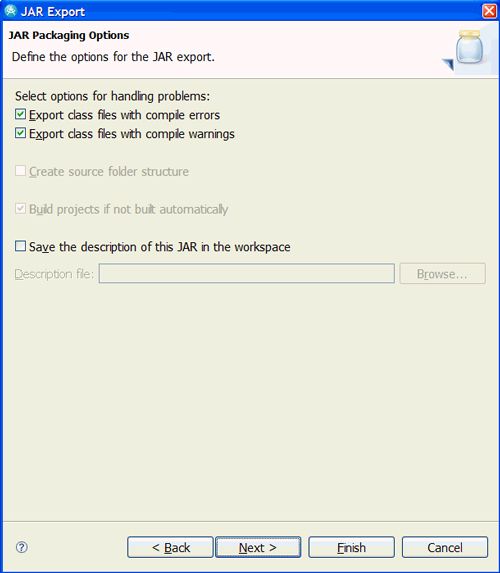
出现图31中显示的“ JAR包装选项”屏幕。 将设置保留为默认设置。 点击下一步。
图31.更多的Jar导出属性
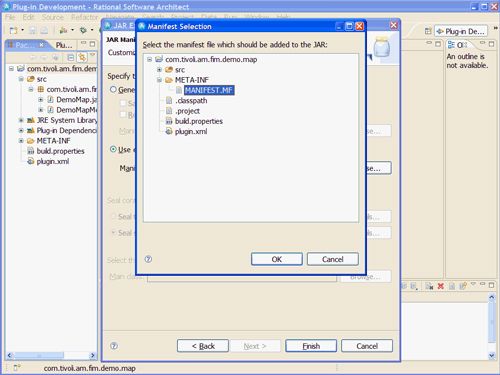
下一个屏幕允许您配置JAR清单规范。 选择使用工作空间中的现有清单并从插件项目中导航到清单文件非常重要(请参见图32 )。 单击确定。
图32.选择项目的MANIFEST.MF
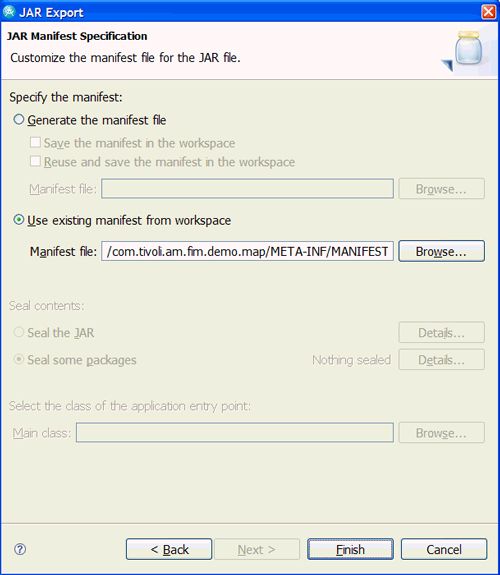
在“ JAR清单规范”屏幕上单击“完成”(如图33所示)以完成“ JAR导出向导”。
图33. Jar清单规范
现在将在导出向导期间指定的导出目标中创建自定义模块JAR,即C:\ temp \ com.tivoli.am.fim.demo.map_1.0.0.jar
部署模块
自定义模块部署
本节介绍如何将自定义模块部署到TFIM 6.2中。
首先,将定制模块jar文件com.tivoli.am.fim.demo.map_1.0.0.jar复制到
- 通过TFIM控制台发布插件
- 重新加载TFIM运行时*
- 创建我们的自定义模块的实例
- 配置使用新插件的信任链
本节的其余部分将更详细地描述这些步骤。
*注意:在TFIM的早期版本中,必须重新部署TFIM运行时,以便检测更改并将更改加载到
TFIM 6.2提供了“发布插件”功能,该功能将jar文件从托管TFIM管理应用程序的服务器上的
The 'Publish Plug-ins' operation does not reload the TFIM Runtime, but it does reload the TFIM Management application. The console will indicate when updated plug-in data is detected in the plug-ins directory with a message prompting a re-load.
The TFIM runtime must be explicitly reloaded before the new plug-in(s) can be used. The prompt can generally be ignored until all the necessary configuration required for the new plug-in is complete.
Publish the plug-in
Log in to TFIM console: https://< ip_address >:9043/ibm/console/. The TFIM Console shown in Figure 34 will be displayed.
Figure 34. The WebSphere / TFIM Console
Expand the Tivoli® Federated Identity Manager options and select Domain Management -> Runtime Node Management. Figure 35 shows the Runtime Management panel.
Figure 35. Publishing Plug-ins with the Runtime Node Management Panel
Click on the Publish plug-ins button.
Load the configuration changes
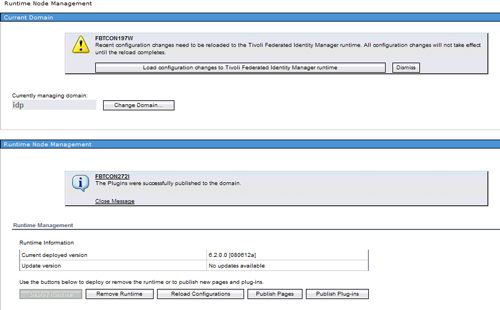
Once the Publish plug-ins operation completes, a warning message will be displayed in the TFIM Console prompting you to load the recent configuration changes, as shown in Figure 36 .
Figure 36. Load Configuration Changes
Click on the Load configuration changes to Tivoli Federated Identity Manager runtime button and wait for the process to complete.
Create an instance of the custom module
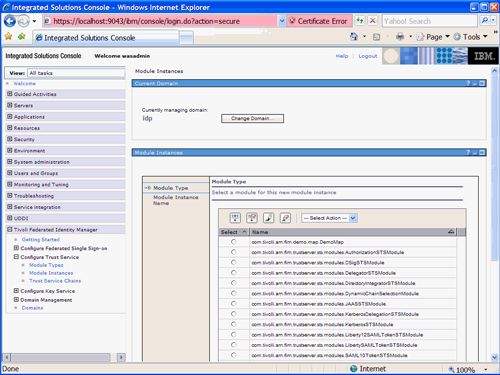
Create an instance of module in the TFIM Console. Navigate to the Configure Trust Service -> Module Instances section of the Management Console. Click on the Create button. A Module Type screen as shown in Figure 37 will appear. The DemoMap class that defines our custom module should be included in the list of available modules. Note that it may appear on the second page.
Figure 37. Module Types
Select the DemoMap module, then click Next as shown in Figure 38 .
Figure 38. Selecting the DemoMap Module Type
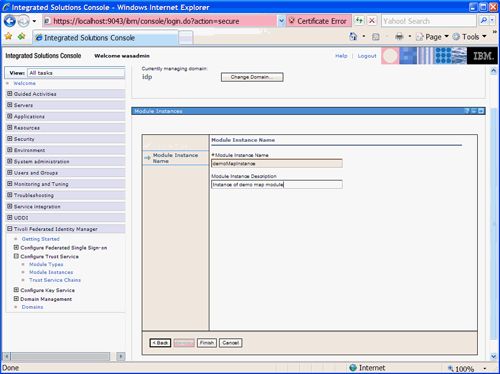
Enter a name and description for the new instance being created as illustrated in Figure 39 .
Figure 39. Naming the new Module Instance
Click Finish and then re-load the configuration changes to TFIM runtime as prompted.
Create a Trust Service Chain
We can now create new Trust Service Chains that include the 'demoMapInstance' of our custom module.
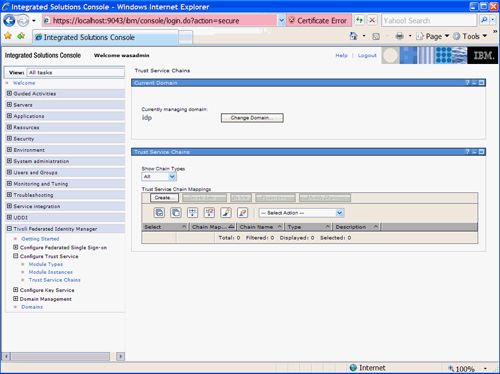
Navigate to the Configure Trust Service -> Trust Service Chains section of the Management Console. A Trust Service Chains panel as shown in Figure 40 will be displayed.
Figure 40. Trust Chain Management
Click on the Create button and the Trust Service Chain Mapping Wizard will begin. Figure 41 shows the Introduction screen for this wizard.
Figure 41. Trust Chain Wizard
Click Next to proceed to the Chain Mapping Identification screen, as shown in Figure 42 . Enter the following values for our basic trust chain and then click Next:
- Chain Mapping Name: DemoChain
- Description: Test DemoMap module instance
Figure 42. Chain Mapping Identification
The next screen allows you to configure the Chain Mapping Lookup properties. The RequestType for our chain should be set to Validate and addresses for AppliesTo and Issuer need to be entered as shown in Figure 43 .
Figure 43. Chain Mapping Lookup Parameters
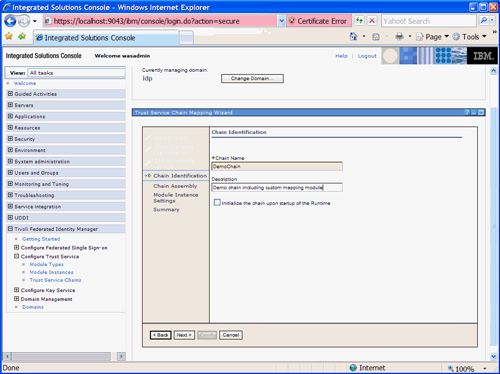
Click Next and the Chain Identification details can be entered:
- Chain Name: DemoChain
- Description: Demo chain including custom mapping module
Figure 44. Chain Identification
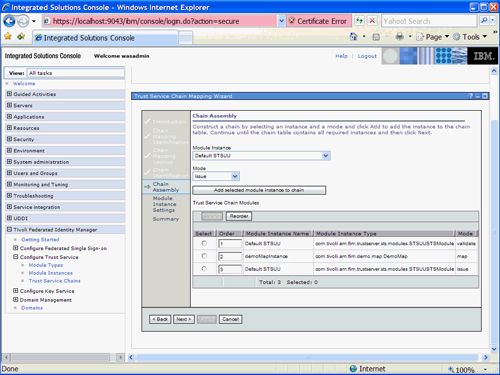
点击下一步。 We can now specify the Chain Assembly. For simplicity in this tutorial we have decided to include the custom mapping module in a basic trust chain consisting of a Default STSUU Instance in 'validate' mode, followed by the custom module in 'map' mode to add an extra attribute and finally another Default STSUU Instance to 'issue' the token.
Add these selected module instances to the chain so that the created chain assembly appears as illustrated in Figure 45 .
Figure 45. Chain Assembly
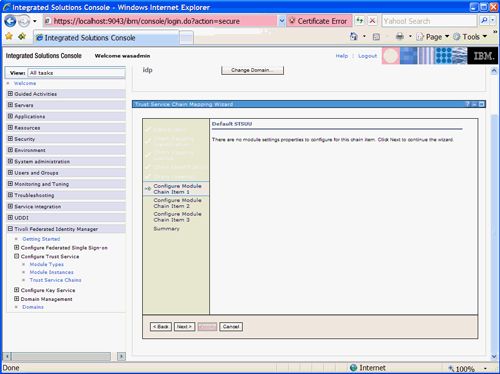
Click Next to continue. The next screen in the Wizard, as shown in Figure 46 , is the configuration screen for the first module in the chain. This module is the Default STSUU instance in validation mode. There is no configuration required for this module.
Figure 46. STSUU Validate Properties
Click Next and the configuration screen of our custom module will be displayed as shown in Figure 47 . Enter the name and value for the attribute that should be added to the STSUU object. For this tutorial we will add a test attribute with name 'testName' and value 'testValue'.
Figure 47. DemoMap Configuration Properties
点击下一步。 The next screen in the Wizard is the configuration screen for the last module in the chain, as shown in Figure 48 . This module configuration is also for the Default STSUU instance (this time in issue mode). Once again, there is no configuration required.
Figure 48. STSUU Issue Properties
Click Next and a summary of the new trust chain is displayed as shown in Figure 49 .
Figure 49. Chain Summary
Click Finish to complete the wizard. Click on the button to load the latest configuration changes into the TFIM runtime.
Figure 50. Created Chain
Figure 50 above shows the new chain which appears in the TFIM console.
Testing the module
Custom module testing
In order to test our module, we need a way to send a WS-Trust request (RST) to the STS. A simple command line utility called cURL can be used (as a command-line browser) to send a canned SOAP message to the TFIM STS. Create a file called rst.xml with the following content:
Listing 4. rst.xml
      http://schemas.xmlsoap.org/ws/2005/02/trust/Validate


        http://issuer/demo


          http://appliesto/demo


            demoName
Notes on the rst.xml file:
- The
wst:RequestTypeshould be set to Validate (since the TrustChain was configured for Validate requests. - The Issuer Address must have an address value that matches the Issuer value filled in when configuring the chain
- The AppliesTo Address must have an address value that matches the AppliesTo value filled in when configuring the chain
- This RST and our example chain do not make use of the optional TokenType for chain matching
In order to invoke the STS with the RST, use a curl command similar to that shown below:
curl --header "soapaction: anything" --data-binary @rst.xml "http://localhost:9080/TrustServer/SecurityTokenService"
The result from the TFIM STS should be a RequestSecurityTokenResponse (RST), similar to that shown here (note - some portions of the response have been removed from this listing for brevity):
Listing 5. rstr.xml
      ...


              demoName


                testValue


        ...


      http://schemas.xmlsoap.org/ws/2005/02/trust/status/valid
故障排除
Debugging and trace
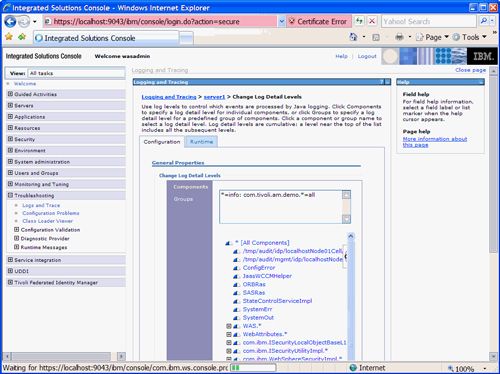
As you may have noticed in the source code in Listing 2 , the demonstration code for the DemoMap class makes use of the java.util.logging.Logger class and infrastructure for trace output. This allows for runtime tracing using standard WebSphere® configuration for trace settings and output. For example, on the WebSphere node where the TFIM runtime is executing, use the WebSphere administration console to navigate to Troubleshooting->Logs and Trace->server1->Change Log Detail Levels and update the Runtime or Configuration tab trace string to include "com.tivoli.am.fim.demo.*=all" and you will be able to observe all the trace output available from our demonstration code in the WebSphere trace.log for the server. Refer to Figure 51 below.
Figure 51. Configuring trace setting
More information on configuration of WebSphere tracing is available in the WebSphere Information Center
Debugging loading problems via the OSGi console
In addition to updating the WebSphere log levels to obtain more detailed trace, TFIM also provides an OSGi console to help you debug any plug-in loading problems. The OSGi console should only be used for debugging purposes and should be disabled after the problem is fixed. Enabling the OSGi console will open a new port on your application server and posts a security risk if left accessible. To enable the OSGi console, you'll need to modify the ITFIMRuntime application's launch.ini file:
- Open the launch.ini file which is located at
/installedApps/ / ITFIMRuntime.ear/com.tivoli.am.fim.war.runtime.war/WEB-INF/eclipse/launch.ini - Uncomment the property osgi.console.port and set its value to an unused port on your server (eg osgi.console.port=8888)
- Save the file and restart the WebSphere Application Server
When the application server is restarted, TFIM will launch the OSGi console at the port you specified. OSGi console is a command line interface that allows to you view the bundle status in the OSGi runtime and manage the bundles' life cycle. From a terminal or command prompt, use the telnet command to access the OSGi console:
telnet localhost 8888
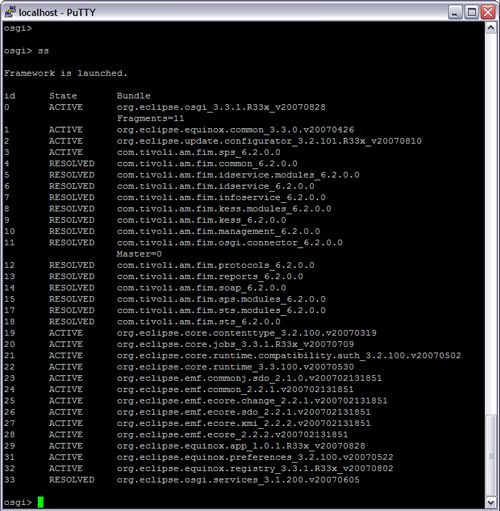
This will open the OSGi prompt. To get a list of commands you can execute, enter 'help' command at the OSGi prompt. To exit from the OSGi console, use the 'disconnect' command. DO NOT use the 'exit' or 'stop' command because they may crash the WebSphere Application Server. For debugging potential bundle loading problems, first use the 'ss' command to display a list of installed bundles in the OSGi runtime and their states.
Figure 52. A list of installed OSGi bundles in the TFIM Runtime
An OSGi bundle's state can be either INSTALLED, RESOLVED, STARTING, ACTIVE, STOPPING, or UNINSTALLED. Typically, if your bundle is loaded correctly, it will be in the RESLOVED state at WebSphere start up. However, if the OSGi runtime encountered any exceptions or errors while loading your bundle, the bundle will be left in the INSTALLED state. To view the exception of starting a bundle in the INSTALLED state, run the command 'start
One common problem with loading your custom bundle is that your bundle uses a new package from the WebSphere container, but you forgot to export that package via the com.tivoli.am.fim.osgi.connector_6.2.0.0 MANIFEST.MF (see Advanced Development Considerations ). For example, suppose when you try to start your custom bundle, and the following exception occurs:
"org.osgi.framework.BundleException: The bundle could not be resolved.
Reason: Missing Constraint: Require-Bundle: com.tivoli.am.fim.common; bundle-version="0.0.0"... blah blah blah...!MESSAGE Bundle initial@reference:file:plugins/com.tivoli.am.fim.sps_6.2.0.0.jar/ was not resolved"
The error basically says, "I cannot resolve your bundle because the com.tivoli.am.fim.common bundle is missing", which is a misleading message because the com.tivoli.am.fim.common bundle does exist in the runtime and the plugins directory. The real cause of the problem is likely to be "I cannot resolve your bundle and the com.tivoli.am.fim.common bundle". The com.tivoli.am.fim.common is the first bundle that needs to be resolved because all other bundles depend on it. Since common only depends on packages from external libraries in the J2EE container, problems with find these packages will cause a failure.
To resolve this problem, run the 'start' command on the com.tivoli.am.fim.common bundle, and a new exception should be displayed that indicates which packages you are really missing. Follow the steps shown in Advanced Development Considerations to update the MANIFEST.MF file of the com.tivoli.am.fim.osgi.connector_6.2.0.0 bundle with the missing packages.
Restarting the OSGi engine of the TFIM Runtime and Management Service
Recall that when you update your custom plug-in and republish the plug-ins, the TFIM console prompts you to reload the configuration change (see Figure 36 ). The same ITFIM Runtime reload functionality can be executed directly by using the "Reload Configurations" button on the Runtime Node Management panel. Think of this operation as clearing any memory cache and restarting the ITFIM Runtime without restarting the WebSphere Application Server.
In addition to reloading the ITFIM Runtime configurations, you may also reload the ITFIM Management Service configurations via the ITFIM console. This is useful if the plug-in you added is not showing up in the ITFIM console.
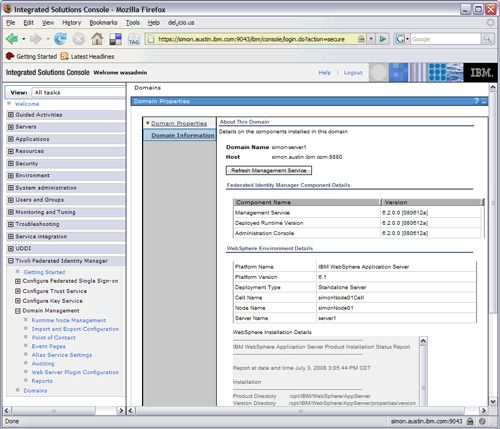
To reload the Management Service configurations, go to Domains panel, select your domain and click Properties. Select the Domain Information tab, and click "Refresh Management Service", as shown in Figure 53 :
Figure 53. Reloading the OSGi runtime for the Management Service
Advanced development considerations
Class loaders and calling WebSphere or J2EE-container-provided libraries
Plug-ins written for Tivoli® Federated Identity Manager 6.2 operate in an OSGi runtime environment. In this environment, each plug-in uses its own class loader, and this class loader doesn't automatically provide access to java packages and classes from the J2EE container. This means that if you try to access many standard WebSphere® or J2EE™ capabilities, you will likely encounter class loading issues. In this section we will demonstrate how to access WebSphere and other J2EE or external classes from within a plug-in.
The TFIM OSGi runtime environment uses a special bundle called com.tivoli.am.fim.osgi.connector_6.2.0.0 to declare exports from WebSphere and other standard libraries that may be used by other plug-ins (including your own custom plug-in). Many of the standard packages your module may wish to import will already have been declared in the com.tivoli.am.fim.osgi.connector_6.2.0.0 bundle. To see the existing set of imports, look at the file
In your development environment, the Plug-in Target Platform includes the com.tivoli.am.fim.osgi.connector_6.2.0.0 bundle expanded. Whilst this lists all the classes exported for use in other plug-ins as they will be available in the WebSphere runtime, your development environment does not have immediate access to all the libraries that contain the actual classes. This means that your development environment will show compile time errors trying to reference libraries that are only available once the plug-in is deployed. To fix this problem in your development environment, we have a procedure which will allow you to resolve the classes you need, and build in a "clean" development environment. The procedure also shows you how to generate an updated MANIFEST.MF (if necessary) to replace the MANIFEST.MF in the existing com.tivoli.am.fim.osgi.connector_6.2.0.0 expanded bundle. The MANIFEST.MF update is only necessary when you wish to use classes that are provided by the WebSphere J2EE container (or are in the WebSphere JRE's classpath) but which are not already listed in the MANIFEST.MF .
Resolving container-provided classes in your development environment with the TFIM SDK project
This section outlines the process for setting up and working in your development environment with a plug-in that wishes to use container-provided classes that are not a part of the standard J2SE API's. To illustrate the process we will make a small modification to our demonstration mapping module which will have it utilize TAM API's to set an extra attribute in the STSUU for the TAM user's first name. The TAM API's are found in PD.jar , which is available to the container at
Listing 6. TAM code to be added to the DemoMap.java mapping module
...
import com.tivoli.pd.jutil.PDContext;
import com.tivoli.pd.jutil.PDMessages;
import com.tivoli.pd.jadmin.PDUser;
...

try {
  // get the PDUser
  PDContext pdc = new PDContext(
  new java.net.URL("file:///path_to_tam_config_file"));
	PDMessages msgs = new PDMessages();
	PDUser pdu = new PDUser(pdc, uuser.getPrincipalName(), msgs);
	msgs.clear();

  // add the firstname as an attribute
  Attribute fn = new Attribute("FirstName", ATTR_TYPE,
    new String[] { pdu.getFirstName() });
  uuser.addAttribute(fn);
} catch (Exception e) {
	// oh well, just don't add it
}
Note that in this particular case the packages to be imported ( com.tivoli.pd.jutil and com.tivoli.pd.jadmin ) are already exported in the com.tivoli.am.fim.osgi.connector_6.2.0.0 MANIFEST.MF, so we will not need to update that file. Even though we do not have to update it, the process below will demonstrate how to update the MANIFEST.MF so that you have the complete procedure.
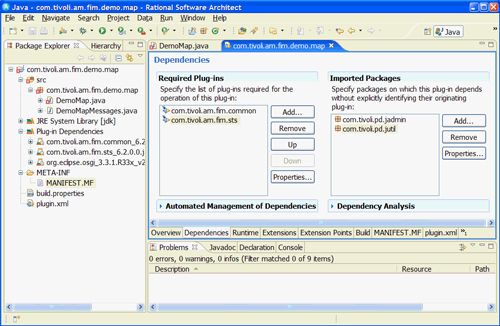
First we need to tell our plug-in that we will be using these classes from another package. To do that, open the MANIFEST.MF of the project, and switch to the Dependencies tab, and add the TAM packages to the Imported Packages list, as shown here:
Figure 54. Importing container packages to MANFIEST.MF
Now let's see what happens if we just try to import the classes and update the code:
Figure 55. Errors importing container packages
This is clearly not good - as the classes should be available in the runtime environment. We could try to add PD.jar directly to the project, and update the project's classpath to use the local copy, however this is not the right thing to do for packages which will be provided from the runtime execution environment. Instead, you should follow these instructions:
- Copy com.ibm.ws.runtime_6.1.0.jar and com.ibm.wsspi.extension_6.1.0.jar from
/plugins - Reload your Target Platform under Window->Preferences->Plug-in Development->Target Platform
- Obtain the com.tivoli.am.fim.sdk.zip file found in the Downloads section of the tutorial, then expand it and import into your workspace as an existing project.
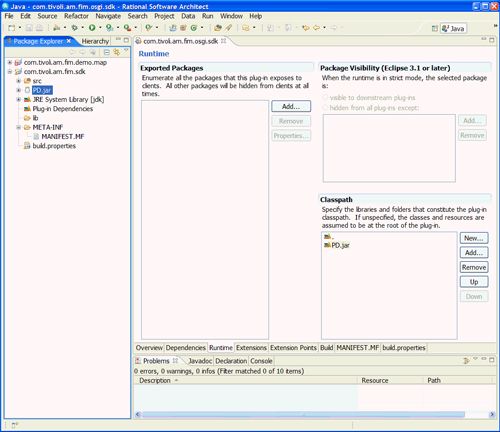
- Copy the third-party jars needed by your custom plug-in into the com.tivoli.am.fim.sdk project, and use the Plug-in Manifest Editor to add the jars to the sdk bundle's Bundle-ClassPath. This is done on the Runtime tab under Classpath:
Figure 56. Updating the SDK classpath
This brings us to an interesting point - what if you know the packages for the classes you wish to use and can see they are exported in the MANIFEST.MF from the com.tivoli.am.fim.osgi.connector_6.2.0.0 bundle, but are not sure of the JAR files that contain the classes so that you can add it to the SDK project?
To aid with that process we have included in the Downloads section a special text file called osgiconnector_exports_to_jar_map.txt which contains a mapping of which JAR's a particular package's classes can be found in. Use this file for reference if you need to locate the JAR file that contains the classes you wish to use. - Export the packages needed by your custom plug-in in the sdk bundle's Manifest. This is done with the Plug-in Manifest Editor on the Runtime tab under Exported Packages:
Figure 57. Updating the SDK exported packages
- Expand your custom plug-in project in the Java or Plug-in Development perspective, and verify if the sdk project is automatically listed under your plug-in project's Plug-in Dependencies list. If com.tivoli.am.fim.sdk is not, but org.eclipse.osgi bundle is listed, you will still have compile errors in your custom plug-in, as shown here:
Figure 58. SDK not in dependencies
To fix this in the Eclipse 3.3 IDE, go to Windows->Preferences->Plug-in Development->Target Platform. Uncheck org.eclipse.osgi from the list of plug-ins and click "OK".
To fix this in the Eclipse 3.2 IDE (including Rational Software Architect 7) go to Windows->Preferences->Plug-in Development->Target Platform. Uncheck org.eclipse.osgi from the list of plug-ins and click "Apply", then recheck the org.eclipse.osgi plug-in, and click "OK". You will have to do this again whenever you restart Eclipse 3.2.
Your custom plug-in project's Plug-in Dependencies should now show com.tivoli.am.fim.sdk instead of org.eclipse.osgi, and your compile errors should have resolved, as shown here:Figure 59. SDK in dependencies
Now the plug-in is resolved, and can be exported (after filling in the correct path for the TAM configuration file of course) and deployed and it will run successfully in the TFIM runtime environment.
Essentially what has been done with the above process is to use the Export-Package list in the MANIFEST.MF of com.tivoli.am.fim.sdk project as a subset of the runtime-available list in the com.tivoli.am.fim.osgi.connector_6.2.0.0 project. We only add to the sdk project the subset of available container-provided jars, and export the particular packages we need. Typically com.tivoli.am.fim.osgi.connector_6.2.0.0 will be a superset of the jars/packages you use in your SDK project. The SDK project exists only to resolve build-time packages.
Whilst in this case there was no need to add new packages to the Export-Package list of the com.tivoli.am.fim.osgi.connector_6.2.0.0 MANIFEST.MF (because the dependent packages were already exported), there may be rare occasions when you know of a container-available package that is not already listed. If that is the case, you may add the package you need to the MANIFEST.MF yourself. This should be done in the MANIFEST.MF , there is a utility application built into the com.tivoli.am.fim.sdk project which will take as parameters the existing com.tivoli.am.fim.osgi.connector_6.2.0.0's MANIFEST.MF and your SDK's MANIFEST.MF and compute the union of the exported packages and generate a new MANIFEST.MF for you with all the packages. You do not need to use this utility, but it is provided for convenience including fully commented, self-documenting source. You can run this utility (a simple Java command-line program) straight from the IDE if you wish, and that is what will be demonstrated here.
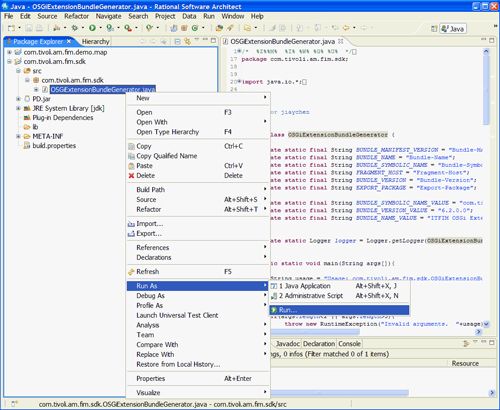
To invoke the MANIFEST.MF generation application, open a Java Perspective in the IDE, and in the Package Explorer navigate to OSGiExtensionBundleGenerator.java , right-click, and select Run As->Run, as shown in Figure 60:
Figure 60. Invoking OSGiExtensionBundleGenerator
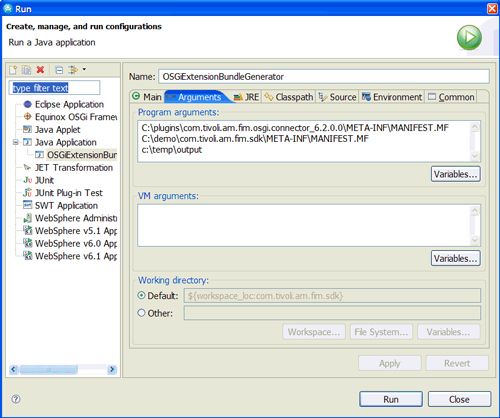
You then need to enter the program arguments. The first parameter is the path to the existing com.tivoli.am.fim.osgi.connector_6.2.0.0 MANIFEST.MF . The second parameter is the path to the SDK's MANIFEST.MF , and the third is the output directory to write the results. Figure 61 shows these for my development environment:
Figure 61. OSGiExtensionBundleGenerator arguments
Press Run, to execute the application, and observe the output in the Console window. If it all runs well, you should see output similar to that shown in Figure 62 :
Figure 62. OSGiExtensionBundleGenerator output
In our demonstration there is now a new MANIFEST.MF in C:\temp\output\com.tivoli.am.fim.osgi.connector_6.2.0.0\META-INF\MANIFEST.MF which can be replace the
Switching Class Loaders at runtime
In addition to resolving compile-time issues by updating the MANIFEST.MF , you may also run into run-time problems in your plug-in when calling certain WebSphere API's that use context class loading. Modules written for Tivoli Federated Identity Manager 6.2 use the class org.eclipse.core.runtime.internal.adaptor.ContextFinder as the thread context class loader instead of the one provided by the WebSphere container. For calling operations such as SOAP Message Factory instantiation, JNDI lookup and RMI lookup you need to temporarily switch the context class loader from TFIM's OSGi runtime to the WebSphere container. This can be achieved by leveraging a TFIM-provided wrapper mechanism called J2EEContainerAction. To use this mechanism, first create a class that implements com.tivoli.am.fim.j2eeactions.J2EEContainerAction . This interface is exported by the com.tivoli.am.fim.common bundle:
Listing 7. J2EEContainerAction interface
package com.tivoli.am.fim.j2eeactions;

public interface J2EEContainerAction {

    public Object run() throws Exception;
}
As an example, consider this simple action class which performs an RMI lookup:
Listing 8. Example J2EEContainerAction implementation
package com.tivoli.am.fim.j2eeactions;

import java.rmi.Naming;

public class RMILookupAction implements J2EEContainerAction {

    String _endpoint;

    public RMILookupAction(String endpoint) {
        _endpoint = endpoint;
    }

    public Object run() throws Exception {
        // call container-classloader-required code here
        return Naming.lookup(_endpoint);
    }
};
Next, you will invoke your action class via the com.tivoli.am.fim.j2eeactions.J2EEContainerFactory class, as shown here:
Listing 9. Utilizing your J2EEContainerAction
import com.tivoli.am.fim.j2eeactions.J2EEContainerFactory;
import com.tivoli.am.fim.j2eeactions.RMILookupAction;

...
String naming_endpoint = "rmi://....";
RmiLookupAction myAction = new RmiLookupAction(naming_endpoint);

MyRemoteObject o = (MyRemoteObject)
  J2EEContainerFactory.runInJ2EEContainer(myRmiLookupAction);
...
The J2EEContainerFactory will handle the thread context class loader switching from TFIM's OSGi runtime to the J2EE container. Then, it will call the run() method in your action class, and finally switch the context class loader back to the original. To aid in regular development tasks, the following three commonly used J2EEContainerActions have bee defined for you:
Table 2. Supplied Common J2EEContainAction implementations
| 班级名称 | 描述 | Usage Example |
|---|---|---|
| com.tivoli.am.fim.j2eeactions.CreateMessageFactoryAction | Create a javax.xml.soap.MessageFactory instance. | |
| com.tivoli.am.fim.j2eeactions.JndiLookupAction | Perform lookup of a String name, equivalent to: (new javax.naming.InitialContext()).lookup(name); | |
| com.tivoli.am.fim.j2eeactions.RmiLookupAction | Create a javax.xml.soap.MessageFactory instance. | |
Using third party libraries in your custom module
In addition to TFIM, WebSphere and J2EE API's, your custom module may also need to call third-party libraries. In this case, you will need to embed the additional jar files into your bundle.
Using your IDE (Eclipse or Rational® Application Developer):
- Copy the third-party jar files you need directly into the workspace under the plug-in project of your custom module.
- Open the project's
MANIFEST.MFfile with the Plug-in manifest editor. Select the Runtime tab, and add the libraries from your plug-in project to the Classpath. This will update your project'sMANIFEST.MFwith a new stanza calledBundle-ClassPath. Make sure theBundle-ClassPathincludes your embedded jar files as well as ".", which represents the classpath to the local classes you've created in your bundle. - When you export the plug-in project, make sure the third-party jar files are included inside the bundle jar.
The libraries declared in the Bundle-ClassPath stanza will only be visible to the classes inside that bundle. However, you may make the packages of the embedded jars visible to other bundles by declaring them in the Export-Package stanza. In case you haven't already noticed, this is exactly what the com.tivoli.am.fim.osgi.connector_6.2.0.0 package does for WebSphere and standard J2EE packages!
In very rare cases some 3rd-party libraries may not be able to be run from within the OSGi environment at all. In that case you can copy them to the
GUIXML widgets reference
Available GUI XML Widgets and their Configuration
When designing a new page layout using GUI XML, (as was done earlier in this tutorial as part of "Developing the Custom Module"), there are a number of available widgets. For the purposes of the GUI design for our demo module, only TextFields with their associated labels were required (refer back to Figure 22 ).
This section describes all the available widgets and their configuration when developing custom Java™ modules.
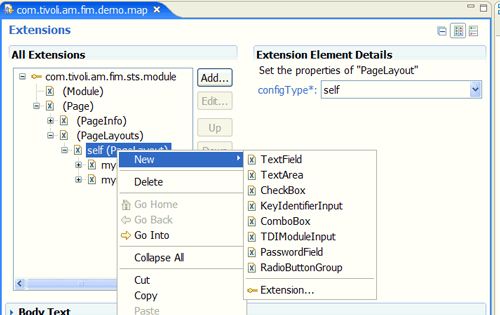
There are 8 widget types available for use in a Page Layout, as shown in Figure 63 below.
Figure 63. Available GUI Elements
Following is a table showing the various widgets and their configuration properties. There are some commonalities among the widgets. 例如:
- name - The name is always required, and represents the name of the configuration parameter. This is the same name that you use to retrieve the parameter value in your module code. See example in Listing 2 .
- required - I bet you can figure this one out.
- modes - This acts as a filter, and is a comma-separated listed of STS module modes that the module may operate in and use this parameter. The set of modes we are talking about is the set of operational modes that the module can be configured in when added to a module chain (ie validate,map,issue,exchange,other,authenticate,authorize). The console will only prompt for the parameter when the module is configured in a listed mode. For example it makes no sense to prompt for a "signature validation key" for a module that is in
issuemode. Similarly it doesn't make sense to prompt for a "signing key" for a module invalidatemode. The console only prompts for the parameters required for the mode the module is operating in.
Non-obvious properties for the widgets are described in detail in the table.
| Widget Type | 描述 | Configurable Properties | Configuration Notes |
|---|---|---|---|
| 文本域 | Text input box that allows users to enter text on a single line. | name* required* {true|false} modes* valueType* multivalued {true|false} password {true|false} displayWidth defaultValue issuerField {true|false} |
The valueType for a text field is not currently used, but the intent is to eventually use it for validating entry. For now we recommend you set it to string (this is what the internal modules use), and perform your own validation of the input at runtime. The multivalued attribute allows a TextField to behave like a TextArea . This is historical, and we now recommend using a TextArea where multiple lines of input are desired. The password attribute determines if the characters on the display are replaced with *. There are two main differences between using this and a PasswordField widget. First, the value is stored in plaintext when using a TextField , but obscured when using a PasswordField . Second, the PasswordField provides a secondary "re-enter password" field for validation, whereas TextField does not. The displayWidth attribute is an integer that controls the default width of the input string. The default is 60 and is suitable for most purposes. The displayValue attribute allows you to pre-populate the text field with a default value. The issuerField attribute is a special attribute that is used internally by TFIM to occasionally hide a text field attribute from the display when collecting parameter information in wizards. For example the issuer attribute for generating SAML assertions is generally defaulted to the Identity Provider ID, and for simplifying the amount of data collected it is not prompted for during wizard federation creation. It is not recommended that you use this field for your own token modules. |
| TextArea | Text input area that allows the user to enter large amounts of text across multiple lines. | name* required* {true|false} modes* |
This is a multi-line text entry field. You can distinguish the lines in your code by looking at the String[] returned by STSGroupMembership.getSelfProperties or STSGroupMembership.getPartnerProperties |
| CheckBox | A check box (tick box) that represents an option to the user. The user is permitted to make multiple selections from a number of options. | name* required* {true|false} modes* checked* {true|false} |
The checked attribute determines if the checkbox is pre-selected as checked. |
| KeyIdentifierInput | Allows the user to enter a key identifier. A key identifier represents a public or private key, and consists of a keystore, plus the label of the key within that keystore. | name* required* {true|false} modes* checked* {true|false} enabledName keyTypes validateUseKeyInfoName |
This complex widget consists of a set of components which allow you to pick a key. It looks something like this: The enabledName attribute describes an optional configuration parameter name. If provided, the widget will display a checkbox to describe if the function associated with this key is enabled. If no enabledName value is provided, a key is to always be prompted for. If a value is provided, a checkbox will appear (like the example above which has the label "Really need a key?"). When the checkbox is selected, the entire rest of the key widget is enabled, when it is not selected, the rest of the key widget is disabled. The tricky part here is providing a label for the checkbox. This is done by adding a ComponentLabel under the KeyIdentifierInput and setting the for: attribute of the ComponentLabel to checkbox , as shown here: Note that this ComponentLabel is in addition to the one which describes the label for the key identifier widget itself (defined as "My KeyID" above). To define the ComponentLabel for the actual key identifier widget, set the for: attribute of the ComponentLabel to keyidentifier , or just leave it blank. The first element in the main portion of the key widget (labeled Keystore) is a drop-down list box of keystore names. This will be filtered based on the type of keys selected in the keyTypes parameter. The keyTypes parameter is a comma-separated list of one or more of the following values:
The second element in the main portion of the key widget is for the Keystore Password, which is the password used to open the keystore you have selected. The third element in the main portion of the key widget is the List Keys button, and the table which shows all the listed keys. The List Keys button should only be pressed after the password is entered, and the keys will only be listed if the password is correct. Each of the keys in the keystore which match the keyTypes filter will be shown. The last part of the main portion of the key widget is actually a variable set of drop-down list boxes which permit you to select which portions of the key are included in the KeyInfo element of digital signatures. Of course in your own module, this will not have the same semantics as what you use the key for is completely up to your own code. Therefore unless you have specific requirements for allowing a user to select these elements, you probably will not need to use them in your own modules. For completeness of documentation though, you can optionally decide whether or not to prompt for any of the following:
For each attribute you will be prompted for one of the following values:
The checked attribute controls whether or not the main portion widget is enabled, and basically pre-checks the optional parameter defined by the checkedName attribute for enabling or disabling key selection. It doesn't make sense to set this attribute to false unless you are definitely including the enabledName attribute and want it to be disabled by default. A good example where TFIM uses this combination internally is enabling signatures for the TAM Credential module. The only other attribute not yet mentioned is validateUseKeyInfoName . This is an advanced configuration parameter we do not recommend using in your own modules (leave it blank). This parameter again represents an optional configuration parameter name, which if provided, causes the key widget to prompt for an additional key selection options (not shown in our example) via a radio button group at the very top of the main part of the widget. The radio buttons allow you to select whether or not a key to be used for signature validation should come from the KeyInfo inside an XMLSignature element itself, or from a user-selected key from the widget (as shown in our example). If signature validation is done from KeyInfo information, then no key is selected from a keystore, and instead we prompt for an optional subject DN expression for allowable X509 certificates. The semantics of this property are very particular to TFIM internal API options for signature validation, and it is more likely that for your own module you would use a combination of other widgets to prompt for these style of options rather than this particular attribute of KeyIdentifierInput. |
| ComboBox | A drop down list box containing a list of existing options that can be selected from. | name* required* {true|false} modes* editable {true|false} |
The editable attribute describes whether or not the user can put in their own text rather than selecting one of the built-in options. The widget allows you to add an Options element, and to this you add one or more child Option elements. Each Option has a display label and value. |
| TDIModuleInput | *For internal use only as part of the TDI mapping module. | name* required* {true|false} modes* tdi.hostname tdi.port tdi.poolsize tdi.maxwaitingthreads tdi.maxwaittime tdi.config tdi.assemblyline |
Do not use this widget in your own modules. |
| PasswordField | A pair of text input fields where the entered characters will be obfuscated so that they do not appear on the screen in clear text. | name* required* {true|false} modes* displayWidth |
The displayWidth has the same meaning as for a TextField widget. The widget will automatically prompt for the same value twice, and will validate that the input is the same for both entry fields. It will also automatically obfuscate the resulting value before storing it in configuration. When reading a password from configuration in your module code, it is necessary to call the method com.tivoli.am.fim.utils.Password.getUnObfuscatedPassword(obfuscatedPassword) with the value of the parameter to access the cleartext password. |
| RadioButtonGroup | A radio button (option button) allows the user to choose one of a predefined set of options. | name* required* {true|false} modes* defaultButtonIndex |
A RadioButtons element is added to a RadioButtonGroup, and under that an ordered list of RadioButton elements are added to build the list of options. Each RadioButton has both a label and a value (as would be expected). The ordered list is zero-indexed, so setting the defaultButtonIndex to 0 will pre-select the first radio button. |
NOTE: * indicates a required field.
Token module example
The primary example used in this tutorial was a mapping module, which did a very basic transformation by adding an attribute name/value pair to an STSUniversalUser.
In the Downloads section of this tutorial you will also find a HelloToken example module that you can import as a project into your development environment, or potentially use as an example in a TFIM Runtime environment. The HelloWorldToken example is a trivial token module that supports the validate , issue and exchange modes of operation (issue and exchange are considered synonymous). It supports a trivial "HelloToken", which looks something like this:
In validate mode, it will not perform any real syntax checking on the token, but it will set the STSUniversalUser's name to the namevalue (if found), and will set an attribute called attribute to the attributevalue if found.
Similarly in issue/exchange modes, it will create an XML token of the above format, setting the name and attribute XML attributes if found in the STSUniversalUser.
It is hoped this project may be a good starting point for developers putting together their own custom STS module which will support their own custom token types. The project also includes two example RST's in XML format that you may use to test the module.
- To test the validate operation, create a trust chain that has two modules in it - a HelloToken instance in validate mode, followed by an STSUU token instance in issue mode. Then use curl and the rst_hw.xml to test validating the HelloWorld token.
- To test the issue/exchange operation, create a trust chain that has two modules in it - an STSUU token instance in validate mode, followed by a HelloWorld token instance in issue mode. Then use curl and the rst_stsuu.xml to test validating the STSUU token and issuing a HelloWorld token.
Note also that these RST examples use WS-Trust 1.3 format, which requires use of the OASIS Validate URI when building your trust chain mapping criteria. You should also use the WS-Trust 1.3 endpoint as the target for the RST's, with a command like:
curl -k --verbose --header "soapaction: blah" --header "Content-type: application/soap+xml; charset=utf-8" --data-binary @rst_hw.xml http://localhost:9080/TrustServerWST13/services/RequestSecurityToken
You can obviously extrapolate this example to your own token requirements.
翻译自: https://www.ibm.com/developerworks/tivoli/tutorials/tz-tfimjava/index.html


