架构探险-第一章:从一个简单的Web应用开始
一,前言
最近一段时间研究Spring源码,买了几本源码相关的书,
这本架构探险,从零开始写java Web框架,
作者是smartFrameWork开源框架创始人,阿里巴巴架构师,
我目前正在学习这本书,随即写成笔记,供自己和他人查阅,
本篇是本书的第一章,简单的使用IDEA创建了一个web项目
并配置Maven和tomcat将服务运行起来,
并将源码托管到开源中国,本文将源码托管到了GitHub
(哦,对了,这本书的序言是开源中国创始人红薯编写的)
二,使用IDEA构建Maven项目
IDEA默认整合了Maven

点击"Create New Project"
选择"Maven"点击Next
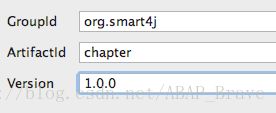
输入GroupId,ArtifactId,Version,点击Next
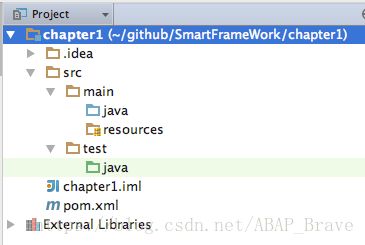
输入项目名称,选择项目文件路径,点击Next创建项目
三,调整Maven配置
项目创建完成自动生成的pom.xml
<project xmlns="http://maven.apache.org/POM/4.0.0"
         xmlns:xsi="http://www.w3.org/2001/XMLSchema-instance"
         xsi:schemaLocation="http://maven.apache.org/POM/4.0.0
         http://maven.apache.org/xsd/maven-4.0.0.xsd">
    <modelVersion>4.0.0modelVersion>

    <groupId>org.smart4jgroupId>
    <artifactId>chapterartifactId>
    <version>1.0.0version>
project>
打开pom.xml文件,IDEA右上角弹出气泡
1,Import Changes :
    手动生效
2,Enable Auto-Import :
    自动生效,当pom文件发生变化时自动生效

建议使用手动生效方式,这样能够确定自己做过那些事情
这里我们点击Import Changes按钮,使Maven配置立即生效
为pom.xml添加常用配置:
<project xmlns="http://maven.apache.org/POM/4.0.0"
         xmlns:xsi="http://www.w3.org/2001/XMLSchema-instance"
         xsi:schemaLocation="http://maven.apache.org/POM/4.0.0
         http://maven.apache.org/xsd/maven-4.0.0.xsd">
    <modelVersion>4.0.0modelVersion>

    <groupId>org.smart4jgroupId>
    <artifactId>chapterartifactId>
    <version>1.0.0version>


    <properties>
        <project.build.sourceEncoding>UTF-8project.build.sourceEncoding>
    properties>

    <build>
        <plugins>

            <plugin>
                <groupId>org.apache.maven.pluginsgroupId>
                <artifactId>maven-compiler-pluginartifactId>
                <version>3.3version>
                <configuration>
                    <source>1.6source>
                    <target>1.6target>
                configuration>
            plugin>

            <plugin>
                <groupId>org.apache.maven.pluginsgroupId>
                <artifactId>maven-surefire-pluginartifactId>
                <version>2.18.1version>
                <configuration>
                    <skipTests>trueskipTests>
                configuration>
            plugin>
        plugins>
    build>
project>
所有plugin需要添加到pom.xml文件中build/plugins标签下
Maven插件和依赖都来自于Maven中央仓库 : http://search.maven.org
当使用手动生效方式时,每次修改pom.xml后需要点击一次Import Changes使配置生效
四,搭建Web项目框架
将新建的Maven项目调整为Web项目结构:
1) main目录下添加webapp目录
2) webapp目录下添加WEB-INF目录
3) WEB-INF目录下添加web.xml文件
当在WEB-INF目录下添加web.xml文件后,
IDEA识别出项目使用web框架(即Servlet框架),
此时IDEA右上角弹出气泡,单击Configure,
弹出对话框对项目进行配置,点击OK,
即可将当前项目转变为Web项目
web.xml添加如下代码,使用Servlet3.0框架
<web-app xmlns="http:/java.sun.com/xml/ns/javaee"
         xmlns:xsi="http://www.w3.org/2001/XMLSchema-instance"
         xsi:schemaLocation="http:/java.sun.com/xml/ns/javaee
         http://java.sun.com/xml/ns/javaee/web-app_3_0.xsd"
         version="3.0">

web-app>
实际上,Servlet3.0框架可以省略web.xml文件,
可以使用java注解进行配置,无需在web.xml中配置
五,添加Java Web的Maven依赖
Web项目需要打包成war,需要在pom.xml中配置packaging为war(默认为jar)
<packaging>warpackaging>添加java Web所需Servlet,JSP,JSTL等依赖,完整maven配置pom.xml如下:
<project xmlns="http://maven.apache.org/POM/4.0.0"
         xmlns:xsi="http://www.w3.org/2001/XMLSchema-instance"
         xsi:schemaLocation="http://maven.apache.org/POM/4.0.0
         http://maven.apache.org/xsd/maven-4.0.0.xsd">
    <modelVersion>4.0.0modelVersion>

    <groupId>org.smart4jgroupId>
    <artifactId>chapterartifactId>
    <version>1.0.0version>


    <packaging>warpackaging>


    <properties>
        <project.build.sourceEncoding>UTF-8project.build.sourceEncoding>
    properties>

    <dependencies>

        <dependency>
            <groupId>javax.servletgroupId>
            <artifactId>javax.servlet-apiartifactId>
            <version>3.1.0version>
            <scope>providedscope>
        dependency>

        <dependency>
            <groupId>javax.servlet.jspgroupId>
            <artifactId>jsp-apiartifactId>
            <version>2.2version>
            <scope>providedscope>
        dependency>

        <dependency>
            <groupId>javax.servletgroupId>
            <artifactId>jstlartifactId>
            <version>1.2version>
            <scope>runtimescope>
        dependency>
    dependencies>

    <build>
        <plugins>

            <plugin>
                <groupId>org.apache.maven.pluginsgroupId>
                <artifactId>maven-compiler-pluginartifactId>
                <version>3.3version>
                <configuration>
                    <source>1.6source>
                    <target>1.6target>
                configuration>
            plugin>

            <plugin>
                <groupId>org.apache.maven.pluginsgroupId>
                <artifactId>maven-surefire-pluginartifactId>
                <version>2.18.1version>
                <configuration>
                    <skipTests>trueskipTests>
                configuration>
            plugin>

            <plugin>
                <groupId>org.apache.tomcat.mavengroupId>
                <artifactId>tomcat7-maven-pluginartifactId>
                <version>2.2version>
                <configuration>
                    <path>/${project.artifactId}path>
                configuration>
            plugin>
        plugins>
    build>
project>
六,编写一个简单的Web应用
1,编写Servlet类
写一个HelloServlet,
接收Get请求/hello,
转发到/WEB-INF/jsp/hello.jsp页面
hello.jsp页面显示系统当前时间
在java目录下创建包,名为org.smart4j.chapter1,并创建HelloServlet.java
package org.smart4j.chapter1;

import javax.servlet.ServletException;
import javax.servlet.annotation.WebServlet;
import javax.servlet.http.HttpServlet;
import javax.servlet.http.HttpServletRequest;
import javax.servlet.http.HttpServletResponse;
import java.io.IOException;
import java.text.SimpleDateFormat;
import java.util.Date;

/**
 * Created by Brave on 18/4/27.
 */
@WebServlet("/hello")//使用注解配置请求路径,对外发布Servlet服务
public class HelloServlet extends HttpServlet {//继承HttpSevlet,成为一个HttpSevlet类

    /**
     * 重写doGet方法,接收Get请求
     */
    @Override
    protected void doGet(HttpServletRequest req, HttpServletResponse resp) throws ServletException, IOException {

        // 获取当前系统时间
        SimpleDateFormat dateFormat = new SimpleDateFormat("yyyy-MM-dd HH:mm:ss");
        String currentTime = dateFormat.format(new Date());
        // 添加到HttpServletRequest请求对象中
        req.setAttribute("currentTime", currentTime);
        // 转发至/WEB-INF/jsp/hello.jsp页面
        req.getRequestDispatcher("/WEB-INF/jsp/hello.jsp").forward(req, resp);
    }
}
使用Servlet3.0框架不需要再web.xml中添加任何配置,使用WebServlet注解即可
还有更多注解API,使项目拥有一个"零配置"的web.xml
2,编写jsp页面
在webapp目录下创建jsp目录并创建hello.jsp
推荐将JSP放到WEB-INF内部,这样无法通过浏览器地址直接请求放在内部的JSP
必须通过Servlet程序进行转发(forward)或重定向(redirect)
<%@ page contentType="text/html;charset=UTF-8" language="java" %>
<html>
<head>
    <title>Hellotitle>
head>
<body>

    <h1>Hello!h1>
    <%--使用JSTL表达式获取HelloServlet传递的currentTime请求属性--%>
    <h2>当前时间:${currentTime}h2>
body>
html>3,IDEA中配置tomcat,启动服务
在IDEA中配置一个Tomcat
1) 点击IDEA工具栏"Edit Configurations..."弹出对话框
2) 点击左上角"+"号,选择TomcatServer->Local选项
3) 输入Tomcat的Name,取消勾选"After Lunch"选项
4) 单击Application server下拉框右侧"Configure...",配置Tomcat
5) 切换到Deployment选项卡,单击右边"+",选择"Artifact..."选项
6) 弹出的Select Artifact to Deploy对话框,选择chapter1:war exploded
7) 回到Run/Debug Configurations对话框,在Application context输入/chapter1
8)切换回Server,在On frame deactivation下拉框中选择"Update resource"

IDEA工具栏,选择RUN或Debug启动Tomcat并部署Web应用
启动服务:
访问服务: http://localhost:8080/chapter1/hello
七,将代码放入本地Git仓库
IDEA找到VCS菜单,
点击"Import into Version Control/Create Git Repository..."
弹出对话框,选中项目根目录,点击OK
此时,IDEA在本地创建了一个Git库,
此时代码文件为红色,表示未加入版本控制
右键点击项目根目录(或在CVS菜单下),选择Git/Add,将项目文件添加至git版本控制
此时代码文件为绿色,表示已添加版本控制
右键点击项目根目录(或在CVS菜单下),选择"Git/Commit Directory..."
填写Commit Message,点击Commit,提交代码到本地Git仓库
此时代码文件为黑色,表示本地代码版本和Git相同
勾选Optimize imports,可以优化项目import,自动删除无用的import
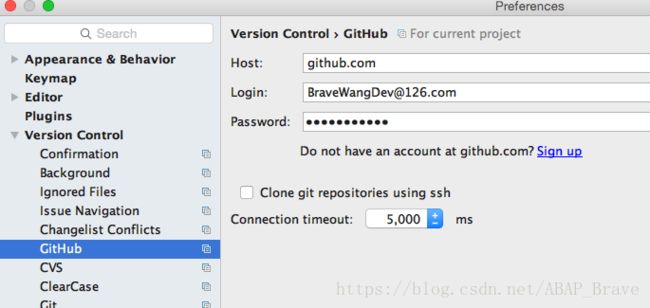
八,将代码推送至GitHub远程仓库
2,登陆GitHub创建仓库,命名为SmartFrameWorkLearn:
https://github.com/BraveWangDev/SmartFrameWorkLearn
3,创建完成将本地仓库推送至GitHub仓库:
Brave:chapter1 Brave$ git remote add origin https://github.com/BraveWangDev/SmartFrameWorkLearn.git
Brave:chapter1 Brave$ git push -u origin master
4,登陆GitHub代码仓库查看上传结果:


