ATECC508A芯片开发笔记(十一):NXP 平台移植ATECCx08 CryptoAuthLib库(I2C)
ATECC508A芯片开发笔记(十一):NXP 平台移植x08库(I2C)
- CryptoAuthLib最新库
- Nxp RT10xx平台上移植CryptoAuthLib
- 驱动代码分析
硬件环境: Nxp的i.Mx RT1060 MCU
软件环境: cryptoauthlib-20190903 (MicroChip官网下载)
之前在Nxp平台上使用过ATECC608A,所以将CryptoAuthLib移植后的代码分享出来。。
最近太忙,好久没有写博客了,刚发现ATECCx08系列都写到第十一啦。。。。
一、CryptoAuthLib
概述
Atmel CryptoAuthentication Library是Atmel 兼容其加密芯片系列一个总的软件库,里面实现了从底层到命令层以及应用层开发使用的所有API,并支持Git使用。
该库还在不断完善,兼容Atmel许多开发板,目前能够support的加密芯片有:
- ATECCx08A (ATECC108A, ATECC508A, ATECC608A)
- ATSHA204A
- ATAES132A
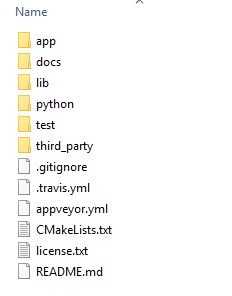
: 目录结构
二、Nxp RT10xx平台上移植CryptoAuthLib
基础知识可以参见之前的博客:
ATECC508A芯片开发笔记(二):开发准备之 CryptoAuthLib 库简介与移植
1、在官网下载最新的CryptoAuthLib库:
https://www.microchip.com/wwwproducts/en/ATECC608A
2、将\lib\hal中无用的代码去掉,并新建自己Driver的.c/h
参见 ATECC508A芯片开发笔记(二):开发准备之 CryptoAuthLib 库简介与移植
3、根据Nxp平台实现初始化、收发等函数:
hal_i2c_init:
ATCA_STATUS hal_i2c_init(void *hal, ATCAIfaceCfg *cfg)
{

	hal_i2c_log("ini i2c\r\n");

	/* BEGIN: Added by Howard Xue, 2018/10/28 */
	lpi2c_master_config_t masterConfig = {0};

	//	LPI2C_MasterGetDefaultConfig(&lpi2cConfig);
	masterConfig.enableMaster            = true;
	masterConfig.debugEnable             = false;
	masterConfig.enableDoze              = true;
	masterConfig.ignoreAck               = true;
	masterConfig.pinConfig               = kLPI2C_2PinOpenDrain;
	masterConfig.baudRate_Hz             = 400000U;
	masterConfig.busIdleTimeout_ns       = 0;
	masterConfig.pinLowTimeout_ns        = 0;
	masterConfig.sdaGlitchFilterWidth_ns = 0;
	masterConfig.sclGlitchFilterWidth_ns = 0;
	masterConfig.hostRequest.enable      = false;
	masterConfig.hostRequest.source      = kLPI2C_HostRequestExternalPin;
	masterConfig.hostRequest.polarity    = kLPI2C_HostRequestPinActiveHigh;


	LPI2C_MasterInit(ATECC608_LPI2C_BASEADDR, &masterConfig, LPI2C_CLOCK_FREQUENCY);

    return ATCA_SUCCESS;


}
hal_i2c_send
ATCA_STATUS hal_i2c_send(ATCAIface iface, uint8_t *txdata, int txlength)
{
	hal_i2c_log("send i2c\r\n");

	ATCAIfaceCfg *cfg = atgetifacecfg(iface);
	status_t reVal;
		// txdata[0] is using _reserved byte of the ATCAPacket
	txdata[0] = 0x03;   // insert the Word Address Value, Command token
	txlength++;         // account for word address value byte.


	lpi2c_master_transfer_t transfer;


	transfer.flags			= kLPI2C_TransferDefaultFlag;
	transfer.slaveAddress	= (cfg->atcai2c.slave_address);
	transfer.direction		= kLPI2C_Write;
	transfer.subaddress 	= 0;
	transfer.subaddressSize = 0;
	transfer.data			= txdata;
	transfer.dataSize		= txlength;

	reVal = LPI2C_MasterTransferBlocking(ATECC608_LPI2C_BASEADDR, &transfer);


    return reVal;


	hal_i2c_log("send i2c ok\r\n");
 	return ATCA_SUCCESS;

}
hal_i2c_receive:
ATCA_STATUS hal_i2c_receive(ATCAIface iface, uint8_t *rxdata, uint16_t *rxlength)
{
	hal_i2c_log("recv i2c\r\n");

	ATCAIfaceCfg *cfg = atgetifacecfg(iface);


	/* BEGIN: Added by Howard Xue, 2018/10/28 */
	status_t reVal;


	lpi2c_master_transfer_t transfer;


	transfer.flags			= kLPI2C_TransferDefaultFlag;
	transfer.slaveAddress	= (cfg->atcai2c.slave_address);
	transfer.direction		= kLPI2C_Read;
	transfer.subaddress 	= 0;
	transfer.subaddressSize = 0;
	transfer.data			= rxdata;
	transfer.dataSize		= *rxlength;

	LPI2C_MasterTransferBlocking(ATECC608_LPI2C_BASEADDR, &transfer);


	hal_i2c_log("recv i2c ok\r\n");
	return ATCA_SUCCESS;


}
至此,移植工作就结束了,接下来可以对加密芯片硬件或CryptoAuthLib进行简单的测试,参照ATECC508A芯片开发笔记(二):开发准备之 CryptoAuthLib 库简介与移植
完整Driver代码下载地址:
https://download.csdn.net/download/HowieXue/11967660
三、驱动代码分析:
之前博文的代码分析,结构是一样的
第一层:
在atca_iface.c (libraries\cryptoauthlib\lib目录)中 ,有_atinit()这么一个函数,会在atcab_init初始化设备时调用,函数里实现了hal层通讯函数与API层的绑定:
ATCA_STATUS _atinit(ATCAIface caiface, ATCAHAL_t *hal)
{
	// get method mapping to HAL methods for this interface
	hal_iface_init( caiface->mIfaceCFG, hal );
	caiface->atinit     = hal->halinit;
	caiface->atpostinit = hal->halpostinit;
	caiface->atsend     = hal->halsend;
	caiface->atreceive  = hal->halreceive;
	caiface->atwake     = hal->halwake;
	caiface->atsleep    = hal->halsleep;
	caiface->atidle     = hal->halidle;
	caiface->hal_data   = hal->hal_data;

	return ATCA_SUCCESS;
}
第二层:
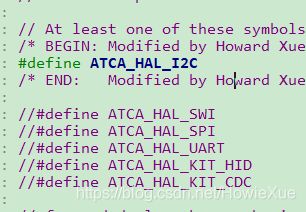
在atca_hal.c (libraries\cryptoauthlib\lib\hal) 中,实现了Hal层与底层通讯驱动函数的绑定,例如在前面我们打开了I2C宏: ATCA_I2C_IFACE,则现在hal层各函数就会与I2C相关函数绑定:
ATCA_STATUS hal_iface_init( ATCAIfaceCfg *cfg, ATCAHAL_t *hal )
{
	ATCA_STATUS status = ATCA_COMM_FAIL;

	switch (cfg->iface_type) {
	case ATCA_I2C_IFACE:
		#ifdef ATCA_HAL_I2C
		hal->halinit = &hal_i2c_init;
		hal->halpostinit = &hal_i2c_post_init;
		hal->halreceive = &hal_i2c_receive;
		hal->halsend = &hal_i2c_send;
		hal->halsleep = &hal_i2c_sleep;
		hal->halwake = &hal_i2c_wake;
		hal->halidle = &hal_i2c_idle;
		hal->halrelease = &hal_i2c_release;
		hal->hal_data = NULL;

		status = ATCA_SUCCESS;
		#endif
		break;
	case ATCA_SWI_IFACE:
		#ifdef ATCA_HAL_SWI...
第三层:
进入Hal_i2c_bitbang.c (libraries\cryptoauthlib\lib\hal),执行相应函数,比如上层通过atsend调用到了hal_i2c_send,就会执行该函数:该函数模拟了I2C通讯时序,(既先Start信号拉低SDA,之后发送7位地址位+1位读写,然后发送数据位、最后Stop信号拉高SDA),将一串数据发送到I2C总线。
ATCA_STATUS hal_i2c_send(ATCAIface iface, uint8_t *txdata, int txlength)
{
	ATCAIfaceCfg *cfg = atgetifacecfg(iface);

	ATCA_STATUS status = ATCA_TX_TIMEOUT;

	int bus     = cfg->atcai2c.bus;

	txdata[0] = 0x03;   //!< Word Address Value = Command
	txlength++;         //!< count Word Address byte towards txlength

	//! Set I2C pins
	i2c_set_pin(i2c_hal_data[bus]->pin_sda, i2c_hal_data[bus]->pin_scl);

	do {
		//! Address the device and indicate that bytes are to be written
		status = hal_i2c_send_slave_address(iface, I2C_WRITE);
		if (status != ATCA_SUCCESS)
			break;
		//! Send the remaining bytes
		status = i2c_send_bytes(txlength, txdata);
	} while (0);

	//! Send STOP regardless of i2c_status
	i2c_send_stop();

	return status;
}
支持原创,转载请附引用链接。
博主热门文章推荐:
一篇读懂系列:
- 一篇读懂无线充电技术(附方案选型及原理分析) :https://mp.csdn.net/postedit/77799262
- 一篇读懂:Android/iOS手机如何通过音频接口(耳机孔)与外设通信:https://mp.csdn.net/postedit/79145048
- 一篇读懂:Android手机如何通过USB接口与外设通信(附原理分析及方案选型):https://mp.csdn.net/postedit/79167618
LoRa系列:
- LoRa学习:LoRa关键参数(扩频因子,编码率,带宽)的设定及解释 https://blog.csdn.net/HowieXue/article/details/78028881
- LoRa学习:信道占用检测原理(CAD) https://blog.csdn.net/HowieXue/article/details/78052608
- LoRa/FSK 无线频谱波形分析(频谱分析仪测试LoRa/FSK带宽、功率、频率误差等) https://blog.csdn.net/HowieXue/article/details/79199712
网络安全系列:
- ATECC508A芯片开发笔记(一):初识加密芯片 https://blog.csdn.net/HowieXue/article/details/75193922
- SHA/HMAC/AES-CBC/CTR 算法执行效率及RAM消耗 测试结果 https://blog.csdn.net/HowieXue/article/details/78700694
- 常见加密/签名/哈希算法性能比较 (多平台 AES/DES, DH, ECDSA, RSA等) https://blog.csdn.net/HowieXue/article/details/79283008
- AES加解密效率测试(纯软件AES128/256)–以嵌入式Cortex-M0与M3 平台为例 https://blog.csdn.net/HowieXue/article/details/76549487
嵌入式开发系列:
- 嵌入式学习中较好的练手项目和课题整理(附代码资料、学习视频和嵌入式学习规划) https://blog.csdn.net/HowieXue/article/details/76696316
- IAR调试使用技巧汇总:数据断点、CallStack、设置堆栈、查看栈使用和栈深度、Memory、Set Next Statement等 https://blog.csdn.net/HowieXue/article/details/80381023
- Linux内核编译配置(Menuconfig图形化方式)、制作文件系统的步骤 https://blog.csdn.net/HowieXue/article/details/76696631
- Android底层调用C代码(JNI实现) https://blog.csdn.net/HowieXue/article/details/76714314
- 树莓派到手第一步:上电启动、安装中文字体、虚拟键盘、开启SSH等 https://blog.csdn.net/HowieXue/article/details/78181871
- Shell脚本实现动态配置IP与路由:解决嵌入式Android/Linux有线和无线网卡双网共存问题 https://blog.csdn.net/HowieXue/article/details/75937972
友情赞助
如果你觉得博主的文章对你那么一点小帮助,恰巧你又有想打赏博主的小冲动,那么事不宜迟,赶紧扫一扫,小额地赞助下,攒个奶粉钱,也是让博主有动力继续努力,写出更好的文章-,感谢~。
1. 支付宝
![]()
2. 微信**
![]()


