使用Express模拟接口数据
Express简介
Express是一个基于 Node.js 平台,快速、开放、极简的 Web 开发框架。Express 在 node.js 基础上扩展了 Web 应用所需的功能,并提供了丰富的 HTTP 实用工具以及来自Connect框架的中间件,使得创建强健、友好的 API 变得快速而且简单。
NodeJS下安装Express
npm install express -g // 全局安装
npm install express --save // 项目本地安装
模拟接口数据
创建本地应用
打开命令行窗口,切换到要创建应用的目录下,执行如下命令完成项目创建。
// 创建项目目录
mkdir api-server

// 进入项目目录
cd api-server

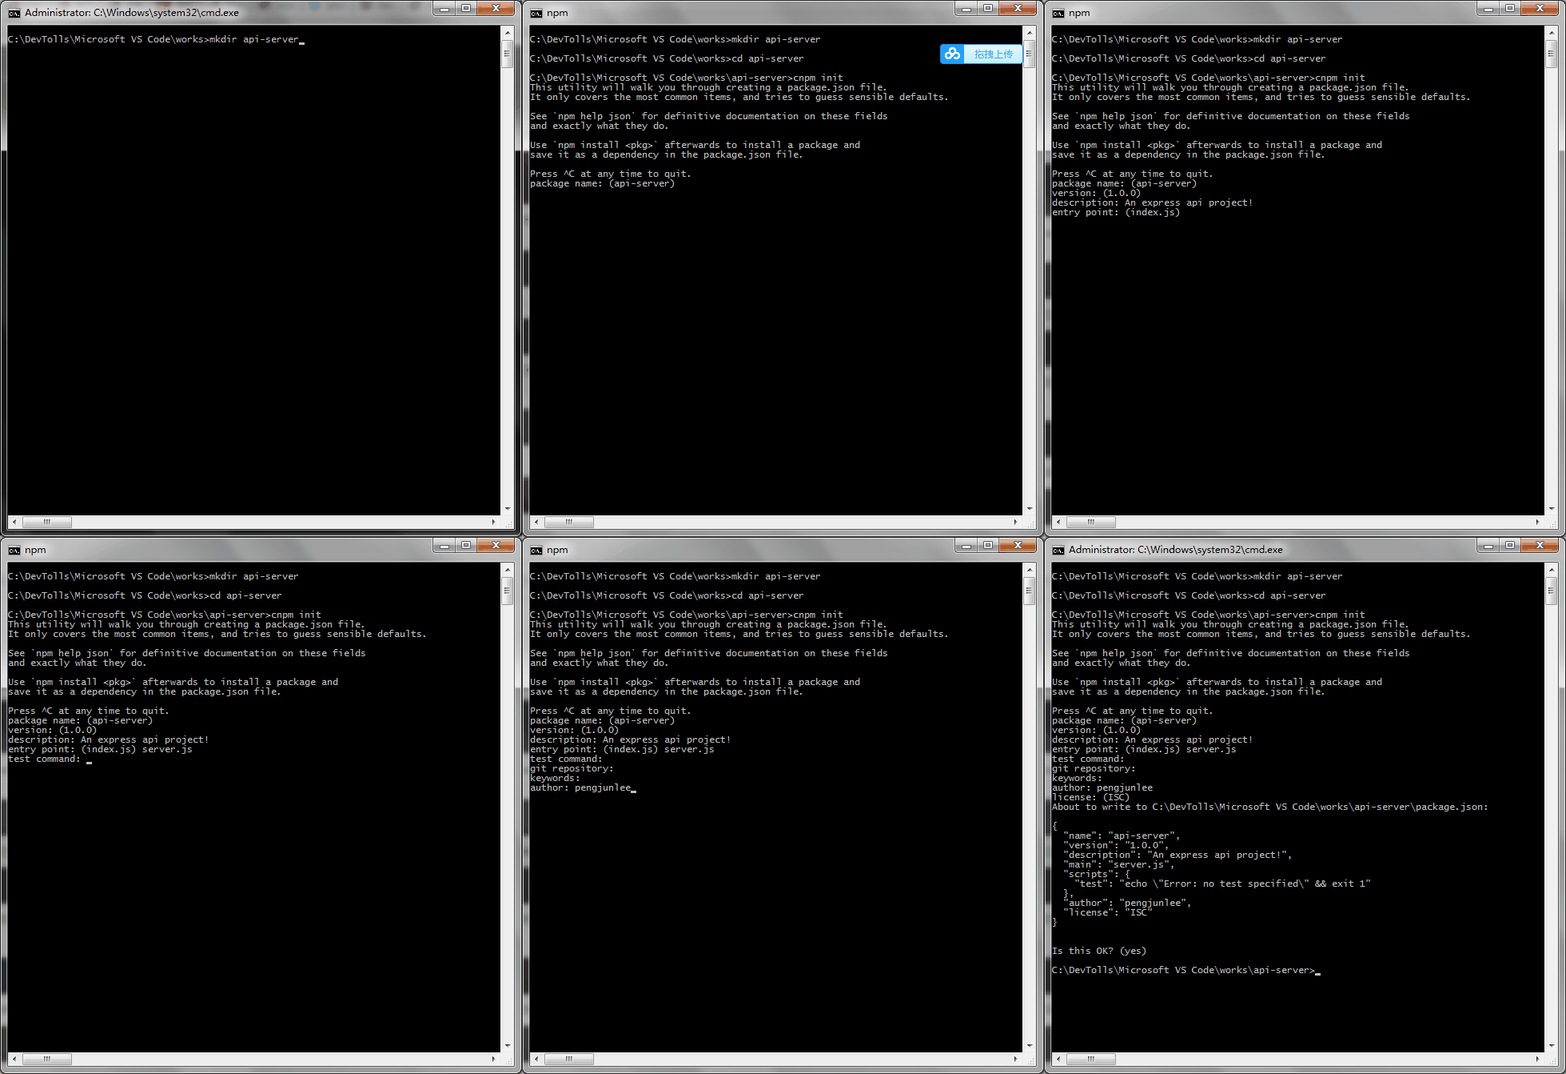
// 生成项目的 package.json 文件,此命令需要输入几个参数,参见下图
npm init

// 引入依赖
npm install express --save
如图所示,本例中项目的入口文件名称被指定为 server.js (默认为 index.js),在项目根目录下创建 server.js ,内容如下:
const express = require('express');
const app = express();

// 模拟字符串数据
app.get('/user/18818578458', (req, res) => res.send('{id:"18818578458",name:"pengjunlee"}'));

// 模拟HTML数据
app.get('/index', function getHome(req,res,next){
    res.setHeader('Content-Type', 'text/html');
    res.sendfile(`${__dirname}/index.html`);
})

app.listen(3000, () => console.log('Example app listening on port 3000!'));
然后,执行如下命令启动项目并监听 3000 端口:
node server.js访问 http://localhost:3000/user/18818578458 ,返回如下内容:
使用Express-Generator创建应用
通过应用生成器工具 express-generator 可以快速创建一个应用的骨架。express-generator 包含了 express 命令行工具。通过如下命令即可安装:
npm install express-generator -g-h 参数可以列出所有可用的命令行参数:
> express -h

Usage: express [options] [dir]

Options:

-h, --help // 输出使用方法
--version // 输出版本号
-e, --ejs // 添加对 ejs 模板引擎的支持
--hbs // 添加对 handlebars 模板引擎的支持
--pug // 添加对 pug 模板引擎的支持
-H, --hogan // 添加对 hogan.js 模板引擎的支持
--no-view // 创建不带视图引擎的项目
-v, --view  // 添加对视图引擎(view)  的支持 (ejs|hbs|hjs|jade|pug|twig|vash) (默认是 jade 模板引擎)
-c, --css  // 添加样式表引擎  的支持 (less|stylus|compass|sass) (默认是普通的 css 文件)
--git // 添加 .gitignore
-f, --force // 强制在非空目录下创建
例如,如下命令创建了一个名称为 mock-server 的 Express 应用。此应用将在当前目录下的 mock-server 目录中创建,并且设置为使用 Pug 模板引擎(view engine):
> express --view=pug mock-server

create : mock-server\
create : mock-server\public\
create : mock-server\public\javascripts\
create : mock-server\public\images\
create : mock-server\public\stylesheets\
create : mock-server\public\stylesheets\style.css
create : mock-server\routes\
create : mock-server\routes\index.js
create : mock-server\routes\users.js
create : mock-server\views\
create : mock-server\views\error.pug
create : mock-server\views\index.pug
create : mock-server\views\layout.pug
create : mock-server\app.js
create : mock-server\package.json
create : mock-server\bin\
create : mock-server\bin\www

change directory:
> cd mock-server

install dependencies:
> npm install

run the app:
> SET DEBUG=mock-server:* & npm start
然后,切换到项目目录,安装所有依赖包:
> cd mock-server
> npm install
在 MacOS 或 Linux 中,通过如下命令启动此应用:
$ DEBUG=mock-server:* npm start在 Windows 中,通过如下命令启动此应用:
> set DEBUG=mock-server:* & npm start然后在浏览器中打开 http://localhost:3000/ 网址就可以看到这个应用了。
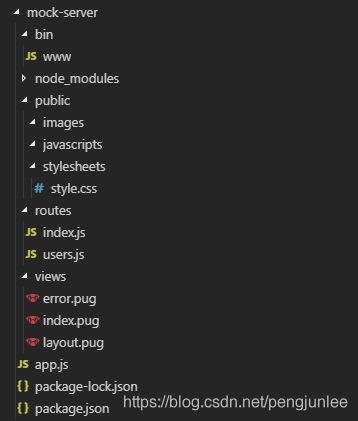
通过生成器创建的 mock-server 应用目录结构如下:
webpack项目中使用Express
旧版的webpack项目是在dev-server.js文件中配置的模拟数据,新版的webpack项目已经去掉了dev-server.js和dev-client.js,模拟数据改为在 webpack.dev.conf.js 中进行配置。
首先切换到项目目录,执行 npm install express --save 为项目安装 express 。然后在 webpack.dev.conf.js 的如下两处位置添加代码。
  /* 。。。 */
const portfinder = require('portfinder')

/* ====== 要插入的第一段代码开始 ====== */

// 引入express
const express = require("express")
const bodyParser = require('body-parser');


// 创建express实例
const app = express()

// 解析application/json
var jsonParser = bodyParser.json();

// 解析application/x-www-form-urlencoded
// var urlencodedParser = bodyParser.urlencoded({extended: false});

// 读取/mock/login.json中的json数据
var loginData = require("../src/mock/login.json")

/* ====== 要插入的第一段代码结束 ====== */

const HOST = process.env.HOST
const PORT = process.env.PORT && Number(process.env.PORT)

const devWebpackConfig = merge(baseWebpackConfig, {
  /* 。。。 */
  devServer: {
    /* 。。。 */
    watchOptions: {
      poll: config.dev.poll,
    },
    /* ====== 要插入的第二段代码开始 ====== */
    before(app) { // localhost:8080/api/login
      app.post("/api/login",jsonParser, (req, res) => {
        if(!req.body) return res.sendStatus(400);
        res.send(loginData[req.body.name === 'admin' ? 'admin':'other']);
        // res.json(loginData);
      })
    }
    /* ====== 要插入的第二段代码结束 ====== */
  },
  /* 。。。 */
})
执行 npm run dev 命令重启应用,访问 http://localhost:8080/api/login 即可获取到我们定义的Json 数据。
使用Express托管静态文件
如果需要使用Express对外提供诸如图像、CSS 和 JavaScript 之类的静态文件,可以使用 Express 中的 express.static 内置中间件函数。例如,通过如下代码就可以将 public 目录下的图片、CSS 文件、JavaScript 文件对外开放访问了:
app.use(express.static('public'))现在,你就可以访问 public 目录中的所有文件了。
http://localhost:3000/images/logo.png你也可以为你的资源指定一个虚拟的访问路径,例如:
app.use('/static', express.static('public'))现在,你就可以通过带有 /static 前缀地址来访问 public 目录中的文件了。
http://localhost:3000/static/images/logo.pngExpress 在静态资源文件夹中查找文件,因此,存放静态资源的文件夹的目录名不会出现在 URL 中。如果要使用多个静态资源目录,请多次调用 express.static 中间件函数:
app.use('/public', express.static('public'))
app.use('/files', express.static('files'))
访问静态资源文件时,express.static 中间件函数会根据目录的添加顺序查找所需的文件。
需要注意的是, express.static 函数的 path 参数的路径是相对于express 实例的启动目录来说的,如果你的 express 实例是从其他目录启动的,很有可能会出现传入的path路径找不到的情况,安全一点的做法就是使用绝对路径。
app.use('/static', express.static(path.join(__dirname, 'public')))


