(一)APP 启动原理 —— 优化启动黑白屏
版权声明:本文为博主原创文章,未经博主允许不得转载。
本文纯个人学习笔记,由于水平有限,难免有所出错,有发现的可以交流一下。
一、启动黑屏、白屏
有的 App 在启动时会出现一段时间的黑屏或者白屏。这就是俗称的启动黑白屏的问题。这期间弄得用户不知道该干嘛,体验不好。
1.黑白屏来源
在最早的时候,App 点击需要一会时间来响应,然后启动。但是在这 App 未完全启动的时候,用户不能明确 App 是否已经启动,为了解决这个用户体验的问题,特意加上了启动黑白屏来表示 App 已经启动。
但是就黑白配的显示,给用户的体验仍然不是很好,所以目前较多的 App 是把它改成了广告来显示。
2.原因
当 App 的 theme 没有任何继承,这时候 App 的启动时候为黑屏屏。
当 App 的 theme 继承于 Theme.AppCompat.Light,这时候 App 的启动时候为白屏。
我们查看 Theme.AppCompat.Light 所在的 value.xml。
路径:![]()
@color/material_grey_50
#fffafafa
结论: Theme.AppCompat.Light 最终继承于 Platform.AppCompat.Light,在这下面设置了一个 android:windowBackground 为白色。
3.解决方案
由上面可以知道,黑白屏出现的原因是在 App 未完全启动的时候,出现了一个背景界面,来提示用户 App 正在启动中。
所以我们可以直接替换背景 android:windowBackground 为图片。可以使用广告进行宣传,这是目前常用的方案。
设置 Theme 背景为透明的。这样虽然可以避免出现黑白屏的问题,但是这在一些低端手机上,还是会闪烁一下。而且有时候由于背景设置为透明的,会影响到 Activity 间的切换动画。
直接把 Theme 的背景去掉,这样就不会出现黑白屏,也不会有设置 Theme 背景为透明的一些问题。
**注:**不论是把 Theme 背景设置为透明的还是直接把背景去掉,这样又会回到问题的最起点,点击 App 图标进行启动,在 App 未完全启动的时候,用户不能确定 App 是否已经启动。所以不太推荐这样处理。
4.解决方案小优化
在使用为 Theme 设置背景图这个方案的时候,如果直接把这个设置添加 App 的 Theme 中,那么所有的 Acticity 都有默认使用这个背景,不太符合逻辑。所以一般是对 Acticity 进行设置。
但是,直接添加到 Acticity 的 Theme 中,有时候这个 Acticity 实际上并不需要这个背景的时候。那么可以在 onCreate 方法中进行主题重新设置。
style.xml:
配置两个 Theme,AppTheme 为真正需要使用的 Theme,AppTheme.Launcher 只设置了背景图片这个属性, 在 AndroidManifest.xml 中配置 Acticity 使用的 Theme 为 AppTheme.Launcher 。然后在 Acticity 的 onCreate 方法调用 setTheme(R.style.AppTheme) 进行主题的切换。
二、启动时间
1.启动类型
App 启动有分为热启动和冷启动,同一台手机同一个应用,热启动比冷启动相对来说会快。
**冷启动:**当启动应用时,后台没有该应用的进程,这时系统会新创建一个新的进程分配给该应用,这个启动方式就是冷启动。冷启动因为系统会重新创建一个新的进程分配给它,所以会先创建和初始化 Application 类,再创建和初始化 MainActivity 类,最后显示在界面上。
**热启动:**当启动应用时,后台已有该应用的进程(例:按 back 键、home 键,应用虽然会退出,但是该应用的进程是依然会保留在后台,可进入任务列表查看),所以在已有进程的情况下,这种启动会从已有的进程中来启动应用,这个方式叫热启动。热启动因为会从已有的进程中来启动,所以热启动就不会走 Application 这步了,而是直接走 MainActivity,所以热启动的过程不必创建和初始化 Application,因为一个应用从新进程的创建到进程的销毁,Application 只会初始化一次。
**首次启动:**首次启动严格来说也是冷启动,之所以把首次启动单独列出来,一般来说,首次启动时间会比非首次启动要久,首次启动会做一些系统初始化工作,如缓存目录的生产,数据库的建立,SharedPreference 的初始化,如果存在多 dex 和插件的情况下,首次启动会有一些特殊需要处理的逻辑,而且对启动速度有很大的影响,所以首次启动的速度非常重要,毕竟影响用户对 App 的第一印象。
2.获取统计时间
1.过滤 Display 关键字
![]()
在日志信息里面有 App 的启动时间,上面一个是冷启动的时间,下面一个是热启动的时间。

注:这个只支持 Android 4.4 之后的手机。
2.命令行查看
在命令行窗口使用命令进行查看。
adb shell am start -W 应用包名/全类名

上面一个是冷启动的启动时间信息,下面一个是热启动的启动时间信息。
ThisTime:启动一连串 Activity 的时候,最后一个 Activity 启动时间。
TotalTime:新应用启动的时间,包括新进程的启动和 Activity 的启动,但不包括前一个应用 Activity pause 的时间。
WaitTime:总的时间,包括前一个应用 Activity pause 的时间和新应用启动的时间。
注: Android 5.0 之前的手机是没有 WaitTime。

小结: ThisTime 可以查看应用的 Acticity 启动时间 。TotalTime 可以查看整个应用的启动时间。WaitTime 可以查看系统启动应用的时间。
三、启动原理
使用命令 adb shell dumpsys activity activities 可以进行检测 Android 的 Activity 任务栈,查看当前任务栈中的 Activity。手机的桌面也是一个 Activity,通过任务栈可以对桌面的 Acticity 进行查看。
![]()
com.android.launcher/com.android.launcher2.Launcher
源码路径为:
android-7.1.0_r1\packages\apps\Launcher2\src\com\android\launcher2\Launcher.java
注: Launcher2 和 Launcher3 思想是一致的。
Launcher.java:
public final class Launcher extends Activity
        implements View.OnClickListener, OnLongClickListener, LauncherModel.Callbacks,
                   View.OnTouchListener {
	......
}
Launcher 这个类就是一个 Activity,并且实现了 View.OnClickListener 这个接口,那么当我们对桌面上的应用图标进行点击的时候,就会进行响应,启动对应的应用。
Launcher 的 OnClick:
    public void onClick(View v) {
        // Make sure that rogue clicks don't get through while allapps is launching, or after the
        // view has detached (it's possible for this to happen if the view is removed mid touch).
        if (v.getWindowToken() == null) {
            return;
        }

        if (!mWorkspace.isFinishedSwitchingState()) {
            return;
        }

        Object tag = v.getTag();
        //判断是否是快照
        if (tag instanceof ShortcutInfo) {
            // Open shortcut
            final Intent intent = ((ShortcutInfo) tag).intent;
            int[] pos = new int[2];
            v.getLocationOnScreen(pos);
            intent.setSourceBounds(new Rect(pos[0], pos[1],
                    pos[0] + v.getWidth(), pos[1] + v.getHeight()));
			//启动Activity
            boolean success = startActivitySafely(v, intent, tag);

            if (success && v instanceof BubbleTextView) {
                mWaitingForResume = (BubbleTextView) v;
                mWaitingForResume.setStayPressed(true);
            }
        //判断是否是文件夹
        } else if (tag instanceof FolderInfo) {
            if (v instanceof FolderIcon) {
                FolderIcon fi = (FolderIcon) v;
                handleFolderClick(fi);
            }
        } else if (v == mAllAppsButton) {
            if (isAllAppsVisible()) {
                showWorkspace(true);
            } else {
                onClickAllAppsButton(v);
            }
        }
快照类似 Window 的快捷方式,就是一个链接。当判断是一个快照的时候,会调用 startActivitySafely 方法开启 Activity。
Launcher 的 startActivitySafely:
    boolean startActivitySafely(View v, Intent intent, Object tag) {
        boolean success = false;
        try {
            success = startActivity(v, intent, tag);
        } catch (ActivityNotFoundException e) {
            Toast.makeText(this, R.string.activity_not_found, Toast.LENGTH_SHORT).show();
            Log.e(TAG, "Unable to launch. tag=" + tag + " intent=" + intent, e);
        }
        return success;
    }
startActivitySafely 直接调用 startActivity。
Launcher 的 startActivity:
    boolean startActivity(View v, Intent intent, Object tag) {
        intent.addFlags(Intent.FLAG_ACTIVITY_NEW_TASK);

        try {
            // Only launch using the new animation if the shortcut has not opted out (this is a
            // private contract between launcher and may be ignored in the future).
            boolean useLaunchAnimation = (v != null) &&
                    !intent.hasExtra(INTENT_EXTRA_IGNORE_LAUNCH_ANIMATION);
            UserHandle user = (UserHandle) intent.getParcelableExtra(ApplicationInfo.EXTRA_PROFILE);
            LauncherApps launcherApps = (LauncherApps)
                    this.getSystemService(Context.LAUNCHER_APPS_SERVICE);
            if (useLaunchAnimation) {
                ActivityOptions opts = ActivityOptions.makeScaleUpAnimation(v, 0, 0,
                        v.getMeasuredWidth(), v.getMeasuredHeight());
                if (user == null || user.equals(android.os.Process.myUserHandle())) {
                    // Could be launching some bookkeeping activity
                    startActivity(intent, opts.toBundle());
                } else {
                    launcherApps.startMainActivity(intent.getComponent(), user,
                            intent.getSourceBounds(),
                            opts.toBundle());
                }
            } else {
                if (user == null || user.equals(android.os.Process.myUserHandle())) {
                    startActivity(intent);
                } else {
                    launcherApps.startMainActivity(intent.getComponent(), user,
                            intent.getSourceBounds(), null);
                }
            }
            return true;
        } catch (SecurityException e) {
            Toast.makeText(this, R.string.activity_not_found, Toast.LENGTH_SHORT).show();
            Log.e(TAG, "Launcher does not have the permission to launch " + intent +
                    ". Make sure to create a MAIN intent-filter for the corresponding activity " +
                    "or use the exported attribute for this activity. "
                    + "tag="+ tag + " intent=" + intent, e);
        }
        return false;
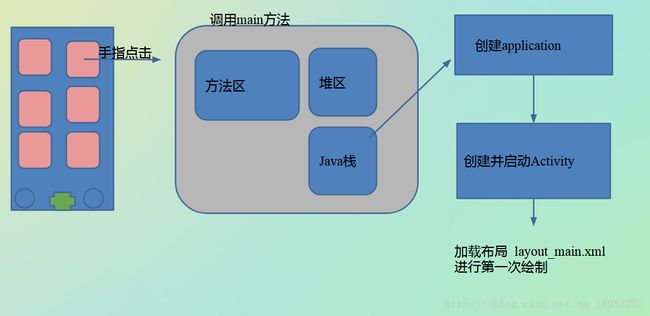
Launcher 的 startActivity 最终调用到了 startActivity(intent, opts.toBundle()); 或 startActivity(intent);,这是 Activity 中的 startActivity 方法,调用应用的入口 ActivityThread 的 main 方法。这时候开始为应用分配内存,创建 Application,创建并启动 Acticity。
**小结:**应用启动的过程,主要时间就花在上述的三个部分,分配内存这部分时间是无法进行优化的,所以我们要优化的 Application 和 Acticity 的创建。
Application 和 Acticity 的创建主要流程有:
-> Application 构造函数
-> Application.attachBaseContext()
-> Application.onCreate()
-> Activity 构造函数
-> Activity.setTheme()
-> Activity.onCreate()
-> Activity.onStart
-> Activity.onResume
-> Activity.onAttachedToWindow
-> Activity.onWindowFocusChanged
四、trance 文件分析
File file = new File(Environment.getExternalStorageDirectory(), "app");
Log.i(TAG, "onCreate: " + file.getAbsolutePath());
Debug.startMethodTracing(file.getAbsolutePath());
...
Debug.stopMethodTracing();
使用安卓自带的 Debug 这个类,可以生成 .trance 文件。在 Debug 类的 startMethodTracing 和 stopMethodTracing 方法之间,所有执行的方法花费的时间将会被记录下来。
在对应的路径下会生成 app.trance 这个文件,可以直接拉到 Android Studio 中进行查看分析。
![]()
这里主要有三个参数:
Invocation Count:被调用次数
Inclusive Time:花费的时间,包括里面各个方法下花费的时间
Exclusive Time:花费的时间,不包括里面各个方法下花费的时间
通过分析这个文件,可以查看到哪些方法调用是比较花费时间的,我们可以对这些较花费时间的方法进行优化。
在 App 启动的时候,我们可以把一些耗时的操作放在子线程中进行操作。特别是初始化一些第三方库文件,单这些操作没有创建 handler、没有操作 UI、对异步要求不高的时候,就可以把他放在子线程中进行操作。还有一些单例模式,有些单例模式初始化也比较复杂,耗时,可以采用懒加载方法进行加载。
