Swift读写plist文件教程及代码
英文原文地址:http://www.swiftkiller.com/?p=559
或者:http://www.tuicool.com/articles/vY7vMjZ
项目代码:https://github.com/SandorNagy/ReadWritePlistTutorial
在许多iOS app中经常需要加载和保存数据。常见的有许多方法能完成这个功能:NSUserDefaults, CoreData,或者是用plist等等。今天这篇文章我将告诉大家怎么使用plist。
下载资源
我们将用到一个GameData.plist。点击下载
打开它你会看到以下三个内容
- BedroomFloor (代码中将要用到的带有ID的特定floor)
- BedroomWall (代码中将要用到的带有ID的特定wall)
- XInitializerItem (代码中将要用到的,不能被改变的)

创建工程
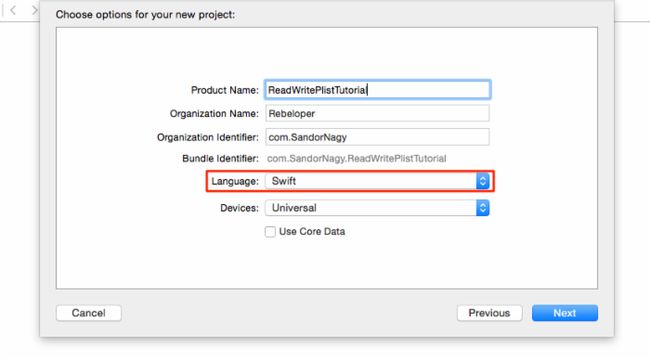
创建一个简单的工程,选择Single View Application.

然后起一个名字:ReadWritePlistTutorial,确保语言选择Swift
设置工程
好的,现在我们把刚才下载的GameData.plist拖到你的工程里。

确保选择了Copy items if needed并且目标是ReadWritePlistTutorial.

首先我们要为这个plist的关键字添加一些常量。添加下面代码到ViewController.swift里的import UIKit之后。
// MARK: == GameData.plist Keys ==
  let BedroomFloorKey = "BedroomFloor"
  let BedroomWallKey = "BedroomWall"
  // MARK: -
现在继续添加两个辅助变量在viewDidLoad方法前边。
// MARK: == Variables ==
  var bedroomFloorID: AnyObject = 101
  var bedroomWallID: AnyObject = 101
现在你的ViewController应该是这样

添加逻辑
我们想要能够在代码中使用plist文件元素,所以我们要把它转换成字典类型加载到我们的代码里。复制下面的代码在didReceiveMemoryWarning()方法之后。
func loadGameData() {
  // getting path to GameData.plist
  let paths = NSSearchPathForDirectoriesInDomains(.DocumentDirectory, .UserDomainMask, true) as NSArray
  let documentsDirectory = paths[0] as String
  let path = documentsDirectory.stringByAppendingPathComponent("GameData.plist")
  let fileManager = NSFileManager.defaultManager()
  //check if file exists
  if(!fileManager.fileExistsAtPath(path)) {
    // If it doesn't, copy it from the default file in the Bundle
    if let bundlePath = NSBundle.mainBundle().pathForResource("GameData", ofType: "plist") {
      let resultDictionary = NSMutableDictionary(contentsOfFile: bundlePath)
      println("Bundle GameData.plist file is --> \(resultDictionary?.description)")
      fileManager.copyItemAtPath(bundlePath, toPath: path, error: nil)
      println("copy")
    } else {
    println("GameData.plist not found. Please, make sure it is part of the bundle.")
    }
  } else {
    println("GameData.plist already exits at path.")
    // use this to delete file from documents directory
    //fileManager.removeItemAtPath(path, error: nil)
  }
  let resultDictionary = NSMutableDictionary(contentsOfFile: path)
  println("Loaded GameData.plist file is --> \(resultDictionary?.description)")
  var myDict = NSDictionary(contentsOfFile: path)
  if let dict = myDict {
    //loading values
    bedroomFloorID = dict.objectForKey(BedroomFloorKey)!
    bedroomWallID = dict.objectForKey(BedroomWallKey)!
    //...
  } else {
    println("WARNING: Couldn't create dictionary from GameData.plist! Default values will be used!")
  }
}func saveGameData() {
let paths = NSSearchPathForDirectoriesInDomains(.DocumentDirectory, .UserDomainMask, true) as NSArray
let documentsDirectory = paths.objectAtIndex(0) as NSString
let path = documentsDirectory.stringByAppendingPathComponent("GameData.plist")
var dict: NSMutableDictionary = ["XInitializerItem": "DoNotEverChangeMe"]
//saving values
dict.setObject(bedroomFloorID, forKey: BedroomFloorKey)
dict.setObject(bedroomWallID, forKey: BedroomWallKey)
//...
//writing to GameData.plist
dict.writeToFile(path, atomically: false)
let resultDictionary = NSMutableDictionary(contentsOfFile: path)
println("Saved GameData.plist file is --> \(resultDictionary?.description)")
}
通常我们需要在app一开始运行时候就获取到plist中的数据,为此我们在viewDidLoad()中调用plist.

为了保存一些数据我们首先在Main.storyboard中创建一个button.

把它重命名,然后按住Ctrl键,点击按钮拖到ViewController.swift中以建立一个连接。

选择Action连接,命名为:SaveButtonTapped.

现在假设你想改变bedroomFloorID为999并且保存在plist中,添加以下代码到 saveButtonTapped IBAction.
//change bedroomFloorID variable value
  bedroomFloorID = 999
  //save the plist with the changes
  saveGameData()
完成之后,如果你关闭app然后再次编译运行,BedroomFloorID 将会变为999
注:你可能想把Save按钮的位置在app屏幕上居中,然而那是另一个教程提示一下:
