图像标注工具labelImg安装及使用教程,制作voc数据集
本教程主要针对在faster rcnn上训练自己的数据集,制作pascal VOC格式的数据集(当然如果嫌弃下面方法太麻烦的话,直接下载exe文件,打开就可以直接使用,简直不要太简便)
安装环境:win10 + Python 3.5.1
安装步骤:
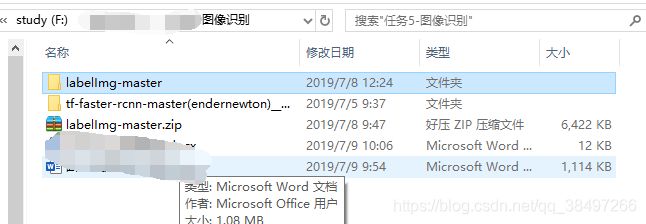
1、labelImg源码下载地址:https://github.com/tzutalin/labelImg,解压到指定目录:
2、安装labelImg所需依赖:PyQt5、lxml,win+R并输入cmd进入命令行窗口,
- PyQt5安装,命令行输入:pip install PyQt5 -i https://pypi.douban.com/simple
- lxml安装,命令行输入:pip install lxml,若这样可以安装成功,后面的踩坑步骤可忽略。
本人在采用上述安装方法时报错,于是上网百度,可以下载lxml与本机环境匹配版本的.whl文件,下载地址:https://pypi.org/project/lxml/#files
查看本机所需版本的方法:在命令行中输入python; import pip; print(pip.pep425tags.get_supported())可以获取到:
通过上图可以看出本机应该下载的版本和红色框里的格式类似,因此下载lxml-4.3.4-cp35-cp35m-win32.whl保存到python的安装目录D:\Program Files\Python35\Lib\site-packages中,并重命名为lxml-4.3.4-cp35-none-win32.whl,再次进入命令行界面,并使用cd命令跳转到D:\Program Files\Python35\Lib\site-packages下,输入pip install lxml-4.3.4-cp35-none-win32.whl安装lxml依赖包,即可安装成功,成功之后输入pip list可以看到lxml和PyQt5包已经安装成功。
3、上面两步成功后,在命令行窗口用cd命令进入labelImg源码解压目录中,输入:pyrcc5 -o resources.py resources.qrc
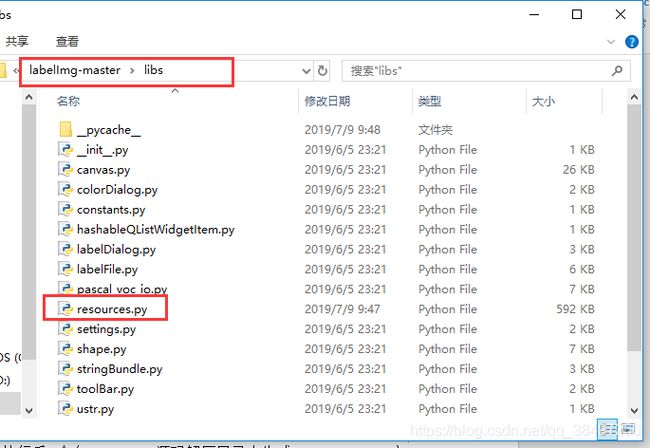
4、第三步命令执行后,会在labelImg源码解压目录中生成resources.py文件,将其移动到同级目录的libs中
5、最后一步,命令行中输入python labelImg.py,稍等片刻,labelImg图形用户界面成功打开。
使用教程:
labelImg-master目录下文件如下图:
其中data目录下的predefined_classes.txt文件为预先定义好的label值,可以根据实际数据集修改label值。
制作数据集:
- 在任意目录下创建两个文件夹,一个data_picture文件夹存储需要标注的图片,另外一个data_xml文件夹存储与voc数据集格式一样的xml文件;
- 在labelImg界面ctrl+R选择标注图片时生成的xml文件保存的路径;
- 点击labelImg界面的open dir选择创建的文件夹data_picture,就可以导入需要标注的图片,图片列表显示在标注界面的右下角,如下图所示:

- 点击界面左下角,选中create\nRectBox就可以在图片上进行标注,标注好的区域及标签会显示在右边中间位置(上图右边中间红色框的person即为已经标注的位置),图片标注完成之后,点击按钮save即可保存生成和图片名命名相同的xml文件到data_xml文件夹下。
图片批量处理:
1、 图片可能分辨率太大,不利于训练,把他们缩小到跟voc数据集里的图片差不多大小
#coding=utf-8
import os  #打开文件时需要
from PIL import Image
import re

Start_path='C:\\Users\\zcy\\Desktop\\transform\\' #你的图片目录
iphone5_width=333 #图片最大宽度
iphone5_depth=500 #图片最大高度

list=os.listdir(Start_path)
#print list
count=0
for pic in list:
    path=Start_path+pic
    print path
    im=Image.open(path)
    w,h=im.size
    #print w,h
    #iphone 5的分辨率为1136*640,如果图片分辨率超过这个值,进行图片的等比例压缩

    if w>iphone5_width:
        print pic
        print "图片名称为"+pic+"图片被修改"
        h_new=iphone5_width*h/w
        w_new=iphone5_width
        count=count+1
        out = im.resize((w_new,h_new),Image.ANTIALIAS)
        new_pic=re.sub(pic[:-4],pic[:-4]+'_new',pic)
        #print new_pic
        new_path=Start_path+new_pic
        out.save(new_path)

    if h>iphone5_depth:
        print pic
        print "图片名称为"+pic+"图片被修改"
        w=iphone5_depth*w/h
        h=iphone5_depth
        count=count+1
        out = im.resize((w_new,h_new),Image.ANTIALIAS)
        new_pic=re.sub(pic[:-4],pic[:-4]+'_new',pic)
        #print new_pic
        new_path=Start_path+new_pic
        out.save(new_path)

print 'END'
count=str(count)
print "共有"+count+"张图片尺寸被修改"
2、按照一定的规律批量重命名图片
#coding=utf-8
import os  #打开文件时需要
from PIL import Image
import re

class BatchRename():
    def __init__(self):
        #我的图片文件夹路径
        self.path = 'C:\\Users\\zcy\\Desktop\\transform'

    def rename(self):
        filelist = os.listdir(self.path)
        total_num = len(filelist)
        i = 10000 #图片编号从多少开始,不要跟VOC原本的编号重复了
        n = 6
        for item in filelist:
            if item.endswith('.jpg'):
                n = 6 - len(str(i))
                src = os.path.join(os.path.abspath(self.path), item)
                dst = os.path.join(os.path.abspath(self.path), str(0)*n + str(i) + '.jpg')
                try:
                    os.rename(src, dst)
                    print 'converting %s to %s ...' % (src, dst)
                    i = i + 1
                except:
                    continue
        print 'total %d to rename & converted %d jpgs' % (total_num, i)
if __name__ == '__main__':
    demo = BatchRename()
    demo.rename()
3、生成训练和测试需要的txt文件索引(就是voc数据集中的main文件夹下的txt文件),程序是根据这个索引来获取图像的。
# !/usr/bin/python
# -*- coding: utf-8 -*-
import os
import random

trainval_percent = 0.8  #trainval占比例多少
train_percent = 0.7  #test数据集占比例多少
xmlfilepath = 'Annotations'
txtsavepath = 'ImageSets\Main'
total_xml = os.listdir(xmlfilepath)

num=len(total_xml)
list=range(num)
tv=int(num*trainval_percent)
tr=int(tv*train_percent)
trainval= random.sample(list,tv)
train=random.sample(trainval,tr)

ftrainval = open('ImageSets/Main/trainval.txt', 'w')
ftest = open('ImageSets/Main/test.txt', 'w')
ftrain = open('ImageSets/Main/train.txt', 'w')
fval = open('ImageSets/Main/val.txt', 'w')

for i  in list:
    name=total_xml[i][:-4]+'\n'
    if i in trainval:
        ftrainval.write(name)
        if i in train:
            ftrain.write(name)
        else:
            fval.write(name)
    else:
        ftest.write(name)

ftrainval.close()
ftrain.close()
fval.close()
ftest .close()参考链接:
https://www.e-learn.cn/content/qita/821279
https://blog.csdn.net/qq_34809033/article/details/80589868
https://blog.csdn.net/Bryan_QAQ/article/details/90763167
https://blog.csdn.net/zcy0xy/article/details/79614862


