人脸融合技术,用 Python - OpenCV 来帮你实现!
提了好几天的人脸融合技术,今天终于被提上日程,该技术是基于之前介绍的技术基础上延伸得到的,如果之前没有了解过这两篇文章,建议提前看下,
实现人脸识别、人脸68个特征点提取,或许这个 Python 库能帮到你!
利用 OpenCV-Python 进行人脸 Delaunay 三角剖分(人脸检测核心技术之一)
1,Image Morphing 介绍
图像融合简单来说,通过把图像设置为不同的透明度,把两张图像融合为一张图像(一般要求图像需要是等尺寸大小的),公式如下:
M ( x , y ) = ( 1 − α ) I ( x , y ) + α J ( x , y ) α 为 设 置 的 透 明 度 参 数 I ( x , y ) 为 图 像 I 坐 标 为 ( x , y ) 的 像 素 值 ; J ( x , y ) 为 图 像 J 坐 标 为 ( x , y ) 的 像 素 值 ; M ( x , y ) 为 融 合 之 后 图 像 的 像 素 值 ; M(x,y) = (1-\alpha)I(x,y)+\alpha J(x,y)\\ \alpha 为设置的透明度参数\\ I(x,y) 为图像 I 坐标为 (x,y) 的像素值;\\J(x,y)为图像 J 坐标为 (x,y) 的像素值;\\ M(x,y) 为融合之后图像的像素值; M(x,y)=(1−α)I(x,y)+αJ(x,y)α为设置的透明度参数I(x,y)为图像I坐标为(x,y)的像素值;J(x,y)为图像J坐标为(x,y)的像素值;M(x,y)为融合之后图像的像素值;
2,Image Morphing 简单尝试
可以根据这个公式尝试实现一下融合技术,利用 OpenCV 的 cv2.addWeighted() 函数,代码如下:
import cv2
import  numpy as np

file_path1 = "E:/data_ceshi/1.jpg"
file_path2 = "E:/data_ceshi/2.jpg"
img1 = cv2.imread(file_path1)
img2 = cv2.imread(file_path2)
morph_img = cv2.addWeighted(img1,0.5,img2,0.5,0)
save_img = np.hstack((img1,morph_img,img2))
cv2.imwrite("E:/data_ceshi/save.jpg",save_img)
cv2.imshow("morph_img",save_img)
cv2.waitKey(0)
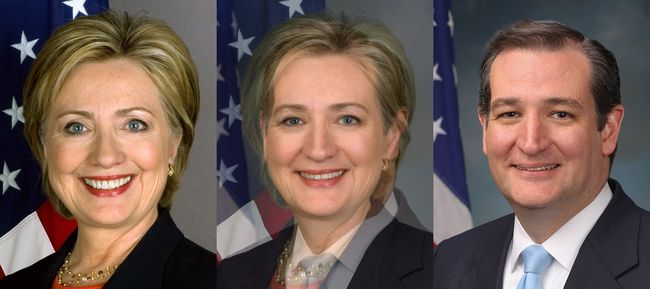
这里 alpha 设置为 0.5, 最终结果如下图:
左右两边分别为欲融合的两张图片,中间的为最终的融合结果,看起来非常不好,图片中脸的部分的确融合了一步分但是给我们的感觉就是明显的失真效果,太假了
以上对人脸进行融合之前,若想要达到不错的效果需要对人脸区域进行对齐操作,而这一步就需要用到之前介绍的技术:人脸68个特征点提取,Delaunay 三角剖分
3,特征点提取
在做人脸对齐时,不仅需要考虑人脸部分需要对齐,这里也需要考虑图片的整体性(例如头发、脖子、肩膀等部位),因此这里除去 dlib 提取68个特征点之外,又加入了12个特征点(人工标记)分别图像四角、四边中点、是肩膀处,右耳边缘、脖子等
4,Delaunay 三角剖分
这里三角剖分目的网格化图像脸部区域,方便寻找特征点,为后面使用仿射变换进行对齐操作:
从三角剖分图上来看,人脸区域轮廓是非常相似的,人脸融合时需要把脸部每一个对应的小三角区域事先一一对齐,然后利用设置的透明度参数来做最终的效果融合。这样结果就显得不那么失真。
5,脸部融合
下面将脸部融合技术拆解为几部分:
1,脸部特长点提取、三角剖分(前面已经详细介绍了,这里就不再一一展开了);
2,对 1 中的三角剖分每个顶点做对应点衔接并记录下来,对应点记录的是三角形三顶点的索引数,如下图所示:
3,图片中对每一个三角剖分区域做放射变换,用到的函数:getAffineTransform() 得到仿射变换矩阵,warpAffine() 进行放射变换,最终得到两个变换图像,
4,对 3 中得到的两图像中像素值调整透明度参数,来进行图像融合
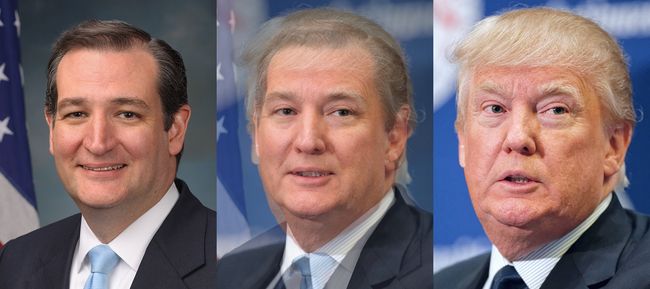
最终结果如下:
结果来看,脸部区域能够取得不错的结果,但整体来看仍然有很大的瑕疵,但是我们可以通过手动选择更多特征对应点来改善这种效果,最后附上完整代码
import cv2
import numpy as np
import sys


#Read points from  text file
def readPoints(path):
    # Create an array of points
    points = []
    # Read points
    with open(path) as file:
        for line in file:
            x,y = line.split()
            points.append((int(x),int(y)))

    return points


# Apply affine tranform calculated using srcTri and sdtTri to src and output an image of size
def applyAffineTransform(src,srcTri,dstTri,size):

    #Given a pair of triangles,find the affine transform.

    warpMat = cv2.getAffineTransform(np.float32(srcTri),np.float32(dstTri))

    #Apply the Affine Transform just foundto the src image
    dst = cv2.warpAffine(src,warpMat,(size[0],size[1]),None,flags=cv2.INTER_LINEAR,borderMode=cv2.BORDER_REFLECT_101)

    return dst


# Warps and alpha blends triangular regions from img1 and img2 to img
def morphTriangle(img1,img2,img,t1,t2,t,alpha):

    #Find bounding rectangle for each triangle
    r1 = cv2.boundingRect(np.float32([t1]))
    r2 = cv2.boundingRect(np.float32([t2]))
    r = cv2.boundingRect(np.float32([t]))

    # Offset points by left top corner of the respective rectangles
    t1Rect = []
    t2Rect = []
    tRect = []

    for i in range(0,3):
        tRect.append(((t[i][0] - r[0]),(t[i][1]-r[1])))
        t1Rect.append(((t1[i][0]-r1[0]),(t1[i][1]-r1[1])))
        t2Rect.append(((t2[i][0] -r2[0]),(t2[i][1]-r2[1])))

    # Get mask by filling triangles
    mask = np.zeros((r[3],r[2],3),dtype = np.float32)
    cv2.fillConvexPoly(mask,np.int32(tRect),(1.0,1.0,1.0),16,0)

    # Apply warpImage to small rectangular patched
    img1Rect = img1[r1[1]:r1[1]+r1[3],r1[0]:r1[0]+r1[2]]
    img2Rect = img2[r2[1]:r2[1]+r2[3],r2[0]:r2[0]+r2[2]]

    size = (r[2],r[3])
    warpImage1 = applyAffineTransform(img1Rect,t1Rect,tRect,size)
    warpImage2 = applyAffineTransform(img2Rect,t2Rect,tRect,size)

    # Alpha blend rectangular patches
    imgRect = (1.0-alpha) *warpImage1 +alpha*warpImage2

    # Copy triangular region of rectangular patch to tje output image
    print(r[1],r[3],r[0],r[2])
    print(imgRect.shape)
    img[r[1]:r[1]+r[3],r[0]:r[0]+r[2]] = img[r[1]:r[1]+r[3],r[0]:r[0]+r[2]]*(1-mask) +imgRect*mask


if __name__ =='__main__':
    filename1 = "E:/data_ceshi/2.jpg"
    filename2 = "E:/data_ceshi/3.jpg"

    points_txt1 = "E:/data_ceshi/2.txt"
    points_txt2  ="E:/data_ceshi/3.txt"

    alpha = 0.5

    # Read images
    img1 = cv2.imread(filename1)
    img2 = cv2.imread(filename2)

    # Convertat to float data type
    img1 = np.float32(img1)
    img2 = np.float32(img2)

    # Read array of corresponding points
    points1 = readPoints(points_txt1)
    points2 = readPoints(points_txt2)
    points = []


    # Compute weighted average point coordinate

    for i in range(0,len(points1)):
        x = (1-alpha) *points1[i][0] +alpha *points2[i][0]
        y = (1-alpha)*points1[i][1] + alpha*points2[i][1]
        points.append((x,y))


    imgMorph = np.zeros(img1.shape,dtype = img1.dtype)

    # Read triangles for tri.txt
    with open("E:/data_ceshi/tri.txt") as file:
        for line in file:
            x,y,z = line.split()

            x = int(x)
            y = int(y)
            z = int(z)

            t1 = [points1[x],points1[y],points1[z]]
            t2 = [points2[x],points2[y],points2[z]]
            t = [points[x],points[y],points[z]]
            # Morph one triangle at a time
            morphTriangle(img1,img2,imgMorph,t1,t2,t,alpha)


    # Display Results

    out_img = np.hstack((img1,imgMorph,img2))
    cv2.imwrite("E:/data_ceshi/out_img.jpg",out_img)

    cv2.imshow("Morphed Face",np.uint8(imgMorph))
    cv2.waitKey(0)
小总结
虽然本次面向对象是人脸,但相同技术原理也可以运用到其他物体上面,比如把苹果和橘子相融合、人脸区域更换等功能,如果有更好的 idea 的话,可能会得到意想不到的结果!
最后文章中完整源码和文件都已经打包到 Github 上去了,关注公众号: Z先生点记,后台回复关键词 FaceMorph 即可获取.


