React 源码分析-调用ReactDOM.render后发生了什么
我们知道, 对于一般的React 应用, 浏览器会首先执行代码 ReactDOM.render来渲染顶层组件, 在这个过程中递归渲染嵌套的子组件, 最终所有组件被插入到DOM中. 我们来看看
调用ReactDOM.render 发生了什么
大致过程(只展示主要的函数调用):
1、创建元素
首先, 对于你写的jsx, Babel会把这种语法糖转义成这样:
// jsx
ReactDOM.render(
没错, 就是调用React.createElement来创建元素. 元素是什么? 元素只是一个对象描述了DOM树, 它像这样:
{
  $$typeof: Symbol(react.element)
  key: null
  props: {}        // props有child属性, 描述子组件, 同样是元素
  ref: null
  type: class C    // type可以是类(自定义组件)、函数(wrapper)、string(DOM节点)
  _owner: null
  _store: {validated: false}
  _self: null
  _source: null
}
React.createElement源码在ReactElement.js中, 其他逻辑比较简单, 值得说的是props属性, 这个props属性里面包含的就是我们给组件传的各种属性:
// jsx
return (

          "dscsdcsd"
           console.log(e)}>{this.state.val}


)
// bable 转义后
// createElement(type, props, children)
return React.createElement(
    'div', { className: 'container' },
    '"dscsdcsd"',
    React.createElement('i', { onClick: e => console.log(e) }, this.state.val),
    React.createElement(Children, { val: this.state.val })
);
// 对应的元素树
{
  $$typeof: Symbol(react.element)
  key: null
  props: {  // props有children属性, 描述子组件, 同样是元素
    children: [
      ""dscsdcsd"",
      // 子元素
  {$$typeof: Symbol(react.element), type: "i", key: null, ref: null, props: {…}, …},
  {$$typeof: Symbol(react.element), type: class Children, props: {…}, …}
    ]
    className: 'container'
  }
  ref: null
  type: 'div'
  _owner: null
  _store: {validated: false}
  _self: null
  _source: null
}
2、创建对应类型的React组件
创建出来的元素被当作参数和指定的 DOM container 一起传进ReactDOM.render. 接下来会调用一些内部方法, 接着调用了 instantiateReactComponent, 这个函数根据element的类型实例化对应的component. 当element的类型为:
- string时, 说明是文本, 创建ReactDOMTextComponent;
- ReactElement时, 说明是react元素, 进一步判断element.type的类型, 当为
string时, 为DOM原生节点, 创建ReactDOMComponent;
函数或类时, 为react 组件, 创建ReactCompositeComponent
instantiateReactComponent函数在instantiateReactComponent.js :
function instantiateReactComponent(node(这里node指element), shouldHaveDebugID) {
  ...

  // 如果element为空
  if (node === null || node === false) {
    // 创建空component
    instance = ReactEmptyComponent.create(instantiateReactComponent);
  } else if (typeof node === 'object') {  // 如果是对象
      ...     // 这里是类型检查

    // 如果element.type是字符串
    if (typeof element.type === 'string') {
      //实例化宿主组件, 也就是DOM节点
      instance = ReactHostComponent.createInternalComponent(element);
    } else if (isInternalComponentType(element.type)) {
      // 保留给以后版本使用,此处暂时不会涉及到
    } else { // 否则就实例化ReactCompositeComponent
      instance = new ReactCompositeComponentWrapper(element);
    }
  // 如果element是string或number
  } else if (typeof node === 'string' || typeof node === 'number') {
    // 实例化ReactDOMTextComponent
    instance = ReactHostComponent.createInstanceForText(node);
  } else {
    invariant(false, 'Encountered invalid React node of type %s', typeof node);
  }
   ...
  return instance;
}
3.开启批量更新以应对可能的setState
在调用instantiateReactComponent拿到组件实例后, React 接着调用了batchingStrategy.batchedUpdates并将组件实例当作参数执行批量更新(首次渲染为批量插入).
批量更新是一种优化策略, 避免重复渲染, 在很多框架都存在这种机制. 其实现要点是要弄清楚何时存储更新, 何时批量更新.
在React中, 批量更新受batchingStrategy控制,而这个策略除了server端都是ReactDefaultBatchingStrategy:
那么React是如何实现批量更新的? 在ReactDefaultBatchingStrategy.js我们看到, 它的实现依靠了事务.
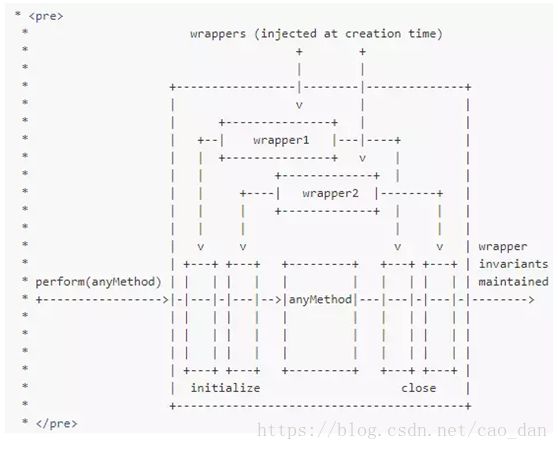
在 Transaction.js中, React 介绍了事务:
React 把要调用的函数封装一层wrapper, 这个wrapper一般是一个对象, 里面有initialize方法, 在调用函数前调用;有close方法, 在函数执行后调用. 这样封装的目的是为了, 在要调用的函数执行前后某些不变性约束条件(invariant)仍然成立.函数调用前后某些规则仍然成立. 比如, 在调和(reconciliation)前后保留UI组件一些状态.React 中, 事务就像一个黑盒, 函数在这个黑盒里被执行, 执行前后某些规则仍然成立, 即使函数报错. 事务提供了函数执行的一个安全环境.
// 事务的抽象实现, 作为基类
 reinitializeTransaction: function () {
    this.transactionWrappers = this.getTransactionWrappers();
    if (this.wrapperInitData) {
      this.wrapperInitData.length = 0;
    } else {
      this.wrapperInitData = [];
    }
    this._isInTransaction = false;
  },

  _isInTransaction: false,

  // 这个函数会交给具体的事务实例化时定义, 初始设为null
  getTransactionWrappers: null,
  // 判断是否已经在这个事务中, 保证当前的Transaction正在perform的同时不会再次被perform
  isInTransaction: function () {
    return !!this._isInTransaction;
  },

  // 顶级API, 事务的主要实现, 用来在安全的窗口下执行函数
  perform: function (method, scope, a, b, c, d, e, f) {
    var ret;
    var errorThrown;
    try {
      this._isInTransaction = true;
      errorThrown = true;
      this.initializeAll(0);  // 调用所有wrapper的initialize方法
      ret = method.call(scope, a, b, c, d, e, f); // 调用要执行的函数
      errorThrown = false;
    } finally {
      // 调用所有wrapper的close方法, 利用errorThrown标志位保证只捕获函数执行时的错误,
     // 对initialize 和close抛出的错误不做处理
      try {
        if (errorThrown) {
          try {
            this.closeAll(0);
          } catch (err) {}
        } else {
          this.closeAll(0);
        }
      } finally {
        this._isInTransaction = false;
      }
    }
    return ret;
  },

  // 调用所有wrapper的initialize方法的函数定义
  initializeAll: function (startIndex) {
    var transactionWrappers = this.transactionWrappers; // 得到wrapper
    // 遍历依次调用
    for (var i = startIndex; i < transactionWrappers.length; i++) {
      var wrapper = transactionWrappers[i];
      try {
        ...
        this.wrapperInitData[i] = wrapper.initialize ? wrapper.initialize.call(this):null;
      } finally {
        if (this.wrapperInitData[i] === OBSERVED_ERROR) {
          try {
            this.initializeAll(i + 1);
          } catch (err) {}
        }
      }
    }
  },

  // 调用所有wrapper的close方法的函数定义
  closeAll: function (startIndex) {
    ...
    var transactionWrappers = this.transactionWrappers; // 拿到wrapper
    // 遍历依次调用
    for (var i = startIndex; i < transactionWrappers.length; i++) {
      var wrapper = transactionWrappers[i];
      var initData = this.wrapperInitData[i];
      var errorThrown;
      try {
        ...
        if (initData !== OBSERVED_ERROR && wrapper.close) {
          wrapper.close.call(this, initData);
        }
        errorThrown = false;
      } finally {
        if (errorThrown) {
          ...
          try {
            this.closeAll(i + 1);
          } catch (e) {}
        }
      }
    }
    this.wrapperInitData.length = 0;
  }
};
ReactDefaultBatchingStrategy.js中, 批量更新的实现依靠了事务:
...
var Transaction = require('Transaction');// 引入事务
...

var RESET_BATCHED_UPDATES = {   // 重置的 wrapper
  initialize: emptyFunction,
  close: function() {
    ReactDefaultBatchingStrategy.isBatchingUpdates = false;  // 事务结束即一次batch结束
  },
};

var FLUSH_BATCHED_UPDATES = {  // 批处理的 wrapper
  initialize: emptyFunction,
  close: ReactUpdates.flushBatchedUpdates.bind(ReactUpdates),
};

// 组合成 ReactDefaultBatchingStrategyTransaction 事务的wrapper
var TRANSACTION_WRAPPERS = [FLUSH_BATCHED_UPDATES, RESET_BATCHED_UPDATES];

// 调用 reinitializeTransaction 初始化
function ReactDefaultBatchingStrategyTransaction() {
  this.reinitializeTransaction();
}

// 参数中依赖了事务
Object.assign(ReactDefaultBatchingStrategyTransaction.prototype, Transaction, {
  getTransactionWrappers: function() {
    return TRANSACTION_WRAPPERS;
  },
});

var transaction = new ReactDefaultBatchingStrategyTransaction(); // 实例化这类事务

// 批处理策略
var ReactDefaultBatchingStrategy = {
  isBatchingUpdates: false, // 是否处在一次BatchingUpdates标志位

  // 批量更新策略调用的就是这个方法
  batchedUpdates: function(callback, a, b, c, d, e) {
    var alreadyBatchingUpdates = ReactDefaultBatchingStrategy.isBatchingUpdates;
// 一旦调用批处理, 重置isBatchingUpdates标志位, 表示正处在一次BatchingUpdates中
    ReactDefaultBatchingStrategy.isBatchingUpdates = true;

    // 避免重复分配事务
    if (alreadyBatchingUpdates) {
      return callback(a, b, c, d, e);
    } else {
      return transaction.perform(callback, null, a, b, c, d, e);  // 将callback放进事务里执行
    }
  },
};
那么, 为什么批量更新的实现依靠了事务呢? 还记得实现批量更新的两个要点吗?
- 何时存储更新
- 何时批处理
对于这两个问题, React 在执行事务时调用wrappers的initialize方法, 建立更新队列, 然后执行函数, 接着 :
- 何时存储更新—— 在执行函数时遇到更新请求就存到这个队列中
- 何时批处理—— 函数执行后调用wrappers的close方法, 在close方法中调用批量处理函数
我们拿ReactDOM.render会调用的事务ReactReconcileTransaction来看看是不是这样:
ReactReconcileTransaction.js 里有个wrapper, 它是这样定义的(英文是官方注释) :
var ON_DOM_READY_QUEUEING = {
  /**
   * Initializes the internal `onDOMReady` queue.
   */
  initialize: function() {
    this.reactMountReady.reset();
  },

  /**
   * After DOM is flushed, invoke all registered `onDOMReady` callbacks.
   */
  close: function() {
    this.reactMountReady.notifyAll();
  },
};
我们再看ReactReconcileTransaction事务会执行的函数mountComponent, 它在ReactCompositeComponent.js :
/*
   * Initializes the component, renders markup, and registers event listeners.
*/
  mountComponent: function(
    transaction,
    hostParent,
    hostContainerInfo,
    context,
  ) {
    ...

    if (inst.componentDidMount) {
          if (__DEV__) {
            transaction.getReactMountReady().enqueue(() => { // 将要调用的callback存起来
              measureLifeCyclePerf(
                () => inst.componentDidMount(),
                this._debugID,
                'componentDidMount',
              );
            });
          } else {
            transaction.getReactMountReady().enqueue(inst.componentDidMount, inst);
          }
      }

     ...
    }
而上述wrapper定义的close方法调用的this.reactMountReady.notifyAll()在CallbackQueue.js :
/**
   * Invokes all enqueued callbacks and clears the queue. This is invoked after
   * the DOM representation of a component has been created or updated.
   */
  notifyAll() {
      ...
      // 遍历调用存储的callback
      for (var i = 0; i < callbacks.length; i++) {
        callbacks[i].call(contexts[i], arg);
      }
      callbacks.length = 0;
      contexts.length = 0;
    }
  }

