QT5.14.2 官方例子 - Qt Widgets 8: Icons(图标更改)
介绍:
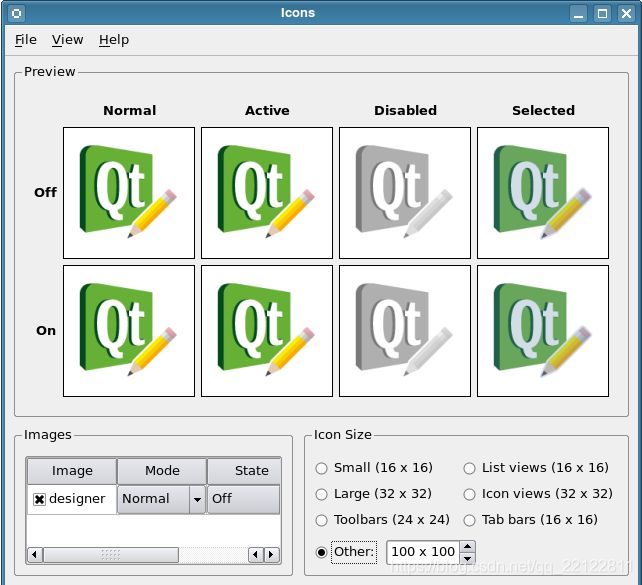
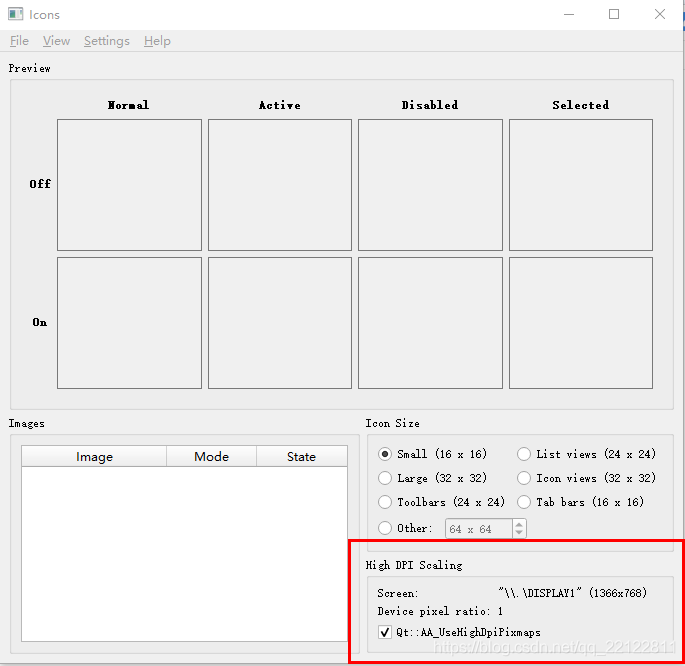
图标的例子展示了QIcon如何生成反映图标状态、模式和大小的像素图。
这些pixmaps是从图标可用的一组pixmaps中生成的,并由Qt小部件用于显示表示特定操作的图标。
QIcon类提供了不同模式和状态下的可伸缩图标。图标的状态和模式取决于图标的预期用途。Qt目前定义了四种模式:
QIcon:正常
当用户没有与图标交互时显示像素图,但是图标所表示的功能可用。
QIcon:活跃
当图标所表示的功能可用并且用户正在与图标交互时,例如,在图标上移动鼠标或单击它时,显示像素图。
QIcon:禁用
当图标所表示的功能不可用时显示像素图。
QIcon:选择
当图标被选中时显示像素图。
QIcon的状态是QIcon::On和QIcon::Off,当小部件处于相应状态时,会显示像素图。QIcon状态最常见的用法是显示可检查的工具按钮或菜单项(参见QAbstractButton::setCheckable()和QAction::setCheckable())。当工具按钮或菜单项被选中时,QIcon的状态是On,否则就是Off。例如,你可以根据工具按钮或菜单项是否被选中,使用QIcon的状态来显示不同的像素图。
QIcon可以从给定的像素图集合中生成更小、更大、活跃的、禁用的和选定的像素图。Qt小部件使用这样的像素映射来显示表示特定动作的图标。
详细讲解:
https://doc.qt.io/qt-5/qtwidgets-widgets-icons-example.html
主要用到的类及类方法:
QMenu:
QMainwindow:
QGroupbox:
QFormLayout:
QScreen:
QButtonGroup:
QTableWidget:
QFileDialog:
QStyle:
QStyleFactory:
QSpinBox:
QRegularExpression:
QCommandLineParser:
收获点或者思路点:
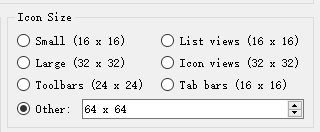
1.图片如何通过右下角的button的改变而改变:
创建:
QWidget *MainWindow::createIconSizeGroupBox()
{
    QGroupBox *iconSizeGroupBox = new QGroupBox(tr("Icon Size"));

    sizeButtonGroup = new QButtonGroup(this);
    sizeButtonGroup->setExclusive(true);

    connect(sizeButtonGroup, QOverload::of(&QButtonGroup::buttonToggled),
            this, &MainWindow::changeSize);

    QRadioButton *smallRadioButton = new QRadioButton;
    sizeButtonGroup->addButton(smallRadioButton, QStyle::PM_SmallIconSize);
    QRadioButton *largeRadioButton = new QRadioButton;
    sizeButtonGroup->addButton(largeRadioButton, QStyle::PM_LargeIconSize);
    QRadioButton *toolBarRadioButton = new QRadioButton;
    sizeButtonGroup->addButton(toolBarRadioButton, QStyle::PM_ToolBarIconSize);
    QRadioButton *listViewRadioButton = new QRadioButton;
    sizeButtonGroup->addButton(listViewRadioButton, QStyle::PM_ListViewIconSize);
    QRadioButton *iconViewRadioButton = new QRadioButton;
    sizeButtonGroup->addButton(iconViewRadioButton, QStyle::PM_IconViewIconSize);
    QRadioButton *tabBarRadioButton = new QRadioButton;
    sizeButtonGroup->addButton(tabBarRadioButton, QStyle::PM_TabBarIconSize);
    QRadioButton *otherRadioButton = new QRadioButton(tr("Other:"));
    sizeButtonGroup->addButton(otherRadioButton, OtherSize);
    otherSpinBox = new IconSizeSpinBox;
    otherSpinBox->setRange(8, 256);
    const QString spinBoxToolTip =
        tr("Enter a custom size within %1..%2")
           .arg(otherSpinBox->minimum()).arg(otherSpinBox->maximum());
    otherSpinBox->setValue(64);
    otherSpinBox->setToolTip(spinBoxToolTip);
    otherRadioButton->setToolTip(spinBoxToolTip);
//! [26]

//! [27]
    connect(otherSpinBox, QOverload::of(&QSpinBox::valueChanged),
            this, &MainWindow::triggerChangeSize);

    QHBoxLayout *otherSizeLayout = new QHBoxLayout;
    otherSizeLayout->addWidget(otherRadioButton);
    otherSizeLayout->addWidget(otherSpinBox);
    otherSizeLayout->addStretch();

    QGridLayout *layout = new QGridLayout(iconSizeGroupBox);
    layout->addWidget(smallRadioButton, 0, 0);
    layout->addWidget(largeRadioButton, 1, 0);
    layout->addWidget(toolBarRadioButton, 2, 0);
    layout->addWidget(listViewRadioButton, 0, 1);
    layout->addWidget(iconViewRadioButton, 1, 1);
    layout->addWidget(tabBarRadioButton, 2, 1);
    layout->addLayout(otherSizeLayout, 3, 0, 1, 2);
    layout->setRowStretch(4, 1);
    return iconSizeGroupBox;
}
根据按下的按键的id,匹配出相应的风格,然后设置该label区域的尺寸:
void MainWindow::changeSize(int id, bool checked)
{
    if (!checked)
        return;

    const bool other = id == int(OtherSize);
    const int extent = other
        ? otherSpinBox->value()
        : QApplication::style()->pixelMetric(static_cast(id));

    previewArea->setSize(QSize(extent, extent));
    otherSpinBox->setEnabled(other);
}
2.通过命令后添加的参数,来设置刚运行时显示打开的图片文件:
QCommandLineParser commandLineParser;
    commandLineParser.setSingleDashWordOptionMode(QCommandLineParser::ParseAsLongOptions);
    commandLineParser.addHelpOption();
    commandLineParser.addVersionOption();
    QCommandLineOption noHighDpiPixmapOption("no-highdpi-pixmaps",
                                             "Disable High DPI image loading (Qt::AA_UseHighDpiPixmaps)");
    commandLineParser.addOption(noHighDpiPixmapOption);
        commandLineParser.addPositionalArgument(MainWindow::tr("[file]"), MainWindow::tr("Icon file(s) to open."));
    commandLineParser.process(QCoreApplication::arguments());

    if (!commandLineParser.isSet(noHighDpiPixmapOption))
        QCoreApplication::setAttribute(Qt::AA_UseHighDpiPixmaps);

    MainWindow mainWin;
    if (!commandLineParser.positionalArguments().isEmpty())
        mainWin.loadImages(commandLineParser.positionalArguments());
具体使用方式可参考:https://blog.csdn.net/jdtugfcg/article/details/87609389
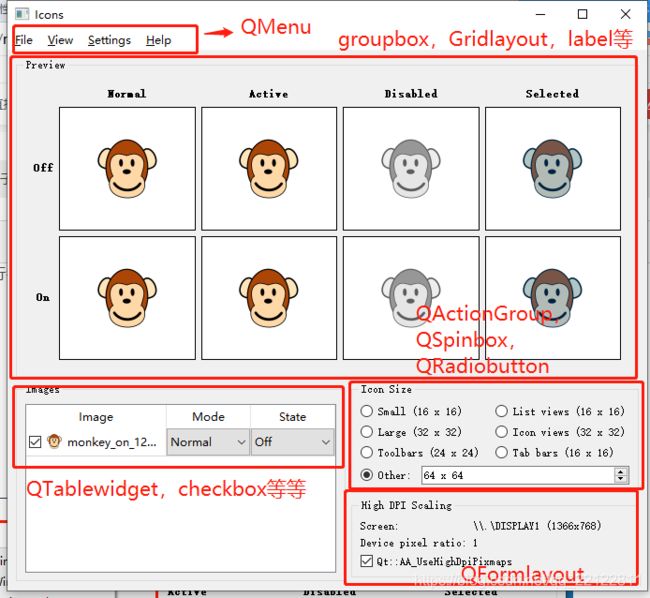
3.布局
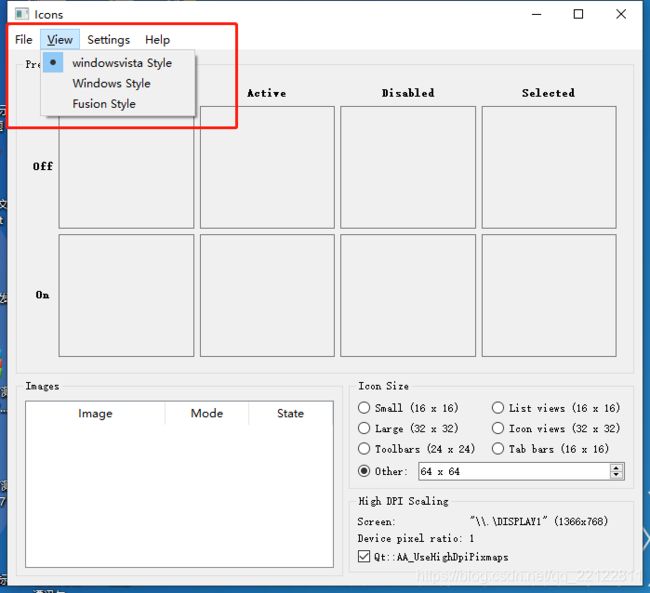
4.改变整体窗口样式:
    QMenu *viewMenu = menuBar()->addMenu(tr("&View"));

    styleActionGroup = new QActionGroup(this);
    const QStringList styleKeys = QStyleFactory::keys();
    for (const QString &styleName : styleKeys)
    {
        QAction *action = new QAction(tr("%1 Style").arg(styleName), styleActionGroup);
        action->setData(styleName);
        action->setCheckable(true);
        connect(action, &QAction::triggered, this, &MainWindow::changeStyle);
        viewMenu->addAction(action);
    }
添加view菜单栏,风格菜单栏由QStyleFactory钟的keys()决定;
QStyleFactory::key():
QStyle类是一个抽象基类,它封装了GUI的外观和感觉。QStyleFactory使用create()函数和标识样式的键创建QStyle对象。样式可以是内置的,也可以是从样式插件动态加载的(参见QStylePlugin)。
可以使用keys()函数检索有效的键。通常包括“窗口”和“融合”。根据不同的平台,可能会有“windowsvista”和“macintosh”。注意键是不区分大小写的。
当选择不同风格时,改变当前窗口的风格:
changeStyle(): slot changes the application's GUI style and adjust the style dependent size options.
void MainWindow::changeStyle(bool checked)
{
    if (!checked)
        return;

    const QAction *action = qobject_cast(sender());
//! [2] //! [3]
    QStyle *style = QStyleFactory::create(action->data().toString());
//! [3] //! [4]
    Q_ASSERT(style);
    QApplication::setStyle(style);

    const QList buttons = sizeButtonGroup->buttons();
    for (QAbstractButton *button : buttons) {
        const QStyle::PixelMetric metric = static_cast(sizeButtonGroup->id(button));
        const int value = style->pixelMetric(metric);
        switch (metric) {
        case QStyle::PM_SmallIconSize:
            button->setText(tr("Small (%1 x %1)").arg(value));
            break;
        case QStyle::PM_LargeIconSize:
            button->setText(tr("Large (%1 x %1)").arg(value));
            break;
        case QStyle::PM_ToolBarIconSize:
            button->setText(tr("Toolbars (%1 x %1)").arg(value));
            break;
        case QStyle::PM_ListViewIconSize:
            button->setText(tr("List views (%1 x %1)").arg(value));
            break;
        case QStyle::PM_IconViewIconSize:
            button->setText(tr("Icon views (%1 x %1)").arg(value));
            break;
        case QStyle::PM_TabBarIconSize:
            button->setText(tr("Tab bars (%1 x %1)").arg(value));
            break;
        default:
            break;
        }
    }

    triggerChangeSize();
}
在上述中:
void MainWindow::changeStyle(bool checked)
  {
      if (!checked)
          return;

      const QAction *action = qobject_cast(sender());
这个函数以QObject指针的形式返回发送方。因为我们知道发送方是一个QAction对象,所以我们可以安全地转换QObject。我们可以使用C风格的cast或c++ static_cast(),但是作为一种防御编程技术,我们使用qobject_cast()。这样做的好处是,如果对象类型错误,则返回一个空指针。由于空指针导致的崩溃比由于不安全类型转换导致的崩溃更容易诊断。
      QStyle *style = QStyleFactory::create(action->data().toString());
      Q_ASSERT(style);
      QApplication::setStyle(style);

      const QList buttons = sizeButtonGroup->buttons();
      for (QAbstractButton *button : buttons) {
          const QStyle::PixelMetric metric = static_cast(sizeButtonGroup->id(button));
          const int value = style->pixelMetric(metric);
          switch (metric) {
          case QStyle::PM_SmallIconSize:
              button->setText(tr("Small (%1 x %1)").arg(value));
              break;
          case QStyle::PM_LargeIconSize:
              button->setText(tr("Large (%1 x %1)").arg(value));
              break;
          case QStyle::PM_ToolBarIconSize:
              button->setText(tr("Toolbars (%1 x %1)").arg(value));
              break;
          case QStyle::PM_ListViewIconSize:
              button->setText(tr("List views (%1 x %1)").arg(value));
              break;
          case QStyle::PM_IconViewIconSize:
              button->setText(tr("Icon views (%1 x %1)").arg(value));
              break;
          case QStyle::PM_TabBarIconSize:
              button->setText(tr("Tab bars (%1 x %1)").arg(value));
              break;
          default:
              break;
          }
      }

      triggerChangeSize();
} 为了安全起见,在使用QApplication::setStyle()函数将应用程序的GUI样式设置为新样式之前,我们使用Q_ASSERT()宏检查创建的样式是否有效。
const int value = style->pixelMetric(metric);返回给定像素度量的值。
程序刚运行时,会核对当前窗口样式:
void MainWindow::checkCurrentStyle()
{
    const QList actions = styleActionGroup->actions();
    for (QAction *action : actions)
    {
        const QString styleName = action->data().toString();

        qDebug() << "styleName: " << styleName;

        const std::unique_ptr candidate{QStyleFactory::create(styleName)};
        Q_ASSERT(candidate);
        if (candidate->metaObject()->className()
                == QApplication::style()->metaObject()->className()) {
            action->trigger();
            return;
        }
    }
}
在checkCurrentStyle()函数中,我们遍历样式操作组,寻找当前GUI样式。
对于每个操作,我们首先使用QAction::data()提取样式名。因为这只是一个QStyleFactory键(例如,“macintosh”),我们不能直接将它与当前样式的类名进行比较。我们需要使用静态QStyleFactory::create()函数创建一个QStyle对象,并将创建的QStyle对象的类名与当前样式的类名进行比较。一旦我们完成QStyle候选项,我们就删除它。
对于使用Q_OBJECT宏的所有QObject子类,对象的类名可以通过它的元对象使用。
我们可以假设QStyleFactory支持样式,但是为了安全起见,我们使用Q_ASSERT()宏来确保QStyleFactory::create()返回一个有效的指针。
5.创建右下角的布局:
用的时QFormLayout布局方式:
QFormLayout类管理输入小部件的表单及其关联标签。如下类似:
6.有扩展屏的前提下,当窗口在屏幕间移动时:
重写QMainwindow的show方法:
void MainWindow::show()
{
    QMainWindow::show();
    connect(windowHandle(), &QWindow::screenChanged, this, &MainWindow::screenChanged);
    screenChanged();
}
当窗口移动到另一个桌面,会触发信号:screenChanged,接着触发自定义槽:screenChanged()
void MainWindow::screenChanged()
{
    devicePixelRatioLabel->setText(QString::number(devicePixelRatioF()));
    if (const QWindow *window = windowHandle())
    {
        const QScreen *screen = window->screen();
        const QString screenDescription =
            tr("%1 (%2x%3)").arg(screen->name())
               .arg(screen->geometry().width()).arg(screen->geometry().height());
        screenNameLabel->setText(screenDescription);
    }
    changeIcon();
}
a.改变label显示:
=》
b.改变图标大小
void MainWindow::changeIcon()
{
    QIcon icon;

    for (int row = 0; row < imagesTable->rowCount(); ++row)
    {
        const QTableWidgetItem *fileItem = imagesTable->item(row, 0);
        const QTableWidgetItem *modeItem = imagesTable->item(row, 1);
        const QTableWidgetItem *stateItem = imagesTable->item(row, 2);

        if (fileItem->checkState() == Qt::Checked)
        {
            const int modeIndex = IconPreviewArea::iconModeNames().indexOf(modeItem->text());
            Q_ASSERT(modeIndex >= 0);
            const int stateIndex = IconPreviewArea::iconStateNames().indexOf(stateItem->text());
            Q_ASSERT(stateIndex >= 0);
            const QIcon::Mode mode = IconPreviewArea::iconModes().at(modeIndex);
            const QIcon::State state = IconPreviewArea::iconStates().at(stateIndex);
//! [6]

//! [8]
            const QString fileName = fileItem->data(Qt::UserRole).toString();
            QImage image(fileName);
            if (!image.isNull())
                icon.addPixmap(QPixmap::fromImage(image), mode, state);
//! [8] //! [9]
        }
//! [9] //! [10]
    }
//! [10]

//! [11]
    previewArea->setIcon(icon);
}
=》
void IconPreviewArea::setIcon(const QIcon &icon)
{
    this->icon = icon;
    updatePixmapLabels();
}
=》
void IconPreviewArea::updatePixmapLabels()
{
    QWindow *window = nullptr;
    if (const QWidget *nativeParent = nativeParentWidget())
        window = nativeParent->windowHandle();
    for (int column = 0; column < NumModes; ++column)
    {
        for (int row = 0; row < NumStates; ++row)
        {
            const QPixmap pixmap =
                icon.pixmap(window, size, IconPreviewArea::iconModes().at(column),
                            IconPreviewArea::iconStates().at(row));
            QLabel *pixmapLabel = pixmapLabels[column][row];
            pixmapLabel->setPixmap(pixmap);
            pixmapLabel->setEnabled(!pixmap.isNull());
            QString toolTip;
            if (!pixmap.isNull())
            {
                const QSize actualSize = icon.actualSize(size);
                toolTip =
                    tr("Size: %1x%2\nActual size: %3x%4\nDevice pixel ratio: %5")
                        .arg(size.width()).arg(size.height())
                        .arg(actualSize.width()).arg(actualSize.height())
                        .arg(pixmap.devicePixelRatioF());
            }
            pixmapLabel->setToolTip(toolTip);
        }
    }
}
其中:
根据size改变了各个label图标的尺寸大小:
            const QPixmap pixmap =
                icon.pixmap(window, size, IconPreviewArea::iconModes().at(column),
                            IconPreviewArea::iconStates().at(row));
            QLabel *pixmapLabel = pixmapLabels[column][row];
            pixmapLabel->setPixmap(pixmap);
