智能花盆(二)
NodeMcu的使用
我们想要使用NodeMcu,只需要简单的四个步骤
- 准备好固件(你后面编程所需要的程序库)
- 将固件刷入NodeMcu
- 编写程序
- 将程序刷入NodeMcu
准备固件
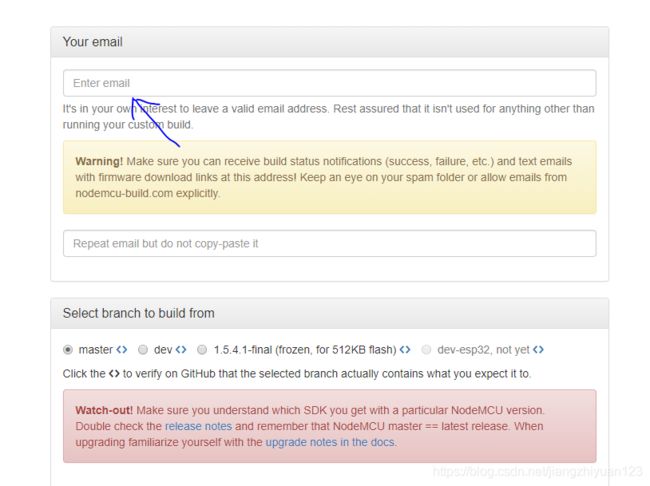
你可以在这个网站https://nodemcu-build.com/构建属于你的固件
输入你的邮箱地址
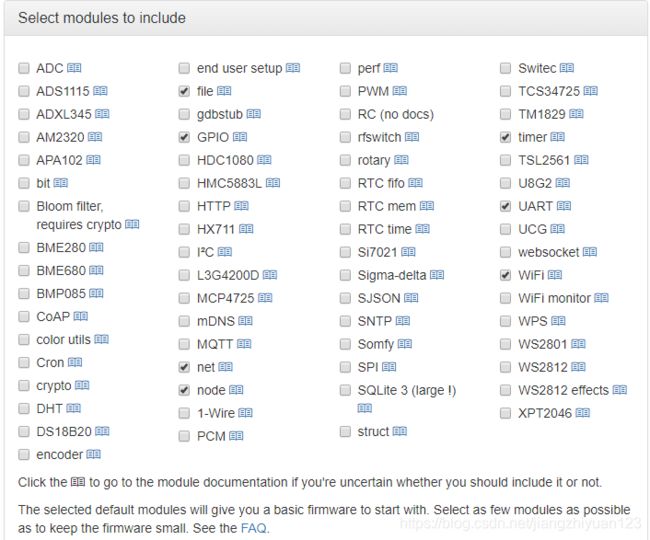
选择你需要的固件,这里会自动帮你选择一些固件,大概看到这些固件就会知道是什么意思,timer就是一个定时器,WiFi用来连接wifi的,这里https://nodemcu.readthedocs.io/en/master/提供了固件的英文文档,可以随意浏览一下,本人作为英语弱渣,也能看个大概,相信对于各位聚聚来讲更不在话下。
再看一下固件,发现了HTTP和SJSON,推测可以将采集的数据以JSON格式通过HTTP发送出去,感觉相当便捷。实际上我最后也是采用的这种方式
最后点击构建固件,就阔以了,只要等待固件发送到你的邮箱来就行了。
将固件刷入NodeMcu
使用ESP8266flasher
下载地址:https://github.com/nodemcu/nodemcu-flasher
这玩意长这样
首先点击Config,选择你固件的所在位置
然后选择端口号,点击Flash
若是你的电脑未能识别到你的设备,那么你需要手动安装驱动,具体安装什么驱动呢,google输入NodeMcu上USB转TTL芯片的名字。
编写程序并刷入NodeMcu
使用ESPLorer
下载地址:https://esp8266.ru/esplorer/
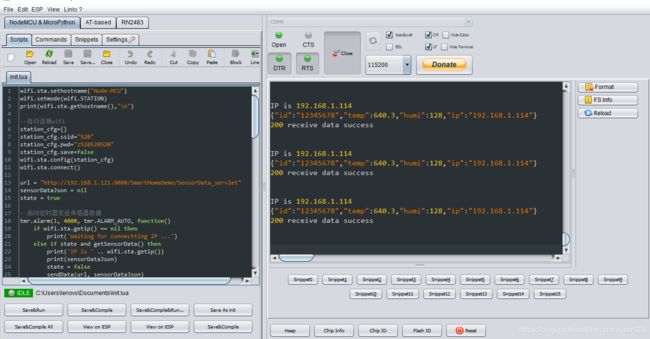
这玩意长这样
使用Lua脚本语言编程,具体怎么编,网上一大堆。
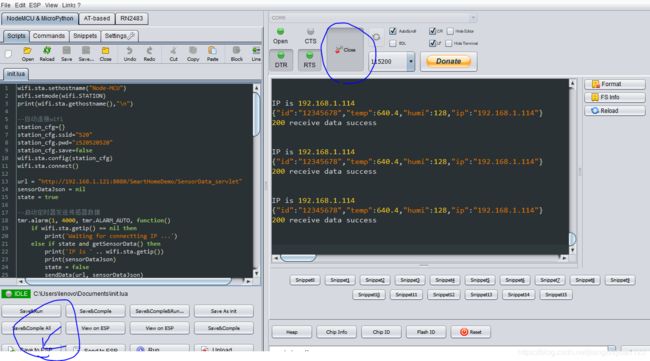
这里我们是编写一个init.lua文件,然后将其刷入NodeMcu中,当你复位的时候,运行的就是这个文件里的程序。
首先打开串口,然后点击save to ESP。
代码
自动连接wifi,使用WIFI模块,esp8266有两种模式,一种是station模式(连接wifi),一种是AP模式(esp8266做热点),我们采用station模式,WIFI模块。
--自动连接wifi
station_cfg={}
station_cfg.ssid="520"
station_cfg.pwd="z520520520"
station_cfg.save=false
wifi.sta.config(station_cfg)
wifi.sta.connect()
获取温湿度,如果你使用DHT传感器的话,那么很幸运的是有一个DHT模块可以帮助你读取数据 ,然后我们可以使用SJSON模块将获取的数据封装成json格式,DHT模块,SJSON模块。
function getSensorData()
pin = 1
status, temp, humi, temp_dec, humi_dec = dht.read(pin)
if status == dht.OK then
    -- Integer firmware using this example
    --print(string.format("DHT Temperature:%d.%03d;Humidity:%d.%03d\r\n",
    --      math.floor(temp),
    --      temp_dec,
    --      math.floor(humi),
    --      humi_dec
    --))

    data = {}
    data.id = "12345678"
    data.ip = wifi.sta.getip()
    data.temp = temp
    data.humi = humi
    sensorDataJson = sjson.encode(data)

    return true
else
    print('sensor data read failed\r\n')
    return false
end
end
将json格式的数据通过http库的post函数发送出去,HTTP模块。
-- 发送http链接
function sendData(url, st)
http.post(url,
  'Content-Type: application/json\r\n',
  st,
  function(code, data)
    state = true
    if (code < 0) then
      print("HTTP request failed\r\n")
    else
      print(code, data, '\r\n')
    end
  end)
end
启动定时器,将读取到的传感器数据定时上传到服务器,tmr模块。
--启动定时器发送传感器数据
tmr.alarm(1, 4000, tmr.ALARM_AUTO, function()
    if wifi.sta.getip() == nil then
        print('Waiting for connectting IP ...')
    else if state and getSensorData() then
        print('IP is ' .. wifi.sta.getip())
        print(sensorDataJson)
        state = false
        sendData(url, sensorDataJson)
        --tmr.stop(1)
    end
    end
end)
链接wifi的时候不一定能立马连接上,所有我们需要esp8266链接上wifi后,再发送数据。
完整代码:
wifi.sta.sethostname("Node-MCU")
wifi.setmode(wifi.STATION)
print(wifi.sta.gethostname(),"\n")

--自动连接wifi
station_cfg={}
station_cfg.ssid="520"
station_cfg.pwd="z520520520"
station_cfg.save=false
wifi.sta.config(station_cfg)
wifi.sta.connect()

url = "http://192.168.1.121:8080/SmartHomeDemo/SensorData_servlet"
sensorDataJson = nil
state = true

--启动定时器发送传感器数据
tmr.alarm(1, 4000, tmr.ALARM_AUTO, function()
    if wifi.sta.getip() == nil then
        print('Waiting for connectting IP ...')
    else if state and getSensorData() then
        print('IP is ' .. wifi.sta.getip())
        print(sensorDataJson)
        state = false
        sendData(url, sensorDataJson)
        --tmr.stop(1)
    end
    end
end)

-- 获取传感器数据
function getSensorData()
pin = 1
status, temp, humi, temp_dec, humi_dec = dht.read(pin)
if status == dht.OK then
    -- Integer firmware using this example
    --print(string.format("DHT Temperature:%d.%03d;Humidity:%d.%03d\r\n",
    --      math.floor(temp),
    --      temp_dec,
    --      math.floor(humi),
    --      humi_dec
    --))

    data = {}
    data.id = "12345678"
    data.ip = wifi.sta.getip()
    data.temp = temp
    data.humi = humi
    sensorDataJson = sjson.encode(data)

    return true
else
    print('sensor data read failed\r\n')
    return false
end
end

-- 发送http链接
function sendData(url, st)
http.post(url,
  'Content-Type: application/json\r\n',
  st,
  function(code, data)
    state = true
    if (code < 0) then
      print("HTTP request failed\r\n")
    else
      print(code, data, '\r\n')
    end
  end)
end

-- 监听80端口
sv = net.createServer(net.TCP, 30)

function receiver(sck, data)
  print(data)
  changeLight()
  sck:close()
end

if sv then
  sv:listen(80, function(conn)
    conn:on("receive", receiver)
    conn:send("hello world")
  end)
end

function changeLight()
    gpio.mode(4, gpio.OUTPUT)
    light = gpio.read(4)
    if (light == 1) then
        gpio.write(4, gpio.LOW)
    else
        gpio.write(4, gpio.HIGH)
    end
end


