ipython是一个升级版的交互式python命令行工具.
ipython安装
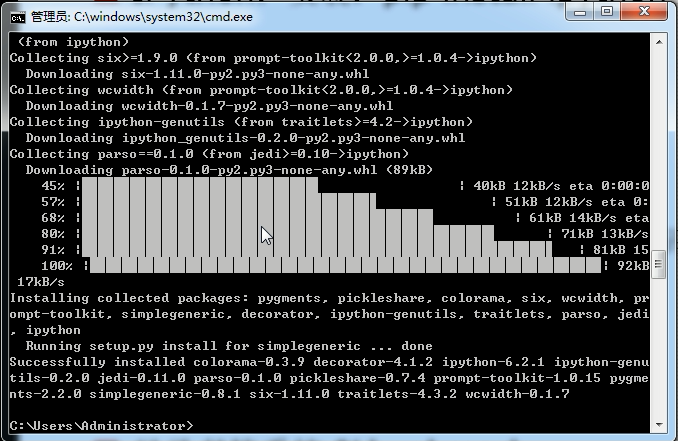
pip install ipython等到命令执行完成后显示successfully表示完装成功
在命令提示符下输入ipython就可以启动ipython了
其与原版python命令行工具不同在于ipython的提示符变成了in和out.
in为输入命令的地方,out为命令执行完成后输出的地方
ipython的特点
tab键自动补全一些常用的方法
支持一些系统命令
    In [2]: pwd             # 显示当前所在目录
    Out[2]: '/root'

    In [3]: cd ..           # 返回当前目录的上一级目录
    /
执行系统命令(!)
    In [6]: !ifconfig
    ens33: flags=4163  mtu 1500
            inet 192.168.81.10  netmask 255.255.255.0  broadcast 192.168.81.255
            inet6 fe80::a545:8b99:d507:4d0f  prefixlen 64  scopeid 0x20
            ether 00:0c:29:95:d5:31  txqueuelen 1000  (Ethernet)
            RX packets 12851  bytes 9887304 (9.4 MiB)
            RX errors 0  dropped 0  overruns 0  frame 0
            TX packets 7172  bytes 1546188 (1.4 MiB)
            TX errors 0  dropped 0 overruns 0  carrier 0  collisions 0

    lo: flags=73  mtu 65536
            inet 127.0.0.1  netmask 255.0.0.0
            inet6 ::1  prefixlen 128  scopeid 0x10
            loop  txqueuelen 1  (Local Loopback)
            RX packets 140  bytes 12132 (11.8 KiB)
            RX errors 0  dropped 0  overruns 0  frame 0
            TX packets 140  bytes 12132 (11.8 KiB)
            TX errors 0  dropped 0 overruns 0  carrier 0  collisions 0

    In [7]: !ip a
    1: lo:  mtu 65536 qdisc noqueue state UNKNOWN qlen 1
        link/loopback 00:00:00:00:00:00 brd 00:00:00:00:00:00
        inet 127.0.0.1/8 scope host lo
           valid_lft forever preferred_lft forever
        inet6 ::1/128 scope host
           valid_lft forever preferred_lft forever
    2: ens33:  mtu 1500 qdisc pfifo_fast state UP qlen 1000
        link/ether 00:0c:29:95:d5:31 brd ff:ff:ff:ff:ff:ff
        inet 192.168.81.10/24 brd 192.168.81.255 scope global ens33
           valid_lft forever preferred_lft forever
        inet6 fe80::a545:8b99:d507:4d0f/64 scope link
           valid_lft forever preferred_lft forever

    In [8]: !cat /etc/sysconfig/selinux

    # This file controls the state of SELinux on the system.
    # SELINUX= can take one of these three values:
    #     enforcing - SELinux security policy is enforced.
    #     permissive - SELinux prints warnings instead of enforcing.
    #     disabled - No SELinux policy is loaded.
    SELINUX=disabled
    # SELINUXTYPE= can take one of three two values:
    #     targeted - Targeted processes are protected,
    #     minimum - Modification of targeted policy. Only selected processes are protected.
    #     mls - Multi Level Security protection.
    SELINUXTYPE=targeted
?命令(内省,命令空间搜索)
    In [12]: l1?
    Type:        list
    String form: [1, 2, 3, 4]
    Length:      4
    Docstring:
    list() -> new empty list
    list(iterable) -> new list initialized from iterable's items

    In [13]: def func():
        ...:     print("hello world")
        ...:

    In [14]: func?
    Signature: func()
    Docstring:
    File:      /
    Type:      function

    In [15]: func??             # 打印函数的源码
    Signature: func()
    Source:
    def func():
        print("hello world")
    File:      /
    Type:      function

    In [17]: l1.a*?
    l1.append

    In [18]: l1.p*?
    l1.pop

    In [19]: l1.__*__?
    l1.__add__
    l1.__class__
    l1.__contains__
    l1.__delattr__
    l1.__delitem__
    l1.__dir__
    l1.__doc__
    l1.__eq__
    l1.__format__
    l1.__ge__
    l1.__getattribute__
    l1.__getitem__
    l1.__gt__
    l1.__hash__
    l1.__iadd__
    l1.__imul__
    l1.__init__
    l1.__init_subclass__
    l1.__iter__
    l1.__le__
    l1.__len__
    l1.__lt__
    l1.__mul__
    l1.__ne__
    l1.__new__
    l1.__reduce__
    l1.__reduce_ex__
    l1.__repr__
    l1.__reversed__
    l1.__rmul__
    l1.__setattr__
    l1.__setitem__
    l1.__sizeof__
    l1.__str__
    l1.__subclasshook__
%run命令执行文件代码
    In [29]: !vi test.py

    In [30]: !cat test.py
    def func1():
        print("hello world")

    func1()

    In [31]: %run "test.py"
    hello world
%paste和%cpaste命令执行剪帖板代码
    In [2]: %paste
    def func1():
        print("hello world")

    func1()

    ## -- End pasted text --
    hello world
与编辑器和IDE交互
魔术命令:%timeit %pdb
    In [37]: %timeit a+b
    47.1 ns ± 0.955 ns per loop (mean ± std. dev. of 7 runs, 10000000 loops each)

    pdb是python debug的简写,一般用于排错
使用命令历史
使用上箭头或下箭头可以查看上一条命令或下一条命令的历史
输入与输出变量
    In [40]: !ls
    1    boot  etc   lib    media  opt   root  sbin  sys      tmp  var
    bin  dev   home  lib64  mnt    proc  run   srv   test.py  usr

    In [41]: _                  # 执行前面倒数第一条命令
    Out[41]: 3

    In [47]: !ls
    1    boot  etc   lib    media  opt   root  sbin  sys      tmp  var
    bin  dev   home  lib64  mnt    proc  run   srv   test.py  usr

    In [48]: print("hello world")
    hello world

    In [49]: !ls
    1    boot  etc   lib    media  opt   root  sbin  sys      tmp  var
    bin  dev   home  lib64  mnt    proc  run   srv   test.py  usr

    In [50]: __
    Out[50]: 3


    In [54]: _i48               # 执行第48条命令
    Out[54]: 'print("hello world")'
目录书签系统%bookmark
    In [55]: %bookmark local /usr/local         # 定义local书签

    In [56]: %bookmark selinux /etc/sysconfig/selinux   # 定义selinux书签

    In [57]: %bookmark -l       # 显示所有的书签
    Current bookmarks:
    local   -> /usr/local
    selinux -> /etc/sysconfig/selinux

    In [55]: %bookmark local /usr/local

    In [56]: %bookmark sysconfig /etc/sysconfig

    In [57]: %bookmark -l
    Current bookmarks:
    local   -> /usr/local
    sysconfig -> /etc/sysconfig

    In [58]: pwd
    Out[58]: '/'

    In [59]: cd local
    (bookmark:local) -> /usr/local
    /usr/local

    In [60]: pwd
    Out[60]: '/usr/local'

    In [61]: cd sysconfig
    (bookmark:sysconfig) -> /etc/sysconfig
    /etc/sysconfig

    In [62]: pwd
    Out[62]: '/etc/sysconfig'
ipython notebook
安装jupyter
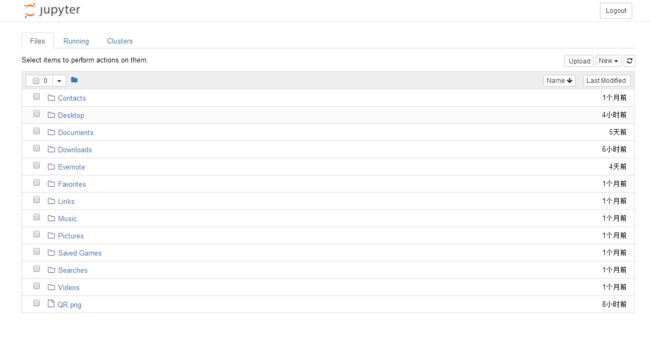
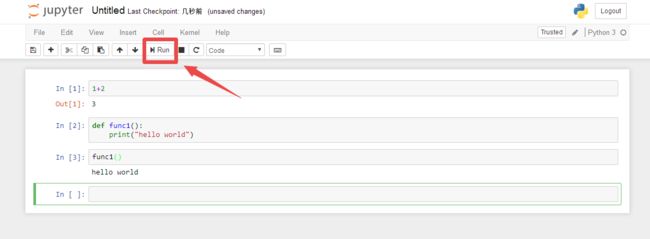
pip install jupyter运行界面
ipython常用的魔术命令
%quickref                   显示ipython的快速参考
%magic                      显示所有的魔术命令的详细文档
%debug                      从最新的异常跟踪的底部进入交互式调试器
%hist                       打印命令的输入(可选输出)历史
%pdb                        在异常发生后自动进入调试器
%paste                      执行剪贴板中的python代码
%cpaste                     打开一个特殊提示符以便手工粘贴待执行的python代码
%reset                      删除interactive命名空间中的全部变量/名称
%page OBJECT                通过分页器打印输出object
%run script.py              在ipython中执行一个python脚本文件
%prun statement             通过cprofile执行statement,并打印分析器的输出结果
%time statement             报告statement的执行时间
%timeit statement           多次执行statement以计算系统平均执行时间.对那么执行时间非常小的代码很有用
%who,%who_id,%whos          显示interactive命名空间中定义的变量,信息级别/冗余度可变
%xdel variable              删除variable,并尝试清除其在ipython中的对象上的一切引用
python调试器命令
h(help)                 显示命令列表
help command            显示command的文档
c(continue)             恢复程序的执行
q(quit)                 退出调试器,不再执行任何代码
b(break) n              在当前文件的第n行设置一个断点
b path/to/file.py:n     在指定文件的第n行设置一个断点
s(step)                 单步进入函数调用
n(next)                 执行当前行,并前进到当前级别的下一行
u(up)/d(down)           在函数调用栈中向上或向下移动
a(args)                 显示当前函数的参数
debug statement         在新的递归调试器中调用语句statement
l(list) statement       显示当前行,以及当前栈级别上的上下文参考代码
w(where)                打印当前位置的完整栈跟踪(包括上下文参考代码)
ipython快捷键
Ctrl+p或者向上键头            向后搜索命令历史中以当前输入的文本开头的命令
Ctrl+n或者向上键头            向前搜索命令历史中以当前输入的文本开头的命令
Ctrl+r                      按行读取的反向历史搜索(部分匹配)
Ctrl+Shift+variable         从剪贴板粘贴文本
Ctrl+c                      中止当前正在执行的代码
Ctrl+a                      把光标移动到行首
Ctrl+e                      把光标移动到行尾
Ctrl+k                      删除从光标开始到行尾的文本
Ctrl+u                      清除当前行的所有内容
Ctrl+f                      将光标向前移动一个字符
Ctrl+b                      将光标向后移动一个字符
Ctrl+l                      清屏


