Redis 群集搭建以及报错MOVED
文章目录
- 为什么要创建 Redis 群集
-
- Redis有三种群集模式
- Cluster数据分片
- 来吧!展示!!
-
- 实验参数
- 实验配置
- 实验验证
- 报错 MOVED
为什么要创建 Redis 群集
因为单节点可能会出现故障
处理大量的并发请求时会卡
单节点若宕机,数据容易丢失
Redis有三种群集模式
主从模式
- 主数据库可以进行读写操作,当读写操作导致数据变化时会自动将数据同步给从数据库
- 从数据库一般都是只读的,并且接收主数据库同步过来的数据
- 一个master可以拥有多个slave,但是一个slave只能对应一个master
- slave挂了不影响其他slave的读和master的读和写,重新启动后会将数据从master同步过来
- master挂了以后,不影响slave的读,但redis不再提供写服务,master重启后redis将重新对外提供写服务
- master挂了以后,不会在slave节点中重新选一个master
Sentinel模式
- sentinel模式是建立在主从模式的基础上,如果只有一个Redis节点,sentinel就没有任何意义
- 当master挂了以后,sentinel会在slave中选择一个做为master,并修改它们的配置文件,其他slave的配置文件也会被修改,比如slaveof属性会指向新的master
- 当master重新启动后,它将不再是master而是做为slave接收新的master的同步数据
sentinel因为也是一个进程有挂掉的可能,所以sentinel也会启动多个形成一个sentinel集群 - 多sentinel配置的时候,sentinel之间也会自动监控
- 当主从模式配置密码时,sentinel也会同步将配置信息修改到配置文件中,不需要担心
一个sentinel或sentinel集群可以管理多个主从Redis,多个sentinel也可以监控同一个redis - sentinel最好不要和Redis部署在同一台机器,不然Redis的服务器挂了以后,sentinel也挂了
Cluster模式
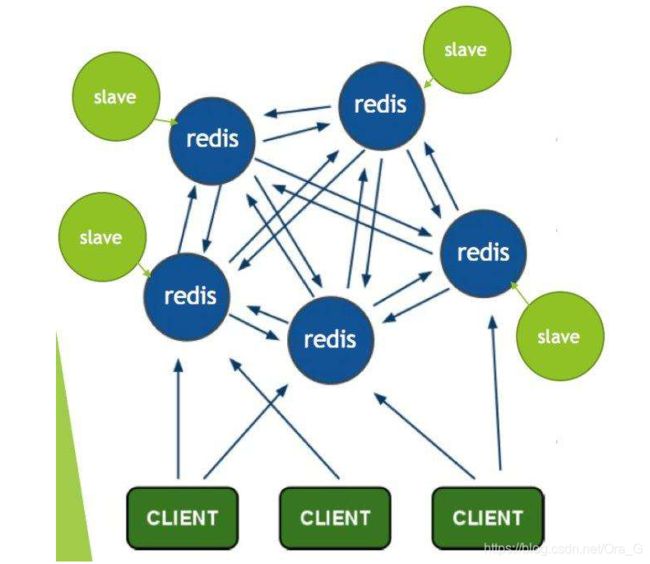
- 多个redis节点网络互联,数据共享
- 所有的节点都是一主一从(也可以是一主多从),其中从不提供服务,仅作为备用
- 不支持同时处理多个key(如MSET/MGET),因为redis需要把key均匀分布在各个节点上
- 并发量很高的情况下同时创建key-value会降低性能并导致不可预测的行为
- 支持在线增加、删除节点
- 客户端可以连接任何一个主节点进行读写
Cluster数据分片
- 没有引入一致性HASH,而是引入了哈希槽(hash槽)概念
- 每个群集有 16384 个哈希槽
- 每个 key 键值通过CRC16校验后对哈希槽来决定放置槽
- 群集每个节点负责一部分的哈希槽
来吧!展示!!
我们使用的是 cluster模式
- sentinel模式基本可以满足一般生产的需求,具备高可用性。但是当数据量过大到一台服务器存放不下的情况时,主从模式或sentinel模式就不能满足需求了,这个时候需要对存储的数据进行分片,将数据存储到多个Redis实例中。cluster模式的出现就是为了解决单机Redis容量有限的问题,将Redis的数据根据一定的规则分配到多台机器。
- cluster可以说是sentinel和主从模式的结合体,通过cluster可以实现主从和master重选功能,所以如果配置两个副本三个分片的话,就需要六个Redis实例。因为Redis的数据是根据一定规则分配到cluster的不同机器的,当数据量过大时,可以新增机器进行扩容。
- 使用集群,只需要将redis配置文件中的cluster-enable配置打开即可。每个集群中至少需要三个主数据库才能正常运行,新增节点非常方便。
实验参数
六台服务器IP为
20.0.0.11
20.0.0.12
20.0.0.21
20.0.0.22
20.0.0.23
20.0.0.24
实验配置
六台主机都需要安装 redis
[root@localhost ~]# yum -y install gcc gcc-c++ make
[root@localhost ~]# mkdir /bao
[root@localhost ~]# cd /bao
[root@localhost bao]# rz -E
rz waiting to receive.
[root@localhost bao]# tar zxvf redis-5.0.7.tar.gz
[root@localhost bao]# cd redis-5.0.7/
[root@localhost redis-5.0.7]# make
[root@localhost redis-5.0.7]# make install PREFIX=/usr/local/redis
[root@localhost redis-5.0.7]# cd utils/
[root@localhost utils]# ./install_server.sh
Welcome to the redis service installer
This script will help you easily set up a running redis server

Please select the redis port for this instance: [6379]
Selecting default: 6379
Please select the redis config file name [/etc/redis/6379.conf]
Selected default - /etc/redis/6379.conf
Please select the redis log file name [/var/log/redis_6379.log]
Selected default - /var/log/redis_6379.log
Please select the data directory for this instance [/var/lib/redis/6379]
Selected default - /var/lib/redis/6379
Please select the redis executable path [] /usr/local/redis/bin/redis-server
Selected config:
Port           : 6379
Config file    : /etc/redis/6379.conf
Log file       : /var/log/redis_6379.log
Data dir       : /var/lib/redis/6379
Executable     : /usr/local/redis/bin/redis-server
Cli Executable : /usr/local/redis/bin/redis-cli
Is this ok? Then press ENTER to go on or Ctrl-C to abort.
Copied /tmp/6379.conf => /etc/init.d/redis_6379
Installing service...
Successfully added to chkconfig!
Successfully added to runlevels 345!
Starting Redis server...
Installation successful!
[root@localhost utils]# ln -s /usr/local/redis/bin/* /usr/local/bin
修改配置文件
[root@localhost utils]# vim /etc/redis/6379.conf
70 #bind 127.0.0.1	##注释掉监听地址
89 protected-mode no	##关闭保护模式
93 port 6379	##端口还是6379
137 daemonize yes	##独立启动进程
700 appendonly yes	##开启aof持久化
833 cluster-enabled yes	##开启群集功能,取消注释
841 cluster-config-file nodes-6379.conf	##群集文件名称,取消注释
847 cluster-node-timeout 15000	##群集超时时间设置,取消注释
[root@localhost utils]# vim /etc/redis/6379.conf
[root@localhost utils]# cd /var/lib/redis/6379/
[root@localhost 6379]# service redis_6379 restart
Stopping ...
Redis stopped
Starting Redis server...
[root@localhost 6379]# ls
appendonly.aof  dump.rdb  nodes-6379.conf
一台主服务器安装 rvm 和 RUBY
[root@localhost 6379]# gpg --keyserver hkp://keys.gnupg.net --recv-keys 409B6B1796C275462A1703113804BB82D39DC0E3	##密钥文件导入
[root@localhost 6379]# cd /bao/
[root@localhost bao]# rz -E
rz waiting to receive.
[root@localhost bao]# ls
redis-5.0.7  redis-5.0.7.tar.gz  rvm-installer.sh
[root@localhost bao]# chmod +x rvm-installer.sh
[root@localhost bao]# ./rvm-installer.sh		##这个下的太慢了,我直接拿的下好的
[root@localhost bao]# ./rvm-installer.sh
[root@localhost bao]# source /etc/profile.d/rvm.sh
[root@localhost bao]# rvm list known		##列出可安装版本
# MRI Rubies
[ruby-]1.8.6[-p420]
[ruby-]1.8.7[-head] # security released on head
[ruby-]1.9.1[-p431]
[ruby-]1.9.2[-p330]
[ruby-]1.9.3[-p551]
[ruby-]2.0.0[-p648]
[ruby-]2.1[.10]
[ruby-]2.2[.10]
[ruby-]2.3[.8]
[ruby-]2.4[.10]
[ruby-]2.5[.8]
[ruby-]2.6[.6]
[ruby-]2.7[.1]
ruby-head

# for forks use: rvm install ruby-head- --url https://github.com/github/ruby.git --branch 2.2

# JRuby
jruby-1.6[.8]
jruby-1.7[.27]
jruby-9.1[.17.0]
jruby[-9.2.13.0]
jruby-head

# Rubinius
rbx-1[.4.3]
rbx-2.3[.0]
rbx-2.4[.1]
rbx-2[.5.8]
rbx-3[.107]
rbx-4[.20]
rbx-5[.0]
rbx-head

# TruffleRuby
truffleruby[-20.2.0]

# Opal
opal

# Minimalistic ruby implementation - ISO 30170:2012
mruby-1.0.0
mruby-1.1.0
mruby-1.2.0
mruby-1.3.0
mruby-1[.4.1]
mruby-2.0.1
mruby-2[.1.1]
mruby[-head]

# Ruby Enterprise Edition
ree-1.8.6
ree[-1.8.7][-2012.02]

# Topaz
topaz

# MagLev
maglev-1.0.0
maglev-1.1[RC1]
maglev[-1.2Alpha4]
maglev-head

# Mac OS X Snow Leopard Or Newer
macruby-0.10
macruby-0.11
macruby[-0.12]
macruby-nightly
macruby-head

# IronRuby
ironruby[-1.1.3]
ironruby-head

[root@localhost bao]# rvm install 2.4.1		##安装 2.4.1版本
[root@localhost bao]# ruby -v	##查看版本信息
ruby 2.4.1p111 (2017-03-22 revision 58053) [x86_64-linux]
[root@localhost bao]#  gem install redis	##再次安装 redis
在主服务器上配置群集
这边就可以看到主从节点了
[root@localhost network-scripts]# redis-cli --cluster create 20.0.0.11:6379 20.0.0.12:6379 20.0.0.21:6379 20.0.0.22:6379 20.0.0.23:6379 20.0.0.24:6379 --cluster-replicas 1
>>> Performing hash slots allocation on 6 nodes...
Master[0] -> Slots 0 - 5460
Master[1] -> Slots 5461 - 10922
Master[2] -> Slots 10923 - 16383
Adding replica 20.0.0.23:6379 to 20.0.0.11:6379
Adding replica 20.0.0.24:6379 to 20.0.0.12:6379
Adding replica 20.0.0.22:6379 to 20.0.0.21:6379
M: 32dfc6ddc0b9b11a5761468cd56be4bc4d932eff 20.0.0.11:6379
   slots:[0-5460] (5461 slots) master
M: da81b568b82ec8d2e65967a4c3ed6550aa59b42d 20.0.0.12:6379
   slots:[5461-10922] (5462 slots) master
M: 32dfc6ddc0b9b11a5761468cd56be4bc4d932eff 20.0.0.21:6379
   slots:[10923-16383] (5461 slots) master
S: 32dfc6ddc0b9b11a5761468cd56be4bc4d932eff 20.0.0.22:6379
   replicates 32dfc6ddc0b9b11a5761468cd56be4bc4d932eff
S: da81b568b82ec8d2e65967a4c3ed6550aa59b42d 20.0.0.23:6379
   replicates 32dfc6ddc0b9b11a5761468cd56be4bc4d932eff
S: da81b568b82ec8d2e65967a4c3ed6550aa59b42d 20.0.0.24:6379
   replicates da81b568b82ec8d2e65967a4c3ed6550aa59b42d
Can I set the above configuration? (type 'yes' to accept): yes		##手敲yes
实验验证
开始验证
[root@localhost network-scripts]# redis-cli -h 20.0.0.11 -p 6379 -c
20.0.0.11:6379> set gundam EXIA
OK
20.0.0.11:6379> keys *
1) "gundam"


[root@localhost network-scripts]# redis-cli -h 20.0.0.23 -p 6379 -c	##另一台机器,验证“主从”
20.0.0.23:6379> keys *
1) "gundam"
20.0.0.23:6379> get gundam
"EXIA"
验证自动删除
[root@localhost network-scripts]# redis-cli -h 20.0.0.11 -p 6379 -c
20.0.0.11:6379> EXPIRE gundam 5		##五秒后删除这个键
(integer) 1
##五秒后
20.0.0.11:6379> keys *
(empty list or set)

##另一台机器
20.0.0.23:6379> keys *	##另一台机器也没了
(empty list or set)
报错 MOVED
如果在你创建 键 的时候,出现这个报错,退出,进入时加上选项 -c,-c的意思是启动群集模式
(error) MOVED 5798 127.0.0.1:7001
redis-cli -h 20.0.0.12 -p 6379 -c
注:若宕机一台master,对应的slave会顶上两成为master,服务正常使用。若相互对应的主从宕机,你的群集就没了……
