iOS开发:使用 Sign In With Apple(登录)用法以及注意事项
一、为什么要使用Sign in with Apple?
苹果在19年 9 月12 号更新了审核指南,加入 4.8 Sign in with Apple 一条,要求所有使用第三方登录 的 App,都必须接入 Sign in with Apple。已经上架的 App 需在 2020 年 4 月 前完成接入工作,新上架 App(如果支持三方登录)必须接入Sign in with Apple,否则将被拒。
二、如何接入Sign In With Apple ?
1、前期准备
(1)、系统配置:苹果开发文档明确规定:苹果电脑系统macos(10.15)(吓的我赶紧升级我的笔记本系统),手机iOS系统ios(13.0)(毫不犹豫的升级)。由于只有Xcode11才支持Sign In With Apple接入代码的开发,所以Xcode我升级到了11.1正式版。
(2)、证书配置
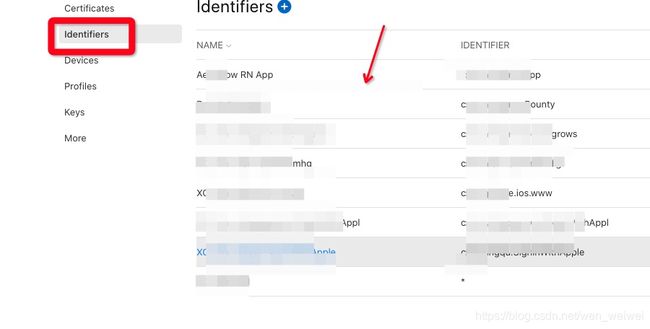
登录开发者中心,在需要启用 Sign in with Apple 的 Apple ID中勾选 Sign in with Apple.
具体步骤如下图

登录苹果开发者中心,选择Account

选择 Identifiers 这边可以看到自己工程的 Bundle Identifier点进去勾选 Sign in with Apple 若没有添加一个
注意:
描述信息最好使用 XC + Bundle ID
(3)、工程配置
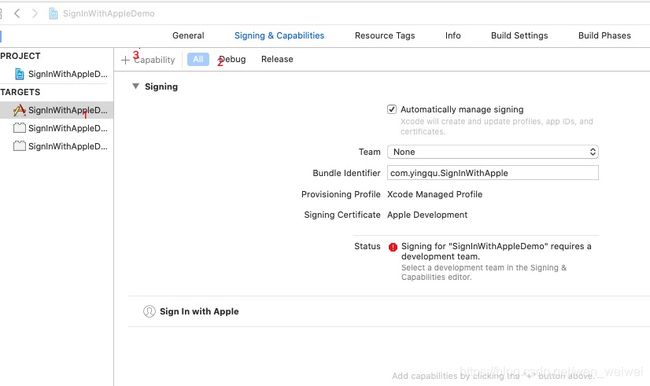
新建工程,选择项目 TARGETS -> Signing&Capabilities ,单击下图中的 3:Capability:

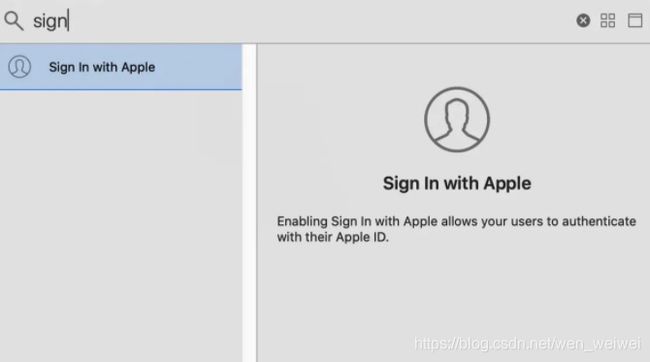
在弹出框中搜索找到 Sign in with Apple:双击添加

这些完成后,我们就可以在项目中添加代码了。
2、添加代码
(1)、在需要使用 login with Apple 的地方,引入头文件:
#import 首先,我们需要一个登录按钮,系统为我们预设了一个固定样式登录按钮ASAuthorizationAppleIDButton,我们可以直接使用。
if (@available(iOS 13.0, *)) {

        ASAuthorizationAppleIDButton *appleIDButton = [ASAuthorizationAppleIDButton new];
        appleIDButton.frame =  CGRectMake(.0, .0, CGRectGetWidth(self.view.frame) - 40.0, 100.0);
        CGPoint origin = CGPointMake(20.0, CGRectGetMidY(self.view.frame));
        CGRect frame = appleIDButton.frame;
        frame.origin = origin;
        appleIDButton.frame = frame;
        appleIDButton.cornerRadius = CGRectGetHeight(appleIDButton.frame) * 0.25;
        [self.view addSubview:appleIDButton];
        [appleIDButton addTarget:self action:@selector(handleAuthrization:) forControlEvents:UIControlEventTouchUpInside];
    }
通过参数 type、style可以设置为不同样式的按钮;当然,我们也可以自定义,但是要遵循苹果的相关设计规范,详见 Human Interface Guidelines
(2)、我们还需要用到两个协议
// 提供关于授权请求结果信息的接口
ASAuthorizationControllerDelegate,
// 控制器的代理找一个展示授权控制器的上下文的接口
ASAuthorizationControllerPresentationContextProviding>
协议的方法
#pragma mark - ASAuthorizationControllerDelegate

// 授权成功地回调
- (void)authorizationController:(ASAuthorizationController *)controller didCompleteWithAuthorization:(ASAuthorization *)authorization  API_AVAILABLE(ios(13.0));

// 授权失败的回调
- (void)authorizationController:(ASAuthorizationController *)controller didCompleteWithError:(NSError *)error  API_AVAILABLE(ios(13.0));

#pragma mark - ASAuthorizationControllerPresentationContextProviding

/*! @brief 返回弹出请求视图的window
 *
 * @param ASPresentationAnchor  为 UIWindow 的别名
 * @param controller   管理授权请求的控制器
 * return 弹出请求视图的window
 */
- (ASPresentationAnchor)presentationAnchorForAuthorizationController:(ASAuthorizationController *)controller  API_AVAILABLE(ios(13.0));
以及 3个类
//主要作用是用创建相应的请求,查询用户授权状态
ASAuthorizationAppleIDProvider

// 授权请求,可以设置具体的请求信息
ASAuthorizationAppleIDRequest

// 发送请求控制器,可以设置相应的协议
ASAuthorizationController
首先在程序运行时会执行perfomExistingAccountSetupFlows 来判断如果存在iCloud Keychain 凭证或者AppleID 凭证提示用户
#pragma mark - 如果存在iCloud Keychain 凭证或者AppleID 凭证提示用户

- (void)perfomExistingAccountSetupFlows {

    if (@available(iOS 13.0, *)) {

        // 基于用户的Apple ID授权用户,生成用户授权请求的一种机制
        ASAuthorizationAppleIDProvider *appleIDProvider = [ASAuthorizationAppleIDProvider new];
        // 授权请求依赖于用于的AppleID
        ASAuthorizationAppleIDRequest *authAppleIDRequest = [appleIDProvider createRequest];
        // 为了执行钥匙串凭证分享生成请求的一种机制
        ASAuthorizationPasswordRequest *passwordRequest = [[ASAuthorizationPasswordProvider new] createRequest];

        NSMutableArray <ASAuthorizationRequest *>* mArr = [NSMutableArray arrayWithCapacity:2];
        if (authAppleIDRequest) {

            [mArr addObject:authAppleIDRequest];
        }
        if (passwordRequest) {

            [mArr addObject:passwordRequest];
        }
        // ASAuthorizationRequest:对于不同种类授权请求的基类
        NSArray <ASAuthorizationRequest *>* requests = [mArr copy];
        // ASAuthorizationController是由ASAuthorizationAppleIDProvider创建的授权请求 管理授权请求的控制器
        ASAuthorizationController *authorizationController = [[ASAuthorizationController alloc] initWithAuthorizationRequests:requests];
        // 设置授权控制器通知授权请求的成功与失败的代理
        authorizationController.delegate = self;
        // 设置提供 展示上下文的代理,在这个上下文中 系统可以展示授权界面给用户
        authorizationController.presentationContextProvider = self;
        // 在控制器初始化期间启动授权流
        [authorizationController performRequests];
    }
}
通过点击按钮ASAuthorizationAppleIDButton 响应事件添加代理再执行相应的代理方法
#pragma mark - 点击授权按钮

- (void)handleAuthrization:(UIButton *)sender {

    if (@available(iOS 13.0, *)) {

        // 基于用户的Apple ID授权用户,生成用户授权请求的一种机制
        ASAuthorizationAppleIDProvider *appleIDProvider = [ASAuthorizationAppleIDProvider new];
        // 创建新的AppleID 授权请求
        ASAuthorizationAppleIDRequest *request = appleIDProvider.createRequest;
        // 在用户授权期间请求的联系信息
        request.requestedScopes = @[ASAuthorizationScopeFullName, ASAuthorizationScopeEmail];
        // 由ASAuthorizationAppleIDProvider创建的授权请求 管理授权请求的控制器
        ASAuthorizationController *controller = [[ASAuthorizationController alloc] initWithAuthorizationRequests:@[request]];
        // 设置授权控制器通知授权请求的成功与失败的代理
        controller.delegate = self;
        // 设置提供 展示上下文的代理,在这个上下文中 系统可以展示授权界面给用户
        controller.presentationContextProvider = self;
        // 在控制器初始化期间启动授权流
        [controller performRequests];
    }
}
#pragma mark - 授权成功地回调

- (void)authorizationController:(ASAuthorizationController *)controller didCompleteWithAuthorization:(ASAuthorization *)authorization  API_AVAILABLE(ios(13.0)) {

    NSLog(@"%s", __FUNCTION__);
    NSLog(@"%@", controller);
    NSLog(@"%@", authorization);
    NSLog(@"authorization.credential:%@", authorization.credential);
    NSMutableString *mutableString = [NSMutableString string];
    mutableString = [self.appleIDInfoTextView.text mutableCopy];
    if ([authorization.credential isKindOfClass:[ASAuthorizationAppleIDCredential class]]) {

        // 用户登录使用ASAuthorizationAppleIDCredential
        ASAuthorizationAppleIDCredential *appleIDCredential = authorization.credential;
        NSString *user = appleIDCredential.user;
        // 使用钥匙串的方式保存用户的唯一信息
        NSString *bundleId = [NSBundle mainBundle].bundleIdentifier;
        [SAMKeychain setPassword:user forService:bundleId account:ShareCurrentIdentifier];
        [mutableString appendString:user?:@""];
        NSString *familyName = appleIDCredential.fullName.familyName;
        [mutableString appendString:familyName?:@""];
        NSString *givenName = appleIDCredential.fullName.givenName;
        [mutableString appendString:givenName?:@""];
        NSString *email = appleIDCredential.email;
        [mutableString appendString:email?:@""];
        NSLog(@"mStr:%@", mutableString);
        [mutableString appendString:@"\n"];
        self.appleIDInfoTextView.text = mutableString;
    } else if ([authorization.credential isKindOfClass:[ASPasswordCredential class]]) {

        // 用户登录使用现有的密码凭证
        ASPasswordCredential *passwordCredential = authorization.credential;
        // 密码凭证对象的用户标识 用户的唯一标识
        NSString *user = passwordCredential.user;
        // 密码凭证对象的密码
        NSString *password = passwordCredential.password;
        [mutableString appendString:user?:@""];
        [mutableString appendString:password?:@""];
        [mutableString appendString:@"\n"];
        NSLog(@"mStr:%@", mutableString);
        self.appleIDInfoTextView.text = mutableString;
    } else {

        NSLog(@"授权信息均不符");
        mutableString = [@"授权信息均不符" mutableCopy];
        self.appleIDInfoTextView.text = mutableString;
    }
}
#pragma mark - 授权失败的回调

- (void)authorizationController:(ASAuthorizationController *)controller didCompleteWithError:(NSError *)error  API_AVAILABLE(ios(13.0)) {

    NSLog(@"%s", __FUNCTION__);
    NSLog(@"错误信息:%@", error);
    NSString *errorMsg = nil;
    switch (error.code) {

        case ASAuthorizationErrorCanceled:
            errorMsg = @"用户取消了授权请求";
            break;
        case ASAuthorizationErrorFailed:
            errorMsg = @"授权请求失败";
            break;
        case ASAuthorizationErrorInvalidResponse:
            errorMsg = @"授权请求响应无效";
            break;
        case ASAuthorizationErrorNotHandled:
            errorMsg = @"未能处理授权请求";
            break;
        case ASAuthorizationErrorUnknown:
            errorMsg = @"授权请求失败未知原因";
            break;
    }
    NSMutableString *mStr = [self.appleIDInfoTextView.text mutableCopy];
    [mStr appendString:errorMsg];
    [mStr appendString:@"\n"];
    self.appleIDInfoTextView.text = [mStr copy];
    if (errorMsg) {

        return;
    }
    if (error.localizedDescription) {

        NSMutableString *mStr = [self.appleIDInfoTextView.text mutableCopy];
        [mStr appendString:error.localizedDescription];
        [mStr appendString:@"\n"];
        self.appleIDInfoTextView.text = [mStr copy];
    }
    NSLog(@"controller requests:%@", controller.authorizationRequests);
}
#pragma mark - 告诉代理应该在哪个window 展示内容给用户

- (ASPresentationAnchor)presentationAnchorForAuthorizationController:(ASAuthorizationController *)controller  API_AVAILABLE(ios(13.0)){

    NSLog(@"调用展示window方法:%s", __FUNCTION__);
    // 返回window
    return self.view.window;
}
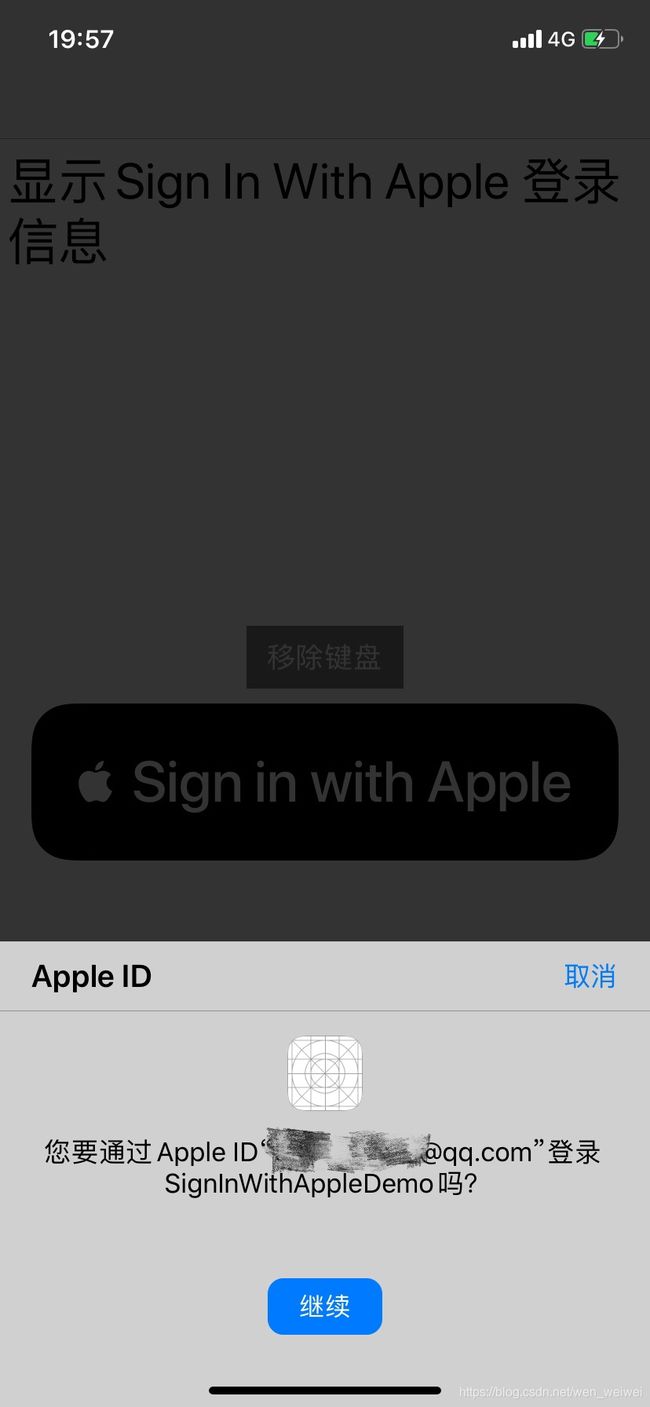
点击按钮ASAuthorizationAppleIDButton 登录后,如果是未授权会弹出如下弹框:

这里的邮件地址,用户可以选择共享或者隐藏,如果选择了隐藏,开发者将会获得一个苹果自动生成的一个邮箱地址,而不是用户的真实邮箱;成功后返回的信息如下:
user: 001963.27e48e27b0e5853a7c5d744d9a1c5432.0701
 familyName: XX
givenName: XX
email: 你的邮箱
我们可以将 user 信息保存到钥匙串中,这里我用的是一个开源的第三方库
SAMKeychain
1、下载SAMKeychain.h、SAMKeychain.m、SAMKeychainQuery.h、SAMKeychainQuery.m这4个文件并导入项目中
2、在.m文件中引用(#import “SAMKeychain.h”)
如果我们已经授权登录成功,再次登录的时候,就会显示如下的页面:

我们再次读取时只会返回user的信息
app登录成功后,需要将获取到的 identityToken、code等信息发送给后台,然后由后台调用 Apple 的后台API,来验证用户的真实性,从而完成验证,详情参考 Sign in with Apple(苹果授权登陆)服务端验证
登录成功后,用户是可以随时取消授权的,或者用户将 AppleID退出了当前设备,都需要重新获取。我们可以在应用启动的时候使用下面的方法来检测用户状态
#pragma mark - 使用 user 信息,查询当前用户的状态

- (void)checkAuthorizationStateWithUser:(NSString *) user
                        completeHandler:(void(^)(BOOL authorized, NSString *msg)) completeHandler {

    if (user == nil || user.length <= 0) {

        if (completeHandler) {

            completeHandler(NO, @"用户标识符错误");
        }
        return;
    }
    ASAuthorizationAppleIDProvider *provider = [[ASAuthorizationAppleIDProvider alloc]init];
    [provider getCredentialStateForUserID:user completion:^(ASAuthorizationAppleIDProviderCredentialState credentialState, NSError * _Nullable error) {

        NSString *msg = @"未知";
        BOOL authorized = NO;
        switch (credentialState) {

            case ASAuthorizationAppleIDProviderCredentialRevoked:
                msg = @"授权被撤销";
                authorized = NO;
                break;
            case ASAuthorizationAppleIDProviderCredentialAuthorized:
                msg = @"已授权";
                authorized = YES;
                break;
            case ASAuthorizationAppleIDProviderCredentialNotFound:
                msg = @"未查到授权信息";
                authorized = NO;
                break;
            case ASAuthorizationAppleIDProviderCredentialTransferred:
                msg = @"授权信息变动";
                authorized = NO;
                break;
            default:
                authorized = NO;
                break;
        }
        if (completeHandler) {

            completeHandler(authorized, msg);
        }
    }];
}
如果app在运行中,我们可以通过添加通知的方法来实时监控:
#pragma mark - 添加苹果登录的状态通知

- (void)observeAppleSignInState {

    if (@available(iOS 13.0, *)) {

        NSNotificationCenter *center = [NSNotificationCenter defaultCenter];
        [center addObserver:self selector:@selector(handleSignInWithAppleStateChanged:) name:ASAuthorizationAppleIDProviderCredentialRevokedNotification object:nil];
    }
}
#pragma mark - 观察SignInWithApple状态改变

- (void)handleSignInWithAppleStateChanged:(NSNotification *) noti {

    NSLog(@"%@", noti.name);
    NSLog(@"%@", noti.userInfo);
}
这里的 userInfo 信息一直都是 null,
3、取消授权
对应用授权登录后,我们可以在设备中取消对某个app的授权,操作方法如下:
设置 -> Apple ID -> 密码与安全性 -> 使用您 Apple ID 的 App
选择需要取消的app,停止使用 Apple ID 即可!
!! 但是这个方法只对 iphone 11 以上的手机才有效,11以下的手机还是展示已授权页面

