自定义View 例子
View 的主要工作流程 是指 measure,layout,draw 这三大过程,即布局,测量,和绘制。measure 确定 View 的测量宽高,layout 确定 View 的最终 宽 / 高 和四个顶点的位置,二draw 则将View 绘制到屏幕上。由于我们是自定义View ,用不掉layout。所以就不使用它。
自定义View 的步骤
1,自定义View 的属性
2,在View 的构造方法中 获取我们的 自定义属性
3,重写 onMeasure
4,重写 onDraw
自定义文本
1,自定义View的属性,在res/values/下 建立一个 attrs.xml ,在里面定义我们的属性 和 声明我们的整个样式
<!-- format 为取值类型
    dimension 代表 尺寸-->
<attr name="titleText" format="string" />
<attr name="titleColor" format="color" />
<attr name="titleTextSize" format="dimension" />

<declare-styleable name="CustomTitleView">
    <attr name="titleText" />
    <attr name="titleColor" />
    <attr name="titleTextSize" />
</declare-styleable>
2,获取自定义的属性
private String mTitleText;
private int mTitleTextColor;
private int mTitleTextSize;

/**
 * 坐标 和 画笔
 */
private Rect mBound;
private Paint mPaint;

public CustomTitleView(Context context) {
    this(context, null);
}

public CustomTitleView(Context context, AttributeSet attrs) {
    this(context, attrs, 0);
}

/**
 * 获取自定义属性的值
 */
public CustomTitleView(Context context, AttributeSet attrs, int defStyleAttr) {
    super(context, attrs, defStyleAttr);
    /*
     * 获取 自定义属性
     */
    TypedArray type = context.getTheme().obtainStyledAttributes(
            attrs, R.styleable.CustomTitleView, defStyleAttr, 0);
    int count = type.getIndexCount();
    for (int i = 0; i < count; i++) {
        int attr = type.getIndex(i);
        if (attr == R.styleable.CustomTitleView_titleText) {
            mTitleText = type.getString(attr);
        } else if (attr == R.styleable.CustomTitleView_titleColor) {
            mTitleTextColor = type.getColor(attr, Color.BLACK);
        } else if (attr == R.styleable.CustomTitleView_titleTextSize) {
            //默认设置为 16 sp,TypeValue 可以将sp 转化为 px
            mTitleTextSize = type.getDimensionPixelSize(attr, (int) TypedValue.applyDimension(
                    TypedValue.COMPLEX_UNIT_SP, 16, getResources().getDisplayMetrics()));
        }

    }
    //回收资源
    type.recycle();

    mPaint = new Paint();
    mPaint.setTextSize(mTitleTextSize);
    mBound = new Rect();
    //设置文字的 矩阵
    mPaint.getTextBounds(mTitleText,0,mTitleText.length(),mBound);
}
3,重写 onMeasure
在onMeasure 中,我们要测量 宽和高的尺寸,在布局中 我们可以 直接固定 View 的宽和高,也可以设置为 wrap_content 或者 match_parent 。因为这两个并没有指定其真正的大小,可是我们绘制到屏幕上的 View 必须要有 具体的宽度和高度,正是因为这个原因,所以我们必须自己去处理和设置 尺寸。
在测量之前,我们首先要了解 MeasureSpec 的 specMode ,一共三种类型
EXACTLY :一般是 设置了明确的值 或者是 match_parent
AT_MOST :表示子布局的限制在一个最大值内,一般为 wrap_content
UNSPECIFIED :表示子布局想要多大就多大,很少使用
下面 看一下 onMeasure 方法
protected void onMeasure(int widthMeasureSpec, int heightMeasureSpec)
在这个方法中只有两个参数,看起来就是 宽和高。实际上每一个参数中都包含了两个值,也就是 一个int 数里面有两个值,分别是 尺寸 和 测量模式。具体实现就不多说了。那么怎么提取 测量模式 和 尺寸呢。如下所示:
int widthMode = MeasureSpec.getMode(widthMeasureSpec);
int widthSize = MeasureSpec.getSize(widthMeasureSpec);
看上面:我们从 一个 int 值中取出了 测量模式 和 尺寸.
下面看一下具体的实现
 @Override
    protected void onMeasure(int widthMeasureSpec, int heightMeasureSpec) {
        super.onMeasure(widthMeasureSpec, heightMeasureSpec);

        int widthMode = MeasureSpec.getMode(widthMeasureSpec);
        int widthSize = MeasureSpec.getSize(widthMeasureSpec);
        int heightMode = MeasureSpec.getMode(heightMeasureSpec);
        int heightSize = MeasureSpec.getSize(heightMeasureSpec);
        int width;
        int height;

        //判读是否为 固定值,或者 match_parent
        if (widthMode == MeasureSpec.EXACTLY) {
            width = widthSize;
            //否则就是 wrap_content
        } else {
            mPaint.setTextSize(mTitleTextSize);
            mPaint.getTextBounds(mTitleText, 0, mTitleText.length(), mBound);
            width = mBound.width() + (getPaddingLeft() + getPaddingRight());
        }

        if (heightMode == MeasureSpec.EXACTLY){
            height = heightSize;
        }else {
            mPaint.setTextSize(mTitleTextSize);
            mPaint.getTextBounds(mTitleText,0,mTitleText.length(),mBound);
            height = mBound.height() +(getPaddingTop() + getPaddingBottom());
        }
        setMeasuredDimension(width,height);
    }
4,重写 onDraw
@Override
protected void onDraw(Canvas canvas) {
    super.onDraw(canvas);
    mPaint.setColor(Color.YELLOW);
    //绘制一个 矩形
    canvas.drawRect(0, 0, getMeasuredWidth(), getMeasuredHeight(), mPaint);

    mPaint.setColor(mTitleTextColor);
    //绘制 文字
    canvas.drawText(mTitleText, getWidth() / 2 - mBound.width() / 2,
            getHeight() / 2 + mBound.height() / 2, mPaint);
}
最后 使用就可以了 :
<com.admin.view_core.view.CustomTitleView
    android:layout_width="wrap_content"
    android:layout_height="wrap_content"
    android:layout_centerInParent="true"
    android:padding="10dp"
    app:titleColor="#ff0000"
    app:titleText="4341"
    app:titleTextSize="30sp" />
效果如下:
自定义 图片 + 文字
<!-- format 为取值类型
    dimension 代表 尺寸-->
<attr name="titleText" format="string" />
<attr name="titleColor" format="color" />
<attr name="titleTextSize" format="dimension" />
<attr name="image" format="reference" />
<attr name="imageScaleType">
    <enum name="fileXY" value="0" />
    <enum name="center" value="1" />
</attr>
<declare-styleable name="CustomImageView">
    <attr name="titleText" />
    <attr name="titleColor" />
    <attr name="titleTextSize" />
    <attr name="image" />
    <attr name="imageScaleType" />
</declare-styleable>
public class CustomImageView extends View {

    private static final int FILEXY = 0;
    private static final int CENTER = 1;

    private Bitmap mImage;
    private int mImageScale;
    private String mTitle;
    private int mTextColor;
    private int mTextSize;
    private Rect rect;
    private Paint mPaint;
    private Rect mTextBound;

    private int mWidth;
    private int mHeight;
    private TextPaint paint;

    public CustomImageView(Context context) {
        this(context, null);
    }

    public CustomImageView(Context context, AttributeSet attrs) {
        this(context, attrs, 0);
    }

    public CustomImageView(Context context, AttributeSet attrs, int defStyleAttr) {
        super(context, attrs, defStyleAttr);

        TypedArray a = context.getTheme().obtainStyledAttributes(
                attrs, R.styleable.CustomImageView, defStyleAttr, 0);

        int n = a.getIndexCount();
        for (int i = 0; i < n; i++) {
            int attr = a.getIndex(i);
            if (attr == R.styleable.CustomImageView_image) {
                mImage = BitmapFactory.decodeResource(getResources(), a.getResourceId(attr, 0));
            } else if (attr == R.styleable.CustomImageView_imageScaleType) {
                mImageScale = a.getInt(attr, CENTER);
            } else if (attr == R.styleable.CustomImageView_titleText) {
                mTitle = a.getString(attr);
            } else if (attr == R.styleable.CustomImageView_titleColor) {
                mTextColor = a.getColor(attr, Color.BLACK);
            } else if (attr == R.styleable.CustomImageView_titleTextSize) {
                mTextSize = a.getDimensionPixelSize(attr, (int) TypedValue.applyDimension(
                        TypedValue.COMPLEX_UNIT_SP, 16, getResources().getDisplayMetrics()));
            }
        }
        a.recycle();

        mPaint = new Paint();
        rect = new Rect();
        mTextBound = new Rect();
        mPaint.setTextSize(mTextSize);
        //计算字体的范围
        mPaint.getTextBounds(mTitle, 0, mTitle.length(), mTextBound);
    }

    @Override
    protected void onMeasure(int widthMeasureSpec, int heightMeasureSpec) {
        /*
         *  设置宽度
         */
        super.onMeasure(widthMeasureSpec, heightMeasureSpec);
        int widthMode = MeasureSpec.getMode(widthMeasureSpec);
        int widthSize = MeasureSpec.getSize(widthMeasureSpec);

        if (widthMode == MeasureSpec.EXACTLY) {
            mWidth = widthSize;
        } else {
            //图片的 宽
            int desireByImg = getPaddingLeft() + getPaddingRight() + mImage.getWidth();
            //文字的 宽
            int desireByTitle = getPaddingLeft() + getPaddingRight() + mTextBound.width();

            if (widthMode == MeasureSpec.AT_MOST) {
                int desire = Math.max(desireByImg, desireByTitle);
                mWidth = Math.min(desire, widthSize);
            }
        }

        /*
         *  设置高度
         */
        int heightMode = MeasureSpec.getMode(heightMeasureSpec);
        int heightSize = MeasureSpec.getSize(heightMeasureSpec);

        if (heightMode == MeasureSpec.EXACTLY) {
            mHeight = heightSize;
        } else {
            int desire = getPaddingTop() + getPaddingBottom() + mImage.getHeight() + mTextBound.height();
            if (heightMode == MeasureSpec.AT_MOST) {
                mHeight = Math.min(desire, heightSize);
            }
        }
        setMeasuredDimension(mWidth, mHeight);
    }

    @Override
    protected void onDraw(Canvas canvas) {
        super.onDraw(canvas);
        mPaint.setStrokeWidth(4);
        mPaint.setStyle(Paint.Style.STROKE);
        mPaint.setColor(Color.CYAN);
        canvas.drawRect(0, 0, getMeasuredWidth(), getMeasuredHeight(), mPaint);

        rect.left = getPaddingLeft();
        rect.right = mWidth - getPaddingRight();
        rect.top = getPaddingTop();
        rect.bottom = mHeight - getPaddingBottom();

        mPaint.setColor(mTextColor);
        mPaint.setStyle(Paint.Style.FILL);

        if (mTextBound.width() > mWidth) {
            if (paint == null) {
                paint = new TextPaint(mPaint);
            }
            String msg = TextUtils.ellipsize(mTitle, paint,
                    (float) mWidth - getPaddingLeft() - getPaddingRight(),
                    TextUtils.TruncateAt.END).toString();
            canvas.drawText(msg, getPaddingLeft(), mHeight - getPaddingBottom(), mPaint);
        } else {
            canvas.drawText(mTitle, mWidth / 2 - mTextBound.width() / 2, (mHeight - getPaddingBottom()), mPaint);
        }

        //减去 字体的高度
        rect.bottom -= mTextBound.height();
        if (mImageScale == FILEXY) {
            canvas.drawBitmap(mImage, null, rect, mPaint);
        } else {
            rect.left = mWidth / 2 - mImage.getWidth() / 2;
            rect.right = mWidth / 2 + mImage.getWidth() / 2;
            rect.top = (mHeight - mTextBound.height()) / 2 - mImage.getHeight() / 2;
            rect.bottom = (mHeight - mTextBound.height()) / 2 + mImage.getHeight() / 2;
            canvas.drawBitmap(mImage, null, rect, mPaint);
        }
    }
}
使用如下:
<?xml version="1.0" encoding="utf-8"?>
<LinearLayout xmlns:android="http://schemas.android.com/apk/res/android"
    xmlns:app="http://schemas.android.com/apk/res-auto"
    android:layout_width="match_parent"
    android:layout_height="match_parent"
    android:orientation="vertical">

    <com.admin.view_core.view.CustomImageView
        android:layout_width="wrap_content"
        android:layout_height="wrap_content"
        android:layout_marginLeft="50dp"
        android:padding="10dp"
        app:image="@drawable/ic_launcher"
        app:imageScaleType="center"
        app:titleColor="#ff0000"
        app:titleText="Hello Android ! "
        app:titleTextSize="30dp" />

    <com.admin.view_core.view.CustomImageView
        android:layout_width="100dp"
        android:layout_height="wrap_content"
        android:layout_marginLeft="50dp"
        android:layout_marginTop="50dp"
        android:padding="10dp"
        app:image="@drawable/ic_launcher"
        app:imageScaleType="center"
        app:titleColor="#ff0000"
        app:titleText="Hello Android ! "
        app:titleTextSize="30dp" />

    <com.admin.view_core.view.CustomImageView
        android:layout_width="wrap_content"
        android:layout_height="wrap_content"
        android:layout_marginLeft="50dp"
        android:layout_marginTop="50dp"
        android:padding="10dp"
        app:image="@drawable/ic_launcher"
        app:imageScaleType="center"
        app:titleColor="#ff0000"
        app:titleText="He!  "
        app:titleTextSize="10dp" />

</LinearLayout>
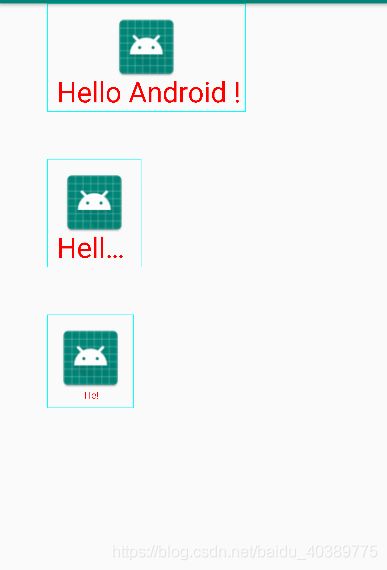
结果如下:
自定义 圆环
<attr name="firstColor" format="color"/>
<attr name="secondColor" format="color"/>
<attr name="circleWidth" format="dimension"/>
<attr name="speed" format="integer"/>

<declare-styleable name="CustomProgressBar">
    <attr name="firstColor"/>
    <attr name="secondColor"/>
    <attr name="circleWidth"/>
    <attr name="speed"/>
</declare-styleable>
public class CustomProgressBar extends View {
    //第一圈的颜色
    private int mFirstColor;
    //第二圈的颜色
    private int mSecondColor;
    //圆的宽度
    private int mCircleWidth;
    //画笔
    private Paint mPaint;
    //当前进度
    private int mProgress;
    //速度
    private int mSpeed;
    // 是否应该 开始下一个
    private boolean isNext = false;
    // 状态
    private volatile boolean isState = true;
    private RectF oval;

    public CustomProgressBar(Context context) {
        this(context, null);
    }

    public CustomProgressBar(Context context, AttributeSet attrs) {
        this(context, attrs, 0);
    }

    @SuppressLint("ObjectAnimatorBinding")
    public void start() {
        isState = true;
        new Thread() {
            @Override
            public void run() {
                while (isState) {
                    mProgress++;
                    if (mProgress == 360) {
                        mProgress = 0;
                        isNext = !isNext;
                    }
                    postInvalidate();
                    try {
                        sleep(mSpeed);
                    } catch (InterruptedException e) {
                        e.printStackTrace();
                    }
                }
            }
        }.start();
    }

    public void stop() {
        isState = false;
    }

    public CustomProgressBar(Context context, AttributeSet attrs, int defStyleAttr) {
        super(context, attrs, defStyleAttr);
        TypedArray a = context.getTheme().obtainStyledAttributes(attrs,
                R.styleable.CustomProgressBar, defStyleAttr, 0);
        int count = a.getIndexCount();
        for (int i = 0; i < count; i++) {
            int arr = a.getIndex(i);
            if (arr == R.styleable.CustomProgressBar_firstColor) {
                mFirstColor = a.getColor(arr, Color.BLACK);
            } else if (arr == R.styleable.CustomProgressBar_secondColor) {
                mSecondColor = a.getColor(arr, Color.BLACK);
            } else if (arr == R.styleable.CustomProgressBar_circleWidth) {
                mCircleWidth = a.getDimensionPixelSize(arr, (int) TypedValue.applyDimension(TypedValue.COMPLEX_UNIT_SP,
                        20, getResources().getDisplayMetrics()));
            } else if (arr == R.styleable.CustomProgressBar_speed) {
                mSpeed = a.getIndex(arr);
            }
        }
        a.recycle();
        mPaint = new Paint();
    }

    @Override
    protected void onDraw(Canvas canvas) {
        super.onDraw(canvas);

        int center = getWidth() / 2; //圆心 的坐标
        int radius = center - mCircleWidth / 2; //半径

        mPaint.setStrokeWidth(mCircleWidth);//圆环 宽度
        mPaint.setAntiAlias(true);//抗锯齿
        mPaint.setStyle(Paint.Style.STROKE);//描边

        if (oval == null) {
            oval = new RectF(center - radius, center - radius, center + radius, center + radius);
        }
        if (isNext) {
            mPaint.setColor(mFirstColor);
            canvas.drawCircle(center, center, radius, mPaint);
            mPaint.setColor(mSecondColor);
            canvas.drawArc(oval, -90, mProgress, false, mPaint);
        } else {
            mPaint.setColor(mSecondColor);
            canvas.drawCircle(center, center, radius, mPaint);
            mPaint.setColor(mFirstColor);
            canvas.drawArc(oval, -90, mProgress, false, mPaint);
        }
    }
}
使用
<com.admin.view_core.view.CustomProgressBar
    android:layout_centerInParent="true"
    android:id="@+id/progress_bar"
    android:layout_width="150dp"
    android:layout_height="150dp"
    app:firstColor="#ff0000"
    app:secondColor="#ffff00"
    app:speed="10"
    app:circleWidth="20dp"/>
final CustomProgressBar bar = findViewById(R.id.progress_bar);
bar.setOnClickListener(new View.OnClickListener() {
    @Override
    public void onClick(View v) {
        if (flag) {
            bar.start();
            flag = false;
        }else {
            bar.stop();
            flag = true;
        }
    }
});
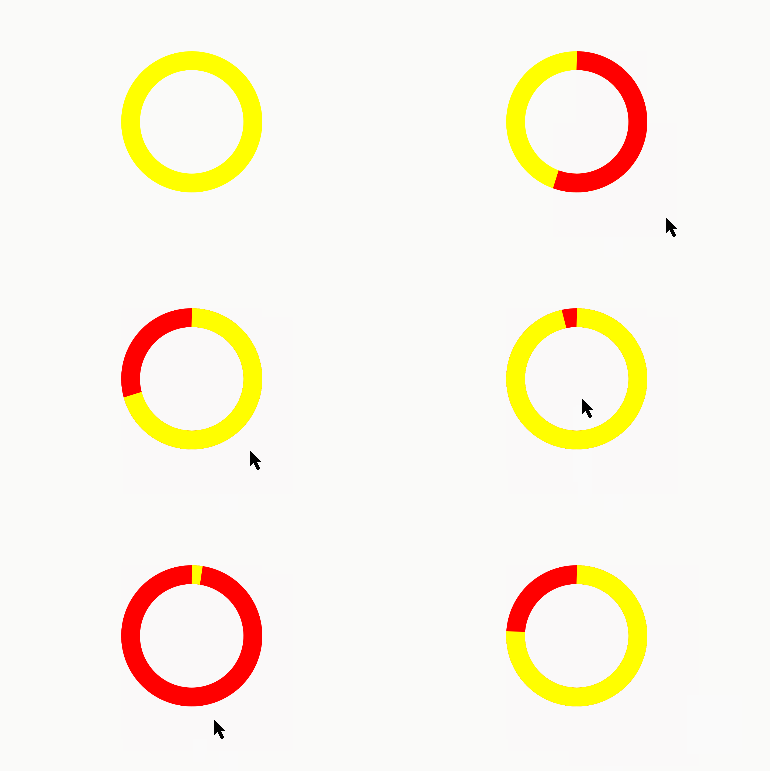
效果如图
自定义音量控制
<attr name="firstColor" format="color" />
<attr name="secondColor" format="color" />
<attr name="circleWidth" format="dimension" />
<attr name="dotCount" format="integer" />
<attr name="splitSize" format="integer" />
<attr name="bg" format="reference" />

<declare-styleable name="CustomVolumeControlBar">
        <attr name="firstColor" />
        <attr name="secondColor" />
        <attr name="circleWidth" />
        <attr name="dotCount" />
        <attr name="splitSize" />
        <attr name="bg" />
</declare-styleable>
public class CustomVolumeControlBar extends View {

    private int mFirstColor; //第一圈的颜色
    private int mSecondColor; //第二圈的颜色
    private int mCircleWidth; //圆的宽度
    private Paint mPaint;   //画笔
    private int mCurrentCount;  //当前进度
    private Bitmap mImage;  //中间的图片
    private int mSplitSize; //间隙
    private int mCount; //个数
    private Rect mRect; //记录圆 坐标

    Rect rect; //记录 View 的坐标
    boolean top = false;
    boolean bottom = false;
    int[] pos = new int[2];

    public CustomVolumeControlBar(Context context) {
        this(context, null);
    }

    public CustomVolumeControlBar(Context context, AttributeSet attrs) {
        this(context, attrs, 0);
    }

    public CustomVolumeControlBar(Context context, AttributeSet attrs, int defStyleAttr) {
        super(context, attrs, defStyleAttr);
        TypedArray a = context.getTheme().obtainStyledAttributes(attrs,
                R.styleable.CustomVolumeControlBar, defStyleAttr, 0);
        int count = a.getIndexCount();
        for (int i = 0; i < count; i++) {
            int attr = a.getIndex(i);
            if (attr == R.styleable.CustomVolumeControlBar_firstColor) {
                mFirstColor = a.getColor(attr, Color.BLACK);
            } else if (attr == R.styleable.CustomVolumeControlBar_secondColor) {
                mSecondColor = a.getColor(attr, Color.BLACK);
            } else if (attr == R.styleable.CustomVolumeControlBar_bg) {
                mImage = BitmapFactory.decodeResource(getResources(), a.getResourceId(attr, 0));
            } else if (attr == R.styleable.CustomVolumeControlBar_circleWidth) {
                mCircleWidth = a.getDimensionPixelSize(attr, (int) TypedValue.applyDimension(
                        TypedValue.COMPLEX_UNIT_PX, 20, getResources().getDisplayMetrics()));
            } else if (attr == R.styleable.CustomVolumeControlBar_dotCount) {
                mCount = a.getInt(attr, 20);
            } else if (attr == R.styleable.CustomVolumeControlBar_splitSize) {
                mSplitSize = a.getInt(attr, 20);
            }
        }
        a.recycle();
        mPaint = new Paint();
        mRect = new Rect();
        rect = new Rect();
    }

    @Override
    protected void onDraw(Canvas canvas) {
        super.onDraw(canvas);

        getLocationInWindow(pos); //获取位于屏幕的位置 保存到 数组中
        rect.left = pos[0];
        rect.top = pos[1];
        rect.right = pos[0] + getWidth();
        rect.bottom = pos[1] + getHeight();

        mPaint.setAntiAlias(true);
        mPaint.setStrokeWidth(mCircleWidth);
        mPaint.setStrokeCap(Paint.Cap.ROUND);//圆头
        mPaint.setStyle(Paint.Style.STROKE);

        int centre = getWidth() / 2; //圆心 坐标
        int radius = centre - mCircleWidth / 2;// 外圆 的半径

        drawOval(canvas, centre, radius);

        int relRadius = radius - mCircleWidth / 2;//内圆 的半径

        //内切正方形 的位置
        mRect.left = (int) ((relRadius - Math.sqrt(2) * 1.0f / 2 * relRadius) + mCircleWidth);
        mRect.top = (int) ((relRadius - Math.sqrt(2) * 1.0f / 2 * relRadius) + mCircleWidth);
        mRect.bottom = (int) (mRect.left + Math.sqrt(2) * relRadius);
        mRect.right = (int) (mRect.left + Math.sqrt(2) * relRadius);

        //如果图片比较小,那么根据图片的尺寸放置到正中心
        if (mImage.getWidth() < Math.sqrt(2) * relRadius) {
            mRect.left = (int) (mRect.left + Math.sqrt(2) * relRadius * 1.0f / 2 - mImage.getWidth() * 1.0f / 2);
            mRect.top = (int) (mRect.top + Math.sqrt(2) * relRadius * 1.0f / 2 - mImage.getHeight() * 1.0f / 2);
            mRect.right = (mRect.left + mImage.getWidth());
            mRect.bottom = (mRect.top + mImage.getHeight());
        }
        canvas.drawBitmap(mImage, null, mRect, mPaint);
    }

    @SuppressLint("ClickableViewAccessibility")
    @Override
    public boolean onTouchEvent(MotionEvent event) {
        switch (event.getAction() & MotionEvent.ACTION_MASK) {
            case MotionEvent.ACTION_DOWN:
                int center = (rect.bottom - rect.top) / 2 + rect.top;
                if (event.getRawY() > rect.top && event.getRawY() < center) {
                    if (event.getRawX() > rect.left && event.getRawX() < rect.right) {
                        top = true;
                    }
                }
                if (event.getRawY() > center && event.getRawY() < rect.bottom) {
                    if (event.getRawX() > rect.left && event.getRawX() < rect.right) {
                        bottom = true;
                    }
                }
                break;
            case MotionEvent.ACTION_UP:
                if (top) {
                    if (mCurrentCount < mCount && mCurrentCount >= 0) {
                        mCurrentCount++;
                        invalidate();
                    }
                }
                if (bottom) {
                    if (mCurrentCount <= mCount && mCurrentCount > 0) {
                        mCurrentCount--;
                        invalidate();
                    }
                }
                initSite();
                break;
        }
        return true;
    }

    private void initSite() {
        top = false;
        bottom = false;
    }

    private void drawOval(Canvas canvas, int centre, int radius) {
        /*
         * 根据 需要画的个数 计算每个块 所占的大小
         */
        float itemSize = (360 * 1.0f - mCount * mSplitSize) / mCount;

        RectF oval = new RectF(centre - radius, centre - radius, centre + radius, centre + radius);

        mPaint.setColor(mFirstColor);
        for (int i = 0; i < mCount; i++) {
            canvas.drawArc(oval, (i * (itemSize + mSplitSize))-90, itemSize, false, mPaint);
        }

        mPaint.setColor(mSecondColor);
        for (int i = 0; i < mCurrentCount; i++) {
            canvas.drawArc(oval, (i * (itemSize + mSplitSize))-90, itemSize, false, mPaint);
        }
    }
}
使用如下:
<com.admin.view_core.view.CustomVolumeControlBar
    android:layout_centerInParent="true"
    android:id="@+id/progress_bar"
    android:background="#413D35"
    android:layout_width="150dp"
    android:layout_height="150dp"
    app:firstColor="#999999"
    app:secondColor="#000000"
    app:circleWidth="12dp"
    app:bg="@drawable/ic_launcher"
    app:dotCount="8"
    app:splitSize="15"/>
效果如下:
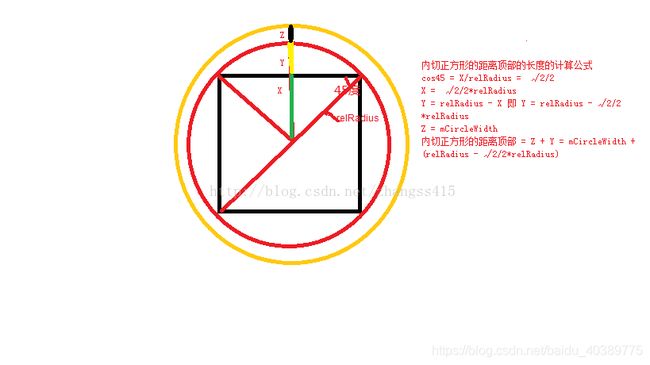
这个在圆的内部 切了一个正方形,逻辑有点难懂,结合这个图片看会比较好一些

这个图片 引用 于https://blog.csdn.net/zhangss415/article/details/54094328
这篇文章参考自 鸿洋大神的博客。我在敲一遍也是为了加深理解,并且,加入了一些我自己的理解。因为这些代码都是在AndroidLibrary 中写的。所以不能使用 switch --------
原文链接:https://so.csdn.net/so/search/s.do?q=自定义View&t=blog&u=lmj623565791


