CoolWeather项目实战(第三部分终章:手动更新天气和切换城市以及后台自动更新)--->第一行代码-Android(第2版)
CoolWeather项目实战(第三部分终章:手动更新天气和切换城市以及后台自动更新)
GitHub上源码的链接:https://github.com/wangliu1102/CoolWeather
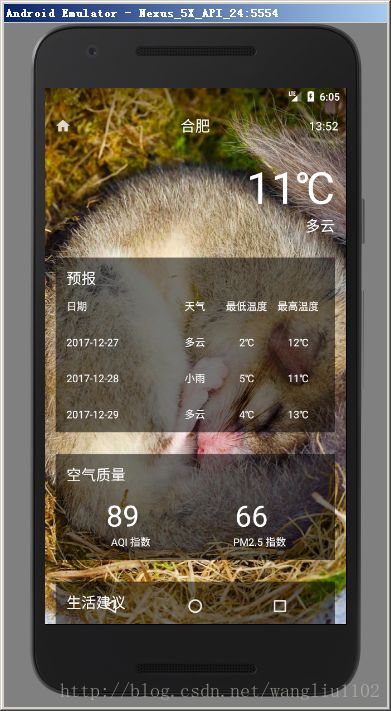
前面我们实现了遍历全国所有省市县,选中某一县后可以查看其天气信息,但是选中后就没有办法查看其它城市的天气了。所以,这部分我们增加切换城市,并可以实时更新天气以及手动更新天气的功能,同时开启后台服务,可以定时自动更新天气。
1、手动更新天气
这里我们通过SwipeRefreshLayout来实现下拉刷新的功能,修改activity_weather.xml文件,代码如下所示:
<FrameLayout
    xmlns:android="http://schemas.android.com/apk/res/android"
    android:layout_width="match_parent"
    android:layout_height="match_parent"
    android:background="@color/colorPrimary">

    ...


        <android.support.v4.widget.SwipeRefreshLayout
            android:id="@+id/swipe_refresh"
            android:layout_width="match_parent"
            android:layout_height="match_parent">

           <ScrollView
                android:id="@+id/weather_layout"
                android:layout_width="match_parent"
                android:layout_height="match_parent"
                android:overScrollMode="never"
                android:scrollbars="none">

            ...
            ScrollView>
        android.support.v4.widget.SwipeRefreshLayout>
    FrameLayout>
然后修改WeatherActivity中的代码,加入更新天气的处理逻辑,代码如下所示:
public class WeatherActivity extends AppCompatActivity {

    public SwipeRefreshLayout mSwipeRefreshLayout; // 下拉刷新

    private String mWeatherId; // 天气id
    ...

    @Override
    protected void onCreate(Bundle savedInstanceState) {
        super.onCreate(savedInstanceState);
        ...
        mSwipeRefreshLayout = (SwipeRefreshLayout) findViewById(R.id.swipe_refresh);
        mSwipeRefreshLayout.setColorSchemeResources(R.color.colorPrimary); // 设置下拉刷新进度条颜色

        SharedPreferences preferences = PreferenceManager.getDefaultSharedPreferences(this);
        String weatherString = preferences.getString("weather", null);
        if (weatherString != null) {
            // 有缓存时直接解析天气数据
            Weather weather = Utility.handleWeatherResponse(weatherString);
            mWeatherId = weather.basic.weatherId;
            showWeatherInfo(weather);
        } else {
            // 无缓存去服务器查询天气
            mWeatherId = getIntent().getStringExtra("weather_id");
            mWeatherLayoutScrollView.setVisibility(View.INVISIBLE); // 请求数据时隐藏ScrollView
            requestWeather(mWeatherId);
        }

        // 下拉刷新监听器
        mSwipeRefreshLayout.setOnRefreshListener(new SwipeRefreshLayout.OnRefreshListener() {
            @Override
            public void onRefresh() {
                requestWeather(mWeatherId);
            }
        });

        ...
    }

    /**
     * 根据天气id请求城市天气信息
     *
     * @param weatherId 天气id
     */
    public void requestWeather(final String weatherId) {
        String weatherUrl = "http://guolin.tech/api/weather?cityid=" + weatherId
                + "&key=28c01281607a4a9b92195626fb49a4a1";
        HttpUtil.sendOkHttpRequest(weatherUrl, new Callback() {
            @Override
            public void onFailure(Call call, IOException e) {
                runOnUiThread(new Runnable() {
                    @Override
                    public void run() {
                        Toast.makeText(WeatherActivity.this, "获取天气信息失败", Toast.LENGTH_SHORT).show();
                        mSwipeRefreshLayout.setRefreshing(false);

                    }
                });
            }

            @Override
            public void onResponse(Call call, Response response) throws IOException {
                ...
                runOnUiThread(new Runnable() {
                    @Override
                    public void run() {
                        if (weather != null && "ok".equals(weather.status)) {
                            // 从服务器中成功获取到天气信息,先缓存到SharedPreferences
                            SharedPreferences.Editor editor = PreferenceManager
                                    .getDefaultSharedPreferences(WeatherActivity.this)
                                    .edit();
                            editor.putString("weather", responseText);
                            editor.apply();

                            mWeatherId = weather.basic.weatherId;
                            showWeatherInfo(weather);
                        } else {
                            Toast.makeText(WeatherActivity.this, "获取天气信息失败", Toast.LENGTH_SHORT).show();
                        }
                        mSwipeRefreshLayout.setRefreshing(false); // 刷新结束,隐藏进度条
                    }
                });
            }
        });
        loadBingPic();
    }
}
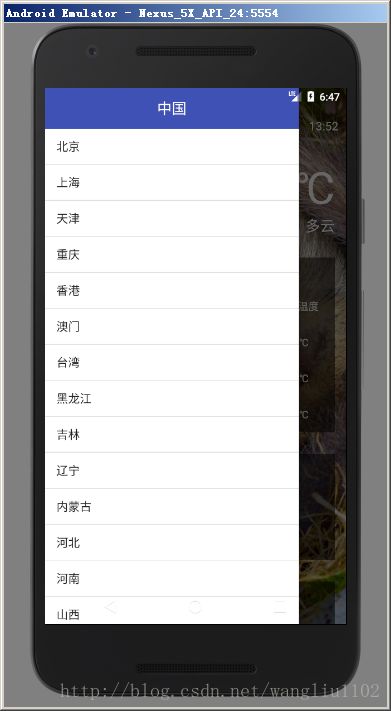
2、切换城市
使用滑动菜单,来切换城市,通过DrawerLayou实现。
首先,在天气界面的标题布局title.xml中添加一个切换城市的导航按钮,让用户知道应用有滑动菜单的功能。修改代码如下:
<RelativeLayout
    xmlns:android="http://schemas.android.com/apk/res/android"
    xmlns:tools="http://schemas.android.com/tools"
    android:layout_width="match_parent"
    android:layout_height="?attr/actionBarSize">


    <Button
        android:id="@+id/nav_button"
        android:layout_width="30dp"
        android:layout_height="30dp"
        android:layout_alignParentStart="true"
        android:layout_centerInParent="true"
        android:layout_marginStart="10dp"
        android:background="@drawable/ic_home"/>

    ...
RelativeLayout>
接着,在activity_weather.xml文件中添加滑动菜单的功能,代码如下:
<FrameLayout
    xmlns:android="http://schemas.android.com/apk/res/android"
    android:layout_width="match_parent"
    android:layout_height="match_parent"
    android:background="@color/colorPrimary">

    ...


    <android.support.v4.widget.DrawerLayout
        android:id="@+id/drawer_layout"
        android:layout_width="match_parent"
        android:layout_height="match_parent">


        <android.support.v4.widget.SwipeRefreshLayout
            android:id="@+id/swipe_refresh"
            android:layout_width="match_parent"
            android:layout_height="match_parent">

            ...

        android.support.v4.widget.SwipeRefreshLayout>


         <fragment
            android:id="@+id/choose_area_fragment"
       android:name="com.wl.android.coolweather.ChooseAreaFragment"
            android:layout_width="match_parent"
            android:layout_height="match_parent"
            android:layout_gravity="start"/>

    android.support.v4.widget.DrawerLayout>
FrameLayout>
接着,修改WeatherActivity中的代码,加入滑动菜单的逻辑处理,代码如下所示:
public class WeatherActivity extends AppCompatActivity {

    public DrawerLayout mDrawerLayout; // 滑动菜单

    private Button mNavButton; // 自定义标题栏上的滑动菜单按钮

    ...

     @Override
    protected void onCreate(Bundle savedInstanceState) {
        super.onCreate(savedInstanceState);
        ...
        mDrawerLayout = (DrawerLayout) findViewById(R.id.drawer_layout);
        mNavButton = (Button) findViewById(R.id.nav_button);
        mNavButton.setOnClickListener(new View.OnClickListener() {
            @Override
            public void onClick(View v) {
                mDrawerLayout.openDrawer(GravityCompat.START); // 打开滑动菜单
            }
        });
    }
}
打开滑动菜单后,我们还需要处理切换城市后的逻辑才行。因为之前选中了某个城市后是跳转到WeatherActivity的,而现在由于我们本来就是在WeatherActivity中,因此不需要跳转,只需要请求新城市的天气信息就可以了,修改ChooseAreaFragment中的代码,根据不同状态来进行不同的逻辑处理。代码如下所示:
public class ChooseAreaFragment extends Fragment {

    ...


    @Override
    public void onActivityCreated(@Nullable Bundle savedInstanceState) {
        super.onActivityCreated(savedInstanceState);
        mListView.setOnItemClickListener(new AdapterView.OnItemClickListener() {
            @Override
            public void onItemClick(AdapterView parent, View view, int position, long id) {
                if (currentLevel == LEVEL_PROVINCE) {
                    mSelectedProvince = mProvinceList.get(position);
                    queryCities();
                } else if (currentLevel == LEVEL_CITY) {
                    mSelectedCity = mCityList.get(position);
                    queryCounties();
                } else if (currentLevel == LEVEL_COUNTY) {
                    // 跳转到天气详情页面WeatherActivity
                    String weatherId = mCountyList.get(position).getWeatherId();
                    if(getActivity() instanceof MainActivity){
                        Intent intent = new Intent(getActivity(), WeatherActivity.class);
                        intent.putExtra("weather_id", weatherId);
                        startActivity(intent);
                        getActivity().finish();
                    }else if(getActivity() instanceof  WeatherActivity){
                        WeatherActivity activity = (WeatherActivity) getActivity();
                        activity.mDrawerLayout.closeDrawers(); // 关闭滑动菜单
                        activity.mSwipeRefreshLayout.setRefreshing(true); // 显示下拉刷新进度条
                        activity.requestWeather(weatherId); // 请求新城市的天气
                    }
                }
            }
        });

        ...
    }
    ...
}
这里增加了一个if判断,通过instanceof关键字判断一个对象是否属于某个类的实例,就可以轻松地判断该碎片实在MainActivity当中还是在WeatherActivity中,如果实在MainActivity中,处理逻辑不变,如果实在WeatherActivity中,就关闭滑动菜单,显示下拉刷新进度条,然后请求新城市的天气信息。
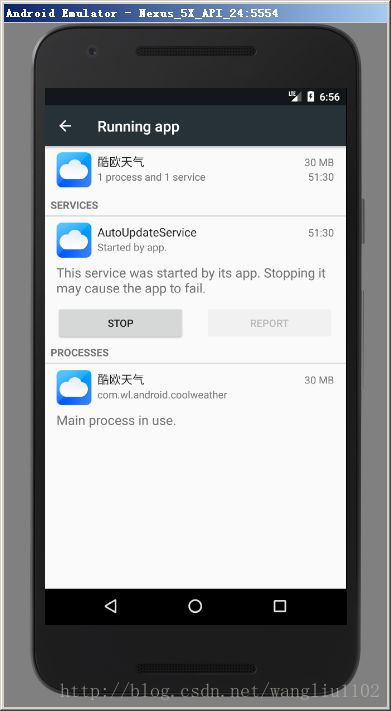
3、后台自动更新天气
为了让用户每次打开软件时看到都是最新的天气信息,我们添加一个后台服务,让后台服务定时自动更新天气信息。
在service包下新建一个服务,右击com.wl.android.coolweather.service –>New–>Service–>Service,创建一个AutoUpdateService,代码如下所示:
package com.wl.android.coolweather.service;

import android.app.AlarmManager;
import android.app.PendingIntent;
import android.app.Service;
import android.content.Intent;
import android.content.SharedPreferences;
import android.os.IBinder;
import android.os.SystemClock;
import android.preference.PreferenceManager;

import com.wl.android.coolweather.gson.Weather;
import com.wl.android.coolweather.util.HttpUtil;
import com.wl.android.coolweather.util.Utility;

import java.io.IOException;

import okhttp3.Call;
import okhttp3.Callback;
import okhttp3.Response;

/**
 * 后台自动更新服务,每隔8小时更新
 */
public class AutoUpdateService extends Service {
    public AutoUpdateService() {
    }

    @Override
    public IBinder onBind(Intent intent) {
        // TODO: Return the communication channel to the service.
        throw new UnsupportedOperationException("Not yet implemented");
    }

    @Override
    public int onStartCommand(Intent intent, int flags, int startId) {
        updateWeather();
        updateBingPic();
        // 设置定时任务
        AlarmManager manager = (AlarmManager) getSystemService(ALARM_SERVICE);
        int anHour = 8 * 60 * 60 * 1000; // 8小时
        long triggerAtTime = SystemClock.elapsedRealtime() + anHour;
        Intent i = new Intent(this, AutoUpdateService.class);
        PendingIntent pi = PendingIntent.getService(this, 0, i, 0);
        manager.cancel(pi);
        manager.set(AlarmManager.ELAPSED_REALTIME_WAKEUP, triggerAtTime, pi);
        return super.onStartCommand(intent, flags, startId);
    }

    /**
     * 更新天气信息,保存到SharedPreferences中,因为打开WeatherActivity会优先从SharedPreferences中读取数据
     */
    private void updateWeather() {
        SharedPreferences prefs = PreferenceManager.getDefaultSharedPreferences(this);
        String weatherString = prefs.getString("weather", null);
        if (weatherString != null) {
            // 有缓存直接解析天气数据
            Weather weather = Utility.handleWeatherResponse(weatherString);
            String weatherId = weather.basic.weatherId;

            String weatherUrl = "http://guolin.tech/api/weather?cityid=" + weatherId
                    + "&key=28c01281607a4a9b92195626fb49a4a1";
            HttpUtil.sendOkHttpRequest(weatherUrl, new Callback() {
                @Override
                public void onFailure(Call call, IOException e) {
                    e.printStackTrace();
                }

                @Override
                public void onResponse(Call call, Response response) throws IOException {
                    String responseText = response.body().string();
                    Weather weather = Utility.handleWeatherResponse(responseText);
                    if (weather != null && "ok".equals(weather.status)) {
                        SharedPreferences.Editor editor = PreferenceManager
                                .getDefaultSharedPreferences(AutoUpdateService.this)
                                .edit();
                        editor.putString("weather", responseText);
                        editor.apply();
                    }
                }
            });
        }
    }

    /**
     * 更新必应每日一图,也保存到SharedPreferences中
     */
    private void updateBingPic() {
        String requestBingPic = "http://guolin.tech/api/bing_pic";
        HttpUtil.sendOkHttpRequest(requestBingPic, new Callback() {
            @Override
            public void onFailure(Call call, IOException e) {
                e.printStackTrace();
            }

            @Override
            public void onResponse(Call call, Response response) throws IOException {
                String binPic = response.body().string();
                SharedPreferences.Editor editor = PreferenceManager
                        .getDefaultSharedPreferences(AutoUpdateService.this)
                        .edit();
                editor.putString("bing_pic", binPic);
                editor.apply();
            }
        });
    }

}
然后,去WeatherActivity中添加激活服务的逻辑,添加代码如下所示:
public class WeatherActivity extends AppCompatActivity {
    ...

    /**
     * 处理并显示Weather实体类中的数据
     *
     * @param weather 天气对象
     */
    private void showWeatherInfo(Weather weather) {
       ...
       mWeatherLayoutScrollView.setVisibility(View.VISIBLE); // 数据加载完毕显示ScrollView

        // 启动后台自动更新服务
        Intent intent = new Intent(this, AutoUpdateService.class);
        startService(intent);
    }

    ...
}

