OpenCV Using Python——RGB颜色空间中的肤色检测
RGB颜色空间中的肤色检测
1. 问题
很多相关文章中都会每每在肤色检测时都会提到:RGB颜色空间中肤色受光照影响,背光时肤色都是黑的,当然会受光照影响了。
之前像我这样的懒人在网上各种人脸和手势的实现中发现大多数人都转入HSV颜色空间去,而且我也这么干了,结果可以想象,Hue空间的噪声很多都是大颗粒的跟椒盐很相似的噪声,尝试过各种自认为速成的办法,通通都跪了。手势检测的前提是完美的肤色检测。如果连复杂背景下的肤色都搞不定,那就真的没有下文了。
但是正常可见的情况下,真的有人在RGB空间建立过肤色模型,虽然原理上很过时,但是所有看到模型规则的人应该都会想:你怎么还可以这么搞?
2. RGB空间参数肤色模型
Kovac等人提出在不同光照条件下的RGB颜色空间中定义的模型。像素值(红、绿、蓝范围都为[0,255])满足条件(1)和(2)时为肤色。Kovac等人提出在不同光照条件下的RGB颜色空间中定义的模型。像素值(红、绿、蓝范围都为[0,255])满足条件(1)和(2)时为肤色。
3. 代码说明
如果满足肤色条件,为了输出结果首先要学会操纵像素值(像素访问和修改)。所以就有了“Pixel Value Access”和“Pixel Value Modification”实验。肤色检测实验名为“Skin Model”实验。
import cv2
import numpy as np
from matplotlib import pyplot as plt
################################################################################

print 'Pixel Values Access'

imgFile = 'images/face.jpg'

# load an original image
img = cv2.imread(imgFile)

# access a pixel at (row,column) coordinates
px = img[150,200]
print 'Pixel Value at (150,200):',px

# access a pixel from blue channel
blue = img[150,200,0]
# access a pixel from green channel
green = img[150,200,1]
# access a pixel from red channel
red = img[150,200,2]
print 'Pixel Value from B,G,R channels at (150,200): ',blue,green,red
################################################################################

print 'Pixel Values Modification'

img[150,200] = [0,0,0]
print 'Modified Pixel Value at (150,200):',px
################################################################################
# better way: using numpy

# access a pixel from blue channel
blue = img.item(100,200,0)
# access a pixel from green channel
green = img.item(100,200,1)
# access a pixel from red channel
red = img.item(100,200,2)
print 'Pixel Value using Numpy from B,G,R channels at (100,200): ',blue,green,red

# warning: we can only change pixels in gray or single-channel image

# modify green value: (row,col,channel)
img.itemset((100,200,1),255)
# read green value
green = img.item(100,200,1)
print 'Modified Green Channel Value Using Numpy at (100,200):',green
################################################################################

print 'Skin Model'

rows,cols,channels = img.shape

# prepare an empty image space
imgSkin = np.zeros(img.shape, np.uint8)
# copy original image
imgSkin = img.copy()

for r in range(rows):
    for c in range(cols):

        # get pixel value
        B = img.item(r,c,0)
        G = img.item(r,c,1)
        R = img.item(r,c,2)

        # non-skin area if skin equals 0, skin area otherwise
        skin = 0

        if (abs(R - G) > 15) and (R > G) and (R > B):
            if (R > 95) and (G > 40) and (B > 20) and (max(R,G,B) - min(R,G,B) > 15):
                skin = 1
                # print 'Condition 1 satisfied!'
            elif (R > 220) and (G > 210) and (B > 170):
                skin = 1
                # print 'Condition 2 satisfied!'

        if 0 == skin:
            imgSkin.itemset((r,c,0),0)
            imgSkin.itemset((r,c,1),0)
            imgSkin.itemset((r,c,2),0)
            # print 'Skin detected!'

# convert color space of images because of the display difference between cv2 and matplotlib
img = cv2.cvtColor(img, cv2.COLOR_BGR2RGB)
imgSkin = cv2.cvtColor(imgSkin, cv2.COLOR_BGR2RGB)

# display original image and skin image
plt.subplot(1,2,1), plt.imshow(img), plt.title('Original Image'), plt.xticks([]), plt.yticks([])
plt.subplot(1,2,2), plt.imshow(imgSkin), plt.title('Skin Image'), plt.xticks([]), plt.yticks([])
plt.show()
################################################################################

print 'Waiting for Key Operation'

k = cv2.waitKey(0)

# wait for ESC key to exit
if 27 == k:
    cv2.destroyAllWindows()

print 'Goodbye!'
4. 实验结果
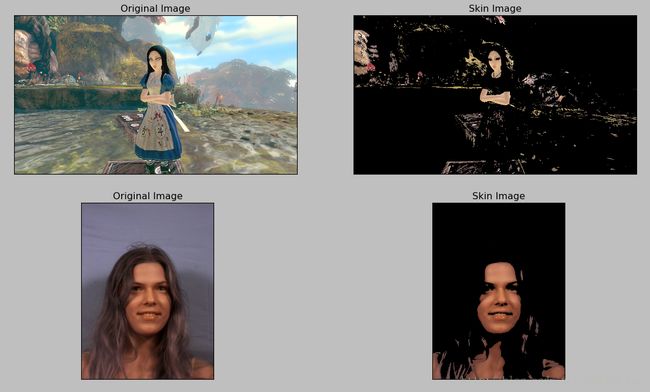
用两幅图片的实验结果来说明肤色检测的有效性和局限性。对于肤色检测来说我觉得已经很好了,第一幅图有的背景肉眼看上去本来就是肤色,所以仅仅靠肤色检测的单一手段来获得前景的肤色是不可行的。但如果像后一幅图像一样,所以如果你住在背景很单一或背景与肤色差异较大并且光照均匀的环境中,这种RGB空间的肤色检测还是很有效的。

