Unity:用Shader和RenderTexture实现胶片颗粒滤镜
利用Shader,我们可以实现很多有趣的效果,比如这样的胶片颗粒滤镜。今天让我们来看看如何搭配RenderTexture把它搬到Unity中,搬到我们的屏幕上,借用屏幕的后期处理,赋予游戏老电影一般的质感。
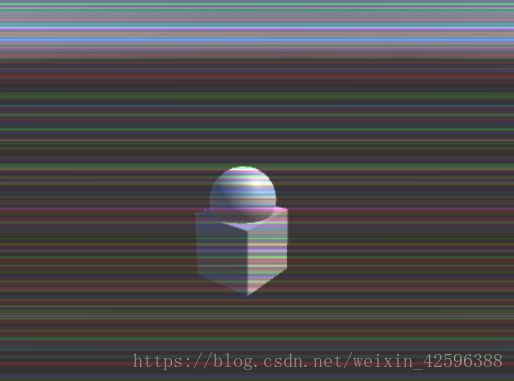
整个过程分为两大步骤,首先生成一张噪点纹理,然后将噪点纹理和输入的屏幕贴图进行颜色混合,这些过程都需要在OnRenderImage中执行,因为OnRenderImage会在渲染完所有图像后执行,方便我们进行屏幕后期处理。话不多说,先上效果图。
生成噪点纹理
好吧,场景是有点。。。但那不是重点。重点在于这些颗粒状的噪点是如何实现的呢?以下是基于https://www.shadertoy.com/view/4sSXDW中Shader实现的Unity ShaderLab版本,让我们先啃掉最关键的部分吧。
    //从外部获取随机数,让画面达到随机变换的效果
    float _Random;

    //噪点像素值生成方法
    float Noise(float2 n, float x)
    {
        n += x;
        return frac(sin(dot(n.xy, float2(12.9898, 78.233))) * 43758.5453);
    }

    //对每一个像素进行卷积操作,取其周围及自身的像素值生成噪点,再以一定权重相加
    float Step1(float2 uv, float n)
    {
        float a = 1.0, b = 2.0, c = -12.0, t = 1.0;
        return (1.0 / (a * 4.0 + b * 4.0 + abs(c))) * (
        Noise(uv + float2(-1.0,-1.0) * t, n) * a +
        Noise(uv + float2( 0.0,-1.0) * t, n) * b +
        Noise(uv + float2( 1.0,-1.0) * t, n) * a +
        Noise(uv + float2(-1.0, 0.0) * t, n) * b +
        Noise(uv + float2( 0.0, 0.0) * t, n) * c +
        Noise(uv + float2( 1.0, 0.0) * t, n) * b +
        Noise(uv + float2(-1.0, 1.0) * t, n) * a +
        Noise(uv + float2( 0.0, 1.0) * t, n) * b +
        Noise(uv + float2( 1.0, 1.0) * t, n) * a +
        0.0);
    }

    //再对每一个像素进行卷积操作,取的是上面Step1的结果,这样可以让噪点分布更加均匀
    float Step2(float2 uv, float n)
    {
        float a = 1.0, b = 2.0, c = 4.0, t = 1.0;
        return (1.0 / (a * 4.0 + b * 4.0 + abs(c))) * (
        Step1(uv + float2(-1.0,-1.0) * t, n) * a +
        Step1(uv + float2( 0.0,-1.0) * t, n) * b +
        Step1(uv + float2( 1.0,-1.0) * t, n) * a +
        Step1(uv + float2(-1.0, 0.0) * t, n) * b +
        Step1(uv + float2( 0.0, 0.0) * t, n) * c +
        Step1(uv + float2( 1.0, 0.0) * t, n) * b +
        Step1(uv + float2(-1.0, 1.0) * t, n) * a +
        Step1(uv + float2( 0.0, 1.0) * t, n) * b +
        Step1(uv + float2( 1.0, 1.0) * t, n) * a +
        0.0);
    }

    //对三个颜色通道赋值,值来自Step2,这里会将外部传入的随机数传到Step2中,让画面达到随机变换的效果
    float3 Step3(float2 uv)
    {
        float a = Step2(uv, 0.07 * frac(_Random));
        float b = Step2(uv, 0.11 * frac(_Random));
        float c = Step2(uv, 0.13 * frac(_Random));
        return float3(a, b, c);
    }
在片元着色器中调用Step3,通过以上算法对输入的纹理进行处理。
    float3 frag(v2f i) : SV_Target
    {
        return Step3(i.uv);
    }
对于顶点着色器倒没有什么特殊的要求,因为这里没有涉及到其他的顶点变换,用最普通的屏幕投射就行,通过UnityObjectToClipPos方法将顶点从对象空间转换为齐次坐标中的相机剪辑空间。
    v2f vert(a2f v)
    {
        v2f o;
        o.pos = UnityObjectToClipPos(v.vert);
        o.uv = v.texcoord.xy;
        return o;
    }
这样我们就完成了第一步生成一张噪点纹理的Shader,那么在C#中要如何使用呢?
首先,生成一张RenderTexture,顾名思义就是可以渲染的纹理,这样我们才可以通过上面的Shader渲染出噪点纹理,在这里宽高是自定的,并且如果宽高变化需要重新创建,因为更大的尺寸意味着更多的像素和更多的颗粒。
    if (grainRT == null || !grainRT.IsCreated() || grainRT.width != width || grainRT.height != height)
    {
        Destroy(grainRT);
        grainRT = new RenderTexture(width, height, 0);
        grainRT.Create();
    }
然后,用Shader取渲染刚才创建的RenderTexture,在这里将随机数传入。那么如何完成渲染呢?说到这个就不得不提到Graphics.Blit方法了,这个方法会从源纹理通过材质渲染到目标纹理,在这将源纹理赋值为grainRT自身或者null即可,因为上面Shader中的计算仅涉及到纹理坐标而不涉及采样。
    Material grainMat = GetMaterial("Custom/Grain");
    grainMat.SetFloat(Shader.PropertyToID("_Random"), Random.value);
    Graphics.Blit(grainRT, grainRT, grainMat);
在这里,由于需要经常取Material,所以用一个方法把New出来的Material放到Cache中,需要的时候从Cache中取出,防止反复创建和销毁材质。
   private Dictionary<string, Material> matCache = new Dictionary<string, Material>();

   Material GetMaterial(string shaderName)
   {
       Material mat;
       if (!matCache.TryGetValue(shaderName, out mat))
       {
           Shader shd = Shader.Find(shaderName);
           mat = new Material(shd);
           matCache.Add(shaderName, mat);
       }
       return mat;
   }
好,现在我们已经有一张噪点纹理了,接下去就应该把这张纹理和摄像机得到源纹理进行颜色混合。为此我们还需要再写一个Shader。
对噪点纹理和相机得到的纹理进行颜色混合
在片元着色器中,要先对摄像机得到的源纹理(将会作为_MainTex被传入)进行采样,为了防止过曝,可以进行一定的灰度处理,这里使用了color * = 0.5,其实可以考虑将这个参数作为一个可变参数,会有不同的观感。同样的,也对噪点纹理进行采样,然后进行颜色混合color += color * grain,但这样处理的话颗粒会很不清晰,所以要对噪点进行放大,乘上强度参数 _Intensity。
    half3 frag(v2f i) : SV_Target
    {
        half3 color = tex2D(_MainTex, i.uv).rgb;
        color *= 0.5;

        float3 grain = tex2D(_GrainTex, i.uv).rgb;
        color += color * grain * _Intensity;
        return color;
    }
顶点着色器与前一个Shader相同,不需要特殊处理,所以可以把这个公有的vert方法放到Public.cginc中,将代码模块化。
    #ifndef __PUBLIC__
    #define __PUBLIC__

    #include "UnityCG.cginc"

    struct a2f
    {
        float4 vert : POSITION;
        float4 texcoord : TEXCOORD0;
    };

    struct v2f
    {
        float4 pos : SV_POSITION;
        float2 uv : TEXCOORD0;
    };


    v2f vert(a2f v)
    {
        v2f o;
        o.pos = UnityObjectToClipPos(v.vert);
        o.uv = v.texcoord.xy;
        return o;
    }

    #endif
与第一步类似,在C#中,我们会通过Graphics.Blit来进行纹理渲染。从摄像机获得源纹理,这时候源纹理会被作为_MainTex传入Shader中,然后将噪点纹理作为_GrainTex传入,同样还有刚才提到的强度_Intensity,到这里对接成功。
    void OnRenderImage(RenderTexture src, RenderTexture des)
    {
        //...

        Material outputMat = GetMaterial("Custom/Output");
        outputMat.SetTexture(Shader.PropertyToID("_GrainTex"), grainRT);
        outputMat.SetFloat(Shader.PropertyToID("_Intensity"), intensity);
        Graphics.Blit(src, des, outputMat, 0);
    }
OnRenderImage是每一帧都调用的,如果嫌太快了,也可以加上一个时间间隔
    if ((frame++) % interval != 0)
    {
        return;
    }
    frame = 1;
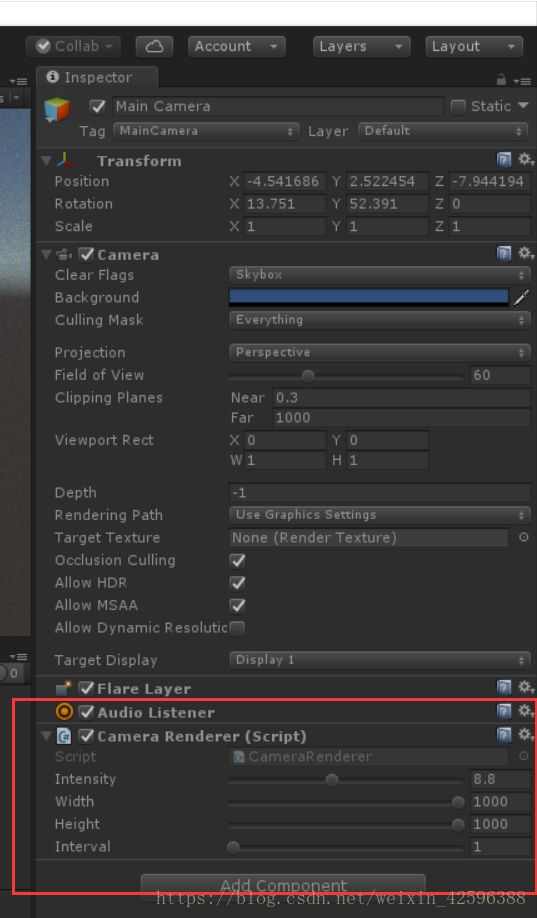
最后,把写好的C#脚本附到主摄像机上,大功告成!

当然,我们可以通过参数调节想要的效果,比如时间旅行画风。。

或者坏掉的电视机画风。。

随文附上代码一份
Grain.shader
Shader "Custom/Grain"
{
    CGINCLUDE

        #pragma exclude_renderers d3d11_9x
        #pragma target 3.0
        #include "UnityCG.cginc"
        #include "Public.cginc"

        //从外部获取随机数,让画面达到随机变换的效果
        float _Random;

        //噪点像素值生成方法
        float Noise(float2 n, float x)
        {
            n += x;
            return frac(sin(dot(n.xy, float2(12.9898, 78.233))) * 43758.5453);
        }

        //对每一个像素进行卷积操作,取其周围及自身的像素值生成噪点,再以一定权重相加
        float Step1(float2 uv, float n)
        {
            float a = 1.0, b = 2.0, c = -12.0, t = 1.0;
            return (1.0 / (a * 4.0 + b * 4.0 + abs(c))) * (
            Noise(uv + float2(-1.0,-1.0) * t, n) * a +
            Noise(uv + float2( 0.0,-1.0) * t, n) * b +
            Noise(uv + float2( 1.0,-1.0) * t, n) * a +
            Noise(uv + float2(-1.0, 0.0) * t, n) * b +
            Noise(uv + float2( 0.0, 0.0) * t, n) * c +
            Noise(uv + float2( 1.0, 0.0) * t, n) * b +
            Noise(uv + float2(-1.0, 1.0) * t, n) * a +
            Noise(uv + float2( 0.0, 1.0) * t, n) * b +
            Noise(uv + float2( 1.0, 1.0) * t, n) * a +
            0.0);
        }

        //再对每一个像素进行卷积操作,取的是上面Step1的结果,这样可以让噪点分布更加均匀
        float Step2(float2 uv, float n)
        {
            float a = 1.0, b = 2.0, c = 4.0, t = 1.0;
            return (1.0 / (a * 4.0 + b * 4.0 + abs(c))) * (
            Step1(uv + float2(-1.0,-1.0) * t, n) * a +
            Step1(uv + float2( 0.0,-1.0) * t, n) * b +
            Step1(uv + float2( 1.0,-1.0) * t, n) * a +
            Step1(uv + float2(-1.0, 0.0) * t, n) * b +
            Step1(uv + float2( 0.0, 0.0) * t, n) * c +
            Step1(uv + float2( 1.0, 0.0) * t, n) * b +
            Step1(uv + float2(-1.0, 1.0) * t, n) * a +
            Step1(uv + float2( 0.0, 1.0) * t, n) * b +
            Step1(uv + float2( 1.0, 1.0) * t, n) * a +
            0.0);
        }

        //对三个颜色通道赋值,值来自Step2,这里会将外部传入的随机数传到Step2中,让画面达到随机变换的效果
        float3 Step3(float2 uv)
        {
            float a = Step2(uv, 0.07 * frac(_Random));
            float b = Step2(uv, 0.11 * frac(_Random));
            float c = Step2(uv, 0.13 * frac(_Random));
            return float3(a, b, c);
        }

        float3 frag(v2f i) : SV_Target
        {
            return Step3(i.uv);
        }

    ENDCG

    SubShader
    {
        //由于是屏幕渲染,所以剔除和深度都可以关
        Cull Back ZWrite Off ZTest Always

        Pass
        {
            CGPROGRAM

                #pragma vertex vert
                #pragma fragment frag

            ENDCG
        }

    }
}
Output.shader
Shader "Custom/Output"
{
    Properties
    {
        _MainTex ("Texture", 2D) = "white" {}
    }

    CGINCLUDE

        #pragma target 3.0

        #include "UnityCG.cginc"
        #include "Public.cginc"

        sampler2D _MainTex;

        float _Intensity;
        sampler2D _GrainTex;

        half3 frag(v2f i) : SV_Target
        {
            half3 color = tex2D(_MainTex, i.uv).rgb;
            color *= 0.5;

            float3 grain = tex2D(_GrainTex, i.uv).rgb;
            color += color * grain * _Intensity;
            return color;
        }

    ENDCG

    SubShader
    {
        Cull Off ZWrite Off ZTest Always

        Pass
        {
            CGPROGRAM

                #pragma vertex vert
                #pragma fragment frag

            ENDCG
        }
    }
}
Public.cginc
#ifndef __PUBLIC__
#define __PUBLIC__

#include "UnityCG.cginc"


struct a2f
{
    float4 vert : POSITION;
    float4 texcoord : TEXCOORD0;
};

struct v2f
{
    float4 pos : SV_POSITION;
    float2 uv : TEXCOORD0;
};


v2f vert(a2f v)
{
    v2f o;
    o.pos = UnityObjectToClipPos(v.vert);
    o.uv = v.texcoord.xy;
    return o;
}

#endif
CameraRenderer.cs
using System.Collections.Generic;
using UnityEngine;

public class CameraRenderer : MonoBehaviour
{
    RenderTexture grainRT;

    [Range(0f, 20f)]
    public float intensity = 10f;

    [Range(1, 1000)]
    public int width = 600;

    [Range(1, 1000)]
    public int height = 600;

    [Range(1, 100)]
    public int interval = 1;

    private int frame = 1;

    void OnRenderImage(RenderTexture src, RenderTexture des)
    {
        if ((frame++) % interval != 0)
        {
            return;
        }
        frame = 1;

        if (grainRT == null || !grainRT.IsCreated() || grainRT.width != width || grainRT.height != height)
        {
            Destroy(grainRT);
            grainRT = new RenderTexture(width, height, 0);
            grainRT.Create();
        }

        Material grainMat = GetMaterial("Custom/Grain");
        grainMat.SetFloat(Shader.PropertyToID("_Random"), Random.value);
        Graphics.Blit(grainRT, grainRT, grainMat);

        Material outputMat = GetMaterial("Custom/Output");
        outputMat.SetTexture(Shader.PropertyToID("_GrainTex"), grainRT);
        outputMat.SetFloat(Shader.PropertyToID("_Intensity"), intensity);
        Graphics.Blit(src, des, outputMat, 0);
    }

    private Dictionary<string, Material> matCache = new Dictionary<string, Material>();

    Material GetMaterial(string shaderName)
    {
        Material mat;
        if (!matCache.TryGetValue(shaderName, out mat))
        {
            Shader shd = Shader.Find(shaderName);
            mat = new Material(shd);
            matCache.Add(shaderName, mat);
        }
        return mat;
    }
}