Flink 原理与实现:如何生成 JobGraph
转载来源:http://wuchong.me/blog/2016/05/10/flink-internals-how-to-build-jobgraph/
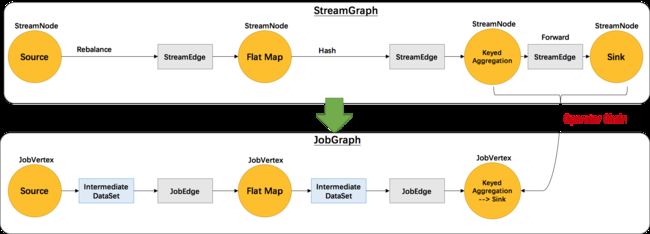
继前文Flink 原理与实现:架构和拓扑概览中介绍了Flink的四层执行图模型,本文将主要介绍 Flink 是如何将 StreamGraph 转换成 JobGraph 的。根据用户用Stream API编写的程序,构造出一个代表拓扑结构的StreamGraph的。以 WordCount 为例,转换图如下图所示:
StreamGraph 和 JobGraph 都是在 Client 端生成的,也就是说我们可以在 IDE 中通过断点调试观察 StreamGraph 和 JobGraph 的生成过程。
JobGraph 的相关数据结构主要在 org.apache.flink.runtime.jobgraph 包中。构造 JobGraph 的代码主要集中在 StreamingJobGraphGenerator 类中,入口函数是 StreamingJobGraphGenerator.createJobGraph()。我们首先来看下StreamingJobGraphGenerator的核心源码:
| public class StreamingJobGraphGenerator { private StreamGraph streamGraph; private JobGraph jobGraph; // id -> JobVertex private Map // 已经构建的JobVertex的id集合 private Collection // 物理边集合(排除了chain内部的边), 按创建顺序排序 private List // 保存chain信息,部署时用来构建 OperatorChain,startNodeId -> (currentNodeId -> StreamConfig) private Map // 所有节点的配置信息,id -> StreamConfig private Map // 保存每个节点的名字,id -> chainedName private Map // 构造函数,入参只有 StreamGraph public StreamingJobGraphGenerator(StreamGraph streamGraph) { this.streamGraph = streamGraph; } // 根据 StreamGraph,生成 JobGraph public JobGraph createJobGraph() { jobGraph = new JobGraph(streamGraph.getJobName()); // streaming 模式下,调度模式是所有节点(vertices)一起启动 jobGraph.setScheduleMode(ScheduleMode.ALL); // 初始化成员变量 init(); // 广度优先遍历 StreamGraph 并且为每个SteamNode生成hash id, // 保证如果提交的拓扑没有改变,则每次生成的hash都是一样的 Map // 最重要的函数,生成JobVertex,JobEdge等,并尽可能地将多个节点chain在一起 setChaining(hashes); // 将每个JobVertex的入边集合也序列化到该JobVertex的StreamConfig中 // (出边集合已经在setChaining的时候写入了) setPhysicalEdges(); // 根据group name,为每个 JobVertex 指定所属的 SlotSharingGroup // 以及针对 Iteration的头尾设置 CoLocationGroup setSlotSharing(); // 配置checkpoint configureCheckpointing(); // 配置重启策略(不重启,还是固定延迟重启) configureRestartStrategy(); try { // 将 StreamGraph 的 ExecutionConfig 序列化到 JobGraph 的配置中 InstantiationUtil.writeObjectToConfig(this.streamGraph.getExecutionConfig(), this.jobGraph.getJobConfiguration(), ExecutionConfig.CONFIG_KEY); } catch (IOException e) { throw new RuntimeException("Config object could not be written to Job Configuration: ", e); } return jobGraph; } ... } |
StreamingJobGraphGenerator的成员变量都是为了辅助生成最终的JobGraph。createJobGraph()函数的逻辑也很清晰,首先为所有节点生成一个唯一的hash id,如果节点在多次提交中没有改变(包括并发度、上下游等),那么这个id就不会改变,这主要用于故障恢复。这里我们不能用 StreamNode.id来代替,因为这是一个从1开始的静态计数变量,同样的Job可能会得到不一样的id,如下代码示例的两个job是完全一样的,但是source的id却不一样了。然后就是最关键的chaining处理,和生成JobVetex、JobEdge等。之后就是写入各种配置相关的信息。
| // 范例1:A.id=1 B.id=2 DataStream DataStream A.union(B).print(); // 范例2:A.id=2 B.id=1 DataStream DataStream A.union(B).print(); |
下面具体分析下关键函数 setChaining 的实现:
| // 从source开始建立 node chains private void setChaining(Map for (Integer sourceNodeId : streamGraph.getSourceIDs()) { createChain(sourceNodeId, sourceNodeId, hashes); } } // 构建node chains,返回当前节点的物理出边 // startNodeId != currentNodeId 时,说明currentNode是chain中的子节点 private List Integer startNodeId, Integer currentNodeId, Map if (!builtVertices.contains(startNodeId)) { // 过渡用的出边集合, 用来生成最终的 JobEdge, 注意不包括 chain 内部的边 List List List // 将当前节点的出边分成 chainable 和 nonChainable 两类 for (StreamEdge outEdge : streamGraph.getStreamNode(currentNodeId).getOutEdges()) { if (isChainable(outEdge)) { chainableOutputs.add(outEdge); } else { nonChainableOutputs.add(outEdge); } } //==> 递归调用 for (StreamEdge chainable : chainableOutputs) { transitiveOutEdges.addAll(createChain(startNodeId, chainable.getTargetId(), hashes)); } for (StreamEdge nonChainable : nonChainableOutputs) { transitiveOutEdges.add(nonChainable); createChain(nonChainable.getTargetId(), nonChainable.getTargetId(), hashes); } // 生成当前节点的显示名,如:"Keyed Aggregation -> Sink: Unnamed" chainedNames.put(currentNodeId, createChainedName(currentNodeId, chainableOutputs)); // 如果当前节点是起始节点, 则直接创建 JobVertex 并返回 StreamConfig, 否则先创建一个空的 StreamConfig // createJobVertex 函数就是根据 StreamNode 创建对应的 JobVertex, 并返回了空的 StreamConfig StreamConfig config = currentNodeId.equals(startNodeId) ? createJobVertex(startNodeId, hashes) : new StreamConfig(new Configuration()); // 设置 JobVertex 的 StreamConfig, 基本上是序列化 StreamNode 中的配置到 StreamConfig 中. // 其中包括 序列化器, StreamOperator, Checkpoint 等相关配置 setVertexConfig(currentNodeId, config, chainableOutputs, nonChainableOutputs); if (currentNodeId.equals(startNodeId)) { // 如果是chain的起始节点。(不是chain中的节点,也会被标记成 chain start) config.setChainStart(); // 我们也会把物理出边写入配置, 部署时会用到 config.setOutEdgesInOrder(transitiveOutEdges); config.setOutEdges(streamGraph.getStreamNode(currentNodeId).getOutEdges()); // 将当前节点(headOfChain)与所有出边相连 for (StreamEdge edge : transitiveOutEdges) { // 通过StreamEdge构建出JobEdge,创建IntermediateDataSet,用来将JobVertex和JobEdge相连 connect(startNodeId, edge); } // 将chain中所有子节点的StreamConfig写入到 headOfChain 节点的 CHAINED_TASK_CONFIG 配置中 config.setTransitiveChainedTaskConfigs(chainedConfigs.get(startNodeId)); } else { // 如果是 chain 中的子节点 Map if (chainedConfs == null) { chainedConfigs.put(startNodeId, new HashMap } // 将当前节点的StreamConfig添加到该chain的config集合中 chainedConfigs.get(startNodeId).put(currentNodeId, config); } // 返回连往chain外部的出边集合 return transitiveOutEdges; } else { return new ArrayList<>(); } } |
每个 JobVertex 都会对应一个可序列化的 StreamConfig, 用来发送给 JobManager 和 TaskManager。最后在 TaskManager 中起 Task 时,需要从这里面反序列化出所需要的配置信息, 其中就包括了含有用户代码的StreamOperator。
setChaining会对source调用createChain方法,该方法会递归调用下游节点,从而构建出node chains。createChain会分析当前节点的出边,根据Operator Chains中的chainable条件,将出边分成chainalbe和noChainable两类,并分别递归调用自身方法。之后会将StreamNode中的配置信息序列化到StreamConfig中。如果当前不是chain中的子节点,则会构建 JobVertex 和 JobEdge相连。如果是chain中的子节点,则会将StreamConfig添加到该chain的config集合中。一个node chains,除了 headOfChain node会生成对应的 JobVertex,其余的nodes都是以序列化的形式写入到StreamConfig中,并保存到headOfChain的 CHAINED_TASK_CONFIG 配置项中。直到部署时,才会取出并生成对应的ChainOperators,具体过程请见理解 Operator Chains。
总结
本文主要对 Flink 中将 StreamGraph 转变成 JobGraph 的核心源码进行了分析。思想还是很简单的,StreamNode 转成 JobVertex,StreamEdge 转成 JobEdge,JobEdge 和 JobVertex 之间创建 IntermediateDataSet 来连接。关键点在于将多个 SteamNode chain 成一个 JobVertex的过程,这部分源码比较绕,有兴趣的同学可以结合源码单步调试分析。下一章将会介绍 JobGraph 提交到 JobManager 后是如何转换成分布式化的 ExecutionGraph 的。
