第一滴血~自定义仿android的AutoCompleteTextView
这是我的第一篇CSDN个人博客,也是我编程开发道路上的第一篇博客,以后多来写写吧,把一些技术上的问题和自己的内心思想记录下来。
废话不多说,开始进入正题:
最近的开发中遇到一个问题就是android版本不一样,还有手机的型号不一样的时候,调用系统自带的一些控件会呈现不同的样式。
我发现我手机里呈现的系统的AutoCompleteTextView非常丑陋,黑不溜秋的。所以项目需要,我也顺便做了一个类似AutoCompleteTextView功能的输入提醒的这么一个效果,在这里和大家分享一下。大家也可以定义自己喜欢的样式,背景色,等等。
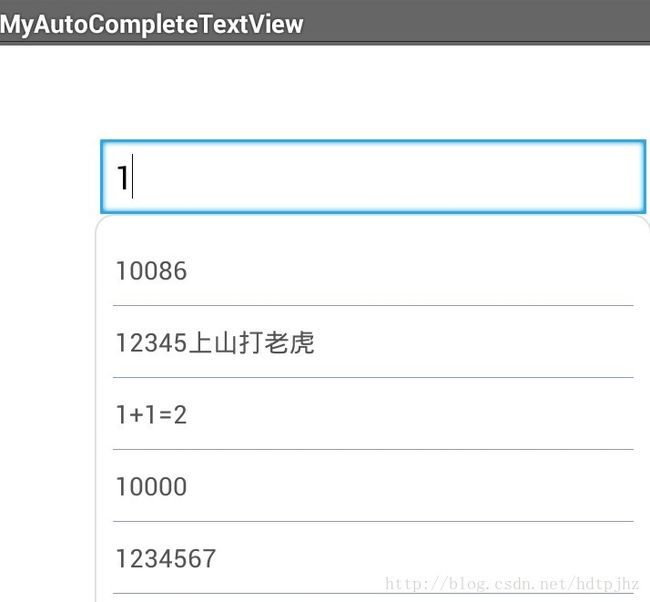
下面是效果图,我自己随便定义了一些文本数据
简单的说一下思路吧。在布局上放的当然是一个EditText,对这个输入框进行文字输入监听,就是addTextChangedListener(textWatcher);然后在这个textWatcher中进行简单的逻辑判断。在输入的时候判断对话框中的字符串和文本库(在这里我用的是一个ArrayList
package com.illidan.tao;

import java.util.ArrayList;
import android.content.Context;
import android.text.Editable;
import android.text.TextWatcher;
import android.util.AttributeSet;
import android.view.View;
import android.widget.AdapterView;
import android.widget.ArrayAdapter;
import android.widget.EditText;
import android.widget.LinearLayout;
import android.widget.ListView;
import android.widget.RelativeLayout;
import android.widget.AdapterView.OnItemClickListener;
import android.widget.RelativeLayout.LayoutParams;

public class MyAutoCompleteTextView extends EditText {

	Context context = null;
	MyTextWatcher myTextWatcher =null;
	public MyAutoCompleteTextView(Context context, AttributeSet attrs) {
		super(context, attrs);
		// TODO Auto-generated constructor stub
		this.context = context;
		setPopw();
		this.addTextChangedListener(watcher);
	}

	/**
	 * 设置要将试图加进去的父布局
	 * @param layout 只能是Relative父布局,如果是linear请用另一个方法
	 */
	public void setFatherRelativeLayouyt(RelativeLayout layout){
		this.relativeLayout = layout;
		isRLayout = true;
	}

	/**
	 * 设置要将试图加进去的父布局
	 * @param layout 只能是Linear父布局,如果是Relative请用另一个方法
	 */
	public void setFatherLinearLayout(LinearLayout layout){
		this.linearLayout = layout;
		isRLayout = false;
	}

	/**
	 * 设置下拉内容的文字库
	 * @param list
	 */
	public void setMemoryData(ArrayList list){
		this.memoryData = list;
	}
	/**
	 * 如果要对此输入框添加TextWatch监听,请使用此方法,不要用系统的
	 * @param myTextWatcher
	 */
	public void addMyTextWatcher(MyTextWatcher myTextWatcher){
		this.myTextWatcher = myTextWatcher;
	}

	public void removeMyTextWatcher(){
		this.myTextWatcher = null;
	}
	/**
	 * 手动隐藏掉这个下拉提示
	 */
	public void removeTheShowView(){
		if(popView.isShown()){
			if(isRLayout){
				relativeLayout.removeView(popView);
			}else{
				linearLayout.removeView(popView);
			}
		}
	}

	public boolean isListShowing(){
		return popView.isShown();
	}
	TextWatcher watcher = new TextWatcher() {

		@Override
		public void onTextChanged(CharSequence s, int start, int before, int count) {
			// TODO Auto-generated method stub
			mList.clear();
			mList.addAll(getSimilarString(String.valueOf(s), memoryData));
			if(mList.size()>0){
				mAdapter.notifyDataSetInvalidated();
				if(!popView.isShown()){
					int[] top = new int[2];
					MyAutoCompleteTextView.this.getLocationInWindow(top);
					//显示位置稍有不和,可自行修改,这里我就偷懒了
					layoutParams.topMargin = top[1]-15;
					layoutParams.leftMargin = top[0];
					if(isRLayout){
						relativeLayout.addView(popView,layoutParams);
					}else{
						linearLayout.addView(popView,layoutParams);
					}
					popView.setFocusable(true);
				}
			}else{
				if(isRLayout){
					relativeLayout.removeView(popView);
				}else{
					linearLayout.removeView(popView);
				}
			}
			if(myTextWatcher!=null){
				myTextWatcher.onTextChanged(s, start, before, count);
			}
		}

		@Override
		public void beforeTextChanged(CharSequence s, int start, int count,
				int after) {
			// TODO Auto-generated method stub
			if(myTextWatcher!=null){
				myTextWatcher.beforeTextChanged(s, start, count, after);
			}
		}

		@Override
		public void afterTextChanged(Editable s) {
			// TODO Auto-generated method stub
			if(s.length() == 0){
				removeTheShowView();
			}
			if(myTextWatcher!=null){
				myTextWatcher.afterTextChanged(s);
			}
		}
	};

	ArrayList memoryData = null;
	LayoutParams layoutParams = new LayoutParams(LayoutParams.WRAP_CONTENT,LayoutParams.WRAP_CONTENT);
	private View popView = null;
	private ListView mlistView = null;
	private ArrayList mList = null;
	private ArrayAdapter mAdapter = null;//popw的listview的适配器
	RelativeLayout relativeLayout = null;
	LinearLayout linearLayout =null;
	private boolean isRLayout = false;

	private void setPopw(){
		if(this.popView == null){
			popView = View.inflate(context, R.layout.popview, null);
		}

		if(mlistView == null){
			mlistView = (ListView) popView.findViewById(R.id.pop_listview);
			mlistView.setItemsCanFocus(true);
			mlistView.setOnItemClickListener(new OnItemClickListener() {

				@Override
				public void onItemClick(AdapterView parent, View view,
						int position, long id) {
					// TODO Auto-generated method stub
					MyAutoCompleteTextView.this.setText(mList.get(position));
					if(isRLayout){
						relativeLayout.removeView(popView);
					}else{
						linearLayout.removeView(popView);
					}
				}
			});
		}
		mList =new ArrayList();
		if(mAdapter == null){
			mAdapter = new ArrayAdapter(context, R.layout.list_item, R.id.txt_item, mList);
		}
		mlistView.setAdapter(mAdapter);
	}

	/**
	 * 从某字符集合中获取前部分字符串相似的字符集合
	 *  比如,基准字符串为asd的时候,从集合里取出全部以asd打头的字符串
	 * @param edt 拿来比较的基准字符
	 * @param datas 字符集和
	 * @return 匹配的字符集合
	 */
	private ArrayList getSimilarString(String edt,ArrayList datas){
		ArrayList similars = new ArrayList();
		for(String s :datas){
			if(s.startsWith(edt)){
				similars.add(s);
			}
		}
		return similars;
	}
	/**
	 * 因为控件内部已经做了此系统接口的实现监听,这个接口是自己做的留给外部调用的
	 *触发机制、字段都和系统自带的一样,就不赘述了
	 * @author hz
	 *
	 */
	public interface MyTextWatcher{
		/**
		 *
		 * @param s
		 * @param start
		 * @param before
		 * @param count
		 */
		public void onTextChanged(CharSequence s, int start, int before, int count);
		public void beforeTextChanged(CharSequence s, int start, int count,int after);
		public void afterTextChanged(Editable s);
	}
}
主Activity:
package com.illidan.tao;

import java.util.ArrayList;

import android.os.Bundle;
import android.app.Activity;
import android.view.KeyEvent;
import android.view.Menu;
import android.widget.RelativeLayout;

public class MainActivity extends Activity {

	MyAutoCompleteTextView myedit = null;
	ArrayList data = null;
	RelativeLayout mianLayout = null;
	@Override
	protected void onCreate(Bundle savedInstanceState) {
		super.onCreate(savedInstanceState);
		setContentView(R.layout.activity_main);
		myedit = (MyAutoCompleteTextView) findViewById(R.id.editText1);
		mianLayout = (RelativeLayout) findViewById(R.id.mainLayout);

		data = new ArrayList();
		data.add("10086");
		data.add("12345上山打老虎");
		data.add("1+1=2");
		data.add("10000");
		data.add("1234567");
		data.add("123哥想跳槽( ⊙ o ⊙ )嘛蛋");

		myedit.setFatherRelativeLayouyt(mianLayout);
		myedit.setMemoryData(data);
	}

	@Override
	public boolean onCreateOptionsMenu(Menu menu) {
		// Inflate the menu; this adds items to the action bar if it is present.
		getMenuInflater().inflate(R.menu.activity_main, menu);
		return true;
	}
	//监听返回键的时候隐藏掉视图,更人性化
	@Override
	public boolean onKeyDown(int keyCode, KeyEvent event) {
		if (keyCode == KeyEvent.KEYCODE_BACK) {
			if(myedit.isListShowing()){
				myedit.removeTheShowView();
				return true;
			}
		}
		return super.onKeyDown(keyCode, event);
	}


}
最后我再总结一下TextWatch接口里面的那3个方法具体触发和各字段意思:
beforeTextChanged(CharSequence s, int start, int count,int after)中,s不多说了就是里面的文本信息,要获取文本的长度可以用s的length()方法,也可以通过start和
after的和来获取,它们的和就是此v次变化后字符的长度,start表示从第几位开始变化,第一位start标记为0,比如说,输入框中有“abc”3个字符,再输入一个“d”这个动作,此时start就是3,从位置3开始输入。而这个after的意思是完成此次输入,输入游标(在这我估且将输入框里那个一闪一闪的竖线称为输入游标)往后跳了几位。这个count和这个after是恰恰相反的,count是完成输入的时候,输入游标往前跳了几位。但是前面提到这个值都不会是负数,最多是为0.打个比方,当我们输入很多信息后,按回退键,每按一次回退键,就会触发一次beforeTextChanged,而且其中的count为1,after为0,因为是内容减少,输入游标往前跳.
public void onTextChanged(CharSequence s, int start, int before, int count)关于这个方法,在输入字符有变化的时候会触发start和beforeTextChanged中的start意思的完全一样的,开始的输入游标,若原来输入框里什么都没有,那输入内容变化时这个start就0,从0开始增长。这个方法里,start+count的值为输入完成后输入框中所有字符的长度。after的意思的回退了多少位,如果没有回退就是0.count和after相反,count是前进了多少位,也可以视为此次输入增加了多少个字符。
public void afterTextChanged(Editable s)我就不赘述了,这三个方法都会在有输入变化的时候触发,而且几乎的是同一时间的,只不过有先后。先后看方法名就一目了然了。
项目下载地址
转载请注明出处哦,谢谢

