Andrew Ng Deep Learning 第一课
Andrew Ng Deep Learning 第一课
- 前言
- 神经网络基础与浅层神经网络(该基础部分与Machine Learning内容基本重复)
- 1.二元分类
- 2.向量化logistic回归
- 编程作业
- 3.向量化单隐藏层神经网络
- 编程作业
- 4.激活函数
- 5.向量化深层神经网络
- 编程作业
- 6.步骤总结
- 题目
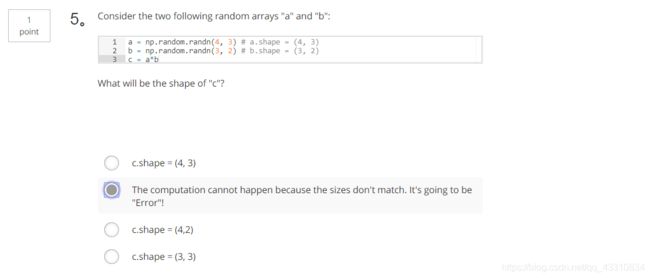
- 1.Question 1
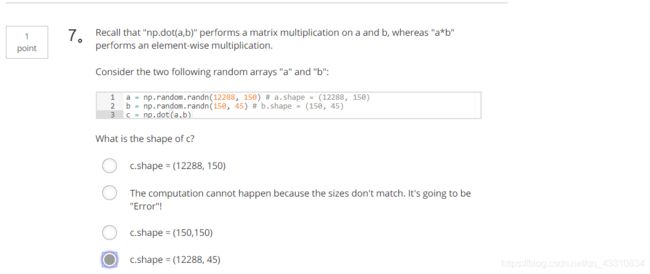
- 2.Question 2
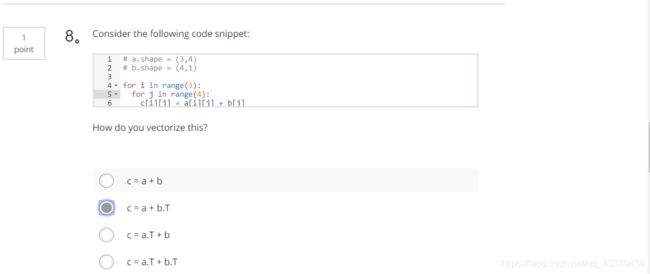
- 3.Question 3
前言
网易云课堂(双语字幕,不卡):https://mooc.study.163.com/smartSpec/detail/1001319001.htmcourseId=1004570029、
Coursera(贵):https://www.coursera.org/specializations/deep-learning
本人初学者,先在网易云课堂上看网课,再去Coursera上做作业,开博客以记录,文章中引用图片皆为课程中所截。
题目转载至:http://www.cnblogs.com/hezhiyao/p/7810725.html
编程作业所需库:链接:https://pan.baidu.com/s/1aS1Oia2fskemBHHEMnSepw 密码:66gd
神经网络基础与浅层神经网络(该基础部分与Machine Learning内容基本重复)
1.二元分类
2.向量化logistic回归


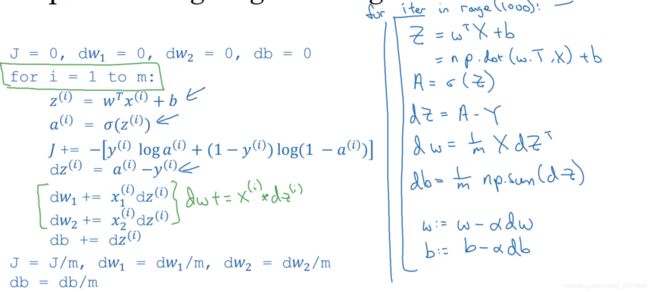
Tips:初始化w为均为0的nx维列向量,b为0,X是nx × m矩阵,w是nx × 1系数矩阵,b是实数,Y是1 × m结果矩阵,dZ是当前计算的h(x)与结果值的差值矩阵,dw是系数变换矩阵,α是学习率,最后进行sigmoid(np.dot(w.T,X)+b)预判最终结果即y=P(y=1|x)
编程作业
def sigmoid(z):
  """
  参数:
      z  - 任何大小的标量或numpy数组。

  返回:
      s  -  sigmoid(z)
  """
  s = 1 / (1 + np.exp(-z))
  return s
def initialize_with_zeros(dim):
  """
      此函数为w创建一个维度为(dim,1)的0向量,并将b初始化为0。

      参数:
          dim  - 我们想要的w矢量的大小(或者这种情况下的参数数量)

      返回:
          w  - 维度为(dim,1)的初始化向量。
          b  - 初始化的标量(对应于偏差)
  """
  w = np.zeros(shape = (dim,1))
  b = 0
  return (w , b)
def propagate(w, b, X, Y):
  """
  实现前向和后向传播的成本函数及其梯度。
  参数:
      w  - 权重,大小不等的数组(num_px * num_px * 3,1)
      b  - 偏差,一个标量
      X  - 矩阵类型为(num_px * num_px * 3,训练数量)
      Y  - 真正的“标签”矢量(如果非猫则为0,如果是猫则为1),矩阵维度为(1,训练数据数量)

  返回:
      cost- 逻辑回归的负对数似然成本
      dw  - 相对于w的损失梯度,因此与w相同的形状
      db  - 相对于b的损失梯度,因此与b的形状相同
  """
  m=X.shape[1]
  z=np.dot(w.T,X)+b
  a=sigmoid(z)
  cost=np.sum(Y*np.log(a)+(1-Y)*np.log(1-a))
  cost/=(-m)
  dz=a-Y
  dw=np.dot(X,dz.T)
  dw/=m
  db=np.sum(dz)
  db/=m
  return (cost , dw ,db)
def optimize(w , b , X , Y , num_iterations , learning_rate , print_cost = False):
  """
  此函数通过运行梯度下降算法来优化w和b

  参数:
      w  - 权重,大小不等的数组(num_px * num_px * 3,1)
      b  - 偏差,一个标量
      X  - 维度为(num_px * num_px * 3,训练数据的数量)的数组。
      Y  - 真正的“标签”矢量(如果非猫则为0,如果是猫则为1),矩阵维度为(1,训练数据的数量)
      num_iterations  - 优化循环的迭代次数
      learning_rate  - 梯度下降更新规则的学习率
      print_cost  - 每100步打印一次损失值

  返回:
      params  - 包含权重w和偏差b的字典
      grads  - 包含权重和偏差相对于成本函数的梯度的字典
      成本 - 优化期间计算的所有成本列表,将用于绘制学习曲线。

  提示:
  我们需要写下两个步骤并遍历它们:
      1)计算当前参数的成本和梯度,使用propagate()。
      2)使用w和b的梯度下降法则更新参数。
  """
  costs=[]
  for i in range(num_iterations):
      cost,dw,db=propagate(w, b, X, Y)
      w=w-learning_rate*dw
      b=b-learning_rate*db
      if i % 100 == 0:
          costs.append(cost)
      if (print_cost) and (i % 100 == 0):
          print("迭代的次数: %i , 误差值: %f" % (i,cost))
  params  = {
              "w" : w,
              "b" : b }
  grads = {
          "dw": dw,
          "db": db }
  return params,grads,costs
def predict(w , b , X ):
  """
  使用学习逻辑回归参数logistic (w,b)预测标签是0还是1,

  参数:
      w  - 权重,大小不等的数组(num_px * num_px * 3,1)
      b  - 偏差,一个标量
      X  - 维度为(num_px * num_px * 3,训练数据的数量)的数据

  返回:
      Y_prediction  - 包含X中所有图片的所有预测【0 | 1】的一个numpy数组(向量)

  """
  Y_prediction=sigmoid(np.dot(w.T,X)+b)

  return np.round(Y_prediction)
def model(X_train , Y_train , X_test , Y_test , num_iterations = 2000 , learning_rate = 0.5 , print_cost = False):
  """
  通过调用之前实现的函数来构建逻辑回归模型

  参数:
      X_train  - numpy的数组,维度为(num_px * num_px * 3,m_train)的训练集
      Y_train  - numpy的数组,维度为(1,m_train)(矢量)的训练标签集
      X_test   - numpy的数组,维度为(num_px * num_px * 3,m_test)的测试集
      Y_test   - numpy的数组,维度为(1,m_test)的(向量)的测试标签集
      num_iterations  - 表示用于优化参数的迭代次数的超参数
      learning_rate  - 表示optimize()更新规则中使用的学习速率的超参数
      print_cost  - 设置为true以每100次迭代打印成本

  返回:
      d  - 包含有关模型信息的字典。
  """
  w , b = initialize_with_zeros(X_train.shape[0])

  parameters , grads , costs = optimize(w , b , X_train , Y_train,num_iterations , learning_rate , print_cost)

  #从字典“参数”中检索参数w和b
  w , b = parameters["w"] , parameters["b"]

  #预测测试/训练集的例子
  Y_prediction_test = predict(w , b, X_test)
  Y_prediction_train = predict(w , b, X_train)

  #打印训练后的准确性
  print("训练集准确性:"  , format(100 - np.mean(np.abs(Y_prediction_train - Y_train)) * 100) ,"%")
  print("测试集准确性:"  , format(100 - np.mean(np.abs(Y_prediction_test - Y_test)) * 100) ,"%")

  d = {
          "costs" : costs,
          "Y_prediction_test" : Y_prediction_test,
          "Y_prediciton_train" : Y_prediction_train,
          "w" : w,
          "b" : b,
          "learning_rate" : learning_rate,
          "num_iterations" : num_iterations }
  return d
3.向量化单隐藏层神经网络

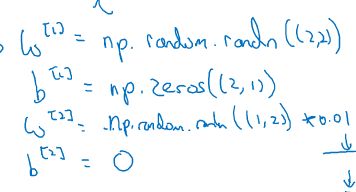


Tips:第一步随机初始化W和b,w[i]为(n[i],n[i-1])矩阵,b[i]为(n[i],1)矩阵,z[i]为(n[i],1)矩阵,之后对于m个样本,将每个W,b,z都以列向量形式堆叠成(x,m)矩阵(此处x为单个样本的矩阵大小),首先进行正向传播计算,然后进行反向传播计算导数后进行梯度下降
编程作业
import numpy as np
import matplotlib.pyplot as plt
from testCases import *
import sklearn
import sklearn.datasets
import sklearn.linear_model
from planar_utils import plot_decision_boundary, sigmoid, load_planar_dataset, load_extra_datasets

#%matplotlib inline #如果你使用用的是Jupyter Notebook的话请取消注释。


np.random.seed(1) #设置一个固定的随机种子,以保证接下来的步骤中我们的结果是一致的。

X, Y = load_planar_dataset()

shape_X = X.shape
shape_Y = Y.shape
m = Y.shape[1]  # 训练集里面的数量

def layer_sizes(X , Y):
    """
    参数:
     X - 输入数据集,维度为(输入的数量,训练/测试的数量)
     Y - 标签,维度为(输出的数量,训练/测试数量)

    返回:
     n_x - 输入层的数量
     n_h - 隐藏层的数量
     n_y - 输出层的数量
    """
    n_x = X.shape[0]
    n_h = 4
    n_y = Y.shape[0]

    return (n_x,n_h,n_y)

def initialize_parameters( n_x , n_h ,n_y):
    """
    参数:
        n_x - 输入层节点的数量
        n_h - 隐藏层节点的数量
        n_y - 输出层节点的数量

    返回:
        parameters - 包含参数的字典:
            W1 - 权重矩阵,维度为(n_h,n_x)
            b1 - 偏向量,维度为(n_h,1)
            W2 - 权重矩阵,维度为(n_y,n_h)
            b2 - 偏向量,维度为(n_y,1)

    """
    W1 = np.random.randn(n_h,n_x) * 0.01
    b1 = np.zeros(shape=(n_h, 1))
    W2 = np.random.randn(n_y,n_h) * 0.01
    b2 = np.zeros(shape=(n_y, 1))

    parameters = {"W1" : W1,
                  "b1" : b1,
                  "W2" : W2,
                  "b2" : b2 }
    return parameters
def forward_propagation( X , parameters ):
    """
    参数:
         X - 维度为(n_x,m)的输入数据。
         parameters - 初始化函数(initialize_parameters)的输出

    返回:
         A2 - 使用sigmoid()函数计算的第二次激活后的数值
         cache - 包含“Z1”,“A1”,“Z2”和“A2”的字典类型变量
     """
    W1 = parameters["W1"]
    b1 = parameters["b1"]
    W2 = parameters["W2"]
    b2 = parameters["b2"]
    Z1 = np.dot(W1,X)+b1
    A1 = np.tanh(Z1)
    Z2 = np.dot(W2,A1)+b2
    A2 = sigmoid(Z2)
    cache = {"Z1": Z1,
             "A1": A1,
             "Z2": Z2,
             "A2": A2}

    return (A2, cache)
def compute_cost(A2,Y,parameters):
    """
    计算方程(6)中给出的交叉熵成本,

    参数:
         A2 - 使用sigmoid()函数计算的第二次激活后的数值
         Y - "True"标签向量,维度为(1,数量)
         parameters - 一个包含W1,B1,W2和B2的字典类型的变量

    返回:
         成本 - 交叉熵成本给出方程(13)
    """
    pass
    m = Y.shape[1]
    W1 = parameters["W1"]
    W2 = parameters["W2"]

    logprobs=np.dot(np.log(A2),Y.T)+np.dot(np.log((1-A2)),(1-Y).T)

    cost = - np.sum(logprobs) / m
    cost = float(np.squeeze(cost))

    return cost
def backward_propagation(parameters,cache,X,Y):
    """
    使用上述说明搭建反向传播函数。

    参数:
     parameters - 包含我们的参数的一个字典类型的变量。
     cache - 包含“Z1”,“A1”,“Z2”和“A2”的字典类型的变量。
     X - 输入数据,维度为(2,数量)
     Y - “True”标签,维度为(1,数量)

    返回:
     grads - 包含W和b的导数一个字典类型的变量。
    """
    m = X.shape[1]

    W1 = parameters["W1"]
    W2 = parameters["W2"]

    A1 = cache["A1"]
    A2 = cache["A2"]
    '''
    w2=n2,n1 z2=n2,1
    n1,1

    '''
    dZ2=A2-Y
    dW2=np.dot(dZ2,A1.T)/m
    db2=np.sum(dZ2,axis=1,keepdims=True)/m

    dZ1=np.dot(W2.T,dZ2)* (1 - np.power (A1, 2) )

    dW1=np.dot(dZ1,X.T)/m
    db1=np.sum(dZ1,axis=1,keepdims=True)/m
    grads = {"dW1": dW1,
             "db1": db1,
             "dW2": dW2,
             "db2": db2 }

    return grads
def update_parameters(parameters,grads,learning_rate=1.2):
    """
    使用上面给出的梯度下降更新规则更新参数

    参数:
     parameters - 包含参数的字典类型的变量。
     grads - 包含导数值的字典类型的变量。
     learning_rate - 学习速率

    返回:
     parameters - 包含更新参数的字典类型的变量。
    """
    W1,W2 = parameters["W1"],parameters["W2"]
    b1,b2 = parameters["b1"],parameters["b2"]

    dW1,dW2 = grads["dW1"],grads["dW2"]
    db1,db2 = grads["db1"],grads["db2"]

    W1 = W1 - learning_rate * dW1
    b1 = b1 - learning_rate * db1
    W2 = W2 - learning_rate * dW2
    b2 = b2 - learning_rate * db2

    parameters = {"W1": W1,
                  "b1": b1,
                  "W2": W2,
                  "b2": b2}

    return parameters
def nn_model(X,Y,n_h,num_iterations,print_cost=False):
    """
    参数:
        X - 数据集,维度为(2,示例数)
        Y - 标签,维度为(1,示例数)
        n_h - 隐藏层的数量
        num_iterations - 梯度下降循环中的迭代次数
        print_cost - 如果为True,则每1000次迭代打印一次成本数值

    返回:
        parameters - 模型学习的参数,它们可以用来进行预测。
     """
    np.random.seed(3) #指定随机种子
    n_x = layer_sizes(X, Y)[0]
    n_y = layer_sizes(X, Y)[2]

    parameters = initialize_parameters(n_x,n_h,n_y)
    W1 = parameters["W1"]
    b1 = parameters["b1"]
    W2 = parameters["W2"]
    b2 = parameters["b2"]

    for i in range(num_iterations):
        A2 , cache = forward_propagation(X,parameters)
        cost = compute_cost(A2,Y,parameters)
        grads = backward_propagation(parameters,cache,X,Y)
        parameters = update_parameters(parameters,grads,learning_rate = 0.5)

        if print_cost:
            if i%1000 == 0:
                print("第 ",i," 次循环,成本为:"+str(cost))
    return parameters
def predict(parameters,X):
    """
    使用学习的参数,为X中的每个示例预测一个类

    参数:
        parameters - 包含参数的字典类型的变量。
        X - 输入数据(n_x,m)

    返回
        predictions - 我们模型预测的向量(红色:0 /蓝色:1)

     """
    A2 , cache = forward_propagation(X,parameters)
    predictions = np.round(A2)

    return predictions
parameters = nn_model(X, Y, n_h = 4, num_iterations=10000, print_cost=True)

#绘制边界
#plot_decision_boundary(lambda x: predict(parameters, x.T), X, Y)
#plt.title("Decision Boundary for hidden layer size " + str(4))

predictions = predict(parameters, X)
print ('准确率: %d' % float((np.dot(Y, predictions.T) + np.dot(1 - Y, 1 - predictions.T)) / float(Y.size) * 100) + '%')
4.激活函数

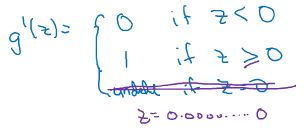

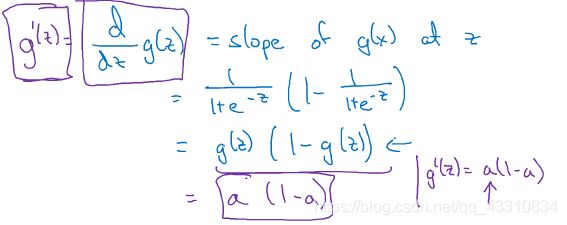
Tips:非二元分类的隐藏层单元使用RELU,二元分类的输出单元使用sigmoid
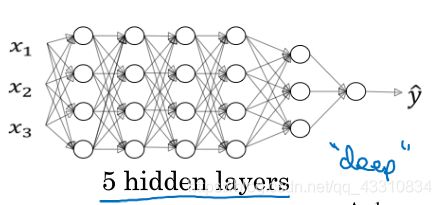
5.向量化深层神经网络
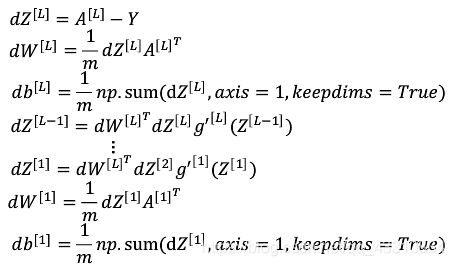
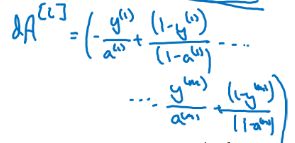
Tips:dA[l-1]为l-1层的成本梯度,dA[L]为向后传播的初始化dA,整体步骤与浅层神经网络相似,多了一步对每层使用for循环进行向前传播和向后传播
编程作业
import numpy as np
import h5py
from skimage.transform import resize
from scipy import ndimage
import matplotlib.pyplot as plt
import testCases #参见资料包,或者在文章底部copy
from dnn_utils import sigmoid, sigmoid_backward, relu, relu_backward #参见资料包
import lr_utils #参见资料包,或者在文章底部copy
def initialize_parameters(n_x,n_h,n_y):
    """
    此函数是为了初始化两层网络参数而使用的函数。
    参数:
        n_x - 输入层节点数量
        n_h - 隐藏层节点数量
        n_y - 输出层节点数量

    返回:
        parameters - 包含你的参数的python字典:
            W1 - 权重矩阵,维度为(n_h,n_x)
            b1 - 偏向量,维度为(n_h,1)
            W2 - 权重矩阵,维度为(n_y,n_h)
            b2 - 偏向量,维度为(n_y,1)

    """
    ### START CODE HERE ### (≈ 4 lines of code)
    W1=np.random.randn(n_h,n_x)*0.01
    b1=np.zeros((n_h,1))
    W2=np.random.rand(n_y,n_h)*0.01
    b2=np.zeros((n_y,1))

    ### END CODE HERE ###

    assert(W1.shape == (n_h, n_x))
    assert(b1.shape == (n_h, 1))
    assert(W2.shape == (n_y, n_h))
    assert(b2.shape == (n_y, 1))

    parameters = {"W1": W1,
                  "b1": b1,
                  "W2": W2,
                  "b2": b2}

    return parameters
def initialize_parameters_deep(layer_dims):
    """
    此函数是为了初始化多层网络参数而使用的函数。
    参数:
        layers_dims - 包含我们网络中每个图层的节点数量的列表

    返回:
        parameters - 包含参数“W1”,“b1”,...,“WL”,“bL”的字典:
                     W1 - 权重矩阵,维度为(layers_dims [1],layers_dims [1-1])
                     bl - 偏向量,维度为(layers_dims [1],1)
                     """
    parameters={}
    L = len(layer_dims)            # number of layers in the network

    for l in range(1, L):
        ### START CODE HERE ### (≈ 2 lines of code)
        parameters['W'+str(l)]=np.random.randn(layers_dims[l], layers_dims[l - 1]) / np.sqrt(layers_dims[l - 1])
        parameters['b'+str(l)]=np.zeros((layer_dims[l],1))
        ### END CODE HERE ###

        assert(parameters['W' + str(l)].shape == (layer_dims[l], layer_dims[l-1]))
        assert(parameters['b' + str(l)].shape == (layer_dims[l], 1))


    return parameters

def linear_forward(A,W,b):
    """
    实现前向传播的线性部分。

    参数:
        A - 来自上一层(或输入数据)的激活,维度为(上一层的节点数量,示例的数量)
        W - 权重矩阵,numpy数组,维度为(当前图层的节点数量,前一图层的节点数量)
        b - 偏向量,numpy向量,维度为(当前图层节点数量,1)

    返回:
         Z - 激活功能的输入,也称为预激活参数
         cache - 一个包含“A”,“W”和“b”的字典,存储这些变量以有效地计算后向传递
    """
    ### START CODE HERE ### (≈ 1 line of code)
    Z=np.dot(W,A)+b
    ### END CODE HERE ###

    assert(Z.shape == (W.shape[0], A.shape[1])) # W的行数,Z的列数
    cache = (A, W, b)

    return Z, cache


def linear_activation_forward(A_prev,W,b,activation):
    """
    实现LINEAR-> ACTIVATION 这一层的前向传播

    参数:
        A_prev - 来自上一层(或输入层)的激活,维度为(上一层的节点数量,示例数)
        W - 权重矩阵,numpy数组,维度为(当前层的节点数量,前一层的大小)
        b - 偏向量,numpy阵列,维度为(当前层的节点数量,1)
        activation - 选择在此层中使用的激活函数名,字符串类型,【"sigmoid" | "relu"】

    返回:
        A - 激活函数的输出,也称为激活后的值
        cache - 一个包含“linear_cache”和“activation_cache”的字典,我们需要存储它以有效地计算后向传递
    """

    if activation == "sigmoid":
        # Inputs: "A_prev, W, b". Outputs: "A, activation_cache".
        ### START CODE HERE ### (≈ 2 lines of code)
        Z,linear_cache=linear_forward(A_prev,W,b)
        A,activation_cache=sigmoid(Z)
        ### END CODE HERE ###

    elif activation == "relu":
        # Inputs: "A_prev, W, b". Outputs: "A, activation_cache".
        ### START CODE HERE ### (≈ 2 lines of code)
        Z,linear_cache=linear_forward(A_prev,W,b)
        A,activation_cache=relu(Z)
        ### END CODE HERE ###

    assert (A.shape == (W.shape[0], A_prev.shape[1]))
    cache = (linear_cache, activation_cache)

    return A, cache
def L_model_forward(X,parameters):
    """
    实现[LINEAR-> RELU] *(L-1) - > LINEAR-> SIGMOID计算前向传播,也就是多层网络的前向传播,为后面每一层都执行LINEAR和ACTIVATION

    参数:
        X - 数据,numpy数组,维度为(输入节点数量,示例数)
        parameters - initialize_parameters_deep()的输出

    返回:
        AL - 最后的激活值
        caches - 包含以下内容的缓存列表:
                 linear_relu_forward()的每个cache(有L-1个,索引为从0到L-2)
                 linear_sigmoid_forward()的cache(只有一个,索引为L-1)
    """
    caches = []
    A = X
    L = len(parameters) // 2       # number of layers in the neural network

    # Implement [LINEAR -> RELU]*(L-1). Add "cache" to the "caches" list.
    for l in range(1, L):   #注意range是(1,L),最后的L不算进循环
        A_prev = A
        ### START CODE HERE ### (≈ 2 lines of code)
        A,cache=linear_activation_forward(A_prev,parameters['W' + str(l)], parameters['b' + str(l)], "relu")
        caches.append(cache)
        ### END CODE HERE ###

    # Implement LINEAR -> SIGMOID. Add "cache" to the "caches" list.
    ### START CODE HERE ### (≈ 2 lines of code)
    AL,cache=linear_activation_forward(A,parameters['W' + str(L)], parameters['b' + str(L)], "sigmoid")
    caches.append(cache)
    ### END CODE HERE ###

    assert(AL.shape == (1,X.shape[1]))

    return AL, caches
def compute_cost(AL,Y):
    """
    实施等式(4)定义的成本函数。

    参数:
        AL - 与标签预测相对应的概率向量,维度为(1,示例数量)
        Y - 标签向量(例如:如果不是猫,则为0,如果是猫则为1),维度为(1,数量)

    返回:
        cost - 交叉熵成本
    """
    m = Y.shape[1]

    # Compute loss from aL and y.
    ### START CODE HERE ### (≈ 1 lines of code)
    cost=np.sum(np.multiply(np.log(AL),Y) + np.multiply(np.log(1 - AL), 1 - Y))/(-m)
    ### END CODE HERE ###

    cost = np.squeeze(cost)      # To make sure your cost's shape is what we expect (e.g. this turns [[17]] into 17).
    assert(cost.shape == ())

    return cost
def linear_backward(dZ,cache):
    """
    为单层实现反向传播的线性部分(第L层)

    参数:
         dZ - 相对于(当前第l层的)线性输出的成本梯度
         cache - 来自当前层前向传播的值的元组(A_prev,W,b)

    返回:
         dA_prev - 相对于激活(前一层l-1)的成本梯度,与A_prev维度相同
         dW - 相对于W(当前层l)的成本梯度,与W的维度相同
         db - 相对于b(当前层l)的成本梯度,与b维度相同
    """
    A_prev, W, b = cache
    m = A_prev.shape[1]

    ### START CODE HERE ### (≈ 3 lines of code)
    dA_prev = np.dot(W.T, dZ)
    dW=np.dot(dZ,A_prev.T)/m
    db=np.sum(dZ,axis=1,keepdims=True)/m
    ### END CODE HERE ###

    assert (dA_prev.shape == A_prev.shape)
    assert (dW.shape == W.shape)
    assert (db.shape == b.shape)

    return dA_prev, dW, db

def linear_activation_backward(dA,cache,activation="relu"):
    """
    实现LINEAR-> ACTIVATION层的后向传播。

    参数:
         dA - 当前层l的激活后的梯度值
         cache - 我们存储的用于有效计算反向传播的值的元组(值为linear_cache,activation_cache)
         activation - 要在此层中使用的激活函数名,字符串类型,【"sigmoid" | "relu"】
    返回:
         dA_prev - 相对于激活(前一层l-1)的成本梯度值,与A_prev维度相同
         dW - 相对于W(当前层l)的成本梯度值,与W的维度相同
         db - 相对于b(当前层l)的成本梯度值,与b的维度相同
    """
    linear_cache, activation_cache = cache

    if activation == "relu":
        ### START CODE HERE ### (≈ 2 lines of code)
        dZ = relu_backward(dA, activation_cache)
        dA_prev, dW, db = linear_backward(dZ, linear_cache)
        ### END CODE HERE ###

    elif activation == "sigmoid":
        ### START CODE HERE ### (≈ 2 lines of code)
        dZ = sigmoid_backward(dA, activation_cache)
        dA_prev, dW, db = linear_backward(dZ, linear_cache)
        ### END CODE HERE ###

    return dA_prev, dW, db
def L_model_backward(AL,Y,caches):
    """
    对[LINEAR-> RELU] *(L-1) - > LINEAR - > SIGMOID组执行反向传播,就是多层网络的向后传播
    参数:
     AL - 概率向量,正向传播的输出(L_model_forward())
     Y - 标签向量(例如:如果不是猫,则为0,如果是猫则为1),维度为(1,数量)
     caches - 包含以下内容的cache列表:
                 linear_activation_forward("relu")的cache,不包含输出层
                 linear_activation_forward("sigmoid")的cache

    返回:
     grads - 具有梯度值的字典
              grads [“dA”+ str(l)] = ...
              grads [“dW”+ str(l)] = ...
              grads [“db”+ str(l)] = ...
    """
    grads = {}
    L = len(caches) # the number of layers
    m = AL.shape[1]
    Y = Y.reshape(AL.shape) # after this line, Y is the same shape as AL

    # Initializing the backpropagation
    ### START CODE HERE ### (1 line of code)
    dAL = - (np.divide(Y, AL) - np.divide(1 - Y, 1 - AL))
    ### END CODE HERE ###

    # Lth layer (SIGMOID -> LINEAR) gradients. Inputs: "AL, Y, caches". Outputs: "grads["dAL"], grads["dWL"], grads["dbL"]
    ### START CODE HERE ### (approx. 2 lines)

    current_cache = caches[L-1]
    grads["dA" + str(L)], grads["dW" + str(L)], grads["db" + str(L)] = linear_activation_backward(dAL, current_cache, "sigmoid")

    ### END CODE HERE ###

    for l in reversed(range(L-1)):
        # lth layer: (RELU -> LINEAR) gradients.
        # Inputs: "grads["dA" + str(l + 2)], caches". Outputs: "grads["dA" + str(l + 1)] , grads["dW" + str(l + 1)] , grads["db" + str(l + 1)]
        ### START CODE HERE ### (approx. 5 lines)
        current_cache =  caches[l]
        dA_prev_temp, dW_temp, db_temp = linear_activation_backward(grads["dA" + str(l+2)], current_cache, activation = "relu")  # l+2=L
        grads["dA" + str(l + 1)] = dA_prev_temp
        grads["dW" + str(l + 1)] = dW_temp
        grads["db" + str(l + 1)] = db_temp
        ### END CODE HERE ###

    return grads

def update_parameters(parameters, grads, learning_rate):
    """
    使用梯度下降更新参数

    参数:
     parameters - 包含你的参数的字典
     grads - 包含梯度值的字典,是L_model_backward的输出

    返回:
     parameters - 包含更新参数的字典
                   参数[“W”+ str(l)] = ...
                   参数[“b”+ str(l)] = ...
    """
    L = len(parameters) // 2 # number of layers in the neural network

    # Update rule for each parameter. Use a for loop.
    ### START CODE HERE ### (≈ 3 lines of code)
    for l in range(L):
        parameters['W'+str(l+1)]-=(learning_rate*(grads['dW'+str(l+1)]))
        parameters['b'+str(l+1)]-=(learning_rate*(grads['db'+str(l+1)]))
    ### END CODE HERE ###
    return parameters


def two_layer_model(X,Y,layers_dims,learning_rate=0.0075,num_iterations=3000,print_cost=False,isPlot=True):
    """
    实现一个两层的神经网络,【LINEAR->RELU】 -> 【LINEAR->SIGMOID】
    参数:
        X - 输入的数据,维度为(n_x,例子数)
        Y - 标签,向量,0为非猫,1为猫,维度为(1,数量)
        layers_dims - 层数的向量,维度为(n_y,n_h,n_y)
        learning_rate - 学习率
        num_iterations - 迭代的次数
        print_cost - 是否打印成本值,每100次打印一次
        isPlot - 是否绘制出误差值的图谱
    返回:
        parameters - 一个包含W1,b1,W2,b2的字典变量
    """
    np.random.seed(1)
    grads={}
    costs=[]
    m=X.shape[1]
    (n_x, n_h, n_y) = layers_dims
    # Initialize parameters dictionary, by calling one of the functions you'd previously implemented
    ### START CODE HERE ### (≈ 1 line of code)
    parameters=initialize_parameters(n_x,n_h,n_y)
    ### END CODE HERE ###

    # Get W1, b1, W2 and b2 from the dictionary parameters.
    W1 = parameters["W1"]
    b1 = parameters["b1"]
    W2 = parameters["W2"]
    b2 = parameters["b2"]

    # Loop (gradient descent)

    for i in range(0, num_iterations):

        # Forward propagation: LINEAR -> RELU -> LINEAR -> SIGMOID. Inputs: "X, W1, b1". Output: "A1, cache1, A2, cache2".
        ### START CODE HERE ### (≈ 2 lines of code)
        A1,cache1=linear_activation_forward(X,W1,b1,'relu')
        A2,cache2=linear_activation_forward(A1,W2,b2,'sigmoid')
        ### END CODE HERE ###

        # Compute cost
        ### START CODE HERE ### (≈ 1 line of code)
        cost=compute_cost(A2,Y)
        ### END CODE HERE ###

        # Initializing backward propagation
        dA2=(-Y/A2)+(1-Y)/(1-A2)

        # Backward propagation. Inputs: "dA2, cache2, cache1". Outputs: "dA1, dW2, db2; also dA0 (not used), dW1, db1".
        ### START CODE HERE ### (≈ 2 lines of code)
        dA1, dW2, db2=linear_activation_backward(dA2,cache2,activation="sigmoid")
        dA0, dW1, db1=linear_activation_backward(dA1,cache1,activation="relu")
        ### END CODE HERE ###

        # Set grads['dWl'] to dW1, grads['db1'] to db1, grads['dW2'] to dW2, grads['db2'] to db2
        grads['dW1'] = dW1
        grads['db1'] = db1
        grads['dW2'] = dW2
        grads['db2'] = db2

        # Update parameters.
        ### START CODE HERE ### (approx. 1 line of code)
        parameters=update_parameters(parameters, grads, learning_rate)
        ### END CODE HERE ###

        # Retrieve W1, b1, W2, b2 from parameters
        W1 = parameters["W1"]
        b1 = parameters["b1"]
        W2 = parameters["W2"]
        b2 = parameters["b2"]

        # Print the cost every 100 training example
        if print_cost and i % 100 == 0:
            print("Cost after iteration {}: {}".format(i, np.squeeze(cost)))
        if print_cost and i % 100 == 0:
            costs.append(cost)

    # plot the cost

    plt.plot(np.squeeze(costs))
    plt.ylabel('cost')
    plt.xlabel('iterations (per tens)')
    plt.title("Learning rate =" + str(learning_rate))
    plt.show()

    return parameters
def L_layer_model(X, Y, layers_dims, learning_rate=0.0075, num_iterations=3000, print_cost=True,isPlot=True):
    """
    实现一个L层神经网络:[LINEAR-> RELU] *(L-1) - > LINEAR-> SIGMOID。

    参数:
        X - 输入的数据,维度为(n_x,例子数)
        Y - 标签,向量,0为非猫,1为猫,维度为(1,数量)
        layers_dims - 层数的向量,维度为(n_y,n_h,···,n_h,n_y)
        learning_rate - 学习率
        num_iterations - 迭代的次数
        print_cost - 是否打印成本值,每100次打印一次
        isPlot - 是否绘制出误差值的图谱

    返回:
     parameters - 模型学习的参数。 然后他们可以用来预测。
    """
    np.random.seed(1)
    costs = []                         # keep track of cost

    # Parameters initialization.
    ### START CODE HERE ###
    parameters=initialize_parameters_deep(layers_dims)
    ### END CODE HERE ###
    # Loop (gradient descent)
    for i in range(0, num_iterations):

        # Forward propagation: [LINEAR -> RELU]*(L-1) -> LINEAR -> SIGMOID.
        ### START CODE HERE ### (≈ 1 line of code)
        AL, caches=L_model_forward(X,parameters)
        ### END CODE HERE ###

        # Compute cost.
        ### START CODE HERE ### (≈ 1 line of code)
        cost=compute_cost(AL,Y)
        ### END CODE HERE ###

        # Backward propagation.
        ### START CODE HERE ### (≈ 1 line of code)

        grads= L_model_backward(AL,Y,caches)
        ### END CODE HERE ###

        # Update parameters.

        ### START CODE HERE ### (≈ 1 line of code)
        parameters=update_parameters(parameters, grads, learning_rate)
        ### END CODE HERE ###

        # Print the cost every 100 training example
        if print_cost and i % 100 == 0:
            print ("Cost after iteration %i: %f" %(i, cost))
        if print_cost and i % 100 == 0:
            costs.append(cost)

    # plot the cost
    if (isPlot==True):
        plt.plot(np.squeeze(costs))
        plt.ylabel('cost')
        plt.xlabel('iterations (per tens)')
        plt.title("Learning rate =" + str(learning_rate))
        plt.show()

    return parameters
def predict(X, y, parameters):
    """
    该函数用于预测L层神经网络的结果,当然也包含两层

    参数:
     X - 测试集
     y - 标签
     parameters - 训练模型的参数

    返回:
     p - 给定数据集X的预测
    """

    m = X.shape[1]
    n = len(parameters) // 2 # 神经网络的层数
    p = np.zeros((1,m))

    #根据参数前向传播
    probas, caches = L_model_forward(X, parameters)

    for i in range(0, probas.shape[1]):
        if probas[0,i] > 0.5:
            p[0,i] = 1
        else:
            p[0,i] = 0

    print("准确度为: "  + str(float(np.sum((p == y))/m)))

    return p
def print_mislabeled_images(classes, X, y, p):
    """
    绘制预测和实际不同的图像。
        X - 数据集
        y - 实际的标签
        p - 预测
    """
    a = p + y
    mislabeled_indices = np.asarray(np.where(a == 1))
    plt.rcParams['figure.figsize'] = (40.0, 40.0) # set default size of plots
    num_images = len(mislabeled_indices[0])
    for i in range(num_images):
        index = mislabeled_indices[1][i]

        plt.subplot(2, num_images, i + 1)
        plt.imshow(X[:,index].reshape(64,64,3), interpolation='nearest')
        plt.axis('off')
        plt.title("Prediction: " + classes[int(p[0,index])].decode("utf-8") + " \n Class: " + classes[y[0,index]].decode("utf-8"))


train_set_x_orig , train_set_y , test_set_x_orig , test_set_y , classes = lr_utils.load_dataset()
train_x_flatten = train_set_x_orig.reshape(train_set_x_orig.shape[0], -1).T
test_x_flatten = test_set_x_orig.reshape(test_set_x_orig.shape[0], -1).T

train_x = train_x_flatten / 255
train_y = train_set_y
test_x = test_x_flatten / 255
test_y = test_set_y


'''
n_x = 12288
n_h = 7
n_y = 1
layers_dims = (n_x,n_h,n_y)
parameters = two_layer_model(train_x, train_set_y, layers_dims = (n_x, n_h, n_y), num_iterations = 2500, print_cost=True,isPlot=True)
'''


layers_dims = [12288, 20, 20, 120, 1] #  5-layer model
parameters = L_layer_model(train_x, train_y, layers_dims, num_iterations = 2500, print_cost = True,isPlot=True)


predictions_train = predict(train_x, train_y, parameters) #训练集
predictions_test = predict(test_x, test_y, parameters) #测试集
#print_mislabeled_images(classes, test_x, test_y, predictions_test)
## START CODE HERE ##
my_image = "6CE5104F8B4F5AEAD07122456EF517A3.jpg" # change this to the name of your image file
my_label_y = [1] # the true class of your image (1 -> cat, 0 -> non-cat)
## END CODE HERE ##
num_px=64
fname = "images/" + my_image
image = np.array(plt.imread(fname))
my_image = resize(image, (num_px,num_px)).reshape((num_px*num_px*3,1))
my_predicted_image = predict(my_image, my_label_y, parameters)

plt.imshow(image)
print ("y = " + str(np.squeeze(my_predicted_image)) + ", your L-layer model predicts a \"" + classes[int(np.squeeze(my_predicted_image)),].decode("utf-8") +  "\" picture.")
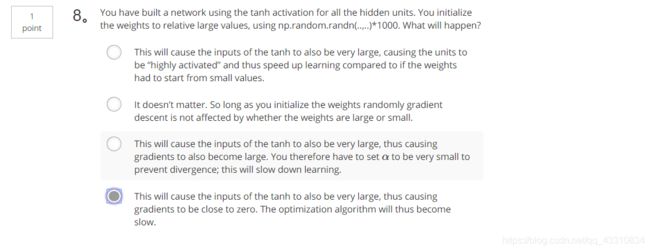
此处要注意深度神经网络的初始化不是随机矩阵×0.001,不然代价函数J会卡在一个数左右降低十分缓慢。激活函数输出值接近于0会导致梯度非常接近于0,因此会导致梯度消失。解决方法在第二课优化中提到
6.步骤总结
《1》初始化网络参数
《2》前向传播
2.1 计算一层的中线性求和的部分
2.2 计算激活函数的部分(ReLU使用L-1次,Sigmod使用1次)
2.3 结合线性求和与激活函数
《3》计算误差
《4》反向传播
4.1 线性部分的反向传播公式
4.2 激活函数部分的反向传播公式
4.3 结合线性部分与激活函数的反向传播公式
《5》更新参数

