谷粒商城分布式高级篇
ElasticSearch
商品发布代码
es索引的设计
(1)方便检索{
skuId:1
spuId:1
skuTitle:华为xx
price:9988
saleCount:99
attrs:[
{尺寸:5寸}
{CPU:高通945}
]}
冗余:100万*20 = 1000000 * 2kb = 2G
(2)
sku索引{
skuId:1
spuId:1
skuTitle:华为xx
price:9988
saleCount:99
}
attr索引{
spuId:1
attrs:[
{尺寸:5寸}
{CPU:高通945}
]}}
es 的数据都是存储在内存中的
搜索:小米
10000个,4000spu
分步,4000个spu对应的所有属性;
esClient:spuId:[4000个spuId] 4000 * 8 = 32000byte = 32kb
来100万个并发
32kb * 1000000 = 32 GB
问题:网络传输的数据量太大,相对于空间的冗余我们的网络IO更珍贵,所以选用第一种。
“index”: false, 不能作为检索字段,就是 query 的时候不能使用这个
“doc_values”: false 插入的时候该字段不进行倒排索引维护,就是不进行分词处理
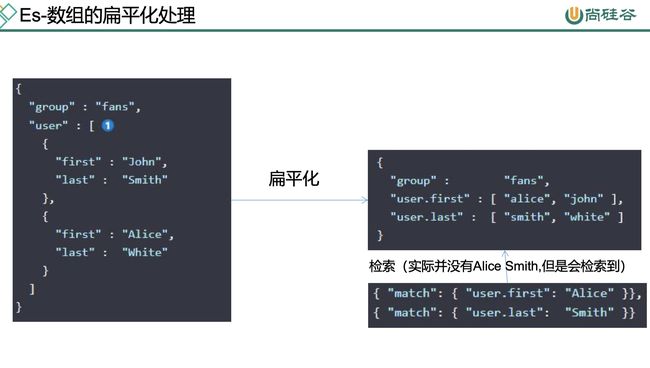
nested
PUT product
{

  "mappings": {

    "properties": {

      "skuId": {

        "type": "long"
      },
      "spuId": {

        "type": "keyword"
      },
      "skuTitle": {

        "type": "text",
        "analyzer": "ik_smart"
      },
      "skuPrice": {

        "type": "keyword"
      },
      "skuImg": {

        "type": "keyword",
        "index": false,
        "doc_values": false
      },
      "saleCount": {

        "type": "long"
      },
      "hasStock": {

        "type": "boolean"
      },
      "hotScore": {

        "type": "long"
      },
      "brandId": {

        "type": "long"
      },
      "catalogId": {

        "type": "long"
      },
      "brandName": {

         "type": "keyword",
        "index": false,
        "doc_values": false
      },
      "brandImg": {

        "type": "keyword",
        "index": false,
        "doc_values": false
      },
      "catalogName": {

        "type": "keyword",
        "index": false,
        "doc_values": false
      },
      "attrs": {

        "type": "nested",
        "properties": {

          "attrId": {

            "type": "long"
          },
          "attrName": {

            "type": "keyword",
            "index": false,
            "doc_values": false
          },
          "attrValue": {

            "type": "keyword"
          }
        }
      }
    }
  }
}
feign 源码分析
SynchronousMethodHandler
/*
1. 构造请求数据,将对象转为json
	RequestTemplate template = buildTemplateFromArgs.create(argv);
2. 发送请求进行执行(执行成功会解码响应数据)
	executeAndDecode(template, options);
3. 执行请求会有重试机制
	while(true){
		try{
			executeAndDecode(template, options);
		}catch(){
			 retryer.continueOrPropagate(e);
		}
	}
*/
public Object invoke(Object[] argv) throws Throwable {

    // 构建一个RestTemplate
    RequestTemplate template = buildTemplateFromArgs.create(argv);
    Options options = findOptions(argv);
    Retryer retryer = this.retryer.clone();
    // 循环调用
    while (true) {

      try {

        return executeAndDecode(template, options);
      } catch (RetryableException e) {

        try {

          // 出现异常就会执行重试机制
          retryer.continueOrPropagate(e);
        } catch (RetryableException th) {

          Throwable cause = th.getCause();
          if (propagationPolicy == UNWRAP && cause != null) {

            throw cause;
          } else {

            throw th;
          }
        }
        if (logLevel != Logger.Level.NONE) {

          logger.logRetry(metadata.configKey(), logLevel);
        }
        continue;
      }
    }
  }
前端商城系统的架构
服务端渲染式开发
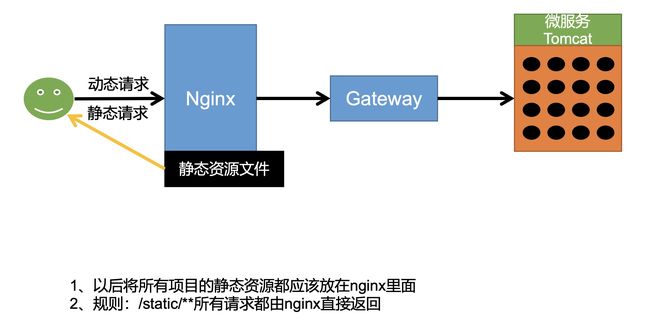
用户访问nginx ,nginx反向代理到网关,网关在转发请求给我们的微服务。在网关进行统一的鉴权认证、限流、日志收集等工作。nginx还存储静态资源(比如css、js),动态资源放在微服务里面(就是html模板),这就是实现了动静分离。静态资源放在nginx,所有要经过服务器处理的页面放在对应的微服务中。动静分离的好处减轻微服务的压力。
Nginx搭建域名访问环境
域名映射效果
- nginx直接代理给网关,网关判断
- 如果/api/,转交给对应的服务器
- 如果是 满足域名,转交给对应的服务
访问流程:用户访问页面(gulimall.com)-> 请求来到nginx,nginx根据server 的配置转发请求 -> nginx将请求转发给gateway -> gateway 转发请求给具体的微服务 -> 微服务被调用
正向代理和反向代理
所谓正向代理就是顺着请求的方向进行的代理,即代理服务器他是由你配置为你服务,去请求目标服务器地址。
所谓反向代理正好与正向代理相反,**代理服务器是为目标服务器服务的。
Nginx
nginx 配置文件结构
nginx 动静分离
访问 http://gulimall.com/static/index/js/hello.js 回去找 /usr/share/nginx/html/static/index/hello.js,就是将端口号后面的路径拼接上我们配置的root 路径来寻找静态资源。
注意点
- Nginx 代理时会丢失请求的host信息等
压力测试 & 性能监控
缓存与分布式锁
商品检索
kibana测试检索语句
需求:模糊匹配(skuTitle),过滤(按照分类,品牌(多值匹配),价格区间,库存,属性(按照属性id和属性值匹配)),排序(按照价格排序),分页,高亮(skuTitle),聚合分析(有几个分类、几个品牌、几个属性、对应的值和名字
相关api:查询结果字段高亮,nested类型字段检索和聚合api
注意:
-
使用filter 的目的是不计算相关性得分
- term 是精确匹配,
- terms也是精确匹配,但是匹配的对象可以有多个值(比如匹配数组、nested类型的字段)
细节点:
- 我们可以通过子聚合拿到按照品牌聚合之后,品牌的名字
- 聚合的数据是在我们query查询的结果进行的。子聚合是在父聚合的结果进行的聚合。
GET /gulimall_product/_search
{

  "query": {

    "bool": {

      "must": [
        {

          "match": {

            "skuTitle": "华为"
          }
        }
      ],
      "filter": [
        {

          "term": {

            "catalogId": "225"
          }
        },
        {

          "terms": {

            "brandId": [
              "9",
              "1",
              "2"
            ]
          }
        },
        {

          "range": {

            "skuPrice": {

              "gte": 6000,
              "lte": 9000
            }
          }
        },
        {

          "term": {

            "hasStock": "false"
          }
        },
        {

          "nested": {

            "path": "attrs",
            "query": {

              "bool": {

                "must": [
                  {

                    "term": {

                      "attrs.attrId": {

                        "value": "15"
                      }
                    }
                  },
                  {

                    "terms": {

                      "attrs.attrValue": [
                        "海思(Hisilicon)",
                        "以官网信息为准"
                      ]
                    }
                  }
                ]
              }
            }
          }
        }
      ]
    }
  },
  "sort": [
    {

      "skuPrice": {

        "order": "desc"
      }
    }
  ],
  "from": 0,
  "size": 10,
  "highlight": {

    "fields": {

      "skuTitle": {
     }
    },
    "pre_tags": "",
    "post_tags": ""
  },
  "aggs": {

    "cata_log_agg": {

      "terms": {

        "field": "catalogId",
        "size": 10
      },
      "aggs": {

        "cata_name_agg": {

          "terms": {

            "field": "catalogName",
            "size": 10
          }
        }
      }
    },
    "brand_id_agg":{

      "terms": {

        "field": "brandId",
        "size": 10
      },"aggs": {

        "brand_name_agg": {

          "terms": {

            "field": "brandName",
            "size": 10
          }
        },
         "brand_img_agg": {

          "terms": {

            "field": "brandImg",
            "size": 10
          }
        }
      }
    },
      "attrs_agg":{

        "nested": {

          "path": "attrs"
        },"aggs": {

          "attr_id_agg": {

            "terms": {

              "field": "attrs.attrId",
              "size": 10
            },"aggs": {

              "attr_name_agg": {

                "terms": {

                  "field": "attrs.attrName",
                  "size": 10
                }
              },
              "attr_value_agg": {

                "terms": {

                  "field": "attrs.attrValue",
                  "size": 10
                }
              }
            }
          }
        }
      }
  }
}
ESCliennt 的使用
导入依赖
<properties>

  <elasticsearch.version>7.6.2elasticsearch.version>
properties>

<dependency>
  <groupId>org.elasticsearch.clientgroupId>
  <artifactId>elasticsearch-rest-high-level-clientartifactId>
  <version>7.6.2version>
dependency>
配置类
请求设置项
配置类的编写
@Configuration
public class GulimallElasticSearchConfig {

    // 因为发送请求的时候需要这个类型的参数
    public static final RequestOptions COMMON_OPTIONS;

    static {

        RequestOptions.Builder builder = RequestOptions.DEFAULT.toBuilder();
//    builder.addHeader("Authorization", "Bearer " + TOKEN);
//    builder.setHttpAsyncResponseConsumerFactory(
//        new HttpAsyncResponseConsumerFactory
//            .HeapBufferedResponseConsumerFactory(30 * 1024 * 1024 * 1024));
        COMMON_OPTIONS = builder.build();
    }

    @Bean
    public RestHighLevelClient restHighLevelClient() {

        RestHighLevelClient client = new RestHighLevelClient(
                RestClient.builder(
                        new HttpHost("192.168.1.10", 9200, "http")));
        return client;
    }
}
使用步骤
-
创建SearchRequest,里面可以存放我们编写的DSL
-
发送请求给es,restHighLevelClient.search(searchRequest, GulimallElasticSearchConfig.COMMON_OPTIONS)
-
数据的序列化和反序列化使用json
// 创建检索请求
SearchRequest searchRequest = new SearchRequest().indices("bank");

// 构造检索条件
SearchSourceBuilder searchSourceBuilder = new SearchSourceBuilder();
....
searchRequest.source(searchSourceBuilder);

// 发送检索请求
SearchResponse searchResponse = restHighLevelClient.search(searchRequest, GulimallElasticSearchConfig.COMMON_OPTIONS);
....

// 发序列化结果为对象
Account account = JSON.parseObject(sourceAsString, Account.class);
浏览器和URLEncoder的区别
private String replaceQueryString(SearchParam param, String value, String key) {

        String encode = "";
        try {

            // TODO  注意浏览器编码 空格 为%20 java编码成 +
            encode = URLEncoder.encode(value, "UTF-8");
            encode = encode.replace("+", "%20");
        } catch (UnsupportedEncodingException e) {

            e.printStackTrace();
        }
        // 这里需要注意 可能是 ?brandId=1 或者是 &brandId=1
        // HttpServletRequest.queryString http://http://search.gulimall.com/list.html?brandId=9 取得的值是 brandId=9 把问号去掉了
        // HttpServletRequest.queryString http://http://search.gulimall.com/list.html?1=1&brandId=9 取得的值是 1=1&brandId=9 把问号去掉了

        return param.get_queryString()
                .replace("&" + key + "=" + encode, "")
                .replace(key + "=" + encode, "");
    }
前端知识
thymeleaf
# 使用简单的字符串,而不是变量,就使用 '' 包裹
<a th:text="${'hello=' + name}"><a>

# thymeleaf 提供的简便操作
th:href="|http://item.gulimall.com/${item.skuId}.html|"

# 字符串加表达式快速写法;使用 || 包裹内容
<a th:href="|http://item.gulimall.com/${product.skuId}.html|">
# 行内表达式,thymeleaf默认只能使用在标签上。
<a>[[ ${param.size()} ]]</a>

# th:utext 不转义
<a href="/static/search/#" th:utext="${product.skuTitle}"></a>

# 遍历
<li th:each="catalog:${result.catalogs}">

# 声明变量,多个变量可以使用,分割
<div th:replace="::frag" th:with="onevar=${value1},twovar=${value2}">

# 三段式
<a> [[ ${
     !#strings.isEmpty(p) ? '↓' : '↑' } ]]

# 声明属性,多个属性使用, 分割
<img src="../../images/gtvglogo.jpg" th:attr="src=@{/images/gtvglogo.jpg},title=#{logo},alt=#{logo}" />

# 获取请求参数(url的参数);查看thymeleaf 附录
${param.foo}
${param.size()}
${param.isEmpty()}
${
     param.containsKey('foo')}

# 字符串工具类;查看thymeleaf 附录
${#strings.isEmpty(name)}
${
     #strings.startsWith(name,'Don')} // also array*, list* and set*
${#strings.endsWith(name,endingFragment)} // also array*, list* and set*

# 集合工具类;查看thymeleaf 附录
${#lists.contains(list, element)}

# 复杂的字符串拼接
<a href="/static/search/#"
th:href="${'javascript:searchProducts("attrs","' + attr.attrId + '_' + attrValue + '")'}"
th:text="${attrValue}">5.56英寸及以上</a>


# 属性优先级 Attribute Precedence
each > if > attr > value > href > src > text > utext >
js
function replaceAndAddParamVal(url, paramName, replaceVal, forceAdd) {

        var oUrl = url.toString();
        var nUrl = "";

        // 判断如果没有这个参数就添加,如果有这个字段就替换
        if (oUrl.indexOf(paramName) != -1) {
      // 替换
            if (forceAdd) {
      // 需要追加添加  -- 属性
                if (oUrl.indexOf("?") != -1) {

                    nUrl = oUrl + "&" + paramName + "=" + replaceVal;
                } else {

                    nUrl = oUrl + "?" + paramName + "=" + replaceVal;
                }
                return nUrl;
            } else {

                var re = eval('/(' + paramName + '=)([^&]*)/gi');
                nUrl = oUrl.replace(re, paramName + '=' + replaceVal);
                return nUrl;
            }
        } else {
      // 添加
            if (oUrl.indexOf("?") != -1) {

                nUrl = oUrl + "&" + paramName + "=" + replaceVal;
            } else {

                nUrl = oUrl + "?" + paramName + "=" + replaceVal;
            }
            return nUrl;

        }

    }

// 判断字符串时候包含
if (href.indexof("?") != -1) {

  location.href = location.href + "&pageNum=" + pn;
}else{

  location.href = location.href + "?pageNum=" + pn;
}
线程并不是并行执行的,能同时并行几个线程取决于你cpu的核数。加入现在是一核然后由3个线程。cpu会随机的给资源给某一个线程。线程的切换,cpu会先保护现场然后在恢复现场,这有点浪费时间。所以我们要控制线程的数量,这可以通过线程池来实现。
但我们的异步任务产生关系(a需要b的执行结果),我们需要进行一步编排,指定线程的执行顺序。
# 属性分组下面的所有属性
select ppav.spu_id, ag.attr_group_name, ag.attr_group_id, aar.attr_id, pa.attr_name, ppav.attr_value
from pms_attr_group ag
         left join pms_attr_attrgroup_relation aar
                   on ag.attr_group_id = aar.attr_group_id
         left join pms_attr pa on aar.attr_id = pa.attr_id
         left join pms_product_attr_value ppav on aar.attr_id = ppav.attr_id
where ag.catelog_id = 225
  and ppav.spu_id = 13


# 分析当前spu有多少个sku,所有sku涉及到的属性组合
select pssav.attr_id,pssav.attr_name,group_concat(distinct pssav.attr_value)
from pms_sku_info info
left join pms_sku_sale_attr_value pssav on info.sku_id = pssav.sku_id
where info.spu_id = 13
group by pssav.attr_id,pssav.attr_name
商品详情页
销售属性的显示,通过属性id查找到所有的sku 然后去交集就能确定出每一个sku的所有销售属性
# 属性分组下面的所有属性
select ppav.spu_id, ag.attr_group_name, ag.attr_group_id, aar.attr_id, ppav.attr_name, ppav.attr_value
from pms_attr_group ag
         left join pms_attr_attrgroup_relation aar
                   on ag.attr_group_id = aar.attr_group_id
          # left join pms_attr pa on aar.attr_id = pa.attr_id # 这一步是多余的,老师写多了
         left join pms_product_attr_value ppav on aar.attr_id = ppav.attr_id
where ag.catelog_id = 225
  and ppav.spu_id = 13


# 分析当前spu有多少个sku,所有sku涉及到的属性组合
select pssav.attr_id,pssav.attr_name,group_concat(distinct pssav.attr_value)
from pms_sku_info info
left join pms_sku_sale_attr_value pssav on info.sku_id = pssav.sku_id
where info.spu_id = 13
group by pssav.attr_id,pssav.attr_name

# 改进一下,方便我们进行属性的组合
select pssav.attr_id  attrId,pssav.attr_name attrName,pssav.attr_value attrValue,group_concat(distinct info.sku_id) skuIds
        from pms_sku_info info
        left join pms_sku_sale_attr_value pssav on info.sku_id = pssav.sku_id
        where info.spu_id = 13
        group by pssav.attr_id,pssav.attr_name,pssav.attr_value
    $(".sku_attr_value").click(function () {


        var skus = new Array();

        // 给点击的元素加上自定义属性,为了识别已被点击了
        $(this).addClass("clicked");
        // 移除点击元素同行的checked  为了方便获取另外选中的内容
        $(this).parent().parent().find(".sku_attr_value").removeClass("checked");

        // 1、获取当前skus组合
        var curr = $(this).attr("skus").split(",");
        skus.push(curr);

        // 2、获取另外一个选中的组合
        $("a[class='sku_attr_value checked']").each(function () {

            skus.push($(this).attr("skus").split(","));
        });

        // console.log(skus);
        // 3、取出交集

        var filterEle = skus[0];
        for (var i=1; i<skus.length; i++){

            filterEle = $(filterEle).filter(skus[i])
        }
        console.log(filterEle)
        // 4、跳转
        location.href = "http://item.gulimall.com/" + filterEle[0] + ".html";
    });
    $(function () {

        // 取出所有边框
        $(".sku_attr_value").parent().css({
     "border": "solid 1px #ccc"});
        // 给选中的元素加边框
        $("a[class='sku_attr_value checked']").parent().css({
     "border": "solid 1px red"});

    });
</script>
加密方案
最终选用spring 提供的BCryptPasswordEncoder类帮我们实现加盐的MD5加密,还能使用密文和原文匹配是否正确。
@Test
    public void contextLoads() {

        // d4541250b586296fcce5dea4463ae17f
        // 抗修改性:但是网上都有md5暴力破解程序。就是别人暴力破解然后将破解的结果存入数据库里面,所以就能解析出MD5的原文
        String s = DigestUtils.md2Hex("123456");
        System.out.println("s = " + s);


        // MD5不能直接进行密码的加密存储,需要在原文的基础上加盐(随机字符)
        String s2 = DigestUtils.md2Hex("123456" + System.currentTimeMillis());
        System.out.println("s2 = " + s2);
        String s1 = Md5Crypt.md5Crypt("12345".getBytes(),"$1$qqqqqqqq");
        System.out.println("s1 = " + s1);

        // 通过自定义随机字段来实现加盐操作,需要在数据库中存储这个用于对应的盐值,很麻烦。spring 提供了简便的操作
        // 好处:我们不需要自己维护每个用户的盐值是什么,spring这个工具会随机生成,还能根据密文推断出原文是什么
        // 这么看来,这样子也是不安全的仍然可以暴力破解,不过吧MD5的跟费劲,因为md5是一样的,而spring这个工具是每次加密的密文都不一样。
        BCryptPasswordEncoder bCryptPasswordEncoder = new BCryptPasswordEncoder();
        // $2a$10$zsWQmE/oCHeL5zglk/okgu.oL/pfftIVAaDS73A606k6K.deqhZzq
        // $2a$10$dtLuUZKZ8DI8AbE2C8QREeZfI8xjCXH7QcT3XakK1DlbANE9zq0Ym
        String encode = bCryptPasswordEncoder.encode("12345");
        System.out.println("encode = " + encode);
        boolean b = bCryptPasswordEncoder.matches("12345", "$2a$10$dtLuUZKZ8DI8AbE2C8QREeZfI8xjCXH7QcT3XakK1DlbANE9zq0Ym");
        boolean b2 = bCryptPasswordEncoder.matches("12345", "$2a$10$zsWQmE/oCHeL5zglk/okgu.oL/pfftIVAaDS73A606k6K.deqhZzq");
        System.out.println("b = " + b);
        System.out.println("b2 = " + b2);

    }
发送短信
概述
上阿里云的云市场找短信服务即可
基本套路就是调用短信服务接口,提供收短信的手机号和发送的短信验证码是什么,还有使用什么短信验证码模板已经指定公司名称标识
代码
我们使用自动转配的思想配置短信服务。
配置文件
spring.cloud.alicloud.sms.host=http://fesms.market.alicloudapi.com
spring.cloud.alicloud.sms.path=/sms/
spring.cloud.alicloud.sms.appcode=7e35952dee2c49f5a32e3240bcf2030a
spring.cloud.alicloud.sms.sign=1
spring.cloud.alicloud.sms.skin=1
组件
@ConfigurationProperties(prefix = "spring.cloud.alicloud.sms")
@Data
@Component
public class SmsComponent {


    private String host;
    private String path;
    private String appcode;
    private String skin;
    private String sign;

    public void sendCode(String phone, String code) {


        String method = "GET";
        Map<String, String> headers = new HashMap<String, String>();
        //最后在header中的格式(中间是英文空格)为Authorization:APPCODE 83359fd73fe94948385f570e3c139105
        headers.put("Authorization", "APPCODE " + appcode);
        Map<String, String> querys = new HashMap<String, String>();
        querys.put("code", code);
        querys.put("phone", phone);
        querys.put("skin", skin);
        querys.put("sign", sign);
        //JDK 1.8示例代码请在这里下载:  http://code.fegine.com/Tools.zip

        try {

            // HttpUtils是编写好的工具类
            HttpResponse response = HttpUtils.doGet(host, path, method, headers, querys);
            //System.out.println(response.toString());如不输出json, 请打开这行代码,打印调试头部状态码。
            //状态码: 200 正常;400 URL无效;401 appCode错误; 403 次数用完; 500 API网管错误
            //获取response的body
            System.out.println(EntityUtils.toString(response.getEntity()));
        } catch (Exception e) {

            e.printStackTrace();
        }

    }
}
工具类(发送http请求)
package com.atguigu.common.utils;

import org.apache.commons.lang.StringUtils;
import org.apache.http.HttpResponse;
import org.apache.http.NameValuePair;
import org.apache.http.client.HttpClient;
import org.apache.http.client.entity.UrlEncodedFormEntity;
import org.apache.http.client.methods.HttpDelete;
import org.apache.http.client.methods.HttpGet;
import org.apache.http.client.methods.HttpPost;
import org.apache.http.client.methods.HttpPut;
import org.apache.http.conn.ClientConnectionManager;
import org.apache.http.conn.scheme.Scheme;
import org.apache.http.conn.scheme.SchemeRegistry;
import org.apache.http.conn.ssl.SSLSocketFactory;
import org.apache.http.entity.ByteArrayEntity;
import org.apache.http.entity.StringEntity;
import org.apache.http.impl.client.DefaultHttpClient;
import org.apache.http.message.BasicNameValuePair;

import javax.net.ssl.SSLContext;
import javax.net.ssl.TrustManager;
import javax.net.ssl.X509TrustManager;
import java.io.UnsupportedEncodingException;
import java.net.URLEncoder;
import java.security.KeyManagementException;
import java.security.NoSuchAlgorithmException;
import java.security.cert.X509Certificate;
import java.util.ArrayList;
import java.util.List;
import java.util.Map;

public class HttpUtils {


    /**
     * get
     *
     * @param host
     * @param path
     * @param method
     * @param headers
     * @param querys
     * @return
     * @throws Exception
     */
    public static HttpResponse doGet(String host, String path, String method,
                                     Map<String, String> headers,
                                     Map<String, String> querys)
            throws Exception {

        HttpClient httpClient = wrapClient(host);

        HttpGet request = new HttpGet(buildUrl(host, path, querys));
        for (Map.Entry<String, String> e : headers.entrySet()) {

            request.addHeader(e.getKey(), e.getValue());
        }

        return httpClient.execute(request);
    }

    /**
     * post form
     *
     * @param host
     * @param path
     * @param method
     * @param headers
     * @param querys
     * @param bodys
     * @return
     * @throws Exception
     */
    public static HttpResponse doPost(String host, String path, String method,
                                      Map<String, String> headers,
                                      Map<String, String> querys,
                                      Map<String, String> bodys)
            throws Exception {

        HttpClient httpClient = wrapClient(host);

        HttpPost request = new HttpPost(buildUrl(host, path, querys));
        for (Map.Entry<String, String> e : headers.entrySet()) {

            request.addHeader(e.getKey(), e.getValue());
        }

        if (bodys != null) {

            List<NameValuePair> nameValuePairList = new ArrayList<NameValuePair>();

            for (String key : bodys.keySet()) {

                nameValuePairList.add(new BasicNameValuePair(key, bodys.get(key)));
            }
            UrlEncodedFormEntity formEntity = new UrlEncodedFormEntity(nameValuePairList, "utf-8");
            formEntity.setContentType("application/x-www-form-urlencoded; charset=UTF-8");
            request.setEntity(formEntity);
        }

        return httpClient.execute(request);
    }

    /**
     * Post String
     *
     * @param host
     * @param path
     * @param method
     * @param headers
     * @param querys
     * @param body
     * @return
     * @throws Exception
     */
    public static HttpResponse doPost(String host, String path, String method,
                                      Map<String, String> headers,
                                      Map<String, String> querys,
                                      String body)
            throws Exception {

        HttpClient httpClient = wrapClient(host);

        HttpPost request = new HttpPost(buildUrl(host, path, querys));
        for (Map.Entry<String, String> e : headers.entrySet()) {

            request.addHeader(e.getKey(), e.getValue());
        }

        if (StringUtils.isNotBlank(body)) {

            request.setEntity(new StringEntity(body, "utf-8"));
        }

        return httpClient.execute(request);
    }

    /**
     * Post stream
     *
     * @param host
     * @param path
     * @param method
     * @param headers
     * @param querys
     * @param body
     * @return
     * @throws Exception
     */
    public static HttpResponse doPost(String host, String path, String method,
                                      Map<String, String> headers,
                                      Map<String, String> querys,
                                      byte[] body)
            throws Exception {

        HttpClient httpClient = wrapClient(host);

        HttpPost request = new HttpPost(buildUrl(host, path, querys));
        for (Map.Entry<String, String> e : headers.entrySet()) {

            request.addHeader(e.getKey(), e.getValue());
        }

        if (body != null) {

            request.setEntity(new ByteArrayEntity(body));
        }

        return httpClient.execute(request);
    }

    /**
     * Put String
     * @param host
     * @param path
     * @param method
     * @param headers
     * @param querys
     * @param body
     * @return
     * @throws Exception
     */
    public static HttpResponse doPut(String host, String path, String method,
                                     Map<String, String> headers,
                                     Map<String, String> querys,
                                     String body)
            throws Exception {

        HttpClient httpClient = wrapClient(host);

        HttpPut request = new HttpPut(buildUrl(host, path, querys));
        for (Map.Entry<String, String> e : headers.entrySet()) {

            request.addHeader(e.getKey(), e.getValue());
        }

        if (StringUtils.isNotBlank(body)) {

            request.setEntity(new StringEntity(body, "utf-8"));
        }

        return httpClient.execute(request);
    }

    /**
     * Put stream
     * @param host
     * @param path
     * @param method
     * @param headers
     * @param querys
     * @param body
     * @return
     * @throws Exception
     */
    public static HttpResponse doPut(String host, String path, String method,
                                     Map<String, String> headers,
                                     Map<String, String> querys,
                                     byte[] body)
            throws Exception {

        HttpClient httpClient = wrapClient(host);

        HttpPut request = new HttpPut(buildUrl(host, path, querys));
        for (Map.Entry<String, String> e : headers.entrySet()) {

            request.addHeader(e.getKey(), e.getValue());
        }

        if (body != null) {

            request.setEntity(new ByteArrayEntity(body));
        }

        return httpClient.execute(request);
    }

    /**
     * Delete
     *
     * @param host
     * @param path
     * @param method
     * @param headers
     * @param querys
     * @return
     * @throws Exception
     */
    public static HttpResponse doDelete(String host, String path, String method,
                                        Map<String, String> headers,
                                        Map<String, String> querys)
            throws Exception {

        HttpClient httpClient = wrapClient(host);

        HttpDelete request = new HttpDelete(buildUrl(host, path, querys));
        for (Map.Entry<String, String> e : headers.entrySet()) {

            request.addHeader(e.getKey(), e.getValue());
        }

        return httpClient.execute(request);
    }

    private static String buildUrl(String host, String path, Map<String, String> querys) throws UnsupportedEncodingException {

        StringBuilder sbUrl = new StringBuilder();
        sbUrl.append(host);
        if (!StringUtils.isBlank(path)) {

            sbUrl.append(path);
        }
        if (null != querys) {

            StringBuilder sbQuery = new StringBuilder();
            for (Map.Entry<String, String> query : querys.entrySet()) {

                if (0 < sbQuery.length()) {

                    sbQuery.append("&");
                }
                if (StringUtils.isBlank(query.getKey()) && !StringUtils.isBlank(query.getValue())) {

                    sbQuery.append(query.getValue());
                }
                if (!StringUtils.isBlank(query.getKey())) {

                    sbQuery.append(query.getKey());
                    if (!StringUtils.isBlank(query.getValue())) {

                        sbQuery.append("=");
                        sbQuery.append(URLEncoder.encode(query.getValue(), "utf-8"));
                    }
                }
            }
            if (0 < sbQuery.length()) {

                sbUrl.append("?").append(sbQuery);
            }
        }

        return sbUrl.toString();
    }

    private static HttpClient wrapClient(String host) {

        HttpClient httpClient = new DefaultHttpClient();
        if (host.startsWith("https://")) {

            sslClient(httpClient);
        }

        return httpClient;
    }

    private static void sslClient(HttpClient httpClient) {

        try {

            SSLContext ctx = SSLContext.getInstance("TLS");
            X509TrustManager tm = new X509TrustManager() {

                public X509Certificate[] getAcceptedIssuers() {

                    return null;
                }
                public void checkClientTrusted(X509Certificate[] xcs, String str) {


                }
                public void checkServerTrusted(X509Certificate[] xcs, String str) {


                }
            };
            ctx.init(null, new TrustManager[] {
      tm }, null);
            SSLSocketFactory ssf = new SSLSocketFactory(ctx);
            ssf.setHostnameVerifier(SSLSocketFactory.ALLOW_ALL_HOSTNAME_VERIFIER);
            ClientConnectionManager ccm = httpClient.getConnectionManager();
            SchemeRegistry registry = ccm.getSchemeRegistry();
            registry.register(new Scheme("https", 443, ssf));
        } catch (KeyManagementException ex) {

            throw new RuntimeException(ex);
        } catch (NoSuchAlgorithmException ex) {

            throw new RuntimeException(ex);
        }
    }
}
Spring Session
session和cookie的工作原理
-
session,使用session可以实现重定向传递数据。首先session的数据是保存在服务器端的,为了区别是那个用户的session数据所以有sessionID,可以吧session看成是map,map的key就是sessionID,value又是一个map。所以我们想重定向的时候携带数据就可以通过session保存数据。而sessionID默认是通过cookie存放的(就是在响应体头中添加
Set-Cookie:JSESSION=250; path=/) -
然后cookie是保存在客户端的(比如浏览器),当浏览器访问一个网站时,会看看保存的cookie中是否有当前域名的cookie信息,如果有就将cookie放在请求头中,然后在访问我们的服务器。
-
请求来到我们的服务端,服务端会查看请求头中是否携带名叫JSESSIOINID的cookie信息(默认就叫这个名字),如果有,就从session中取出数据。
-
spring mvc 提供的类
RedirectAttributes ra
ra.addFlashAttribute();将数据放在session里面可以在页面取出,但是只能取一次
  ra.addAttribute("skuId",skuId);将数据放在
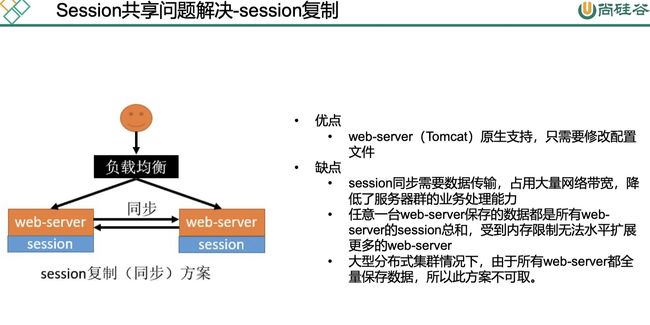
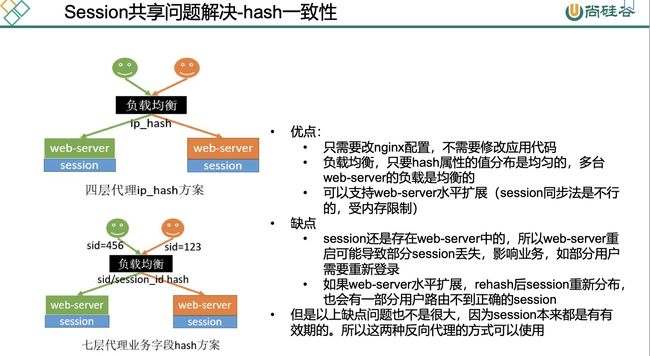
session数据共享问题
session共享问题的解决
session问题最终解决方案
- session数据使用第三方存储服务保存(redis),但是如果是直接使用redis,要求对我们的代码进行修改。所以使用spring session。spring session的原理是对我们的request和response进行了包装。因为session的获取是request.getSession() ,所以包装了请求体,而cookie的设置需要设置到response中所以也包装了响应体。spring session很完美的解决了代码重构的问题。还能对接不同的存储中间件,不仅仅限于redis。
- 子域共享问题。自定义cookie的响应信息。设置cookie 的作用域domean 只能是当前域名或者父域名。domean 是子域名可以拿到父域名的信息,domean是父域名不能拿到子域名的信息。
代码
spring session guide
Sample Applications that use Spring Boot session redis guide
Sample Applications that use Spring Java-based configuration session redis guide
[HttpSession with Redis JSON serialization](https://github.com/spring-projects/spring-session/tree/2.1.12.RELEASE/samples/boot/redis-json)i
Custom Cookie Guide
依赖
<dependency>
  <groupId>org.springframework.sessiongroupId>
  <artifactId>spring-session-data-redisartifactId>
dependency>

<dependency>
  <groupId>org.springframework.bootgroupId>
  <artifactId>spring-boot-starter-data-redisartifactId>
  <exclusions>
    <exclusion>
      <groupId>io.lettucegroupId>
      <artifactId>lettuce-coreartifactId>
    exclusion>
  exclusions>
dependency>
<dependency>
  <groupId>redis.clientsgroupId>
  <artifactId>jedisartifactId>
dependency>
配置文件
# redis的连接信息
spring.redis.host=192.168.1.10
spring.redis.port=6379
# 将session数据保存到redis中
spring.session.store-type=redis
spring.session.redis.flush-mode=on_save
spring.session.redis.namespace=spring:session
启用自动配置
@EnableRedisHttpSession // 整合redis作为session存储,就是通过filter包装了我们的请求体和响应体
Spring sessioin 中redis的序列化、cookie的自定义设置
@Configuration
public class GulimallSessioinConfig {


    @Bean
    public RedisSerializer<Object> springSessionDefaultRedisSerializer() {

        return new GenericFastJsonRedisSerializer();
    }

    @Bean
    public CookieSerializer cookieSerializer() {

        DefaultCookieSerializer serializer = new DefaultCookieSerializer();
        serializer.setCookieName("GULISESSOIN");
        serializer.setDomainName("gulimall.com");
        return serializer;
    }
}
Spring Session原理
社交登录&单点登录
社交登录
QQ、微博、github 等网站的用户量非常大,别的网站为了简化自我网站的登陆与注册逻辑,引入社交登陆功能;
步骤:
-
用户点击QQ按钮
-
引导跳转到QQ授权页
-
用户主动点击授权,跳回之前网页。
OAuth2.0
-
OAuth: OAuth (开放授权)是一个开放标准,允许用户授权第三方网站访问他们存储在另外的服务提供者上的信息,而不需要将用户名和密码提供给第三方网站或分享他们数据的所有内容。
-
0Auth2.0:对于用户相关的OpenAPI (例如获取用户信息,动态同步,照片,日志,分享等),为了保护用户数据的安全和隐私,第三方网站访问用户数据前都需要显式的向用户征求授权。
-
官方版流程:
微博登录准备工作
进入微博开放平台
登录微博,进入维接入,选择网站接入
选择立即接入
创建自己的应用
我们可以在开发阶段
进入高级信息,填写重定向地址
添加测试账号(选做)
进入文档按照流程
微博登录流程图
微博oauth2认证document
核心:引导用户来到授权页面,用户登录成功,第三方服务器会根据重定向的地址到我们指定的服务器并携带code。我们可以拿着code找第三方服务器获取access token
SSO(单点登录)
概述
(SingleSignOn) 是一个分布式单点登录框架。只需要登录一次就可以访问所有相互信任的应用系统
核心:三个系统即使域名不一样,想办法给三个系统同步同一个用户的票据;
- 中央认证服务器;ssoserver.com
- 其他系统,想要登录去ssoserver.com登录,登录成功跳转回来
- 只要有一个登录,其他都不用登录
- 全系统统一一个sso-sessionid;所有系统可能域名都不相同
原理:
单点登录的原理,一个认证中心,多个系统。认证中心通过cookie保存用户的登录信息(cookie是基于浏览器的,所以只要你好好的在同一个浏览器登录软件,就能实现单点登录),各个系统在session中保存用户信息。
实现
这是一个开源的sso的实现
购物车
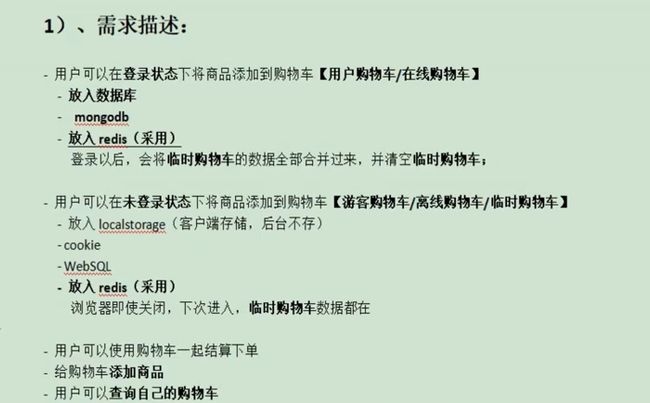
需求描述
数据结构
HashMap
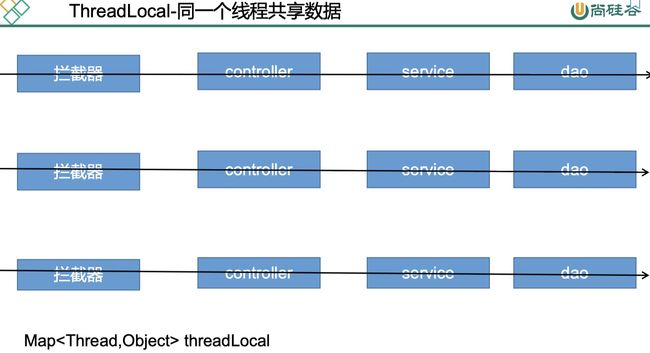
知识点(拦截器、threadlocal)
-
购物车的设计是,浏览器一个(临时购物车)、一个用户一个(真实购物车)。所以可以设置一个UserInfoTo。用户登录了就设置userId的值,不管登录登录userKey是必须要有的,userKey从cookie获取值。用户未登录时根据这个userKey作为key保存购物车数据到redis中,当用户登录了之后并点击查看购物车时,再合并临时购物车和真实购物车的数据,并将临时购物车数据清空。
@Data @ToString public class UserInfoTo { /** * 登录就有 */ private Long userId; /** * 登不登录都有 */ private String userKey; /** * 是否是临时用户 */ private boolean tempUser = false; } -
我们可以通过拦截器判断用户是否登录,是否是临时用户。
-
可以将用户信息放到ThreadLocal中,这样子我们就可以在任何地方取到用户信息。
public class CartInterceptor implements HandlerInterceptor {

    public static ThreadLocal<UserInfoTo> threadLocal = new ThreadLocal<>();

    /**
     * 目标方法执行之前
     *
     * @param request
     * @param response
     * @param handler
     * @return
     * @throws Exception
     */
    @Override
    public boolean preHandle(HttpServletRequest request, HttpServletResponse response, Object handler) throws Exception {

        UserInfoTo userInfoTo = new UserInfoTo();
        HttpSession session = request.getSession();
        MemberRespVo memberRespVo = (MemberRespVo) session.getAttribute(AuthServerConstant.LOGIN_USER);
        if (memberRespVo != null) {

            // 用户登录
            userInfoTo.setUserId(memberRespVo.getId());
        }
        Cookie[] cookies = request.getCookies();
        if (cookies != null && cookies.length > 0) {

            for (Cookie cookie : cookies) {

                // user-key
                String name = cookie.getName();
                if (CartConstant.TEMP_USER_COOKIE_NAME.equals(name)) {

                    userInfoTo.setUserKey(cookie.getValue());
                    userInfoTo.setTempUser(true);
                }
            }
        }
        // 如果没有临时用户一定分配一个临时用户
        if (StringUtils.isEmpty(userInfoTo.getUserKey())) {

            String uuid = UUID.randomUUID().toString().replace("-", "");
            userInfoTo.setUserKey(uuid);
        }
        // 调用目标方法之前
        threadLocal.set(userInfoTo);
        return true;
    }

    /**
     * handler 方法执行后
     * 业务执行之后;分配临时用户,让浏览器保存|
     * @param request
     * @param response
     * @param handler
     * @param modelAndView
     * @throws Exception
     */
    @Override
    public void postHandle(HttpServletRequest request, HttpServletResponse response, Object handler, ModelAndView modelAndView) throws Exception {

        // 如果没有临时用户就保存一个临时用户
        UserInfoTo userInfoTo = threadLocal.get();
        if (!userInfoTo.isTempUser()) {

            Cookie cookie = new Cookie(CartConstant.TEMP_USER_COOKIE_NAME, userInfoTo.getUserKey());
            cookie.setMaxAge(60 * 60 * 24 * 30);
            cookie.setDomain("gulimall.com");
            response.addCookie(cookie);
        }


    }
}
消息中间件-RabbitMQ
feign远程调用过程
流程:
- 调用代理对象的方法时会执行InvocationHandler里面的invoke方法(使用JDK的代理,
Proxy.newProxyInstance()) - Feign 的invoke方法的逻辑是先判断我们的方法是不是Object的方法,不是在执行
return dispatch.get(method).invoke(args); - 流程来到了另一个invoke方法,先构建RequestTemplate,然后while执行
return executeAndDecode(template, options); - 执行的流程会先构造请求体
Request request = targetRequest(template);} - targetRequest 里面就是遍历所有的feign的requestInterceptors属性
- Feign 在构建的时候会注入requestInterceptor,如果我们往IOC 容器添加了requestInterceptor会调用这个方法,加入到Feign里面的requestInterceptor属性中取。
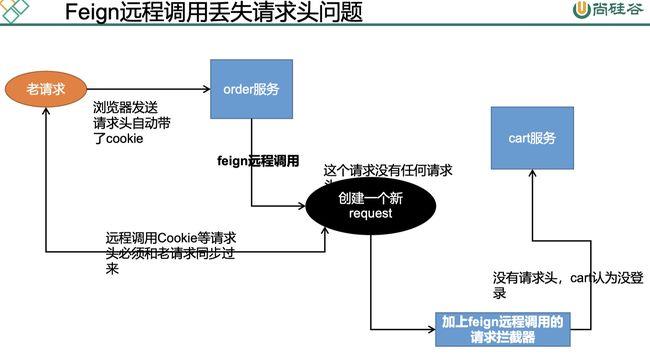
- 先IOC容器注入我们的 RequestInterceptor,实现使用feign调用的时候添加请求头信息。
1.
  List<MemberAddressVo> address = memberFeignService.getAddress(memberRespVo.getId());

2.
  public Object invoke(Object proxy, Method method, Object[] args) throws Throwable {

  if ("equals".equals(method.getName())) {

    try {

      Object otherHandler =
        args.length > 0 && args[0] != null ? Proxy.getInvocationHandler(args[0]) : null;
      return equals(otherHandler);
    } catch (IllegalArgumentException e) {

      return false;
    }
  } else if ("hashCode".equals(method.getName())) {

    return hashCode();
  } else if ("toString".equals(method.getName())) {

    return toString();
  }

  return dispatch.get(method).invoke(args);
}

3.
  public Object invoke(Object[] argv) throws Throwable {

  RequestTemplate template = buildTemplateFromArgs.create(argv);
  Options options = findOptions(argv);
  Retryer retryer = this.retryer.clone();
  while (true) {

    try {

      return executeAndDecode(template, options);

    }

  }
  4.
    Object executeAndDecode(RequestTemplate template, Options options) throws Throwable {

    Request request = targetRequest(template);}

  5.
    Request targetRequest(RequestTemplate template) {

    for (RequestInterceptor interceptor : requestInterceptors) {

      interceptor.apply(template);
    }
    return target.apply(template);
  }


  6.
    public Builder requestInterceptor(RequestInterceptor requestInterceptor) {

    this.requestInterceptors.add(requestInterceptor);
    return this;
  }
  7.
    @Configuration
    public class GuliFeignConfig {

      @Bean("requestInterceptor")
      public RequestInterceptor requestInterceptor() {

        return new RequestInterceptor() {

          @Override
          public void apply(RequestTemplate template) {

            System.out.println("RequestInterceptor...." + Thread.currentThread().getId());

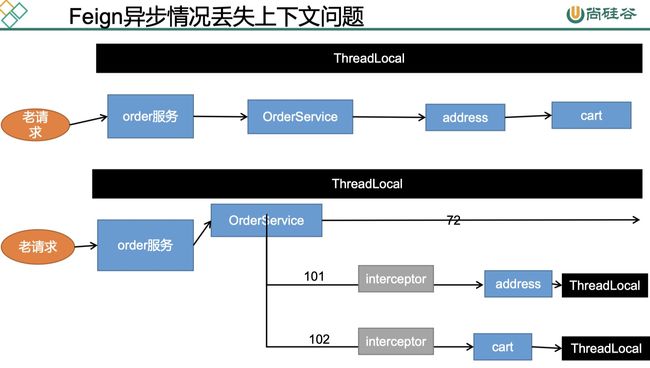
            //1、RequestContextHolder拿到同一线程里面的request(这是spring为了简化我们的操作提供的,当然你可以直接从handler方法里面获取HttpServletRequest)
            ServletRequestAttributes requestAttributes = (ServletRequestAttributes) RequestContextHolder.getRequestAttributes();
            if (requestAttributes != null) {

              HttpServletRequest request = requestAttributes.getRequest();// 老请求
              // 同步请求头数据,Cookie
              String cookie = request.getHeader("Cookie");
              // 给请求同步老请求的cookie信息
              template.header("Cookie", cookie);
            }

          }
        };
      }
    }
接口幂等性
分布式事务
下订单的流程
下单可能会出现的情况:
- 订单下失败、直接回滚,无需担心库存锁定问题。
- 订单下成功、库存服务内部异常,订单回滚,无需担心库存锁定问题。
- 订单下成功、库存服务成功、接下来的业务失败,导致订单回滚,库存业务延时过后就会释放库存。
- 订单和库存服务都成功,只不过用户没有及时支付。由于库存服务延时比订单关闭时间长所以库存释放的时候查询没有这个订单的时候就会自动解锁。
- 订单和库存服务都成功,只不过用户没有及时支付。但是由于网络延时问题,库存服务解锁库存的时候发现有这个订单所以没有释放库存。对于这个问题我们可以在订单关闭的时候发送给库存服务让他释放库存。
谷粒商城下订单流程:
- 用户点击下单,请求来到服务端。服务端会生成一个token并存入redis中然后返回页面给用户。用户点击下单,请求来到服务器我们校验一下传送过来的token和redis中存放的是否一致。通过这个防止用于刷新订单导致库存耗尽问题(原子性校验,通过redis的lua脚本实现比值、删除的原子性,保证用户如果无聊多次刷新提交订单一个token只能被比较一次)
- 校验成功,开始保存订单。我们需要通过sku生成订单项和订单。
- 通过feign调用库存服务的锁库存方法锁定库存。
- feign调用成功,我们就将订单创建成功发送消息给MQ
rabbitTemplate.convertAndSend("order-event-exchange", "order.create.order", order.getOrder());消息发送到的队列,该队列设置了ttl、死信路由键、死信交换机 - 然后我们在订单服微服务设置了@RabbitListener 监听死信交换机发送到的队列。收到服务在发送消息给库存服务的队列告诉它我们已经关闭订单了,你再次确认一下有没有这个订单的库存信息 MQ
rabbitTemplate.convertAndSend("order-event-exchange", "stock.release.other", orderTo); - 订单服务发送锁定库存请求,我们确认有库存后,就锁定库存然后发送消息MQ。
- 如果每一个商品都锁定成功,将当前商品锁定了几件的工作单记录发给MQ,锁定失败。前面保存的工作单信息就回滚了。发送出去的消息,即使要解锁记录,由于去数据库查不到id,所以就不用解锁。
rabbitTemplate.convertAndSend("stock-event-exchange", "stock.locked", stockLockedTo);消息发送到的队列,该队列设置了ttl、死信路由键、死信交换机- 在库存服务设置@RabbitListener 监听死信交换机发送到的队列。收到服务在发送消息给库存服务的队列,库存服务监听到消息就会触发释放库存服务的业务。
解锁库存的流程
1、查询数据库关于这个订单的锁定库存信息。
    有,证明库存锁定成功了。
        解锁:订单情况。
            1、没有这个订单,必须解锁。
            2、有这个订单
                订单状态:已取消:解锁库存
                        没取消:不能解锁库存。

    没有,库存锁定失败了,库存回滚了。这种情况无需解锁
支付宝支付
秒杀系统
Spring知识点回顾
定义viewConntroller
@Configuration
public class MyGulimallWebConfig implements WebMvcConfigurer {

    /**
     * 发送请求直接获取页面,不需要业务逻辑,我们可以使用SpringMVC 提供的ViewController实现
     * 视图映射
     * @param registry
     */
    @Override
    public void addViewControllers(ViewControllerRegistry registry) {

        registry.addViewController("/login.html").setViewName("login");
        registry.addViewController("/reg.html").setViewName("reg");
    }
}
spring mvc
public String regist(RedirectAttributes ra) {
     }

RedirectAttributes ra
     * ra.addFlashAttribute();将数据放在session里面可以在页面取出,但是只能取一次
     * ra.addAttribute("skuId",skuId);将数据放在
sprng mvc 拦截器
@Configuration
public class GulimallWebConfig implements WebMvcConfigurer {

    @Override
    public void addInterceptors(InterceptorRegistry registry) {

        registry.addInterceptor(new CartInterceptor()).addPathPatterns("/**");
    }
}
public class CartInterceptor implements HandlerInterceptor {
     }
添加servlet、filter、listener
If convention-based mapping is not flexible enough, you can use the ServletRegistrationBean, FilterRegistrationBean, and ServletListenerRegistrationBean classes for complete control.
java -jar xxl-sso-web-sample-springboot-1.1.1-SNAPSHOT.jar --server.port=8082
mvn clean package -Dmaven.skip.test=true
@Component
public class LoginUserInterceptor implements HandlerInterceptor {

    public static ThreadLocal<MemberRespVo> loginUser = new ThreadLocal<>();

    @Override
    public boolean preHandle(HttpServletRequest request, HttpServletResponse response, Object handler) throws Exception {

        // /order/order/status/{orderSn}
        // 无需登录的直接放行
        boolean match = new AntPathMatcher().match("/order/order/status/**", request.getRequestURI());
        if (match) {

            return true;
        }
        MemberRespVo attribute = (MemberRespVo) request.getSession().getAttribute(AuthServerConstant.LOGIN_USER);
        if (attribute != null) {

            // 方便同一线程获取数据
            loginUser.set(attribute);
            return true;
        }
        // 没登录就去登录
        request.getSession().setAttribute("msg", "请先登录");
        response.sendRedirect("http://auth.gulimall.com/login.html");
        return false;
    }
}
spring boot 数据源的自动配置
public class DataSourceAutoConfiguration {


	@Configuration
	@Conditional(EmbeddedDatabaseCondition.class)
	@ConditionalOnMissingBean({
      DataSource.class, XADataSource.class })
	@Import(EmbeddedDataSourceConfiguration.class)
	protected static class EmbeddedDatabaseConfiguration {


	}

  // 这里import DataSourceConfiguration.Hikari.class  到IOC容器中
	@Configuration
	@Conditional(PooledDataSourceCondition.class)
	@ConditionalOnMissingBean({
      DataSource.class, XADataSource.class })
	@Import({
      DataSourceConfiguration.Hikari.class, DataSourceConfiguration.Tomcat.class,
			DataSourceConfiguration.Dbcp2.class, DataSourceConfiguration.Generic.class,
			DataSourceJmxConfiguration.class })
	protected static class PooledDataSourceConfiguration {


	}
}

abstract class DataSourceConfiguration {


	@SuppressWarnings("unchecked")
	protected static <T> T createDataSource(DataSourceProperties properties, Class<? extends DataSource> type) 		{

		return (T) properties.initializeDataSourceBuilder().type(type).build();
	}

  @Configuration
	@ConditionalOnClass(HikariDataSource.class)
	@ConditionalOnMissingBean(DataSource.class)
	@ConditionalOnProperty(name = "spring.datasource.type", havingValue = "com.zaxxer.hikari.HikariDataSource",
			matchIfMissing = true)
	static class Hikari {


    // 没有DataSource 才会注入进来,想调用createDataSource() 创建出数据源,然后再添加一下配置。
		@Bean
		@ConfigurationProperties(prefix = "spring.datasource.hikari")
		public HikariDataSource dataSource(DataSourceProperties properties) {

			HikariDataSource dataSource = createDataSource(properties, HikariDataSource.class);
			if (StringUtils.hasText(properties.getName())) {

				dataSource.setPoolName(properties.getName());
			}
			return dataSource;
		}

	}
}
@ConfigurationProperties(prefix = "alipay")
@Component
@Data
public class AlipayTemplate {


    //在支付宝创建的应用的id
    private   String app_id = "xx";
}
@Controller
public class PayWebController {

    @Autowired
    AlipayTemplate alipayTemplate;
    @Autowired
    OrderService orderService;
    @ResponseBody
    @GetMapping(value = "/payOrder",produces = "text/html")
    public String payOrder(@RequestParam("orderSn") String orderSn) throws AlipayApiException {

        PayVo payVo = orderService.getOrderPay(orderSn);
        // 返回的是一个页面,将此页面直接提交给浏览器就行
        String pay = alipayTemplate.pay(payVo);
        return "ok";
    }
}
boolean match = new AntPathMatcher().match("/member/member/login", request.getRequestURI());
        if (match) {

            return true;
        }
规定:远程调用最好都是使用Post请求,因为只有post有请求体,@RequestBody 能从请求体中取出json数据。
日期格式化
spring.mvc.date-format=yyyy-MM-dd HH:mm:ss
Jdk 8 新的时间日期api
/*
     jdk 8 新的api 能很方便的增加时间
    LocalDate 只有年月日
    LocalTime 只有时分秒
    LocalDateTime 有年月日,时分秒
 */
@Test
public void contextLoads() {
    LocalDate now = LocalDate.now();
    LocalDate plus = now.plusDays(2);
    System.out.println(now);
    System.out.println(plus);

    LocalTime min = LocalTime.MIN;
    LocalTime max = LocalTime.MAX;
    System.out.println(min);
    System.out.println(max);

    LocalDateTime start = LocalDateTime.of(now, min);
    LocalDateTime end = LocalDateTime.of(plus, max);
    System.out.println(start);
    System.out.println(end);

    String startFormat = start.format(DateTimeFormatter.ofPattern("yyyy-MM-dd HH:mm:ss"));
    String endFormat = end.format(DateTimeFormatter.ofPattern("yyyy-MM-dd HH:mm:ss"));
    System.out.println(startFormat);
    System.out.println(endFormat);

}


private String startTime() {
        return LocalDateTime.of(LocalDate.now(), LocalTime.MIN).format(DateTimeFormatter.ofPattern("yyyy-MM-dd HH:mm:ss"));
    }

    private String endTime() {
        return LocalDateTime.of(LocalDate.now().plusDays(2), LocalTime.MAX).format(DateTimeFormatter.ofPattern("yyyy-MM-dd HH:mm:ss"));
    }
