【IOS】基于VGG16模型的机器学习CoreML demo体验
IOS下的机器学习
人工智能愈发火热,可以看到各大公司给AI工程师的薪资也是越涨越烈,而机器学习是人工智能的核心,也是实现人工智能的根本途径。机器学习专门研究计算机怎样模拟或实现人类的学习行为,以获取新的知识或技能,重新组织已有的知识结构使之不断改善自身的性能。
而苹果在 iOS 5 里引入了 NSLinguisticTagger 来分析自然语言。iOS 8 出了 Metal,提供了对设备 GPU 的底层访问。
去年,苹果在 Accelerate 框架添加了 Basic Neural Network Subroutines (BNNS),使开发者可以构建用于推理(不是训练)的神经网络。
在2017年,苹果带来了 Core ML 和 Vision。
- Core ML 让我们更容易在 App 中使用训练过的模型。
- Vision 让我们轻松访问苹果的模型,用于面部检测、面部特征点、文字、矩形、条形码和物体。
当然,模型的训练过程是根本不可能在单机上完成的,这需要通过特定算法,使用大量数据来进行模型生成的这个过程,是非常地消耗计算和存储资源的,特别一些大型的神经网络,普通的IOS设备或许根本跑都跑不起来,更多的情况我们都是放在后端的HBase、Cassandra这种数据库中,然后再通过诸如Caffe, Scikit-Learn, Tensorflow这些来进行相应的训练,最后生成我们想要的模型。拿到模型后,对于数据的判断,移动端的设备似乎就能够做一些力所能及之事了。
Core ML 便是这样的存在,开发者不需要理会模型的生成过程,而只需要关注输入和输出的参数,便能够轻松的将机器学习集合到自己的应用中并高效运行起来,
我们分几个步骤来完成这个demo
- 完成壳app,能够照相或者从相册选取照片
- 下载机器学习模型
- 将Core ML模型整合到项目中
根据不同的卷积神经网络模型,苹果提供了几个已经训练好的CoreML模型我们可以直接使用。
-
Places205-GoogleNet
-
ResNet50
-
Inception v3
-
VGG16
关于不同模型的详细内容可以阅读苹果官网的文档。
在这里我选择了VGG16,其简洁性和实用性是目前较流行的卷积神经网络模型。
完成demo
壳APP我们要完成照相或者从相册选取照片的功能,肯定想到使用UIImagePickerController,这个很简单。不过要注意的是要在info.plist中添加Privacy - Photo Library Usage Description 、Privacy - Photo Library Additions Usage Description和 Privacy - Camera Usage Description。否则程序会崩溃。
 UIBarButtonItem *photoBtniItem = [[UIBarButtonItem alloc]initWithBarButtonSystemItem:UIBarButtonSystemItemCamera target:self action:@selector(alertcController)];
    self.navigationItem.leftBarButtonItem = photoBtniItem;
    self.imagePickController = [[UIImagePickerController alloc]init];
    self.imagePickController.delegate = (id)self;
    self.imagePickController.modalTransitionStyle = UIModalTransitionStyleFlipHorizontal;
    self.imagePickController.allowsEditing = YES;
通过AlertController来让用户选择照相还是从相册选择照片。
-(void)alertcController{
    UIAlertController *alert = [UIAlertController alertControllerWithTitle:@"提示" message:nil preferredStyle:UIAlertControllerStyleActionSheet];
    UIAlertAction *cancel = [UIAlertAction actionWithTitle:@"取消" style:UIAlertActionStyleCancel handler:^(UIAlertAction * _Nonnull action) {

    }];
    UIAlertAction *takePhoto = [UIAlertAction actionWithTitle:@"打开相机" style:UIAlertActionStyleDefault handler:^(UIAlertAction * _Nonnull action) {
        self.imagePickController.sourceType = UIImagePickerControllerSourceTypeCamera;
        self.imagePickController.mediaTypes = @[(NSString *)kUTTypeImage];
        self.imagePickController.cameraCaptureMode = UIImagePickerControllerCameraCaptureModePhoto;
        [self.navigationController presentViewController:self.imagePickController
                                                animated:YES
                                              completion:nil];
    }];
    UIAlertAction *cameraLibrary = [UIAlertAction actionWithTitle:@"打开相册" style:UIAlertActionStyleDefault handler:^(UIAlertAction * _Nonnull action) {
        self.imagePickController.sourceType = UIImagePickerControllerSourceTypePhotoLibrary;
        self.imagePickController.mediaTypes = @[(NSString *)kUTTypeImage];
        [self.navigationController presentViewController:self.imagePickController
                                                animated:YES
                                              completion:nil];
    }];
    [alert addAction:cancel];
    [alert addAction:takePhoto];
    [alert addAction:cameraLibrary];
    [self presentViewController:alert animated:YES completion:nil];

}
通过MainStroyborard给界面添加上一个ImageView和一个label,ImageView展示输入图片,label展示模型识别后的输出结果。
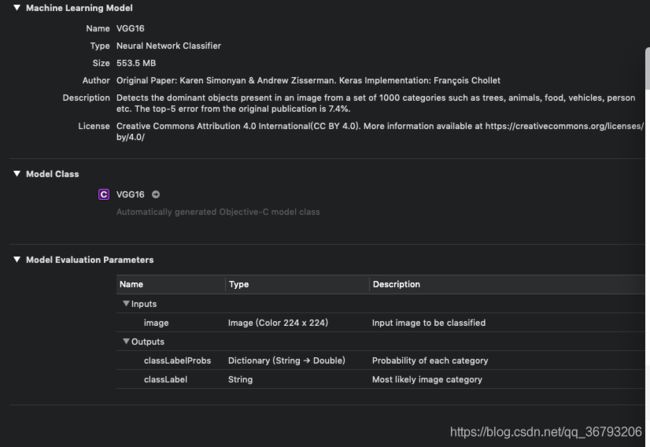
接下来,我们只需要在苹果官网下载好VGG16模型,拖进项目文件后便可以直接使用。
VGG16模型的详细介绍,要注意的是,VGG16模型要求输入参数是224*224大小的图片,因此我们必须对选择好的照片进行一定的修改。CVPixelBufferRef这种图像格式的处理与UIImage, CGImageRef的处理需小心,容易造成内存泄漏。
- (CVPixelBufferRef) pixelBufferFromCGImage: (CGImageRef) image {
    NSDictionary *options = @{
                              (NSString*)kCVPixelBufferCGImageCompatibilityKey : @YES,
                              (NSString*)kCVPixelBufferCGBitmapContextCompatibilityKey : @YES,
                              };
    CVPixelBufferRef pxbuffer = NULL;
    CVReturn status = CVPixelBufferCreate(kCFAllocatorDefault, CGImageGetWidth(image),
                                          CGImageGetHeight(image), kCVPixelFormatType_32ARGB, (__bridge CFDictionaryRef) options,
                                          &pxbuffer);
    if (status!=kCVReturnSuccess) {
        NSLog(@"Operation failed");
    }
    NSParameterAssert(status == kCVReturnSuccess && pxbuffer != NULL);
    CVPixelBufferLockBaseAddress(pxbuffer, 0);
    void *pxdata = CVPixelBufferGetBaseAddress(pxbuffer);
    CGColorSpaceRef rgbColorSpace = CGColorSpaceCreateDeviceRGB();
    CGContextRef context = CGBitmapContextCreate(pxdata, CGImageGetWidth(image),
                                                 CGImageGetHeight(image), 8, 4*CGImageGetWidth(image), rgbColorSpace,
                                                 kCGImageAlphaNoneSkipFirst);
    NSParameterAssert(context);
    CGContextConcatCTM(context, CGAffineTransformMakeRotation(0));
    CGAffineTransform flipVertical = CGAffineTransformMake( 1, 0, 0, -1, 0, CGImageGetHeight(image) );
    CGContextConcatCTM(context, flipVertical);
    CGAffineTransform flipHorizontal = CGAffineTransformMake( -1.0, 0.0, 0.0, 1.0, CGImageGetWidth(image), 0.0 );
    CGContextConcatCTM(context, flipHorizontal);
    CGContextDrawImage(context, CGRectMake(0, 0, CGImageGetWidth(image),
                                           CGImageGetHeight(image)), image);
    CGColorSpaceRelease(rgbColorSpace);
    CGContextRelease(context);
    CVPixelBufferUnlockBaseAddress(pxbuffer, 0);
    return pxbuffer;
}
- (UIImage*)image:(UIImage *)image scaleToSize:(CGSize)size{

    UIGraphicsBeginImageContext(size);
    [image drawInRect:CGRectMake(0, 0, size.width, size.height)];
    UIImage* scaledImage = UIGraphicsGetImageFromCurrentImageContext();
    UIGraphicsEndImageContext();
    return scaledImage;
}
最后就像使用函数一样,便可以轻松的使用VGG16模型
- (void)imagePickerController:(UIImagePickerController *)picker
didFinishPickingMediaWithInfo:(NSDictionary *)info {
    NSString *mediaType=[info objectForKey:UIImagePickerControllerMediaType];
    if ([mediaType isEqualToString:(NSString *)kUTTypeImage]){
        CGSize thesize = CGSizeMake(224, 224);
        UIImage *theimage = [self image:info[UIImagePickerControllerEditedImage] scaleToSize:thesize];
        self.imageView.image = theimage;

        CVPixelBufferRef imageRef = [self pixelBufferFromCGImage:theimage.CGImage];
        VGG16 *VGGModel = [[VGG16 alloc] init];
        NSError *error = nil;
        VGG16Output *output = [VGGModel predictionFromImage:imageRef
                                                              error:&error];
        if (error == nil) {
            NSLog(@"%@",output.classLabel);
            self.photoLable.text = output.classLabel;
        } else {
            NSLog(@"Error is %@", error.localizedDescription);
        }
    }

    UIImagePickerController *imagePickerVC = picker;
    [imagePickerVC dismissViewControllerAnimated:YES completion:^{

