Android Studio 1.5 RC1搭建NDK开发环境

Android Studio已经更新到1.5版本了。我升级了一下。最近项目开发需要配置NDK,于是花了点时间,百度啊,谷歌啊,总是不成功,过程十分心酸。所以小小地总结一下配置过程,方便以后查阅,

  • 新建一个Empty Activity的Android项目。

Android Studio 1.5 RC1搭建NDK开发环境_第1张图片

Android Studio 1.5 RC1搭建NDK开发环境_第2张图片

  • 切换目录结构Andorid——>Project。

Android Studio 1.5 RC1搭建NDK开发环境_第3张图片

  • 需要修改的文件我已经圈出来了。一个一个来。
    注:下面第4个截图截图有误,moduleName "LibHelloJni"中,L要小写。就像这样

ndk {
    moduleName "libHelloJni"
}
注意:一下这个定义添加CPP编译,添加STL应用,否则只可以编译C语言,具体看后面的文章;
ndk {
    moduleName "libHelloJni"

   ldLibs "log"     //这句话是我从别的地方找到

    //moduleName "SeePlusPlus" // Name of C++ module (i.e. libSeePlusPlus)
    cFlags "-std=c++11 -fexceptions" // Add provisions to allow C++11 functionality
    stl "gnustl_shared" // Which STL library to use: gnustl or stlport  或者 “stlport_static”这个参数是参考NDK例子的,前面的是网上文章直接copy的;
}
 或者


       ndk {
             moduleName "mymodule"
             ldLibs "log"
             stl "gnustl_static"
             cFlags "-std=c++11 -fexceptions"
         }
这些内容最后会生成android.mk文件;

如果命名为LibHelloJni,则会生成libLibHelloJni.so函数库。
而写成HelloJni,效果和libHelloJni是一样的,都是生成libHelloJni.so函数库。
调用的时候,就是System.loadLibrary()函数的参数,需要省去lib前缀,即System.loadLibrary("HelloJni")。

Android Studio 1.5 RC1搭建NDK开发环境_第4张图片

Android Studio 1.5 RC1搭建NDK开发环境_第5张图片

Android Studio 1.5 RC1搭建NDK开发环境_第6张图片

上述图片,在Androidstudio1.5中直接写为:

sourceSets { main {
    jniLibs.srcDirs = []
    jni.srcDirs = ['src/main/jni', 'src/main/jni/']    }
}


有的资料中,只是设置了jniLibs参数,而且设置为:
jniLibs.srcDirs = ['src/main/libs']

  • 配置完3个文件之后,需要新建一个jni Folder,方法如图。

Android Studio 1.5 RC1搭建NDK开发环境_第7张图片

  • jni文件夹里面,需要有empty.c和empty.h这两个,防止报错。新建方法:在jni folder上右键,新建即可。不需要改动自动生成的内容。

  • 好了,该敲代码了^_^


注意:在调用函数前,先
static {
    System.loadLibrary("HelloJni");
}


from:
http://segmentfault.com/a/1190000003999352
http://segmentfault.com/a/1190000003999352Android


上述文章,按照仔细配置后,就可以用visualstudio1.5 编译NDK了;


上述文章完成后,你可以用NDK编译C文件的函数,但是无法编译C++函数;
也就是说无法#include, 无法用Cpp文件虽然可以添加C++类,但是无法用C++语法;

以下文章内容很多,很充实,慢慢看;

看这篇文章:
from:http://stackoverflow.com/questions/16667903/android-studio-gradle-and-ndk/

Android studio, gradle and NDK

up vote 107 down vote favorite
69

I am very new to this whole gradle and Android Studio support. I have managed to convert my android project to gradle using the export option.

But I am looking for some documentation or start point how to ingrate the ndk build into the gradle build process.

If possible I also need some sort of "after" stage that copies the build binaries to the asset directory.

share improve this question
 
 
I have posted my answer in the below mentioned link stackoverflow.com/questions/20900814/… –  Ahmad Ali Nasir  Jan 6 '14 at 11:23
9  
New readers: Be aware this question was initially asked during the Android Studio beta period; the answer has changed over time. Pay attention to the Gradle version mentioned in the answers, as well as when the answers were actually posted. –  Dirty Beach  Jan 20 '15 at 21:00
 
If something really changes I will edit the question to relect the status –  plaisthos  Jun 2 '15 at 10:39 
 
Android Studio 1.3 at canary channel fully supports NDK. Reference:tools.android.com/download/studio/canary/latest –  VicJordan  Jun 5 '15 at 13:07
 
June 18th, 2015: Android Studio 1.3 Beta is now available in the beta channel! Sorry, this build does not yet contain the C/C++ support; source: tools.android.com/recent/androidstudio13betaavailable –  fastr.de  Jun 20 '15 at 17:09 

19 Answers

active oldest votes
up vote 70 down vote accepted

We have released a first version of the integration as a preview in 1.3: http://tools.android.com/tech-docs/android-ndk-preview

The integration will stay a preview even after 1.3 becomes final. No current ETA as to when it'll be final (as of 2015/07/10).

More information here: http://tools.android.com/tech-docs/android-ndk-preview

share improve this answer
 
2  
Would be great if I could use NDK and command completion with debugging under Android Studio (and Gradle support) –  powder366  Dec 19 '13 at 13:23
1  
@GREnvoy - How do we configure the right NDK builder in Android studio ? Can you plz give me the steps ? :) –  Shravan  Dec 13 '14 at 16:58
7  
@DirtyBeach Why is it outdated? There still isn't an integration of the NDK in Studio. We are working on it but no ETA at this time. –  Xavier Ducrohet  Jan 27 '15 at 0:06
2  
My action was based upon how I was defining "integration". I understood it to mean "a way to use the NDK with gradle" which now does exist, albeit none of them are fantastic solutions. However, based on your comment, it seems your team has something else in mind for what a true integration could be. I retract my previous statement. –  Dirty Beach  Jan 27 '15 at 19:43
2  
NDK integration was announced during Google IO 2015. It's available in Android Studio 1.3 (preview can be downloaded soon. I'll post a link when it's available). –  Cypress Frankenfeld  May 28 '15 at 18:13
up vote 32 down vote

UPDATE: The Android Studio with NDK support is out now: http://tools.android.com/tech-docs/android-ndk-preview

For building with a script the gradle solution below should work:

I am using my build script and added to my file (Seems to work for 0.8+): This seems to be equivalent to the solution below (but looks nicer in the gradle file):

 android {
    sourceSets {
        main {
            jniLibs.srcDirs = ['native-libs']
            jni.srcDirs = [] //disable automatic ndk-build
        }
    }
 }

The build unfortunately does not fail if the directory is not present or contains no .so files.

share improve this answer
 
4  
This does not work anymore with the new Android Studio version, workaround? –  powder366  Dec 19 '13 at 10:47
 
@powder366 See my answer. –  Leandros  Dec 24 '13 at 1:42
2  
A bit of Groovy magic: tasks.withType(com.android.build.gradle.tasks.PackageApplication) { it.jniFolders = [file("libs")] as Set }. Thank you guys for help! –  trnl  Dec 30 '13 at 23:40 
 
What is the procedure for android Studio 0.8.9 –  Pandiri Deepak  Sep 30 '14 at 7:58
1  
@plaisthos Thanks a lot for pointing out the right direction! The second line in the gradle script jni.srcDirs = [] //disable automatic ndk-build is very important since it will prevent Android Studio from rebuilding C/C++ source code. I have been trying to figure this out for two days until I saw your post and this solved my problem. I really think NDK build is better separately built by Android.mk command line makefile only, not by gradle script since C/C++ has been built by Makefile for more than 40 years! –  tonga  Jan 14 '15 at 16:03 
up vote 29 down vote

In Google IO 2015, Google has announced full NDK integration in Android Studio 1.3.

As of August 18 2015, full debugging integration is in preview mode, and requires you to use experimental gradle configuration. http://tools.android.com/tech-docs/android-ndk-preview

Old answer: Gradle automatically calls ndk-build if you have a jni directory in your project sources.

This is working on Android studio 0.5.9 (canary build).

  1. Download the NDK
  2. Either add ANDROID_NDK_HOME to your environment variables or add ndk.dir=/path/to/ndk to your local.properties in your Android Studio project. This allows Android studio to run the ndk automatically.
  3. Download the latest gradle sample projects to see an example of an ndk project. (They're at the bottom of the page). A good sample project is ndkJniLib.
  4. Copy the gradle.build from the NDK sample projects. It'll look something like this. This gradle.build creates a different apk for each architecture. You must select which architecture you want using the build variants pane. 

    apply plugin: 'android'
    
    dependencies {
        compile project(':lib')
    }
    
    android {
        compileSdkVersion 19
        buildToolsVersion "19.0.2"
    
        // This actual the app version code. Giving ourselves 100,000 values [0, 99999]
        defaultConfig.versionCode = 123
    
        flavorDimensions "api", "abi"
    
        productFlavors {
            gingerbread {
                flavorDimension "api"
                minSdkVersion 10
                versionCode = 1
            }
            icecreamSandwich {
                flavorDimension "api"
                minSdkVersion 14
                versionCode = 2
            }
            x86 {
                flavorDimension "abi"
                ndk {
                    abiFilter "x86"
                }
                // this is the flavor part of the version code.
                // It must be higher than the arm one for devices supporting
                // both, as x86 is preferred.
                versionCode = 3
            }
            arm {
                flavorDimension "abi"
                ndk {
                    abiFilter "armeabi-v7a"
                }
                versionCode = 2
            }
            mips {
                flavorDimension "abi"
                ndk {
                    abiFilter "mips"
                }
                versionCode = 1
            }
            fat {
                flavorDimension "abi"
                // fat binary, lowest version code to be
                // the last option
                versionCode = 0
            }
        }
    
        // make per-variant version code
        applicationVariants.all { variant ->
            // get the version code of each flavor
            def apiVersion = variant.productFlavors.get(0).versionCode
            def abiVersion = variant.productFlavors.get(1).versionCode
    
            // set the composite code
            variant.mergedFlavor.versionCode = apiVersion * 1000000 + abiVersion * 100000 + defaultConfig.versionCode
        }
    
    }

Note that this will ignore your Android.mk and Application.mk files. As a workaround, you can tell gradle to disable atuomatic ndk-build call, then specify the directory for ndk sources manually.

sourceSets.main {
    jniLibs.srcDir 'src/main/libs' // use the jni .so compiled from the manual ndk-build command
    jni.srcDirs = [] //disable automatic ndk-build call
}

In addition, you'll probably want to call ndk-build in your gradle build script explicitly, because you just disabled the automatic call.

task ndkBuild(type: Exec) {
   commandLine 'ndk-build', '-C', file('src/main/jni').absolutePath
}

tasks.withType(JavaCompile) {
    compileTask -> compileTask.dependsOn ndkBuild
}
share improve this answer
 
 
Yes. But that only works under Unix platforms and also limited if you a more complex than very simple ndk configuration/makefiles. –  plaisthos  Jun 6 '14 at 14:40
 
Yes, it will autogenerate makefiles for the limited things that you can set in the gradle build file, however there is a workaround. I added it to my answer. –  Cypress Frankenfeld  Jun 12 '14 at 13:30
1  
The call to ndk-build will only work at the command-line not from within Android Studio. –  Cameron Lowell Palmer  Nov 1 '14 at 15:47
 
Although this is not the most recent answer, it seems likely to be the most accurate. Pay special attention to step 3: "Download the latest gradle sample projects". –  Dirty Beach  Jan 20 '15 at 21:25
4  
I use this hack instead of disabling src dir so I can edit c/c++ files within the ide tasks.all { task -> if (task.name.contains('Ndk')) task.enabled = false } –  sherpya  Mar 12 '15 at 1:14 
up vote 28 down vote

With the update of Android Studio to 1.0, the NDK toolchain support improved immensely (note: please read my updates at the bottom of this post to see usage with the new experimental Gradle plugin and Android Studio 1.5).

Android Studio and the NDK are integrated well enough so that you just need to create an ndk{} block in your module's build.gradle, and set your source files into the (module)/src/main/jni directory - and you're done!

No more ndk-build from the command line.

I've written all about it in my blog post here: http://www.sureshjoshi.com/mobile/android-ndk-in-android-studio-with-swig/

The salient points are:

There are two things you need to know here. By default, if you have external libs that you want loaded into the Android application, they are looked for in the (module)/src/main/jniLibs by default. You can change this by using setting sourceSets.main.jniLibs.srcDirs in your module’s build.gradle. You’ll need a subdirectory with libraries for each architecture you’re targeting (e.g. x86, arm, mips, arm64-v8a, etc…)

The code you want to be compiled by default by the NDK toolchain will be located in (module)/src/main/jni and similarly to above, you can change it by setting sourceSets.main.jni.srcDirs in your module’s build.gradle

and put this into your module's build.gradle:

ndk {
  moduleName "SeePlusPlus" // Name of C++ module (i.e. libSeePlusPlus)
  cFlags "-std=c++11 -fexceptions" // Add provisions to allow C++11 functionality
  stl "gnustl_shared" // Which STL library to use: gnustl or stlport
}

That's the process of compiling your C++ code, from there you need to load it, and create wrappers - but judging from your question, you already know how to do all that, so I won't re-hash.

Also, I've placed a Github repo of this example here: http://github.com/sureshjoshi/android-ndk-swig-example

UPDATE: June 14, 2015

When Android Studio 1.3 comes out, there should be better support for C++ through the JetBrains CLion plugin. I'm currently under the assumption that this will allow Java and C++ development from within Android Studio; however I think we'll still need to use the Gradle NDK section as I've stated above. Additionally, I think there will still be the need to write Java<->C++ wrapper files, unless CLion will do those automatically.

UPDATE: January 5, 2016

I have updated my blog and Github repo (in the develop branch) to use Android Studio 1.5 with the latest experimental Gradle plugin (0.6.0-alpha3).

http://www.sureshjoshi.com/mobile/android-ndk-in-android-studio-with-swig/http://github.com/sureshjoshi/android-ndk-swig-example

The Gradle build for the NDK section now looks like this:

android.ndk {
    moduleName = "SeePlusPlus" // Name of C++ module (i.e. libSeePlusPlus)
    cppFlags.add("-std=c++11") // Add provisions to allow C++11 functionality
    cppFlags.add("-fexceptions")
    stl = "gnustl_shared" // Which STL library to use: gnustl or stlport
}

Also, quite awesomely, Android Studio has auto-complete for C++-Java generated wrappers using the 'native' keyword:

However, it's not completely rosy... If you're using SWIG to wrap a library to auto-generate code, and then try to use the native keyword auto-generation, it will put the code in the wrong place in your Swig _wrap.cxx file... So you need to move it into the "extern C" block:

share improve this answer
 
 
put the *.so in (module)/src/main/jniLibs –  fawkes  Jan 16 '15 at 14:25
 
why is NDEBUG always set when using Android Studio, even on debug builds –  pt123  Jan 17 at 23:04
up vote 19 down vote

I found "gradle 1.11 com.android.tools.build:gradle:0.9.+" supports pre-build ndk now, you can just put the *.so in the dir src/main/jniLibs. when building gradle will package the ndk to the right place.

here is my project

Project:
|--src
|--|--main
|--|--|--java
|--|--|--jniLibs
|--|--|--|--armeabi
|--|--|--|--|--.so files
|--libs
|--|--other.jar
share improve this answer
 
 
0.8 already does. See the third edit of my post –  plaisthos  May 13 '14 at 1:54
up vote 18 down vote

As Xavier said, you can put your prebuilts in /src/main/jniLibs/ if you are using gradle 0.7.2+

taken from: https://groups.google.com/d/msg/adt-dev/nQobKd2Gl_8/ctDp9viWaxoJ

share improve this answer
 
 
How can we see the sample mentiuoned in 0.7.2 ndkJniLib ? –  Ryan Heitner  Jan 2 '14 at 18:27
 
Useful for using libraries such as SqlCipher –  personne3000  Aug 24 '14 at 12:23
up vote 14 down vote

As of now (Android Studio v0.8.6) it's quite simple. Here are the steps to create a "Hello world" type app:

  1. Download the Android NDK and put the root folder somewhere sane -- in the same location as the SDK folder, perhaps.

  2. Add the following to your local.properties file: ndk.dir=

  3. Add the following to your build.gradle file inside of the defaultConfig closure, right after the versionName line: ndk { moduleName="hello-world" }

  4. In your app module's main directory, create a new folder called jni.

  5. In that folder, create a file called hello-world.c, which you'll see below.

  6. See the example Activity code below for an example of how to call a method (or is it a function?) in hello-world.c.


hello-world.c

#include 
#include 

jstring
Java_me_mattlogan_ndktest_MainActivity_stringFromJNI(JNIEnv* env, jobject thiz)
{
    return (*env)->NewStringUTF(env, "Hello world!");
}

MainActivity.java

public class MainActivity extends Activity {

    static {
        System.loadLibrary("hello-world");
    }

    public native String stringFromJNI();

    @Override
    protected void onCreate(Bundle savedInstanceState) {
        super.onCreate(savedInstanceState);
        setContentView(R.layout.activity_main);

        String testString = stringFromJNI();

        TextView mainText = (TextView) findViewById(R.id.main_text);
        mainText.setText(testString);
    }
}

build.gradle

apply plugin: 'com.android.application'

android {
    compileSdkVersion 20
    buildToolsVersion "20.0.0"

    defaultConfig {
        applicationId "me.mattlogan.ndktest"
        minSdkVersion 15
        targetSdkVersion 20
        versionCode 1
        versionName "1.0"

        ndk {
            moduleName "hello-world"
        }
    }
    buildTypes {
        release {
            runProguard false
            proguardFiles getDefaultProguardFile('proguard-android.txt'), 'proguard-rules.pro'
        }
    }
}

dependencies {
    compile fileTree(dir: 'libs', include: ['*.jar'])
}

Find the full source code of a very similar app here (minus the NDK).

share improve this answer
 
 
I'm doing exactly as instructed in my current project, but the NDK stuff still isn't getting built. Any ideas? It seems like it's building everything else, but just skipping the jni stuff. –  justin.harrison  Aug 17 '14 at 0:44
 
Do these instruction work with Android Studio 1.0? –  aaa90210  Dec 23 '14 at 5:04
1  
@aaa90210 this is working on AS 1.0.2 –  Nannuo Lei  Dec 29 '14 at 7:30
 
@NannuoLei thanks, I tried but I am getting a problem where the .so are not being generated. Everything else seems to work, but when I run the apkg in the emulator, it complains it cannot load the shared object. –  aaa90210  Jan 5 '15 at 6:01
1  
it worked with me. PS: anyone seeing this answer, don't forget to changeJava_me_mattlogan_ndktest_MainActivity_stringFromJNI to your own :) –  AbdulMomen عبدالمؤمن  Jun 11 '15 at 16:39 
up vote 7 down vote

An elegant workaround is shown in https://groups.google.com/d/msg/adt-dev/nQobKd2Gl_8/Z5yWAvCh4h4J.

Basically you create a jar which contains "lib/armeabi/yourlib.so" and then include the jar in the build.

share improve this answer
 
 
Yeah. That only works well if you don't change your code native often. And you will have to include binary jar files in the repository. Otherwise you end up with a build script that creates a jar on fly. –  plaisthos  Aug 12 '13 at 19:12 
1  
I've modified Android's Hello-JNI example with a simple bash script that wraps ndk-build, generates.jars for each .so and places them in gradle's build path to ease this pain. Check it out. –  dbro  Oct 17 '13 at 19:18
up vote 7 down vote

If you're on unix the latest version (0.8) adds ndk-build. Here's how to add it:

android.ndk {
    moduleName "libraw"
}

It expects to find the JNI under 'src/main/jni', otherwise you can define it with:

sourceSets.main {
    jni.srcDirs = 'path'
}

As of 28 JAN 2014 with version 0.8 the build is broken on windows, you have to disable the build with:

sourceSets.main {
    jni.srcDirs = [] //disable automatic ndk-build call (currently broken for windows)
}
share improve this answer
 
1  
Is there any documentation to that feature? I could not find any. At the moment that seems to completly ignore my Android.mk/Application.mk. –  plaisthos  Jan 28 '14 at 16:30
 
I haven't found any. It may have snuck into the build half-baked. I'm on windows so I can only confirm that it fails on trying to call the unix ndk-build script. There'd be no other reason to call that then to integrate native compile in gradle. Are you in unix? –  Anthony  Jan 28 '14 at 16:38
 
See stackoverflow.com/questions/20674650/… –  Alex Cohn  Jan 28 '14 at 19:46
 
it actually expects to find prebuilt *.so files in jniLibs.srcDirs –  Alpine  Feb 8 '14 at 5:42
 
I'd disagree based on the fact that it crashes calling ndk-build which absolutely isn't necessary if it requires built libraries. I cannot confirm since I don't have the time to vm Linux right now. –  Anthony  Feb 8 '14 at 9:55
up vote 3 down vote

A good answer automating the packaging of readily compiled .so-files is given in another (closed) thread. To get that working, I had to change the line:

from fileTree(dir: 'libs', include: '**/*.so')

into:

from fileTree(dir: 'src/main/libs', include: '**/*.so') 

Without this change the .so files were not found, and the task for packaging them would therefore never run.

share improve this answer
 
 
Update: please note that in the newer Android Studios (at least in 1.5) the native code is much better incorporated, and it is not necessary to do this separate task for packaging your code. –  HYS  Nov 20 '15 at 14:47
up vote 3 down vote

The answer from @plaisthos broke in the latest gradle version, but there is still a way to do it. Create anative-libs directory in the root of your project directory and copy all y our libs into this directory.

Add the following lines to your build.gradle. Build and be happy.

task copyNativeLibs(type: Copy) {
    from(new File(project(':').getProjectDir(), 'native-libs')) { include '**/*.so' }
    into new File(buildDir, 'native-libs')
}

tasks.withType(Compile) { compileTask -> compileTask.dependsOn copyNativeLibs }

clean.dependsOn 'cleanCopyNativeLibs'
share improve this answer
 
up vote 3 down vote

This is the code i use to build using android-ndk from gradle. For this add ndk directory path in gradle.properties ie . add ndkdir=/home/user/android-ndk-r9d and put all jni files in a folder native in src/main/ as you can see from code posted below. It will create jar with native libs which you can use normally as in System.loadLibrary("libraryname");

dependencies {
    compile fileTree(dir: "$buildDir/native-libs", include: '*.jar')
}

task ndkBuild(type: Exec) {
    commandLine "$ndkdir/ndk-build", "--directory", "$projectDir/src/main/native", '-j', Runtime.runtime.availableProcessors(),
            "APP_PLATFORM=android-8",
            "APP_BUILD_SCRIPT=$projectDir/src/main/native/Android.mk",
            "NDK_OUT=$buildDir/native/obj",
            "NDK_APP_DST_DIR=$buildDir/native/libs/\$(TARGET_ARCH_ABI)"
}

task nativeLibsToJar(type: Jar, description: 'create a jar with native libs') {
    destinationDir file("$buildDir/native-libs")
    baseName 'native-libs'
    from fileTree(dir: "$buildDir/native/libs", include: '**/*.so')
    into 'lib/'
}

tasks.withType(JavaCompile) {
    compileTask -> compileTask.dependsOn nativeLibsToJar
}

nativeLibsToJar.dependsOn 'ndkBuild'
share improve this answer
 
up vote 3 down vote

I have used the following code to compile native dropbox libraries, I am using Android Studio v1.1.

task nativeLibsToJar(type: Zip) {
    destinationDir file("$buildDir/native-libs")
    baseName 'native-libs'
    extension 'jar'
    from fileTree(dir: 'src/main/libs', include: '**/*.so')
    into 'lib/'
}

tasks.withType(JavaCompile) {
    compileTask -> compileTask.dependsOn(nativeLibsToJar)
}
share improve this answer
 
up vote 1 down vote

To expand on what Naxos said (Thanks Naxos for sending me in the right direction!), I learned quite a bit from the recently released NDK examples and posted an answer in a similar question here.

How to configure NDK with Android Gradle plugin 0.7

This post has full details on linking prebuilt native libraries into your app for the various architectures as well as information on how to add NDK support directly to the build.gradle script. For the most part, you shouldn't need to do the work around zip and copy anymore.

share improve this answer
 
up vote 1 down vote

Here are the steps that I used to get the NDK working in my Android Studio project. I used this tutorial to help me out https://software.intel.com/en-us/videos/using-the-ndk-with-android-studio

In order to use NDK you must add a NDK line to local.properties. So under your sdk.dir add

ndk.dir=C\:\\MyPathToMyNDK\ndk

In my apps build.gradle I have the following code

        ndk {
            moduleName "myLib"
            ldLibs "log"
            stl "gnustl_shared"
            cFlags "-std=c++11 -frtti -fexceptions -pthread"
        }

moduleName is the name you want to give your native code. I believe this is what the shared library will be called. ldLibs allows me to log to LogCat, stl is the stl that you want to import. There are lots of options, same as the Eclipse NDK. (http://www.kandroid.org/ndk/docs/CPLUSPLUS-SUPPORT.html)

cFlags are still a certain amount of black magic for me. I have not found a good source for all the options and what they give me. Search around StackOverflow for anything you need, that is where I found it. I do know that the c++11 allows me to use the new c++ 11 standard.

Here is an example of how I log to LogCat from the native code

__android_log_print(ANDROID_LOG_DEBUG, "TestApp", "Adding - String %d has a field name of %s and a value of %s", i, lKeyUTF8.c_str(), lValueUTF8.c_str());
share improve this answer
 
up vote 0 down vote

Just add this lines to app build.gradle

dependencies {
    ...
    compile fileTree(dir: "$buildDir/native-libs", include: 'native-libs.jar')
}

task nativeLibsToJar(type: Zip, description: 'create a jar archive of the native libs') {
    destinationDir file("$buildDir/native-libs")
    baseName 'native-libs'
    extension 'jar'
    from fileTree(dir: 'libs', include: '**/*.so')
    into 'lib/armeabi/'
}

tasks.withType(JavaCompile) {
    compileTask -> compileTask.dependsOn(nativeLibsToJar)
}
share improve this answer
 
 
I think the jniLibs.srcDirs approach is cleaner than this since you can use abiFilter/flavours but your approach should also work. –  plaisthos  Jul 31 '14 at 19:37
 
It works well.) –  Sufferer  Jul 31 '14 at 19:57
up vote 0 down vote

configure project in android studio from eclipse: you have to import eclipse ndk project to android studio without exporting to gradle and it works , also you need to add path of ndk in local.properties ,if shows error then add

sourceSets.main {
        jniLibs.srcDir 'src/main/libs' 
        jni.srcDirs = [] //disable automatic ndk-build callenter code here
    }

in build.gradle file then create jni folder and file using terminal and run it will work

share improve this answer
 
1  
See see my own answer. That is the workaround I am currently using but it is not really a solution. –  plaisthos  Nov 3 '14 at 12:50
up vote 0 down vote

now.I can load the so success!

1.add the .so file to this path

Project:

|--src |--|--main |--|--|--java |--|--|--jniLibs |--|--|--|--armeabi |--|--|--|--|--.so files

2.add this code to gradle.build

android {
splits {
    abi {
        enable true
        reset()
        include 'x86', 'x86_64', 'arm64-v8a', 'armeabi-v7a', 'armeabi'
        universalApk false
    }
}

}

3.System.loadLibrary("yousoname");

  1. goodluck for you,it is ok with gradle 1.2.3
share improve this answer
 
up vote 0 down vote

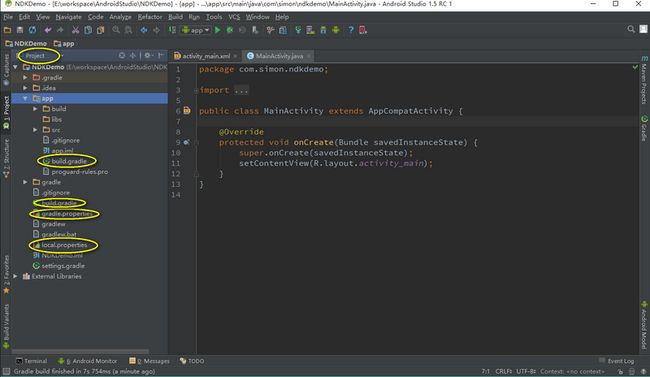
Now that Android Studio is in the stable channel, it is pretty straightforward to get the android-ndk samples running. These samples use the ndk experimental plugin and are newer than the ones linked to from the Android NDK online documentation. Once you know they work you can study the build.gradle, local.properties and gradle-wrapper.properties files and modify your project accordingly. Following are the steps to get them working.

  1. Go to settings, Appearance & Behavior, System Settings, Android SDK, selected the SDK Tools tab, and check Android NDK version 1.0.0 at the bottom of the list. This will download the NDK.

  2. Point to the location of the newly downloaded NDK. Note that it will be placed in the sdk/ndk-bundle directory. Do this by selecting File, Project Structure, SDK Location (on left), and supplying a path under Android NDK location. This will add an ndk entry to local.properties similar to this:

    Mac/Linux: ndk.dir=/Android/sdk/ndk-bundle
    Windows: ndk.dir=C:\Android\sdk\ndk-bundle

I have successfully built and deployed all projects in the repository this way, except gles3gni, native-codec and builder. I'm using the following:

Android Studio 1.3 build AI-141.2117773
android-ndk samples published July 28, 2015 (link above)
SDK Tools 24.3.3
NDK r10e extracted to C:\Android\sdk\ndk-bundle
Gradle 2.5
Gradle plugin 0.2.0
Windows 8.1 64 bit


另一篇文章:文章后面主要讲了实验版本的语法,目前1.5默认还不支持;

http://ph0b.com/new-android-studio-ndk-support/

The new NDK support in Android Studio

Tweet about this on Twitter Share on Google+ Share on Facebook Share on LinkedIn Share on Reddit Email this to someone

During Google I/O 2015, end of May, Google announced a new support for the NDK by Android Studio 1.3, integrating Jetbrains CLion capabilities, and the Android gradle plugin. This support has been released only in July, and while it’s really promising, it’s still in heavy development.

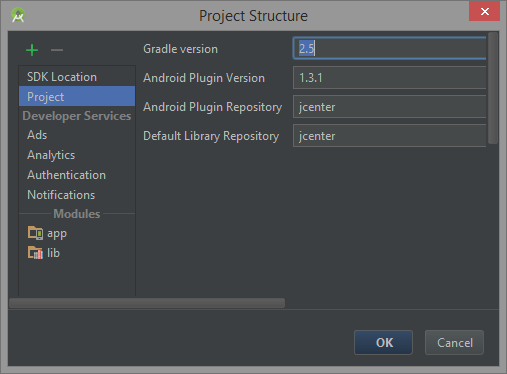
The new NDK support requires the use of Android Studio 1.3 RC1+/2.0+ and the android gradle-experimental plugin. This article is for those who are willing to give it a try. If you’re looking into the NDK support while using the gradle(-stable) plugin, you can check this older (but still up-to-date) article on the NDK and Android Studio.

article last updated on 2016/01/26 (gradle-experimental 0.6.0-alpha7 – Android Studio 2.0 preview 7, support for native dependencies!)

Migrating to the gradle-experimental plugin and the new com.android.model.*

The gradle-experimental 0.6.0-alpha7 requires using gradle-2.10. Start by setting it from your project settings:

Android Studio 1.5 RC1搭建NDK开发环境_第8张图片

Or inside gradle/wrapper/gradle-wrapper.properties:

Then, change the reference to the android gradle plugin to the new gradle-experimental plugin, from ./build.gradle:

The gradle-experimental plugin introduces a change in the DSL. The android pluginscom.android.model.application and com.android.model.library are replacing the former com.android.application and com.android.libraryplugins.

You need to migrate your apps and libs build.gradle files to use these new plugins. Here is an example of the same configuration, with the old DSL (top) and the new (bottom):

To summarize the changes required: all the android declarations are now going under model {}, the various assignments now have to use explicitly ‘=collections must not be overwritten, use .removeAll(),.add().addAll() instead. Variants and other new configurations have to be declared using ‘create()‘. Properties like xxxSdkVersion have changed to xxxSdkVersion.apiLevel.

As it’s experimental, you can expect regular changes around the DSL across versions. For example, minifyEnabled has been changed toisMinifyEnabled, then to minifyEnabled again, and now there is also useProguard; jniDebuggable has been changed to isJniDebuggableand then to ndk.debuggable (and is now set by default for debug builds).

You’ll notice that with both DSLs, there is a configuration block for the NDK. This is the place where you’re supposed to set all the NDK configuration when using gradle, as by default Android.mk andApplication.mk files will be simply ignored.

Enjoying the new C++/NDK support in Android Studio

To activate the C++/NDK support inside Android Studio, you only need to have a NDK module declared inside your application or library build.gradle:

Once it’s done, you can go to your Java sources, create a method prefixed with the native keyword, and press ALT+Enter to generate its C or C++ implementation:

Android Studio 1.5 RC1搭建NDK开发环境_第9张图片

Yes, it’s that magical :)

The implementation will be added under ‘jni‘, inside an existing cpp file if there is one, or inside a new one.

In order to get started with NDK modules, you can have a look at all the samples that have been ported to use the new gradle-experimental plugin: https://github.com/googlesamples/android-ndk

Here is everything you can configure for a ndk module:

Debugging a NDK project

In order to get the debug capabilities of AS, create and use a new Run/Debug configuration from the “Android Native” default. While it was possible to use GDB in Android Studio 1.3, now only the LLDB backend is available.

native-debug-config

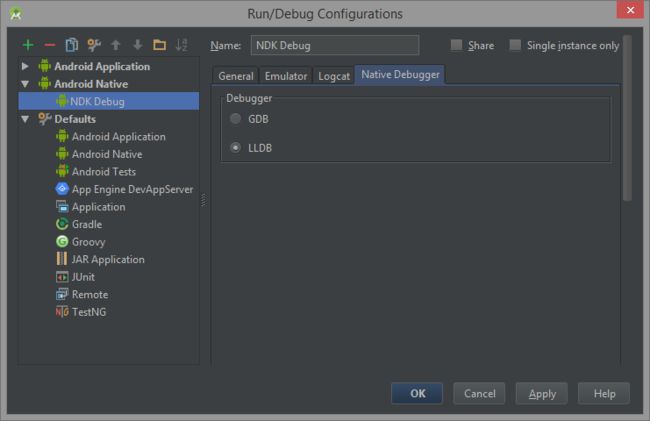
Use it with your debug variant, which will have ndk.debuggable flag set to true by default.

Going further with the NDK with Android Studio

Many advanced features, such as the ability to have dependencies between native libraries, reuse prebuilts, tune specific toolchain options and having dynamic version codes while still having a project in a good shape is a bit complex, as the gradle-experimental plugin is still undergoing a lot of improvements across versions.

Getting the APP_PLATFORM right

When you’re building a NDK module, the android platform you’re compiling it against is a quite important setting, as it basically determines the minimum platform your module will be guaranteed to run on.

With earlier versions than gradle-experimental:0.3.0-alpha4, the chosen platform was the one set as compileSdkVersion. Fortunately with subsequent releases, you can now set android.ndk.platformVersionindependently, and you should make it the same as your minSdkVersion.

Using external libraries and separate modules

with sources

If you have access to your 3rd party libraries source code, you can embed it into your project and make it statically compile with your code.

There is an example of this with the native_app_glue library from the NDK, inside the native-activity sample. For example, you can copy the library sources inside a subfolder inside your jni folder and add a reference to its directory so the includes are properly resolved:

with sources in different modules

Now with 0.6.0-alpha7 version, you can finally have clean dependencies between native libraries, by setting the dependency on another module from your model:

In order to keep debugging working, you may have to edit your app-native run configuration, to add /build/intermediates/binaries/release/obj/[abi] to the symbol directories.

with native prebuilts

This technique works with static and shared prebuilts too! Inside your model, you’ll have to add a “lib repository”:

And declare the dependency on this library:

你可能感兴趣的:(Android)