Raphael绘制流程图箭头的方法
原项目使用的Raphael绘制流程图,要求能自定义箭头的样式和颜色,结合从网上找到的一些资料进行修改。
1.使用Raphael自带的箭头样式,代码与箭头的样式对应如下:
var c = r.path("M10 10L100 10").attr({
            'arrow-end': 'classic-wide-long',
            stroke: "#0000ff",
            "stroke-width": 2
        });
         var c = r.path("M10 50L100 50").attr({
            'arrow-end': 'block-wide-long',
            stroke: "#ff0000",
            "stroke-width": 2
        });
        var c = r.path("M10 100L100 100").attr({
            'arrow-end': 'open-wide-long',
            stroke: "#ff00ff",
            "stroke-width": 2
        });
        var c = r.path("M10 150L100 150").attr({
            'arrow-end': 'oval-wide-long',
            stroke: "#0f0",
            "stroke-width": 2
        });
        var c = r.path("M10 200L100 200").attr({
            'arrow-end': 'diamond-wide-long',
            stroke: "#000",
            "stroke-width": 2
        });
得到的效果: 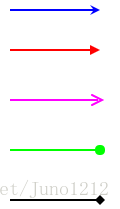
箭头的样式是通过”arrow-end”设置的,改变颜色在画布svg包含的defs元素中添加设置好颜色的箭头对象marker。
"raphael-marker-endclassic-red" markerHeight="5" markerWidth="5" orient="auto" refX="2.5" refY="2.5" style="-webkit-tap-highlight-color: rgba(0, 0, 0, 0);"><use xmlns:xlink="" xlink:href="#raphael-marker-classic" transform="rotate(180 2.5 2.5) scale(1,1)" stroke-width="1.0000" fill="red" stroke="none" style="-webkit-tap-highlight-color: rgba(0, 0, 0, 0);">use>marker>
  <marker id="raphael-marker-endclassic-green" markerHeight="5" markerWidth="5" orient="auto" refX="2.5" refY="2.5" style="-webkit-tap-highlight-color: rgba(0, 0, 0, 0);"><use xmlns:xlink="" xlink:href="#raphael-marker-classic" transform="rotate(180 2.5 2.5) scale(1,1)" stroke-width="1.0000" fill="green" stroke="none" style="-webkit-tap-highlight-color: rgba(0, 0, 0, 0);">use>marker>
强制修改连线箭头的方法:
line1.node.attributes["marker-end"].value = "url(#raphael-marker-endclassic-" + "red" + ")";

line2.node.attributes["marker-end"].value = "url(#raphael-marker-endclassic-" + "green" + ")";
完成后的效果: 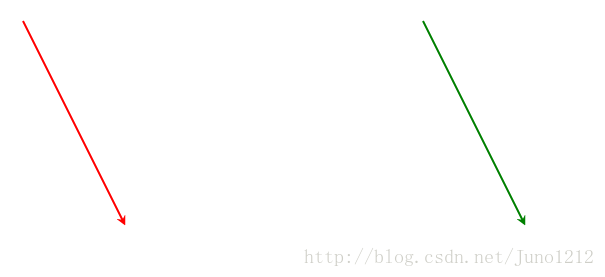
箭头颜色修改参考文章:
http://blog.csdn.net/qq_34838434/article/details/53372168
箭头样式属性参考文章:
https://www.cnblogs.com/stephenykk/p/3564000.html
2.官方文档给出的绘制箭头方法,箭头绘制完成的效果与设置'arrow-end': 'open-wide-long'为一致
1)先绘制节点,并为节点添加样式属性
//绘制节点
var shapes = [
            r.rect(190, 100, 60, 40, 4),
            r.rect(290, 80, 60, 40, 4),
            r.rect(290, 180, 60, 40, 4),
            r.rect(450, 100, 60, 40, 4)
];
//定位节点上的文字
$("#test1").offset({ top: 100 + 10, left: 190 + 10 });
$("#test2").offset({ top: 80 + 10, left: 290 + 10 });
$("#test3").offset({ top: 180 + 10, left: 290 + 10 });
$("#test4").offset({ top: 100 + 10, left: 450 + 10 });
//为节点添加样式和事件,并且绘制节点之间的箭头
for (var i = 0, ii = shapes.length; i < ii; i++) {
    var color = Raphael.getColor();
    shapes[i].attr({ fill: color, stroke: color, "fill-opacity": 0, "stroke-width": 2, cursor: "move" });
    shapes[i].id = i + 1;
    shapes[i].drag(move, dragger, up);
    shapes[i].dblclick(function () { alert(this.id) })
}
2)确定连线节点的起始点值
function getStartEnd(obj1, obj2) {
     var bb1 = obj1.getBBox(),
         bb2 = obj2.getBBox();
     var p = [
             { x: bb1.x + bb1.width / 2, y: bb1.y - 1 },
             { x: bb1.x + bb1.width / 2, y: bb1.y + bb1.height + 1 },
             { x: bb1.x - 1, y: bb1.y + bb1.height / 2 },
             { x: bb1.x + bb1.width + 1, y: bb1.y + bb1.height / 2 },
             { x: bb2.x + bb2.width / 2, y: bb2.y - 1 },
             { x: bb2.x + bb2.width / 2, y: bb2.y + bb2.height + 1 },
             { x: bb2.x - 1, y: bb2.y + bb2.height / 2 },
             { x: bb2.x + bb2.width + 1, y: bb2.y + bb2.height / 2 }
     ];
     var d = {}, dis = [];
     for (var i = 0; i < 4; i++) {
         for (var j = 4; j < 8; j++) {
             var dx = Math.abs(p[i].x - p[j].x),
                 dy = Math.abs(p[i].y - p[j].y);
             if (
                  (i == j - 4) ||
                  (((i != 3 && j != 6) || p[i].x < p[j].x) &&
                  ((i != 2 && j != 7) || p[i].x > p[j].x) &&
                  ((i != 0 && j != 5) || p[i].y > p[j].y) &&
                  ((i != 1 && j != 4) || p[i].y < p[j].y))
                ) {
                 dis.push(dx + dy);
                 d[dis[dis.length - 1]] = [i, j];
             }
         }
     }
     if (dis.length == 0) {
         var res = [0, 4];
     } else {
         res = d[Math.min.apply(Math, dis)];
     }
     var result = {};
     result.start = {};
     result.end = {};
     result.start.x = p[res[0]].x;
     result.start.y = p[res[0]].y;
     result.end.x = p[res[1]].x;
     result.end.y = p[res[1]].y;
     return result;
 }
3)根据确定的连线的起始点计算连线与箭头的值
 function getArr(x1, y1, x2, y2, size) {
      var angle = Raphael.angle(x1, y1, x2, y2);//得到两点之间的角度
      var a45 = Raphael.rad(angle - 45);//角度转换成弧度
      var a45m = Raphael.rad(angle + 45);
      var x2a = x2 + Math.cos(a45) * size;
      var y2a = y2 + Math.sin(a45) * size;
      var x2b = x2 + Math.cos(a45m) * size;
      var y2b = y2 + Math.sin(a45m) * size;
      var result = ["M", x1, y1, "L", x2, y2, "L", x2a, y2a, "M", x2, y2, "L", x2b, y2b];
      return result;
   }
4)定义绘制连线的方法
Raphael.fn.drawArr = function (obj) {
     var point = getStartEnd(obj.obj1, obj.obj2);
     var path1 = getArr(point.start.x, point.start.y, point.end.x, point.end.y, 8);
     if (obj.arrPath) {
          obj.arrPath.attr({ path: path1});
      } else {
          obj.arrPath = this.path(path1);
      }
          return obj;
      };
5)进行连线的绘制
connections.push(r.drawArr({ obj1: shapes[0], obj2: shapes[1] }));
connections.push(r.drawArr({ obj1: shapes[1], obj2: shapes[2] }));
connections.push(r.drawArr({ obj1: shapes[2], obj2: shapes[3] }));
6)流程图绘制完成的效果
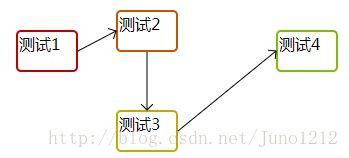
流程绘制参考文章:
https://www.cnblogs.com/liulun/archive/2012/05/18/2507472.html
3.在官方文档给出的绘制箭头方法上进行调整,得到的效果与设置'arrow-end': 'block-wide-long'时一致。
1)具体代码为修改计算连线值的方法,计算出的值不变,调整连接箭头值的顺序,得到不同的箭头样式
function getArr(x1, y1, x2, y2, size) {
    var angle = Raphael.angle(x1, y1, x2, y2);//得到两点之间的角度
    var a45 = Raphael.rad(angle - 45);//角度转换成弧度
    var a45m = Raphael.rad(angle + 45);
    var x2a = x2 + Math.cos(a45) * size;
    var y2a = y2 + Math.sin(a45) * size;
    var x2b = x2 + Math.cos(a45m) * size;
    var y2b = y2 + Math.sin(a45m) * size;
    var result = ["M", x1, y1, "L", x2, y2, "M", x2, y2, "L", x2b, y2b, "L", x2a, y2a, "Z"];
    return result;
}
2)修改绘制连线的方法,添加属性fill,使箭头的颜色样式与所要求的效果一致
 Raphael.fn.drawArr = function (obj) {
    var point = getStartEnd(obj.obj1, obj.obj2);
    var path1 = getArr(point.start.x, point.start.y, point.end.x, point.end.y, 8);
    if (obj.arrPath) {
        obj.arrPath.attr({ path: path1});
    } else {
        obj.arrPath = this.path(path1);
    }
    obj.arrPath.attr({fill: "#000000" });
    return obj;
};
3)绘制完成的效果:
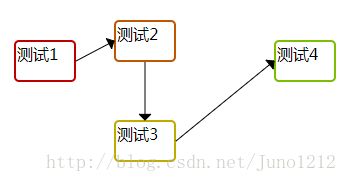
补充:
Raphael属性相关的文章:
http://www.cnblogs.com/idealer3d/p/Instant_RaphaelJS_Starter.html