OpenCV学习心得二:图像基本操作(创建,读取,载入,保存,展示)+像素操控
课程紧张,以后尽量每节课消化后及时更新博客以加深印象。
此次为第一节实验课内容,为了方便,我将各个功能写成一个小方法,在main函数里调用已检验成功与否。
以上为各个实现,具体方法及解释见代码。
//
//  main.cpp
//  lab01
//
//  Created by Flyer on 2018/10/17.
//  Copyright © 2018 Flyer. All rights reserved.
//

#include
#include

using namespace cv;

void helloline(){
    //create a black 256x256, 8bit, gray scale image in a matrix container
    Mat image(256, 256, CV_8UC1, Scalar(0));

    //draw white text HelloOpenCV!
    putText(image, "HelloOpenCV!", Point(70, 70),
            FONT_HERSHEY_COMPLEX_SMALL, 0.8, cvScalar(255), 1, CV_AA);

    //save image to file
    imwrite("myimage.jpg", image);

    //construct a window for image display
    namedWindow("Display window", CV_WINDOW_AUTOSIZE);

    //visualise the loaded image in the window
    imshow("Display window", image);

    //wait for a key press until returning from the program
    waitKey(0);

    //free memory occupied by image
    image.release();

}


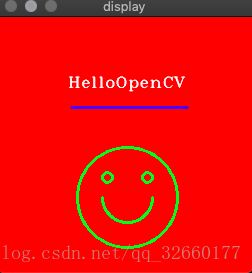
void draw(){
    //create a red 256x256, 8bit, 3channel BGR image in a matrix container
    Mat image(256, 256, CV_8UC3, Scalar(0, 0, 255));

    //put white text HelloOpenCV
    putText(image, "HelloOpenCV", Point(70, 70),
            FONT_HERSHEY_COMPLEX_SMALL, 0.8, cvScalar(255, 255, 255), 1, CV_AA);

    //draw blue line under text
    line(image, Point(74, 90), Point(190, 90), cvScalar(255, 0, 0),2);

    //draw a green smile
    ellipse(image, Point(130, 180), Size(25,25), 180, 180, 360,     cvScalar(0, 255, 0), 2);
    circle(image, Point(130, 180), 50, cvScalar(0, 255, 0), 2);
    circle(image, Point(110, 160), 5, cvScalar(0, 255, 0), 2);
    circle(image, Point(150, 160), 5, cvScalar(0, 255, 0), 2);

    //save image to file
    imwrite("smile.jpg", image);

    namedWindow("display",CV_WINDOW_AUTOSIZE);
    imshow("display", image);
    waitKey(0);


    //free memory occupied by image
    image.release();
}

void pixels(){
    Mat image(256, 256, CV_8UC3, Scalar(0, 0, 0));

    //set pixels to create colour pattern
    for (int y = 0; y < image.rows; y++) //go through all rows (or scanlines)
        for (int x = 0; x < image.cols; x++) { //go through all columns
            image.at(y, x)[0] = x; //set blue component
            image.at(y, x)[1] = y; //set green component
            image.at(y, x)[2] = 255 - image.at(y, x)[1]; //set red component
        }

    //construct a window for image display
    namedWindow("Display window", CV_WINDOW_AUTOSIZE);

    //visualise the loaded image in the window
    imshow("Display window", image);

    //wait for a key press until returning from the program
    waitKey(0);

    //free memory occupied by image
    image.release();
}

void thr(){
    // Read image from file
    Mat image = imread("/Users/Flyer/OneDrive\ -\ University\ of\ Bristol/Advanced\ computing/Image\ Processing\&Computer\ Vision/Lab/01/mandrill.jpg",1);

    // Convert to grey scale
    Mat gray_image;
    cvtColor(image, gray_image, CV_BGR2GRAY);

    // Threshold by looping through all pixels
    for (int y = 0; y(y, x);
            if (pixel>128) gray_image.at(y, x) = 255;
            else gray_image.at(y, x) = 255;
        } }

    //Save thresholded image
    //imwrite("Users/Flyer/OneDrive\ -\ University\ of\ Bristol/Advanced\ computing/Image\ Processing\&Computer\ Vision/Lab/01/thr000.jpg", gray_image,CV_IMWRITE_JPEG_QUALITY);
    //imwrite("flyer.JPEG", gray_image);

    namedWindow("display",CV_WINDOW_AUTOSIZE);
    imshow("display", image);

    waitKey(0);
    image.release();
}


int main(int argc, char** argv) {

    helloline();
    draw();
    pixels();
    thr();

}


