深度学习——Tensorflow DeepLab VOC数据集的标签处理
这段时间在看DeepLab的源码。看到标签处理和损失函数的时候确实觉得智商不够用了。
整个代码的思路就是,先读取图像和标签制作tfrecord,其中标签是单通道的,一个灰度值对应一种类别。
image_reader = build_data.ImageReader('jpeg', channels=3)
label_reader = build_data.ImageReader('png', channels=1)

  def __init__(self, image_format='jpeg', channels=3):
    """Class constructor.

    Args:
      image_format: Image format. Only 'jpeg', 'jpg', or 'png' are supported.
      channels: Image channels.
    """
    with tf.Graph().as_default():
      self._decode_data = tf.placeholder(dtype=tf.string)
      self._image_format = image_format
      self._session = tf.Session()
      if self._image_format in ('jpeg', 'jpg'):
        self._decode = tf.image.decode_jpeg(self._decode_data,
                                            channels=channels)
      elif self._image_format == 'png':
        self._decode = tf.image.decode_png(self._decode_data,
                                           channels=channels)
然后我把VOC数据集中的标签拉出来看,嗯,彩色的,没毛病,这里tensorflow里面解析图片的时候,设定channel就能把彩色图盘转成灰度吗?当时就很疑惑,然后接着往下看。当然是后来才注意到,人家读的标签图片是在这样一个文件夹下:
而我们下载的VOC数据集里面是没有这个文件夹的,但是当时我瞎没看到,但是也继续往下看代码了。
中间网络结构部分至今还不太明白,我带着疑惑直接跳到了损失函数的地方。
没毛病,就是先算出Logits,然后再计算交叉熵。然后这里根据类别数计算了label的one-hot编码了。接下来我就十分不解了,灰度范围是[0,255],这里的类别数加上背景才21种,这怎么搞也不行嘛。。我想标签数据一定是预处理了,然后倒回去看制作数据和数据读取,都没看到预处理的影子。
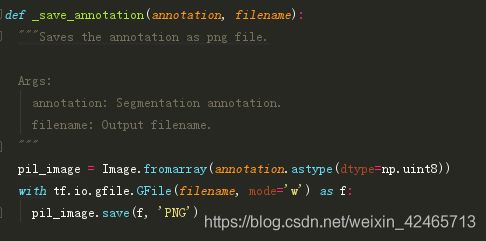
根据经验又检查了一遍datasets文件夹中的.py文件,发现有一个文件叫remove_gt_colormap,进去一看,哦,人家这个就是直接把彩色图像转换为标签图的代码,我打我自己。。。
但是看这个处理流程是这个亚子的:
直接用PIL读一遍然后再保存就完事了???
网上找资料发现有人和我一样懵逼。看他的答案:Tensorflow Deeplab image colormap removal confusion
好吧说实话做了很久的图像处理,但是图像格式相关的知识在脑子里是一团乱麻。。。
但是这里只是给出了这种数据标签的转换方式,那么我们自己制作的标签要怎么转换呢?除了用标记软件,那用ps也是很方便的,这里自己写了一段转换的代码:
def remove_color_map():
    files_label = os.listdir(Config.train_label_path)
    for file in files_label:
        img = cv2.imread(os.path.join(Config.train_label_path, file))
        size = img.shape
        new_label = np.zeros((size[0],size[1]), dtype=np.uint8)

        color_map = np.array(Config.color_map)
        for i in range(len(color_map)):
            bi = (cv2.inRange(img, color_map[i], color_map[i]) / 255) * i
            new_label = new_label + bi

        cv2.imwrite(os.path.join(Config.train_label_raw_path,file), new_label)
其中,color_map就是标记颜色的list,比如:
color_map = [[0,0,0],[255,0,0],[0,255,0]]
背景也是要手动加上去的。
以上~~~


