spring-security入门9---记住我功能
文章目录
- 1.基本原理
- 2 代码开发
-
- 2.1 数据库连接相关
- 2.2 页面增加“记住我”按钮
- 2.3 记住我的时间配置
- 2.4 配置TokenRepository
- 2.5 Remember相关配置
- 2.4和2.5其实写在了一个配置类里,里面有很多前面文章的信息,这里也贴一下
- 3 源码解析---以表单登陆认证方式为例(http.formLogin()…)
-
- 3.1 登陆认证时
-
- 3.1.1登陆认证成功后
- 3.1.2 追踪rememberMeServices.loginSuccess方法
- 3.2 用户在规定的时间以内(这里一般指session已经超时或者重启会话时)再次访问我们的服务时
- 4.测试
-
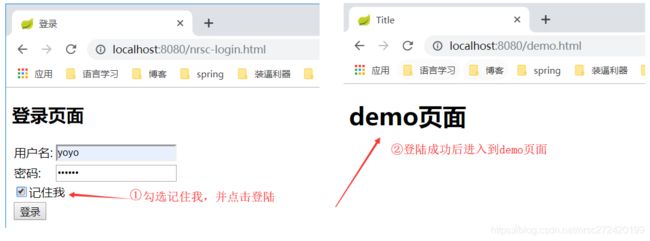
- 4.1 勾选记住我,并点击登陆进入demo页面
- 4.2 关闭项目,再重启项目,这时候会话已经结束,如果在同一浏览器(Cookie中存有token)重新访问项目可以直接访问,表面“记住我”功能已经生效
项目源码地址 https://github.com/nieandsun/security
1.基本原理
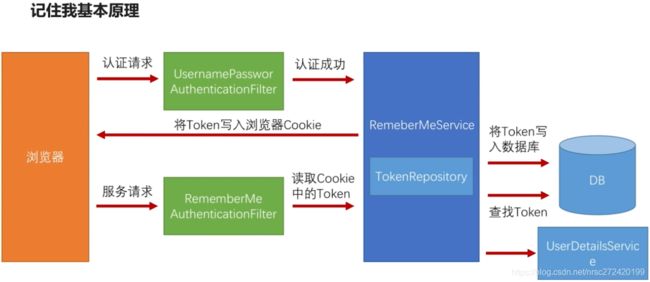
注意1: 图中UsernamePasswordAuthenticationFilter不是很准确,通过看源码我们可以知道,当我们在配置文件里指定认证方式为http.formLogin()… 时,UsernamePasswordAuthenticationFilter位置对应的Filter实际应为AbstractAuthenticationProcessingFilter,当配置的为 http.httpBasic()… 时,该位置应为BasicAuthenticationFilter,即这个位置的Filter就是我在spring-security入门7—浅析spring-security原理那篇文章里讲的FilterA1,A2…
注意2: 可以看我spring-security入门7—浅析spring-security原理这篇文章讲的RememberMeAuthenticationFilter所处的位置。

- 记住我基本原理讲解------结合上图
用户发起认证请求,当认证成功之后会在执行认证成功后的逻辑(如直接返回一个与认证成功相关的json字符串或者重定向到促发认证的请求上去)之前RememberMeService将认证成功的用户信息Token写入到数据库,同时将这个Token写入到浏览器的Cookie。当用户隔了一段时间(指定的时间范围之内),再来请求我们的服务,请求会经过RememberMeAuthenticationFiler,这个filter会读取Cookie中的Token,然后去数据库中查找是否有相应的Token,然后再通过UserDetailsService进行用户信息认证校验,如果可以认证通过,用户便可以访问到我们的服务,而不用重新进行登陆认证。
2 代码开发
2.1 数据库连接相关
- 新增jar包
        <dependency>
            <groupId>org.springframework.bootgroupId>
            <artifactId>spring-boot-starter-jdbcartifactId>
        dependency>

        <dependency>
            <groupId>mysqlgroupId>
            <artifactId>mysql-connector-javaartifactId>
        dependency>
- 连接池相关信息
spring:
  datasource:
    #mysql版本为8.0.13
    driver-class-name: com.mysql.cj.jdbc.Driver
    url: jdbc:mysql://127.0.0.1:3306/nrsc-security?characterEncoding=utf-8&serverTimezone=GMT&useSSL=false
    username: root
    password: 123456
2.2 页面增加“记住我”按钮
			<tr>

				<td colspan='2'><input name="remember-me" type="checkbox" value="true" />记住我td>
			tr>
2.3 记住我的时间配置
package com.nrsc.security.core.properties;
import lombok.Data;
/**
 * Created By: Sun Chuan
 * Created Date: 2019/6/20 22:13
 */
@Data
public class BrowserProperties {

    //指定默认的登陆页面
    private String loginPage = "/nrsc-login.html";
    //指定默认的处理成功与处理失败的方法
    private LoginType loginType = LoginType.JSON;
    //记住我的时间3600秒即1小时
    private int rememberMeSeconds = 3600;
}
2.4 配置TokenRepository
    @Autowired
    //springboot会根据yml文件中的spring:datasource将数据源注入到spring容器
    //所以这里直接通过 @Autowired就可以拿到数据源
    private DataSource dataSource;

    @Bean
    public PersistentTokenRepository persistentTokenRepository() {

        JdbcTokenRepositoryImpl tokenRepository = new JdbcTokenRepositoryImpl();
        tokenRepository.setDataSource(dataSource);
        // 第一次启动的时候自动建表(建议不用这句话,因为第二次启动会报错)
        // 建表语句可在JdbcTokenRepositoryImpl源码中找到
        // tokenRepository.setCreateTableOnStartup(true);
        return tokenRepository;
    }
2.5 Remember相关配置
                //Remember相关配置
                .rememberMe()
                .tokenRepository(persistentTokenRepository())//指定使用的tokenRepository
                .tokenValiditySeconds(securityProperties.getBrowser().getRememberMeSeconds())//指定记住我的时间(秒)
                .userDetailsService(NRSCDetailsService)//指定进行登陆认证的UserDetailsService
2.4和2.5其实写在了一个配置类里,里面有很多前面文章的信息,这里也贴一下
package com.nrsc.security.browser.config;

import com.nrsc.security.core.properties.SecurityProperties;
import org.springframework.beans.factory.annotation.Autowired;
import org.springframework.context.annotation.Bean;
import org.springframework.context.annotation.Configuration;
import org.springframework.security.config.annotation.web.builders.HttpSecurity;
import org.springframework.security.config.annotation.web.configuration.WebSecurityConfigurerAdapter;
import org.springframework.security.core.userdetails.UserDetailsService;
import org.springframework.security.crypto.bcrypt.BCryptPasswordEncoder;
import org.springframework.security.crypto.password.PasswordEncoder;
import org.springframework.security.web.authentication.AuthenticationFailureHandler;
import org.springframework.security.web.authentication.AuthenticationSuccessHandler;
import org.springframework.security.web.authentication.rememberme.JdbcTokenRepositoryImpl;
import org.springframework.security.web.authentication.rememberme.PersistentTokenRepository;

import javax.sql.DataSource;

@Configuration
public class BrowserSecurityConfig extends WebSecurityConfigurerAdapter {


    @Bean
    public PasswordEncoder passwordEncoder() {

        return new BCryptPasswordEncoder();
    }

    @Autowired
    private AuthenticationSuccessHandler NRSCAuthenticationSuccessHandler;

    @Autowired
    private AuthenticationFailureHandler NRSCAuthenticationFailureHandler;

    @Autowired
    private SecurityProperties securityProperties;

    @Autowired
    private UserDetailsService NRSCDetailsService;

    @Autowired
    //springboot会根据yml文件中的spring:datasource将数据源注入到spring容器
    //所以这里直接通过 @Autowired就可以拿到数据源
    private DataSource dataSource;

    @Bean
    public PersistentTokenRepository persistentTokenRepository() {

        JdbcTokenRepositoryImpl tokenRepository = new JdbcTokenRepositoryImpl();
        tokenRepository.setDataSource(dataSource);
        // 第一次启动的时候自动建表(建议不用这句话,因为第二次启动会报错)
        // 建表语句可在JdbcTokenRepositoryImpl源码中找到
        // tokenRepository.setCreateTableOnStartup(true);
        return tokenRepository;
    }

    @Override
    protected void configure(HttpSecurity http) throws Exception {

        http.formLogin()
                .loginPage("/authentication/require")//登陆时进入的url-->相当于进入登陆页面
                .loginProcessingUrl("/nrsc/signIn")//告诉spring-security点击登陆时访问的url为/nrsc/signIn
                // ---->当spring-security接收到此url的请求后,会自动调用
                //com.nrsc.security.browser.action.NRSCDetailsService中的loadUserByUsername
                //进行登陆校验

                .successHandler(NRSCAuthenticationSuccessHandler)//指定使用NRSCAuthenticationSuccessHandler处理登陆成功后的行为
                .failureHandler(NRSCAuthenticationFailureHandler)//指定使用NNRSCAuthenticationFailureHandler处理登陆失败后的行为
                .and()
                //Remember相关配置
                .rememberMe()
                .tokenRepository(persistentTokenRepository())//指定使用的tokenRepository
                .tokenValiditySeconds(securityProperties.getBrowser().getRememberMeSeconds())//指定记住我的时间(秒)
                .userDetailsService(NRSCDetailsService)//指定进行登陆认证的UserDetailsService
                .and()
                .authorizeRequests()
                .antMatchers("/authentication/require", securityProperties.getBrowser().getLoginPage())//指定不校验的url
                .permitAll()
                .anyRequest()
                .authenticated()
                .and()
                .csrf().disable(); //关闭csrf
//        http.httpBasic()
//                .and()
//                .authorizeRequests()
//                .anyRequest()
//                .authenticated();
    }
}
3 源码解析—以表单登陆认证方式为例(http.formLogin()…)
3.1 登陆认证时
3.1.1登陆认证成功后
会在执行登陆成功后的逻辑之前走 rememberMeServices.loginSuccess(request, response, authResult); 方法
	protected void successfulAuthentication(HttpServletRequest request,
			HttpServletResponse response, FilterChain chain, Authentication authResult)
			throws IOException, ServletException {

		if (logger.isDebugEnabled()) {

			logger.debug("Authentication success. Updating SecurityContextHolder to contain: "
					+ authResult);
		}
		//将认证后的结果放入到SecurityContextHolder中的SecurityContext中
		SecurityContextHolder.getContext().setAuthentication(authResult);
		//走记住我相关的逻辑
		rememberMeServices.loginSuccess(request, response, authResult);
		// Fire event----还没具体研究是干什么的
		if (this.eventPublisher != null) {

			eventPublisher.publishEvent(new InteractiveAuthenticationSuccessEvent(
					authResult, this.getClass()));
		}
		//执行登陆成功后的逻辑-----即实现了AuthenticationSuccessHandler接口的类中定义的逻辑
		successHandler.onAuthenticationSuccess(request, response, authResult);
	}
3.1.2 追踪rememberMeServices.loginSuccess方法
发现会走到onLoginSuccess方法,并在该方法内tokenRepository将认证成功的用户信息(Token)写入到数据库,同时将这个Token写入到浏览器的Cookie
	protected void onLoginSuccess(HttpServletRequest request,
			HttpServletResponse response, Authentication successfulAuthentication) {

		String username = successfulAuthentication.getName();
		logger.debug("Creating new persistent login for user " + username);
		PersistentRememberMeToken persistentToken = new PersistentRememberMeToken(
				username, generateSeriesData(), generateTokenData(), new Date());
		try {

			//tokenRepository会将token存入到数据库
			tokenRepository.createNewToken(persistentToken);
			//将token写入到Cookie
			addCookie(persistentToken, request, response);
		}
		catch (Exception e) {

			logger.error("Failed to save persistent token ", e);
		}
	}
3.2 用户在规定的时间以内(这里一般指session已经超时或者重启会话时)再次访问我们的服务时
会穿过RememberMeAuthenticationFilter,并在该Filter里进行认证,认证成功后会将认证信息写入SecurityContextHolder,然后再跳转到引发认证的请求上去,其关键代码如下:
public void doFilter(ServletRequest req, ServletResponse res, FilterChain chain)
			throws IOException, ServletException {

		HttpServletRequest request = (HttpServletRequest) req;
		HttpServletResponse response = (HttpServletResponse) res;
		//如果从SecurityContextHolder拿不到用户信息--session已经超时或者重启会话
		if (SecurityContextHolder.getContext().getAuthentication() == null) {

			//就调用下面的方法尝试拿用户信息
			Authentication rememberMeAuth = rememberMeServices.autoLogin(request,
					response);

			if (rememberMeAuth != null) {

				// Attempt authenticaton via AuthenticationManager
				try {

					//在表单登陆认证原理源码解析那篇文章里讲过,这句话就是尝试进行认证登陆
					rememberMeAuth = authenticationManager.authenticate(rememberMeAuth);

					// Store to SecurityContextHolder---将认证后的用户信息放入到线程里即SecurityContextHolder里
					SecurityContextHolder.getContext().setAuthentication(rememberMeAuth);
					//走认证成功后的逻辑---追踪源码可以发现它并不走我们自定义的认证成功后的逻辑--我猜它走的逻辑肯定是
					//重定向到引发认证的请求上-----下面的代码就不再一一解读了
					onSuccessfulAuthentication(request, response, rememberMeAuth);

					if (logger.isDebugEnabled()) {

						logger.debug("SecurityContextHolder populated with remember-me token: '"
								+ SecurityContextHolder.getContext().getAuthentication()
								+ "'");
					}

					// Fire event
					if (this.eventPublisher != null) {

						eventPublisher
								.publishEvent(new InteractiveAuthenticationSuccessEvent(
										SecurityContextHolder.getContext()
												.getAuthentication(), this.getClass()));
					}
					if (successHandler != null) {

						successHandler.onAuthenticationSuccess(request, response,
								rememberMeAuth);
						return;
					}

				}
				catch (AuthenticationException authenticationException) {

					if (logger.isDebugEnabled()) {

						logger.debug(
								"SecurityContextHolder not populated with remember-me token, as "
										+ "AuthenticationManager rejected Authentication returned by RememberMeServices: '"
										+ rememberMeAuth
										+ "'; invalidating remember-me token",
								authenticationException);
					}

					rememberMeServices.loginFail(request, response);

					onUnsuccessfulAuthentication(request, response,
							authenticationException);
				}
			}
			chain.doFilter(request, response);
		}
		else {

			if (logger.isDebugEnabled()) {

				logger.debug("SecurityContextHolder not populated with remember-me token, as it already contained: '"
						+ SecurityContextHolder.getContext().getAuthentication() + "'");
			}

			chain.doFilter(request, response);
		}
	}

