第十五节 Shiro集成Redis实现分布式集群Cache共享
一、原理
Shiro使用的是Token来封装用户登录的信息,另外一边,从数据库中查询出来的数据存放在"AuthenticationInfo"中,然后将token与info进行对比,对比一致的话说明用户登录成功。在登录成功后,为了缓解数据库的压力,可以将用户登录成功的info信息缓存下来。一般使用的是一组键值对来封装数据。因此,缓存的键值对可以理解为
"用户主凭证" ---- "用户登录成功后的info"
为了实现Shiro的 认证、授权缓存,我们需要把这些缓存信息统一存放到一个地方进行管理,常见情况下存放到Redis服务器中。
二、自定义缓存管理器
Shiro官方介绍的缓存是Ehcache缓存,如果在securityManager中没有配置缓存管理器,那么默认使用的是memoryConstrainedCacheManager。显然使用的就是本机内存作为缓存,这不满足分布式集群的需要。
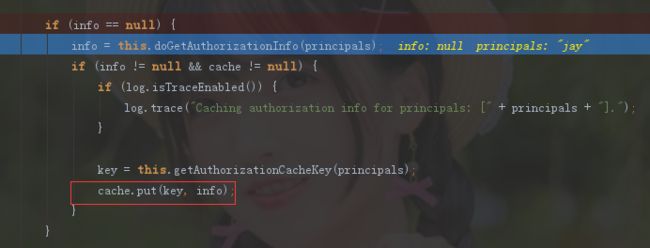
查看源码可发现Shiro在认证与授权的流程中,首先会调用CacheManager的getCache()方法获取缓存对象。如果有缓存对象的话,那么将缓存对象中存放的用户info取出来,与用户的token进行对比。如果没有缓存,那么通过CacheManager对象创建一个新的Cache对象。
接着调用Cache.put("用户主凭证","用户登录成功后的info"),将登录凭证存放到这个新创建的缓存对象中。
再次访问相同的请求,Shiro则通过用户主凭证,取出缓存Cache
首先编写CacheManager,让shiro使用我们自己的缓存管理器。
package com.jay.shiro.cache;

import com.jay.redis.RedisService;
import org.apache.shiro.cache.Cache;
import org.apache.shiro.cache.CacheException;
import org.apache.shiro.cache.CacheManager;
import org.slf4j.Logger;

import java.util.concurrent.ConcurrentHashMap;
import java.util.concurrent.ConcurrentMap;

import static org.slf4j.LoggerFactory.getLogger;

public final class RedisCacheManager implements CacheManager {

    private static final Logger LOGGER = getLogger(RedisCacheManager.class);

    /**
     * Cache缓存时间,单位秒
     */
    private Long expireSeconds;

    /**
     * 使用ConcurrentHashMap作为键值对,可以适用于并发环境
     * key为缓存名
     * value为某个缓存对象
     */
    private final ConcurrentMap caches = new ConcurrentHashMap<>();

    /**
     * 用于Cache的Redis key前缀
     */
    private String keyPrefix = "shiro_redis_cache:";

    private RedisService redisService;

    public RedisService getRedisService() {
        return redisService;
    }

    public void setRedisService(RedisService redisService) {
        this.redisService = redisService;
    }

    public String getKeyPrefix() {
        return keyPrefix;
    }

    public void setKeyPrefix(String keyPrefix) {
        this.keyPrefix = keyPrefix;
    }

    public Long getExpireSeconds() {
        return expireSeconds;
    }

    public void setExpireSeconds(Long expireSeconds) {
        this.expireSeconds = expireSeconds;
    }

    @Override
    @SuppressWarnings("unchecked")
    public  Cache getCache(String name) throws CacheException {
        if (LOGGER.isDebugEnabled()) {
            LOGGER.debug("获取名称为:{}的RedisCache实例.", name);
        }

        //获得cache
        Cache cache = caches.get(name);
        if (null == cache) {
            // 创建一个新的cache实例
            cache = new RedisCache(redisService, keyPrefix + name, expireSeconds);
            // 加入cache集合
            caches.put(name, cache);

            if (LOGGER.isDebugEnabled()) {
                LOGGER.debug("创建新的Cache实例:{}.", name);
            }
        }
        return cache;
    }
}
再编写Cache接口的实现RedisCache,它将数据使用put方法存放到Redis中,也能使用get方法取出Redis服务器中缓存的数据。在用户退出的时候,能够自动使用remove方法删除Redis中缓存的数据。
package com.jay.shiro.cache;

import com.jay.redis.RedisService;
import com.jay.shiro.SerializerUtil;
import org.apache.shiro.cache.Cache;
import org.apache.shiro.cache.CacheException;
import org.apache.shiro.util.CollectionUtils;
import org.slf4j.Logger;

import java.nio.charset.Charset;
import java.util.*;
import java.util.stream.Collectors;

import static org.slf4j.LoggerFactory.getLogger;

public final class RedisCache implements Cache {

    private static final Logger LOGGER = getLogger(RedisCache.class);
    private static final String DEFAULT_CHARSET = "UTF-8";

    private RedisService cache;

    /**
     * 用于Cache的Redis key前缀
     */
    private String keyPrefix;

    /**
     * Cache缓存时间,单位秒
     */
    private Long liveSeconds;

    /**
     * 通过一个JedisManager实例构造RedisCache
     */
    public RedisCache(RedisService cache) {
        if (null == cache) {
            throw new IllegalArgumentException("Cache对象为空.");
        }
        this.cache = cache;
    }

    /**
     * 通过一个JedisManager实例和前缀值构造RedisCache
     */
    public RedisCache(RedisService cache, String prefix) {
        this(cache);
        this.keyPrefix = prefix;
    }

    /**
     * 通过一个JedisManager实例和前缀值构造RedisCache(支持失效时间,单位秒)
     */
    public RedisCache(RedisService cache, String prefix, Long liveSeconds) {
        this(cache, prefix);
        this.liveSeconds = liveSeconds;
    }

    public String getKeyPrefix() {
        return keyPrefix;
    }

    public void setKeyPrefix(String keyPrefix) {
        this.keyPrefix = keyPrefix;
    }

    public Long getLiveSeconds() {
        return liveSeconds;
    }

    public void setLiveSeconds(Long liveSeconds) {
        this.liveSeconds = liveSeconds;
    }

    /**
     * 获得byte[]型的key
     *
     * @param key key值
     * @return byte[]型的key
     */
    private byte[] getByteKey(K key) {
        if (key instanceof String) {
            String preKey = this.keyPrefix + key;
            return preKey.getBytes(Charset.forName(DEFAULT_CHARSET));
        } else {
            return SerializerUtil.serialize(key);
        }
    }

    /**
     * 根据key获取缓存的数据
     *
     * @param key 键
     * @return 值
     * @throws CacheException
     */
    @Override
    @SuppressWarnings("unchecked")
    public V get(K key) throws CacheException {
        try {
            if (null == key) {
                return null;
            } else {
                final Object obj = cache.get(getByteKey(key));
                return (V) obj;
            }
        } catch (Exception t) {
            throw new CacheException(t);
        }
    }

    /**
     * 与put方法是反操作
     *
     * @param key
     * @param value
     * @return
     * @throws CacheException
     * @see #get(Object)
     */
    @Override
    public V put(K key, V value) throws CacheException {
        try {
            cache.setEx(getByteKey(key), value, liveSeconds);
            return value;
        } catch (Exception t) {
            throw new CacheException(t);
        }
    }

    /**
     * Shiro的logout方法会自动调用此方法
     *
     * @param key
     * @return
     * @throws CacheException
     */
    @Override
    public V remove(K key) throws CacheException {
        try {
            V previous = get(key);
            //从Redis中删除指定key的缓存
            cache.del(getByteKey(key));
            return previous;
        } catch (Exception t) {
            throw new CacheException(t);
        }
    }

    @Override
    public void clear() throws CacheException {
        if (LOGGER.isDebugEnabled()) {
            LOGGER.debug("从Redis中删除所有对象.");
        }
        try {
            cache.flushDB();
        } catch (Exception t) {
            throw new CacheException(t);
        }
    }

    @Override
    public int size() {
        if (LOGGER.isDebugEnabled()) {
            LOGGER.debug("查看Redis中有多少数据.");
        }
        try {
            final Long longSize = cache.dbSize();
            return longSize.intValue();
        } catch (Exception t) {
            throw new CacheException(t);
        }
    }

    @Override
    public Set keys() {
        try {
            final Set keys = cache.keys(this.keyPrefix + "*");
            if (CollectionUtils.isEmpty(keys)) {
                return Collections.emptySet();
            } else {
                return keys.stream().map(key -> (K) key).collect(Collectors.toSet());
            }
        } catch (Exception t) {
            throw new CacheException(t);
        }
    }

    @Override
    public Collection values() {
        try {
            //根据前缀,获取所有Key,再获取所有的Value
            final Set keys = cache.keys(this.keyPrefix + "*");
            if (CollectionUtils.isEmpty(keys)) {
                return Collections.emptyList();
            } else {
                final List values = new ArrayList<>(keys.size());
                for (byte[] key : keys) {
                    final V value = get((K) key);
                    if (null != value) {
                        values.add(value);
                    }
                }
                return Collections.unmodifiableList(values);
            }
        } catch (Exception t) {
            throw new CacheException(t);
        }
    }
}
最后在shiro的配置文件中按照如下配置规范即可。
...
三、测试
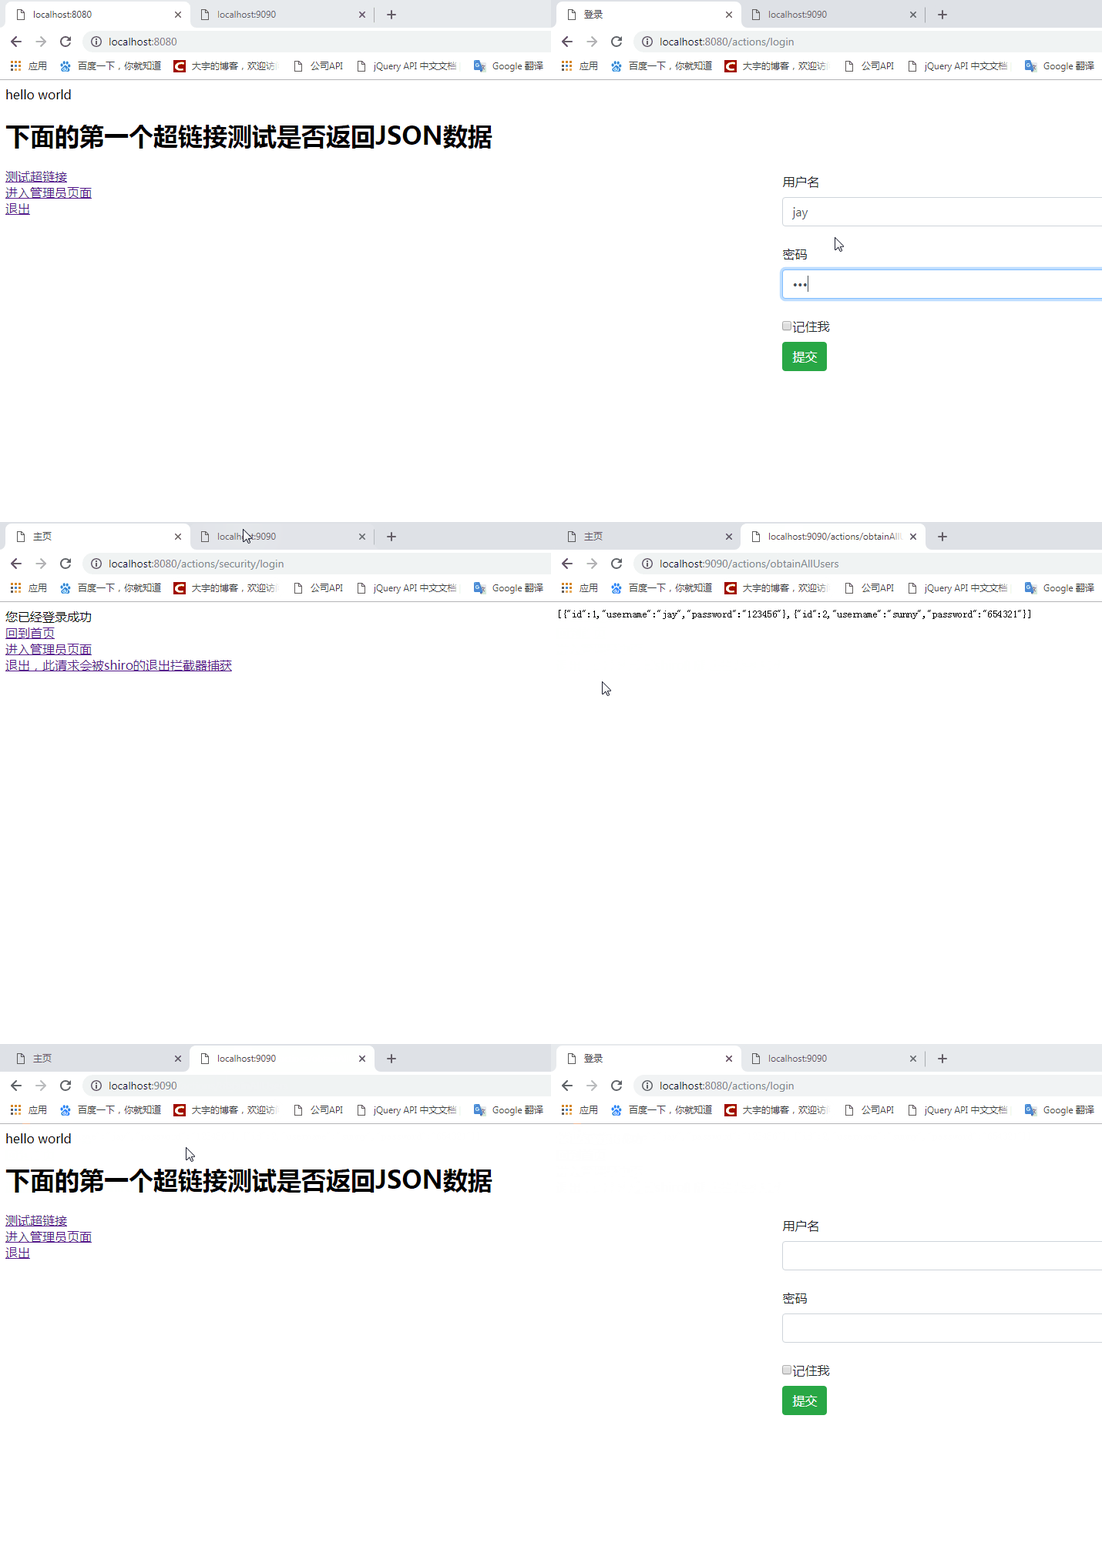
将项目复制成两份,分别以8080端口与9090端口启动。
Shiro在项目启动的时候就会创建两个缓存对象,一个是authenticationCache,另外一个是authorizationCache。这是根据自定义Realm中的配置,是否开启认证缓存、授权缓存。在本项目中都将其配置为了true,所以在项目启动的时候,就创建了这两个缓存对象。
在8080端口点击发送请求后台JSON数据超链接,因为没有登录,所以请求被重定向到登录页面。
在登录页面上输入jay / 123456 ,登录成功后,在后台的RedisCache类的put方法上,你可以打一个断点,它会将本次登录成功的凭证存放到数据库中。
回到9090端口服务器,尝试发送请求后台JSON数据超链接,可以正常访问,说明已经成功获取到了登录凭证缓存info对象。后台的RedisCache类的get方法上,你可以打一个断点,它将会从Redis中获取缓存的info登录信息。
接着在9090端口上进行用户退出,会清除Redis中用户的登录凭证。
最后回到8080端口的服务器,再次尝试发送请求后台JSON数据,点击超链接后被重定向到登录界面,说明在Redis服务器中缓存的用户凭证已经被成功删除。
四、源码下载
本章节项目源码:点击我下载源码
大宇能够成功搭建一个分布式项目,很大一部分原因就是站在巨人的肩膀上。特此鸣谢下方博客与博主。
参考文章:
Apache shiro集群实现 (七)分布式集群系统下---cache共享
Shiro 分布式架构下 Session 的共享实现
序列化工具
----------------------------------------------------分割线-------------------------------------------------------
下一篇:第十六节 Shiro限制密码重试次数限制
阅读更多:跟着大宇学Shiro目录贴


