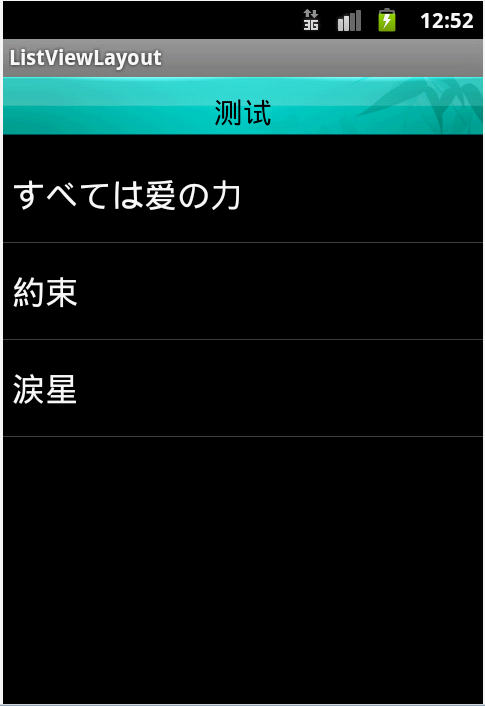
Android布局充分演示Demo
一个好的应用不仅仅功能强,还要在界面上花了一番功夫,设计越好看,用户体验增加了一番或者加动画那就更好不过了.了解布局就必须知道五大布局:
线性布局(LinearLayout),相对布局(RelativeLayout),帧布局(FrameLayout),绝对布局(AbsoluteLayout),表格布局(TableLayout)
目前用的最多前两个:线性,相对布局,前者特点是:它将控件组织在一个垂直或水平的形式。当布局方向设置为垂直时,它里面的所有子控件被组织在同一列中;当布局方向设置为水平时,所有子控件被组织在一行中,后者特点为可以调整方向(左),(水平垂直)(右)对齐,帧布局有点像网页,绝对布局已经目前没什么人用了。表格布局,顾名思义就是用表格显示布局,只不过表格你是看不见的。怎么把以上布局用的熟练了。我做了一个demo,效果图:

这个怎么做的呢?我可以回答你用相对布局,但总体布局还是线性。而且不是写在同一个布局里,二是分开写,分开写好处在于减少代码的重复性而已。所以我新建了三个布局,一个顶部的,底部,最后主界面的。让我们看看代码,首先是头部:
<RelativeLayout

  xmlns:android="http://schemas.android.com/apk/res/android"

  android:orientation="horizontal"

 android:background="@drawable/top"

  android:layout_width="fill_parent"

 android:layout_height="@dimen/main_top">


    <TextView android:text="测试" android:layout_width="fill_parent"

                android:layout_height="wrap_content" android:gravity="center_horizontal|center_vertical"

                android:textSize="19sp" android:textColor="@android:color/background_dark"

                android:layout_centerVertical="true"

                android:layout_centerHorizontal="true"></TextView>


</RelativeLayout>
你可以看到头部是相对作为命名空间,方向是水平,而且高度控制在40-50dip之内,设置wrap_content会觉得很大,所以缩小高度,下面只要文字就行,哪怕你拖进也行。接着是底部:
<RelativeLayout

  xmlns:android="http://schemas.android.com/apk/res/android"

  android:orientation="horizontal"

  android:background="@drawable/list_bottombar_bg"

  android:layout_width="fill_parent"

android:layout_height="@dimen/main_bottom">


  <ImageView

  android:layout_width="105dip"

  android:layout_height="wrap_content"

  android:background="@drawable/list_bottombar_local"

  android:layout_alignParentLeft="true"/>


  <ImageView

  android:layout_width="105dip"

  android:layout_height="wrap_content"

  android:background="@drawable/list_bottombar_favorite"

  android:layout_centerHorizontal="true"/>


   <ImageView

  android:layout_width="105dip"

  android:layout_height="wrap_content"

  android:background="@drawable/list_bottombar_online"

  android:layout_alignParentRight="true"/>

</RelativeLayout>
还是和头部一样,相对布局扔三个ImageView,宽度105dip是估算的,并非是精确计算的。三张图左,中,右代码想必你看的够清楚了吧。最后是主界面:
<LinearLayout xmlns:android="http://schemas.android.com/apk/res/android"

    android:orientation="vertical"

    android:layout_width="fill_parent"

    android:layout_height="fill_parent">


<!--用include把布局包围起来-->

    <include

      android:layout_width="wrap_content"

     android:layout_height="@dimen/main_top"

    layout="@layout/main_top"/>


    <ListView

    android:layout_width="fill_parent"

    android:layout_height="wrap_content"

    android:layout_weight="1"

    android:id="@+id/listview"

    android:cacheColorHint="#ffffffff">

    </ListView>


    <include

      android:layout_width="wrap_content"

     android:layout_height="@dimen/main_bottom"

    layout="@layout/main_bottom"/>

</LinearLayout>
以上可以看到一个新的东西include,什么是include?翻过来意思是包括,就是要一个布局写好包进来,省去代码的繁琐,看!顶部用include包围起来,里面定义宽高(必须要),然后"@layout"这个寻找要包围的布局,同理,底部也是,中间的listview大家都懂的。OK,这个布局介绍到这里了。
本例子源码在这:http://files.cnblogs.com/feifei1010/ListViewLayout.zip
欢迎热爱Android开发的朋友们加入群一起交流~~成都252743807 广州252743081