最近在测试一个项目,里面涉及到一个测试case:在linux服务器上,当网络带宽较差时,观察服务的消息处理能力和表现。限制网卡带宽有许多方法,比如Wondershaper或者ethtool。那验证限速效果呢?
最简单的方式是利用wget一个外网上的包,比如各种软件的下载包,在下载过程中,wget会显示带宽的下载速率,然后通过下载速率x2来估算整个带宽。但这种方式需要人工观察整个过程,只有下载速率,也没有汇总的结果,而且没有考虑不同地区的网络延迟情况。在这里,我给大家推荐一款比较专业的网络测速的工具,大名鼎鼎的SpeedTest。
1.简介
1.1 SpeedTest是干嘛的?
测试上性和下行带宽(即当前网络的能力)
测试网络延时 (即网络的稳定性)
1.2 SpeedTest的特点
无需依赖浏览器:支持web,客户端,命令行三种方式运行
支持远程服务器和低功耗设备:通过关闭预分配内存参数降低内存消耗
可实现自动化脚本测一段时间网速:在命令行下编写shell脚本结合crontab可以获取一天内不同时间段的网速
支持不同操作系统的命令行测速:支持windows,linux,macos以及Android和Ios。
通过CSV,JSONL或 JSON查看测速结果:支持多次输出格式
1.3 相关测试场景
1)排查客户网络问题
打开web页面,加载部分资源失效
打开web页面,websocket接口超时
打开web页面,上传图片和下载文件超时失败
2)测试服务端外网带宽
验证公网限速是否生效
检测网络抖动以及延时
2.Speedtest的打开方式
当前有三种方式运行SpeedTest,最方便的就是打开浏览器使用SpeedTest:
1. web方式:https://www.speedtest.cn/
2.安装对于操作系统客户端
3.命令行执行
下面分别介绍三种方式,其中第二种就以mac客户端举例,其他系统的安装和操作基本是一样的。
2.1 web方式
1) 浏览器输入:https://www.speedtest.cn/,点击 “测速”进行测试
2) 设置计量单位和测速的量程(可选)
单位指的是网络速率单位,这里换算关系为:1MB=1024KB=1024*1024b,我们就选择MB为单位。
量程指的是要测速的总流量,这里根据自己情况选择即可。
3) 等测速完毕后,会自动出一份报告
2.2 客户端方式
1. 访问https://www.speedtest.cn/app。
下载对应系统的客户端,这里我选择MacOS软件,你可以根据自己的情况下载对应的APP,后续测速的操作方式基本都一样。
2)选择网络测速,点击测速
3)客户端生成的报告
报告解释:
1. 下载速度达到了11MB
2.上传速度达到了11MB
3. ping速度5ms
可以看到网速还是不错的。
2.3 命令行
命令行是方便和灵活的方式,结合脚本可以灵活地制定出各种SpeedTest-Cli的使用场景。
speedtest-cli是一个python小工具,所以在安装speedtest之前,建议先安装好python2环境。
2.3.1 安装
首先需要注意的是,只有用pip安装才会安装到最新版的SpeedTest-cli,无论是brew,yum还是apt,最后安装的版本都有可能是老版本。
2.3.1.1 Mac(brew安装)
brew install speedtest-cli
2.3.1.2 Centos(yum安装)
1) 查找speedcli-test
yum search speedtest-cli
2) 安装speedtest-cli
sudo yum install python2-speedtest-cli.noarch -y
2.3.1.3 Ubuntu(apt安装)
sudo apt install -y speedtest-cli
2.3.1.4 pip安装方式(推荐)
#此方法需要预装python2和pip
pip install git+https://github.com/sivel/speedtest-cli.git
2.3.2 命令行执行
2.3.2.1 帮助
这里以speedtest-cli的2.1.2版本为例,不同版本的命令行参数可能略有不同。
speedtest-cli -h
optional arguments:
-h, --help show this help message and exit
//指定该参数将不测试下载速度,默认是要测试下载速度的,建议不要指定。
--no-download Do not perform download test
//指定该参数将不测试上传速度,默认是要测试上传速度的,建议不要指定。
--no-upload Do not perform upload test
//使用单信道,默认使用多信道,测试单文件上传下载可以开启此项。
--single Only use a single connection instead of multiple. This
simulates a typical file transfer.
// 默认单位使用位(bit),开启此项会使用单位为字节(bytes),一个字节相当于8个位。此参数无法影响csv和json,图像输出中的单位(仍旧是bit)。
--bytes Display values in bytes instead of bits. Does not
affect the image generated by --share, nor output from
--json or --csv
//生成一个报告的url,用于分享给别人查看
--share Generate and provide a URL to the speedtest.net share
results image, not displayed with --csv
//输出概要结果,而不是详细结果
--simple Suppress verbose output, only show basic information
//输出为csv格式,速度单位限定为bit/s
--csv Suppress verbose output, only show basic information
in CSV format. Speeds listed in bit/s and not affected
by --bytes
//设定csv的分隔符,默认为逗号
--csv-delimiter CSV_DELIMITER
Single character delimiter to use in CSV output.
Default ","
//输出csv的header,就是表头
--csv-header Print CSV headers
//输出为json格式,速度单位限定为bit/s
--json Suppress verbose output, only show basic information in JSON format. Speeds listed in bit/s and not
affected by --bytes
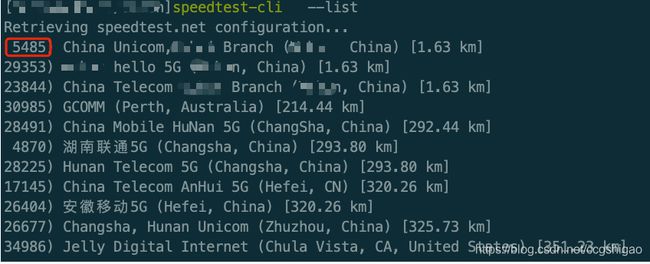
//查看当前speedtest用于测速的目的服务器
--list Display a list of speedtest.net servers sorted by
distance
//指定目的服务器ID进行测试,这里的ID为--list查询到的服务器ID
--server SERVER Specify a server ID to test against. Can be supplied
multiple times
//排除目的服务器ID进行测试,这里的ID为--list查询到的服务器ID
--exclude EXCLUDE Exclude a server from selection. Can be supplied
multiple times
//这里试了下,貌似目的服务器不存在,超时了
-mini MINI URL of the Speedtest Mini server
//指定源ip,其实就是本机ip,可以用ifconifg查看本机ip
--source SOURCE Source IP address to bind to
//设置http超时时间,默认为10s
--timeout TIMEOUT HTTP timeout in seconds. Default 10
//指定--secure后,会使用https协议进行通信
--secure Use HTTPS instead of HTTP when communicating with
speedtest.net operated servers
//这里是speedcli-test的内存使用策略,默认开启就好,指定此参数会占用过多内存
--no-pre-allocate Do not pre allocate upload data. Pre allocation is
enabled by default to improve upload performance. To
support systems with insufficient memory, use this
option to avoid a MemoryError
//查看对应版本
--version Show the version number and exit
2.3.2.2 实例
1) 执行默认测速
speedtest-cli
过一会儿就能输出对于的报告,如图,我的实际上传速度为73Mbps,下载速度为92.75Mbps,我家办理的网正好是百兆带宽。
2)输出简要报告
speedtest-cli --simple
3)使用https通信
speedtest-cli --simple --secure
4)设置网速单位为字节
speedtest-cli --simple --secure --bytes
5) 绑点源IP
speedtest-cli --source 192.168.31.133
6) 输出Json格式
speedtest-cli --json
7)CSV操作
a)输出csv-header
b)输出csv格式数据
c)设置csv分隔符
![]()
8) 查看当前用于测试的目的服务器
speedtest-cli --list
9) 指定测试的目的服务器测速
speedtest-cli --server 5485
以上就是speedtest的所有安装以及使用介绍,编写不易,如果对你有帮助,辛苦点个赞,有疑问可以在文章后面留言~
博主:测试生财
座右铭:专注测试与自动化,致力提高研发效能;通过测试精进完成原始积累,通过读书理财奔向财务自由。
csdn:https://blog.csdn.net/ccgshigao
博客园:https://www.cnblogs.com/qa-freeroad/
51cto:https://blog.51cto.com/14900374


