未经同意,不得转载
人脸遮挡检测(Face occlusion detect)有助于构建高质量的人脸识别底库。本文定义人脸的遮挡位置为5个区域:左眼,右眼,鼻子,嘴和下巴,基于Tensorflow + Keras训练一个简单的CNN人脸遮挡检测模型,并结合Dlib人脸检测器实现测试Demo的示例,最后的效果如下图所示。
项目地址:https://github.com/Oreobird/Face-Occlusion-Detect
一、样本准备
1、Cofw数据库
数据是 .mat 格式,其中包括了图像像素值,29个点的landmarks坐标以及每个点的遮挡情况,可以通过以下的代码转换为jpg图像以及相应的ground_true数据:
#mat_file: COFW_train.mat, COFW_test.mat
#img_token: 'IsTr', 'IsT'
#bbox_token: 'bboxesTr', 'bboxesT'
#phis_token: 'phisTr', 'phisT'
def mat_to_files(mat_file, img_token, bbox_token, phis_token, img_dir, gt_txt_file):
    train_mat = h5py.File(mat_file, 'r')
    tr_imgs_obj = train_mat[img_token][:]
    total_num = tr_imgs_obj.shape[1]
    # print(total_num)

    with open(gt_txt_file, "w+") as trf:
        for i in range(total_num):
            img = train_mat[tr_imgs_obj[0][i]][:]
            bbox = train_mat[bbox_token][:]
            bbox = np.transpose(bbox)[i]

            img = np.transpose(img)
            if not os.path.exists(img_dir):
                os.mkdir(img_dir)

            cv2.imwrite(img_dir + "/{}.jpg".format(i), img)
            gt = train_mat[phis_token][:]
            gt = np.transpose(gt)[i]

            content = img_dir + "/{}.jpg,".format(i)
            for k in range(bbox.shape[0]):
                content = content + bbox[k].astype(str) + ' '
            content += ','
            for k in range(gt.shape[0]):
                content = content + gt[k].astype(str) + ' '
            content += '\n'
            trf.write(content)

if not os.path.exists(data_root + "train_ground_true.txt"):
    mat_to_files(data_root + "COFW_train.mat",
                     'IsTr', 'bboxesTr', 'phisTr',
                     data_root + "train",
                     data_root + "train_ground_true.txt")

if not os.path.exists(data_root + "test_ground_true.txt"):
    mat_to_files(data_root + "COFW_test.mat",
                     'IsT', 'bboxesT', 'phisT',
                     data_root + "test",
                     data_root + "test_ground_true.txt")
打开生成的train_ground_true.txt文件后,以逗号隔开的内容为:
其中的landmarks信息为:
2、分类标签
人脸遮挡定义为5个区域,分类的标签使用one-hot编码,有遮挡的位为1,无遮挡为0,另外再加一个normal的标签表示正常无遮挡,当其他5个区域中至少有一个为1时,normal位就为0,格式为:
[normal,left-eye,right-eye,nose,mouth,chin]
对应的landmarks遮挡标记下标索引为:
left-eye:8,10,12,13,16
right-eye:9,11,14,15,17
nose:18,19,20,21
mouth:22,23,24,25,26,27
chin:28
当其中的这些点有遮挡时,则认为此区域被遮挡。可以通过以下代码对图像生成相应的标注信息:
# gt_txt:ground_true文件
# face_img_dir: 图像目录
# face_txt:要生成的标注信息文件
# show:在人脸图像上显示29个landmarks点

def face_label(gt_txt, face_img_dir, face_txt, show=False):
    img_num = 1
    with open(face_txt, "w+") as face_txt_fp:
        with open(gt_txt, 'r') as gt_fp:
            line = gt_fp.readline()
            while line:
                img_path, bbox, phis = line.split(',')

                phis = phis.strip('\n').strip(' ').split(' ')
                phis = [int(float(x)) for x in phis]
                # print(phis)

                if show:
                    for i in range(29):
                        cv2.circle(img, (phis[i], phis[i + 29]), 2, (0, 255, 255))
                        cv2.putText(img, str(i), (phis[i], phis[i + 29]),
 cv2.FONT_HERSHEY_COMPLEX,0.3,(0,0,255),1)
                        cv2.imshow("img", img)
                        cv2.waitKey(0)

                slot = phis[58:]
                label = [1, 0, 0, 0, 0, 0]
                # if slot[0] and slot[2] and slot[4] and slot[5]:
                # label[1] = 1 # left eyebrow
                # label[0] = 0
                if slot[16]: # slot[10] or slot[12] or slot[13] or slot[16] or slot[8]:
                    label[1] = 1 # left eye
                    label[0] = 0
                # if slot[1] and slot[3] and slot[6] and slot[7]:
                # label[3] = 1 # right eyebrow
                # label[0] = 0
                if slot[17]: # slot[11] or slot[14] or slot[15] or slot[17] or slot[9]:
                    label[2] = 1 # right eye
                    label[0] = 0
                if slot[20]: # slot[18] or slot[19] or slot[20] or slot[21]:
                    label[3] = 1 # nose
                    label[0] = 0
                if slot[22] or slot[23] or slot[25] or slot[26] or slot[27]: # or slot[24]
                    label[4] = 1 # mouth
                    label[0] = 0
                if slot[28]:
                    label[5] = 1 # chin
                    label[0] = 0

                lab_str = ''
                for x in label:
                    lab_str += str(x) + ' '

                content = face_img_dir + "{}.jpg".format(img_num) + ',' + lab_str.rstrip(' ')
                content += '\n'
                # print(content)
                face_txt_fp.write(content)

                line = gt_fp.readline()
                img_num += 1
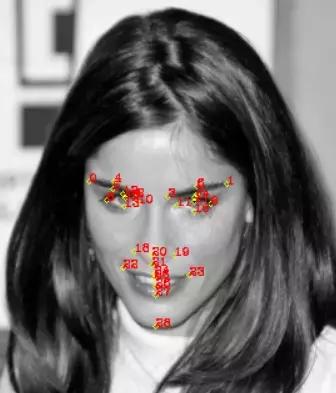
将show参数置为True后,可以得到landmarks的29个点位置如下:
3、数据预处理
由于Cofw的样本数据只有1000多个,并且有遮挡的人脸很少,为了避免训练时过拟合,需要对原始样本做一个处理。本文通过对5个区域随机叠加随机灰度值的遮挡块来扩展遮挡样本:
测试时发现,此方法会导致当人脸有普通的眼镜和有胡子时的误识别率,会把眼镜和胡子也识别为遮挡,所以在构造训练样本时,加入了200张正常眼镜和200张稀疏胡子的正样本,再对所有图像作左右上下和中心区域的截取。将2000张左右的原始图扩展为100000多张训练样本。最终,训练样本图像大小resize为96x96,85%做训练,15%做验证。
二、模型构建
1、模型结构
由于可以是人脸多区域的遮挡,所以可以建模为多标签的分类问题。模型结构如下图所示:
多标签分类的输出层激活函数使用Sigmoid,loss类型为binary_crossentropy,即对每个标签做二分类。模型类的代码如下,其中实现了自定义的简单模型和基于VGG16来finetune的两种构建方式。
import tensorflow as tf
import os
import numpy as np
import cv2
import scipy.io as sio
import heapq
# import tensorflow.contrib.eager as tfe
# tfe.enable_eager_execution()
# np.set_printoptions(threshold=np.nan)
EPOCHS = 25
class FodNet:
def __init__(self, dataset, class_num, batch_size, input_size, fine_tune=True, fine_tune_model_file='imagenet'):
    self.class_num = class_num
    self.batch_size = batch_size
    self.input_size = input_size
    self.dataset = dataset
    self.fine_tune_model_file = fine_tune_model_file
    if fine_tune:
        self.model = self.fine_tune_model()
    else:
        self.model = self.__create_model()

def __base_model(self, inputs):
    feature = tf.keras.layers.Conv2D(filters=64, kernel_size=(5, 5), strides=(1, 1), padding='same')(inputs)
    feature = tf.keras.layers.BatchNormalization()(feature)
    feature = tf.keras.layers.Activation(activation=tf.nn.relu)(feature)
    feature = tf.keras.layers.Conv2D(filters=64, kernel_size=(5, 5), strides=(1, 1), padding='same')(feature)
    feature = tf.keras.layers.BatchNormalization()(feature)
    feature = tf.keras.layers.Activation(activation=tf.nn.relu)(feature)
    feature = tf.keras.layers.MaxPool2D(pool_size=(2, 2), strides=(2, 2))(feature)

    feature = tf.keras.layers.Conv2D(filters=64, kernel_size=(3, 3), strides=(1, 1), padding='same')(feature)
    feature = tf.keras.layers.BatchNormalization()(feature)
    feature = tf.keras.layers.Activation(activation=tf.nn.relu)(feature)
    feature = tf.keras.layers.Conv2D(filters=64, kernel_size=(3, 3), strides=(1, 1), padding='same')(feature)
    feature = tf.keras.layers.BatchNormalization()(feature)
    feature = tf.keras.layers.Activation(activation=tf.nn.relu)(feature)
    feature = tf.keras.layers.MaxPool2D(pool_size=(2, 2), strides=(2, 2))(feature)
    return feature

 def __dense(self, feature):
    feature = tf.keras.layers.Flatten()(feature)
    feature = tf.keras.layers.Dense(units=128)(feature)
    feature = tf.keras.layers.BatchNormalization()(feature)
    feature = tf.keras.layers.Activation(activation=tf.nn.relu)(feature)
    feature = tf.keras.layers.Dropout(0.5)(feature)
    feature = tf.keras.layers.Dense(units=256)(feature)
    feature = tf.keras.layers.BatchNormalization()(feature)
    feature = tf.keras.layers.Activation(activation=tf.nn.relu)(feature)
    feature = tf.keras.layers.Dropout(0.5)(feature)
    return feature

def __create_model(self):
    input_fod = tf.keras.layers.Input(name='fod_input', shape=(self.input_size,   self.input_size, 1))
    feature_fod = self.__base_model(input_fod)
    feature_fod = self.__dense(feature_fod)
    output_fod = tf.keras.layers.Dense(name='fod_output', units=self.class_num, activation=tf.nn.sigmoid)(feature_fod)
    model = tf.keras.Model(inputs=[input_fod], outputs=[output_fod])
    losses = {
      'fod_output': 'binary_crossentropy',
    }
    model.compile(optimizer=tf.train.AdamOptimizer(),
                  loss=losses,
                  metrics=['accuracy'])
    return model
def __extract_output(self, model, name, input):
    model._name = name
    for layer in model.layers:
        layer.trainable = True
    return model(input)

def fine_tune_model(self):
    input_fod = tf.keras.layers.Input(name='fod_input', shape=(self.input_size, self.input_size, 3))
    # resnet_fod = tf.keras.applications.ResNet50(weights='imagenet', include_top=False)
    # feature_fod = self.__extract_output(resnet_fod, 'resnet_fod', input_fod)

    vgg16_fod = tf.keras.applications.VGG16(weights=self.fine_tune_model_file, include_top=False)
    feature_fod = self.__extract_output(vgg16_fod, 'vgg16_fod', input_fod)

    feature_fod = self.__dense(feature_fod)
    output_fod = tf.keras.layers.Dense(name='fod_output', units=self.class_num, activation=tf.nn.sigmoid)(feature_fod)

    model = tf.keras.Model(inputs=[input_fod], outputs=[output_fod])
    losses = {
        'fod_output': 'binary_crossentropy',
    }

    model.compile(optimizer=tf.train.AdamOptimizer(),
    loss=losses,
    metrics=['accuracy'])
    return model

def fit(self, model_file, checkpoint_dir, log_dir, max_epoches=EPOCHS, train=True):
    self.model.summary()
    if not train:
        self.model.load_weights(model_file)
    else:
        cp_callback = tf.keras.callbacks.ModelCheckpoint(checkpoint_dir,
                                                         save_weights_only=True,
                                                          save_best_only=True,
                                                          period=2,
                                                          verbose=1)
        earlystop_cb = tf.keras.callbacks.EarlyStopping(monitor='val_loss',
                                                        mode='min',
                                                        min_delta=0.001,
                                                        patience=3,
                                                        verbose=1)
        tb_callback = tf.keras.callbacks.TensorBoard(log_dir=log_dir)
        input_name_list = ['fod_input']
        output_name_list = ['fod_output']
        self.model.fit_generator(generator=self.dataset.data_generator(input_name_list, output_name_list, 'train.txt'),
                                epochs=max_epoches,
                                steps_per_epoch=self.dataset.train_num() // self.batch_size,
                                validation_data=self.dataset.data_generator(input_name_list, output_name_list, 'val.txt'),
                                validation_steps=self.dataset.val_num() // self.batch_size,
                                callbacks=[cp_callback, earlystop_cb, tb_callback],
                                max_queue_size=10,
                                workers=1,
                                verbose=1)
        self.model.save(model_file)

def predict(self):
    input_name_list = ['fod_input']
    output_name_list = ['fod_output']
    predictions = self.model.predict_generator(generator=self.dataset.data_generator(input_name_list, output_name_list, 'test.txt', shuffle=False),
 steps=self.dataset.test_num() // self.batch_size,
 verbose=1)
    if len(predictions) > 0:
        fod_preds = predictions
        # print(fod_preds)
        test_data = self.dataset.data_generator(input_name_list, output_name_list, 'test.txt', shuffle=False)
        correct = 0
        steps = self.dataset.test_num() // self.batch_size
        total = steps * self.batch_size

        for step in range(steps):
            _, test_batch_y = next(test_data)
            fod_real_batch = test_batch_y['fod_output']
            for i, fod_real in enumerate(fod_real_batch):
                fod_real = fod_real.tolist()
                one_num = fod_real.count(1)
                fod_pred_idxs = sorted(list(map(fod_preds[self.batch_size * step + i].tolist().index,
                                            heapq.nlargest(one_num, fod_preds[self.batch_size * step + i]))))
                fod_real_idxs = [i for i,x in enumerate(fod_real) if x == 1]
                # print(fod_pred_idxs)
                # print(fod_real_idxs)
                if fod_real_idxs == fod_pred_idxs:
                    correct += 1
        print("fod==> correct:{}, total:{}, correct_rate:{}".format(correct, total, 1.0 * correct / total))
    return predictions

def test_online(self, face_imgs):
    batch_x = np.array(face_imgs[0]['fod_input'], dtype=np.float32)
    batch_x = np.expand_dims(batch_x, 0)

    predictions = self.model.predict({'fod_input': batch_x}, batch_size=1)
    # predictions = np.asarray(predictions)
    return predictions
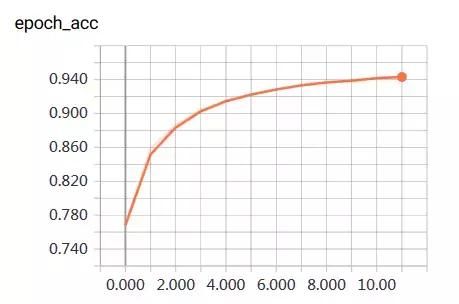
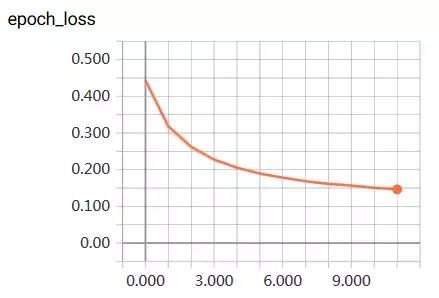
2、训练曲线
三、测试
通过Dlib实时检测人脸实现,需要先下载好Dlib的人脸检测模型文件:
shape_predictor_68_face_landmarks.dat
dlib实现了68个人脸landmarks点的检测,这里根据这些点来crop出人脸区,在有遮挡时在 相应的区域画圈圈,代码如下:
import os
import dlib
from imutils import face_utils
import cv2
import numpy as np
class CameraTester():
    def __init__(self, net=None, input_size=96, fine_tune=False, face_landmark_path='./model/shape_predictor_68_face_landmarks.dat'):
        self.cap = cv2.VideoCapture(0)
        if not self.cap.isOpened():
            raise Exception("Unable to connect to camera.")
        self.detector = dlib.get_frontal_face_detector()
        self.predictor = dlib.shape_predictor(face_landmark_path)
        self.net = net
        self.input_size = input_size
        self.fine_tune = fine_tune

    def crop_face(self, shape, img, input_size):
        x = []
        y = []
        for (_x, _y) in shape:
            x.append(_x)
            y.append(_y)

        max_x = min(max(x), img.shape[1])
        min_x = max(min(x), 0)
        max_y = min(max(y), img.shape[0])
        min_y = max(min(y), 0)

        Lx = max_x - min_x
        Ly = max_y - min_y
        Lmax = int(max(Lx, Ly))
        delta = Lmax // 2

        center_x = (max(x) + min(x)) // 2
        center_y = (max(y) + min(y)) // 2
        start_x = int(center_x - delta)
        start_y = int(center_y - 0.99 * delta)
        end_x = int(center_x + delta)
        end_y = int(center_y + 1.01 * delta)
        start_y = 0 if start_y < 0 else start_y
        start_x = 0 if start_x < 0 else start_x
        end_x = img.shape[1] if end_x > img.shape[1] else end_x
        end_y = img.shape[0] if end_y > img.shape[0] else end_y

        crop_face = img[start_y:end_y, start_x:end_x]
        print(crop_face.shape)
        crop_face = cv2.cvtColor(crop_face, cv2.COLOR_BGR2GRAY)

        crop_face = cv2.resize(crop_face, (input_size, input_size)) / 255
        channel = 3 if self.fine_tune else 1
        crop_face = np.resize(crop_face, (self.input_size, self.input_size, channel))
        return crop_face, start_y, end_y, start_x, end_x

    def get_area(self, shape, idx):
        #[[x, y], radius]
        left_eye = [(shape[42] + shape[45]) // 2, abs(shape[45][0] - shape[42][0])]
        right_eye = [(shape[36] + shape[39]) // 2, abs(shape[39][0] - shape[36][0])]
        nose = [shape[30], int(abs(shape[31][0] - shape[35][0]) / 1.5)]
        mouth = [(shape[48] + shape[54]) // 2, abs(shape[48][0] - shape[54][0]) // 2]
        chin = [shape[8], nose[1]]
        area = [None, left_eye, right_eye, nose, mouth, chin]
        block_area = [x for i, x in enumerate(area) if i in idx]
        return block_area

    def draw_occlusion_area(self, img, shape, idx):
        area = self.get_area(shape, idx)
        for k, v in enumerate(area):
            if v:
                cv2.circle(img, tuple(v[0]), v[1], (0, 255, 0))

    def run(self):
        frames = []
        while self.cap.isOpened():
            ret, frame = self.cap.read()
            if ret:
                frame = cv2.resize(frame, (640, 480))
                face_rects = self.detector(frame, 0)
                if len(face_rects) > 0:
                    shape = self.predictor(frame, face_rects[0])
                    shape = face_utils.shape_to_np(shape)
                    input_img, start_y, end_y, start_x, end_x = self.crop_face(shape, frame, self.input_size)
                    cv2.rectangle(frame, (start_x, start_y), (end_x, end_y), (0, 255, 0), thickness=2)
                    frames.append({'fod_input': input_img})
                    if len(frames) == 1:
                        pred = self.net.test_online(frames)
                        print(pred)
                        idx = [i for i, x in enumerate(pred[0]) if x > 0.5]
                        frames = []
                        print(idx)
                        if len(idx):
                            self.draw_occlusion_area(frame, shape, idx)
                        else:
                            print("No face detect")
            cv2.imshow("frame", frame)
            if cv2.waitKey(1) & 0xFF == ord('q'):
                break
四、总结
本文基于Tensorflow+keras+Dlib实现了一个人脸遮挡实时检测的Demo。由于训练样本的比较单一,模型简单,实现的效果准确率还有待提高。


