Android自定义View详解
Android控件架构
Android中的每个控件都会在界面上占据一个矩形区域,控件大致分成两类,ViewGroup控件和View控件。ViewGroup控件往往作为容器,它可以包含多个View控件,并管理被其包含的子控件。通过ViewGroup,整个界面上的控件形成了一个树形结构,上层控件负责下层子控件的测量和绘制,并传递交互事件
自定义View
View类是Android中的一个超类,ViewGroup类也是继承自View类。View中通常有下面这些比较重要的回调方法:
**onMeasure():**对组件的大小进行测量
**onLayout():**对子控件进行排列,确定子控件的位置
**onDraw():**绘制子控件的内容
**onTouchEvent():**监听组件的触摸事件
通常情况下,自定义控件可以分为下面三类:
(1)继承现有控件,对其进行扩展
(2)组合不同的控件来实现新的控件
(3)重写View实现全新的控件
当我们要实现一个自定义View时,需要思考它是属于哪一类的自定义控件,并且思考实现这样的控件,需要用到View中的哪些回调方法。比如,当你想改变TextView的外观时,那么你可以新建一个类,继承TextView,并重写onDraw()和onMeasure()等方法
View的测量
Android系统给我们提供了一个专门帮助我们测量View的类,MeasureSpec,它是一个32位的int值,其中高2位为测量的模式,低30位为测量的大小,测量模式包括:
(1)EXACTLY:精确值模式,当我们将控件宽高指定为具体数值或者match_parent时,就代表着该控件的测量模式是EXACTLY模式
(2)AT_MOST:最大值模式,当控件的宽高指定为wrap_content时,控件的大小就会随着内容的变化而变化,内容有多大,它就占据多大空间
(3)UNSPECIFIED:不指定测量模式,View想多大就多大
View类默认的onMeasure()方法只支持EXACTLY模式,所以在实现自定义控件的时候,如果没有重写onMeasure()方法,那么在使用的时候必须指定控件的具体数值,而不能指定为wrap_content,否则会出现问题
View的绘制
在Android中,每一个View都有一个用于绘图的画布,即Canvas,用于绘制图形的画笔是Paint,而颜料则是我们自己定义的一些颜色属性,只要给画笔设置颜色属性,就相当于拥有任意颜色任意数量的画笔了,要使用自定义属性,需要在res资源目录的values目录下创建一个attrs.xml的属性定义文件,并添加属性代码:
attrs.xml
<resources>
    <declare-styleable name="CustomView">
        <attr name="ringWidth" format="dimension"/>
        <attr name="ringColor" format="color"/>
        <attr name="progressColor" format="color"/>
        <attr name="textSize" format="dimension"/>
        <attr name="textColor" format="dimension"/>
        <attr name="progressSize" format="dimension"/>
    declare-styleable>
resources>
class CustomView : View {


    private var ringWidth: Float     //圆环的宽度
    private var ringColor: Int   //圆环填充颜色
    private var progressColor: Int  //进度条填充颜色
    private var textSize: Float   //文字大小
    private var textColor: Int     //文字颜色
    private var progressSize: Float   //当前进度值
    private var mPaint = Paint() //画笔
    private var mWidth = 0    //控件本身的宽度

    constructor(context: Context) : this(context, null)

    constructor(context: Context, attrs: AttributeSet?) : this(context, attrs, 0)

    constructor(context: Context, attrs: AttributeSet?, defStyleAttr: Int) : super(
        context,
        attrs,
        defStyleAttr
    ) {

        mPaint.isAntiAlias = true
        val ta = context.obtainStyledAttributes(attrs, R.styleable.CustomView)
        ringWidth = ta.getDimension(R.styleable.CustomView_ringWidth, 20F)
        ringColor = ta.getColor(R.styleable.CustomView_ringColor, Color.GRAY)
        progressColor = ta.getColor(R.styleable.CustomView_progressColor, Color.BLUE)
        textSize = ta.getDimension(R.styleable.CustomView_textSize, 60F)
        textColor = ta.getColor(R.styleable.CustomView_textColor, Color.BLACK)
        progressSize = ta.getDimension(R.styleable.CustomView_progressSize, 50F)
        ta.recycle()  //回收TypeArray
    }

    override fun onMeasure(widthMeasureSpec: Int, heightMeasureSpec: Int) {

        super.onMeasure(widthMeasureSpec, heightMeasureSpec)
        mWidth = measuredWidth   //控件本身的宽度可以在onMeasure()方法中获取到
    }

    @SuppressLint("DrawAllocation")
    override fun onDraw(canvas: Canvas?) {

        super.onDraw(canvas)
        //获取圆心坐标及半径
        val circleX = mWidth / 2.toFloat()
        val circleY = mWidth / 2.toFloat()
        val radius = mWidth / 2 - ringWidth / 2.toFloat()
        //绘制圆环
        mPaint.style = Paint.Style.STROKE
        mPaint.strokeWidth = ringWidth.toFloat()
        mPaint.color = ringColor
        canvas?.drawCircle(circleX, circleY, radius, mPaint)
        //绘制圆弧,RectF用于构造一个矩形区域,作为传入的椭圆对象
        val oval = RectF(ringWidth / 2F, ringWidth / 2F, mWidth - ringWidth / 2F, mWidth - ringWidth / 2F)
        mPaint.color = progressColor
        canvas?.drawArc(oval, 0F, (progressSize * 360 / 100).toFloat(), false, mPaint)
        //绘制文本
        val progressText = "$progressSize%"
        mPaint.color = textColor
        mPaint.textSize = textSize
        mPaint.strokeWidth = 1F
        val rect = Rect()
        mPaint.getTextBounds(progressText, 0, progressText.length, rect)
        canvas?.drawText(
            progressText,
            (mWidth / 2 - rect.width() / 2).toFloat(),
            (mWidth / 2 + rect.height() / 2).toFloat(), mPaint
        )

    }
}
然后直接在xml中引用即可
<androidx.constraintlayout.widget.ConstraintLayout
    xmlns:android="http://schemas.android.com/apk/res/android"
    xmlns:app="http://schemas.android.com/apk/res-auto"
    xmlns:tools="http://schemas.android.com/tools"
    android:layout_width="match_parent"
    android:layout_height="match_parent"
    tools:context=".MainActivity">

    <com.mvvm.customview.CustomView
        android:layout_width="120dp"
        android:layout_height="120dp"
        app:layout_constraintBottom_toBottomOf="parent"
        app:layout_constraintLeft_toLeftOf="parent"
        app:layout_constraintRight_toRightOf="parent"
        app:layout_constraintTop_toTopOf="parent"
        app:progressColor="@android:color/holo_blue_light"
        app:ringColor="@android:color/darker_gray"
        app:ringWidth="10dp"
        app:textColor="@android:color/holo_blue_light" />

androidx.constraintlayout.widget.ConstraintLayout>
注意:如果把宽高都改为wrap_content,会变成如下模样,可以看到,控件的大小占据了整个屏幕,显然不是我们想要的效果
原因在于,我们虽然重写了onMeasure()方法,但是我们没有对测量模式AT_MOST作处理,它就会变成这样的效果,解决方式是重写onMeasure()方法,在里面对宽高指定为wrap_content时的处理,修改onMeasure方法
 override fun onMeasure(widthMeasureSpec: Int, heightMeasureSpec: Int) {

        setMeasuredDimension(measureWidth(widthMeasureSpec), measureHeight(heightMeasureSpec))
        mWidth = measuredWidth   //控件本身的宽度可以在onMeasure()方法中获取到
    }

    //对宽度进行判断
    private fun measureWidth(widthMeasureSpec: Int): Int {

        var resultWidth = 0
        //获取设置的测量模式和大小
        val specMode = MeasureSpec.getMode(widthMeasureSpec)
        val specSize = MeasureSpec.getSize(widthMeasureSpec)

        //如果是精确值模式,则宽度等于用户设置的宽度
        if (specMode == MeasureSpec.EXACTLY) {

            resultWidth = specSize
        } else {

            //否则,设置默认值,如果是最大值模式,则取用户设置的值和默认值中较小的一个
            resultWidth = DensityUtil.dip2px(context, 200F)
            if (specMode == MeasureSpec.AT_MOST) {

                resultWidth = Math.min(resultWidth, specSize)
            }
        }
        return resultWidth
    }

    //对高度进行判断
    private fun measureHeight(heightMeasureSpec: Int): Int {

        var resultHeight = 0
        val specMode = MeasureSpec.getMode(heightMeasureSpec)
        val specSize = MeasureSpec.getSize(heightMeasureSpec)
        if (specMode == MeasureSpec.EXACTLY) {

            resultHeight = specSize
        } else {

            resultHeight = DensityUtil.dip2px(context, 200F)
            if (specMode == MeasureSpec.AT_MOST) {

                resultHeight = Math.min(resultHeight, specSize)
            }
        }
        return resultHeight
    }
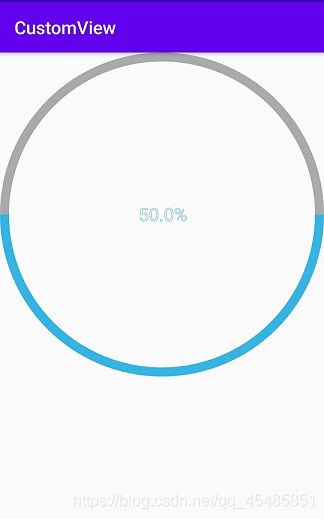
最后的效果如下:

而对于onLayout方法,可用于设置子控件的位置,对应一些普通的控件例如Button、TextView等控件,不存在子控件,所以不用重写该方法。线性布局、相对布局等存在子控件,可以重写该方法去控制子控件的位置,比如控制TextView的位置,可以重写onMeasure和onLayout方法实现
    //首先要获得当前控件中的宽度和高度,才能在onLayout中去知道控件的宽度和高度
    override fun onMeasure(widthMeasureSpec: Int, heightMeasureSpec: Int) {

        super.onMeasure(widthMeasureSpec, heightMeasureSpec)
        val childCount = childCount //判断是否存在子控件
        if (childCount > 0) {

            val childView = getChildAt(0) //获得第一个子控件
            //测量出当前子控件的大小
            measureChild(childView, widthMeasureSpec, heightMeasureSpec)
        }
    }

    override fun onLayout(changed: Boolean, l: Int, t: Int, r: Int, b: Int) {

        val childCount = childCount
        if (childCount > 0) {
      //判断是否存在子控件
            val childView = getChildAt(0) //获得第一个子控件
            //让子控件在屏幕的中点开始填充屏幕
            val childWidth = childView.measuredWidth
            val childHeigth = childView.measuredHeight
            childView.layout(
                DensityUtil.dip2px(context, 80F),
                DensityUtil.dip2px(context, 4F),
                childWidth + DensityUtil.dip2px(context, 80F),
                childHeigth
            ) //设置子控件的位置,需要首先获得子控件的大小
        }
    }