Using JSON with ASP.NET 3.5
Using JSON with ASP.NET 3.5
Published: 04 Jun 2008
By:
Download Sample Code
Thiru Thangarathinam explains how to use JSON as the preferred data format for invoking Web Services from the client side.
| Contents [hide] |
|---|
Introduction
Almost any application that you write will involve exchanging data from a client application to the server. This process involves selecting a data format and exchange protocol that will be required to enable this communication. When it comes to selecting these data formats, you have a variety of open standards that you can consider and the ideal choice depends on the requirements of the application.
For example, if you use SOAP based Web services, you format the data in an XML payload that is wrapped within a SOAP envelope. Although XML works well for many application scenarios, its inherent chatty nature makes it less than ideal for certain scenarios. For example, in an AJAX style Web application, you make asynchronous lightweight out-of-band calls to the server side to get the required data without even refreshing the browser. In this scenario, you need a lightweight, open, text-based platform independent data exchange format for transferring data back and forth between the client and server. That’s exactly what the JSON (Java Script Object Notation) standard provides.
This article will discuss the use of JSON in ASP.NET Web applications. In addition, you will also see how to use JSON as a data format for exchanging data from a WCF service to an AJAX based ASP.NET Web application.
Prerequisites
To follow along with the examples throughout this article series, you need the following installed on your system:
- Visual Studio 2008 (any edition) - Required for .NET Framework 3.5.
- SQL Server 2005 with the AdventureWorks database installed.
Introducing JSON
JSON has simple types and two structures which are very similar to the universally used data structures such as dictionary objects, hash values, key/value pairs, lists, sequences, record sets, arrays and so on. The basic data types supported by JSON are as follows:
- Number - Includes integer, real, and floating point.
- String – Supports Unicode.
- Boolean -
trueandfalse. - Array – It is represented as an ordered sequence of values, with each values being comma-separated and enclosed in square brackets.
- Object – Represents a collection of key/value pairs that are comma-separated and enclosed in curly brackets.
null
Let us consider the key characteristics of JSON in the next few sections.
JSON Object
A JSON object is an unordered set of key/value pairs, with keys separated by values using a colon (:). The members inside the object are separated by a comma (,).
- var prod = {"ProductID":1, "Name":"Adjustable Race", "ProductNumber":"AR-5381"};
Here is a variable that represents a JSON object with three members. A JSON object is always enclosed between curly brackets and the members inside the object are separated by a comma.
- var prod = {"ProductID":1, "Name":"Adjustable Race", "ProductNumber":"AR-5381"};
As you can see, the first member has the name ProductID with the value of 1.
Once you convert the string into a JSON representation, you can access any member value using the dot notation as shown below:
- alert(prod.ProductID);
The above code results in the ProductID value of 1 being displayed through the message box.
JSON Array
Unlike JSON objects, JSON arrays are enclosed between square braces [ ]. The JSON array is an ordered sequence of values separated by a comma (,). The values can be any of the primitive types as well as the JSON objects. In addition, you can also embed a JSON array inside another JSON array. Consider the following JSON array that has four string variables:
- var colorArray =["Red", "Blue", "Yellow", "Magenta"];
You will be able to access the above zero based array item through the array index.
- <Script Language="JavaScript">
- var colorArray =["Red", "Blue", "Yellow", "Magenta"];
- for (i=0; i<4; i++){
- document.write( myJsonArray[i]+ "<br>" );
- }
- </Script>
The above code displays the values of all the elements inside the array.
Using JSON with AJAX Enabled ASP.NET Web Service
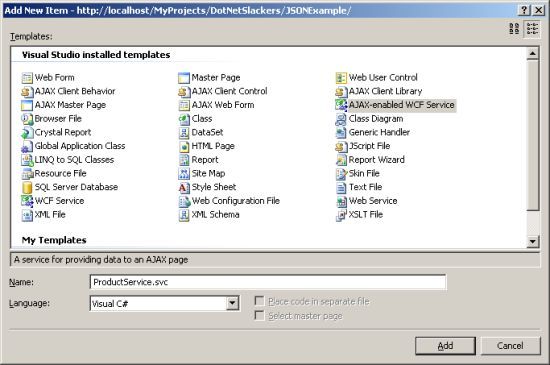
To start with, create a new Website named JSONExample using Visual Studio 2008. Once the Web site is created, add a new Web service by selecting the "AJAX-enabled WCF Service" template and name the Web service as ProductService as shown below:
Figure 1: The New Project dialog in Visual Studio 2008

After the project is created, select View->Solution Explorer from the menu so that you can examine the files within the project. The ProductService.cs file located inside the App_Code folder is the class that actually implements the Web service methods. The next section discusses the code of this class in depth.
Implementing the Web Service
Open up the ProductService.cs file and add a method named GetProductDetailsByProductID that retrieves the product details based on the supplied product id. Inside this method, add code to retrieve the product data from the database, convert that into a JSON string format, and finally return it back to the caller. Here is the required code to accomplish this:
- using System;
- using System.IO;
- using System.Runtime.Serialization;
- using System.ServiceModel;
- using System.ServiceModel.Activation;
- using System.Data.SqlClient;
- using System.Runtime.Serialization.Json;
- [ServiceContract(Namespace = "")]
- [AspNetCompatibilityRequirements(RequirementsMode = AspNetCompatibilityRequirementsMode.Allowed)]
- public class ProductService
- {
- [OperationContract]
- public string GetProductDetailsByProductID(int productID)
- {
- Product prod = new Product();
- string connectionString =
- "server=localhost;uid=sa;pwd=thiru;database=AdventureWorks;";
- using (SqlConnection connection = new SqlConnection(connectionString))
- {
- string sql = "Select Name, ProductNumber from Production.Product " +
- " Where ProductID = " + productID.ToString();
- connection.Open();
- SqlCommand command = new SqlCommand(sql, connection);
- SqlDataReader reader = command.ExecuteReader();
- while (reader.Read())
- {
- prod.Name = reader["Name"].ToString();
- prod.ProductNumber = reader["ProductNumber"].ToString();
- prod.ProductID = productID;
- }
- }
- MemoryStream stream = new MemoryStream();
- DataContractJsonSerializer serializer = new
- DataContractJsonSerializer(typeof(Product));
- serializer.WriteObject(stream, prod);
- stream.Position = 0;
- StreamReader streamReader = new StreamReader(stream);
- return streamReader.ReadToEnd();
- }
- }
- [DataContract]
- public class Product
- {
- [DataMember]
- public int ProductID;
- [DataMember]
- public string Name;
- [DataMember]
- public string ProductNumber;
- }
The ProductService class is decorated with the AspNetCompatibilityRequirements mode attribute that indicates that the WCF service should run in ASP.NET compatibility mode. Without this attribute, you will not be able to access the service from ASP.NET. This attribute is automatically generated when you add the "AJAX-enabled WCF Service."
- [AspNetCompatibilityRequirements(RequirementsMode =
- AspNetCompatibilityRequirementsMode.Allowed)]
- public class ProductService
In the GetProductDetailsByProductID method, you first establish connection to the database and execute the SQL statement that provides the product details as the result. After retrieving the data from the database, you populate the Product object with the values obtained from the SqlDataReader object.
- SqlDataReader reader = command.ExecuteReader();
- while (reader.Read())
- {
- prod.Name = reader["Name"].ToString();
- prod.ProductNumber = reader["ProductNumber"].ToString();
- prod.ProductID = productID;
- }
The Product class is simply a placeholder object that contains properties such as ProductID, Name, and ProductNumber that act as the container. The DataContract and DataMember attributes allow you to specify that the class and the members of the class are serializable.
- [DataContract]
- public class Product
- {
- [DataMember]
- public int ProductID;
- [DataMember]
- public string Name;
- [DataMember]
- public string ProductNumber;
- }
Now that you have the data in the Product object, the next step is to convert that into a JSON string representation. For that, you first create an instance of MemoryStream object and supply that as an argument to the constructor of the DataContractJsonSerializer object. The DataContractJsonSerializer class is a new class introduced with .NET Framework 3.5. As the name suggests, this class serializes an object to the JSON data and deserializes the JSON data back to an object.
- MemoryStream stream = new MemoryStream();
- DataContractJsonSerializer serializer = new
- DataContractJsonSerializer(typeof(Product));
Once you have the DataContractJsonSerializer object created, you then invoke its WriteObject method passing in the MemoryStream and the Product object as arguments. After the MemoryStream object is populated, you then convert it into a string format by loading it through the StreamReader object.
- serializer.WriteObject(stream, prod);
- stream.Position = 0;
- StreamReader streamReader = new StreamReader(stream);
Finally, the StreamReader.ReadToEnd method returns the string representation of the Product object back to the caller.
- return streamReader.ReadToEnd();
Implementing the AJAX Client
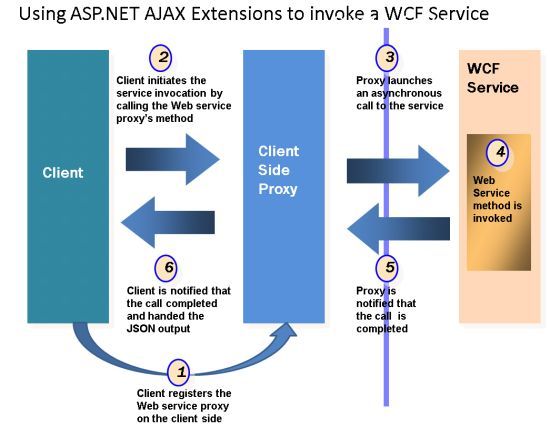
Before looking at the code required to implement the client, let us understand the steps involved in utilizing the ASP.NET AJAX extensions for invoking the WCF Web service.
- The client declares a
<asp:ScriptManager>element to specify the location of the Web service. Inside this element, you declare the path of the Web service using thePathattribute of the<asp:ServiceReference>element. This enables the client side code to dynamically create the proxy for the Web service. - You invoke a client-side method that will use declared proxy to invoke the Web service.
- The proxy invokes the Web service passing in the required arguments to the service, as well as the callback method to invoke after the Web service execution is completed. In addition, you also pass in a separate callback method that will be invoked in case an exception is generated during the server side processing.
- The service receives the request, processes the request by invoking the appropriate methods on the server side. Then it returns the results back to the proxy on the client side.
- The proxy receives the server response and invokes a callback method located on the client-side. If there is an error during the server side processing, the callback manager invokes a separate callback method.
- The client processes the results returned from the service call.
The above steps are depicted in the below diagram.
Figure 2: Using ASP.NET AJAX Extensions to invoke a WCF Service

Now that you have seen the steps, let us add a new ASP.NET Web page named ProductServiceClient.aspx to the Web site and modify its code to look as follows:
- <%@ Page Language="C#" %>
- <html xmlns="http://www.w3.org/1999/xhtml">
- <head runat="server">
- <title>Invoking the Product Service through the AJAX based Client</title>
- <script type="text/javascript">
- function pageLoad() {
- }
- function OnGetProductDetailsByProductID() {
- ProductService.GetProductDetailsByProductID($get("txtProductID").value,
- OnGetProductDetailsByProductIDComplete, OnError);
- }
- function OnGetProductDetailsByProductIDComplete(result){
- var prod = eval("(" + result + ")");
- $get("spnProductID").innerText = prod.ProductID;
- $get("spnProductName").innerText = prod.Name;
- $get("spnProductNumber").innerText = prod.ProductNumber;
- }
- function OnError(errorMessage) {
- alert(errorMessage.get_message());
- }
- </script>
- </head>
- <body>
- <form id="form1" runat="server">
- <div>
- Enter Product ID:
- <input type="text" id="txtProductID" name="txtProductID" />
- <input type="button" value="Get Product Details" id="btnInvokeWebService"
- onclick="OnGetProductDetailsByProductID()" />
- <asp:ScriptManager ID="ScriptManager1" runat="server">
- <Services>
- <asp:ServiceReference Path="~/ProductService.svc" />
- </Services>
- </asp:ScriptManager>
- <br /><br />
- Product ID : <span id="spnProductID"></span> <br /><br />
- Name :<span id="spnProductName"></span> <br /><br />
- Product Number :<span id="spnProductNumber"></span> <br /><br />
- </div>
- </form>
- </body>
- </html>
In the client side, you have a method named OnGetProductDetailsByProductID, which is invoked when the "Get Product Details" command button is clicked.
- function OnGetProductDetailsByProductID() {
- ProductService.GetProductDetailsByProductID($get("txtProductID").value,
- OnGetProductDetailsByProductIDComplete, OnError);
- }
From within the OnGetProductDetailsByProductID method, you invoke the Web service method through the proxy class and supply the following arguments:
ProductIDof the Product that is to be retrieved from the database. You retrieve this value from the text box namedtxtProductIDthrough the$getmethod that is equivalent todocument.getElementById method.- Name of the callback method that needs to be invoked if the Web service execution is successful
- Name of the callback method that needs to be invoked if an exception occurs during the execution of the Web service
Once the Web service method is successfully executed, the proxy automatically calls the OnGetProductDetailsByProductIDComplete method. In this example, since the value returned from the Web service is a JSON string, you need to convert that into an object so that you can easily work with it from the client side. Since JSON is a subset of JavaScript's object literal notation, you can accomplish this by using the simple eval function.
- function OnGetProductDetailsByProductIDComplete(result){
- var prod = eval("(" + result + ")");
- $get("spnProductID").innerText = prod.ProductID;
- $get("spnProductName").innerText = prod.Name;
- $get("spnProductNumber").innerText = prod.ProductNumber;
- }
Note that you need to use parentheses at the time of calling the eval function because bare objects aren’t considered valid JavaScript. Once you convert the JSON string into a Product object, you can then access its ProductID, Name and ProductNumber properties as if you are accessing a traditional object.
In the above implementation, it is important to notice that eval should only be used to parse JSON if the source of the JSON formatted text is completely trusted. However if you need to process JSON input from less trusted sources, you can use the third-party JSON parsers.
If a valid Product is returned from the function call, you display its contents by setting the values of the corresponding HTML span controls to the returned values. In case an exception occurs during the service execution, the error message returned from the service is displayed through a message box.
- function OnError(errorMessage) {
- alert(errorMessage.get_message());
- }
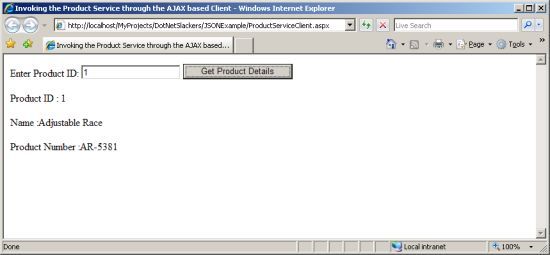
When you browse to the ProductServiceClient.aspx file using the browser and search for a product with product id of 1, the output should be somewhat similar to the following.
Figure 3: Output of the demo page

When you click on the "Get Product Details" in the above screen, you will notice that the product information is retrieved from the server and displayed in the browser; all without refreshing the page.
Conclusion
Although the examples presented in this installment were simple, they covered some key points. First, you learned the basics of JSON and how to declare JSON objects and arrays. After that you understood the steps involved in creating a WCF service that can be invoked through ASP.NET AJAX extensions. As part of implementing the Web service, you also how to use the new DataContractJsonSerializer class to convert an object representation into a JSON string on the service side. On the client side, you saw how to deserialize the JSON string returned from the service onto an object for further processing.