在 Windows Phone上使用QQConnect OAuth2
QQ互联OAuth2.0 .NET SDK 发布以及网站QQ登陆示例代码 这篇文章讲述的普通的ASP.NET站点上使用QQ互联,本篇文章主要介绍在WindowsPhone环境使用QQ互联OAuth2 SDK,本文的程序改自Google OAuth2 on Windows Phone。QQ互联的OAuth2和Google 的OAuth2的流程上差不多,QQ互联的还更简单一点。
代码中使用了如下三个类库:
这些库都可以通过NuGet包安装,需要注意的是JSON.NET (4.0.7)目前和RestSharp的最新版本102.6.0.0不兼容,需要使用JSON.NET (4.0.5)版本。
想把这个例子跑起来,需要到http://connect.qq.com 注册获取到appkey和appscrect,填写到配置文件:
其中CallBackURI是在登记的回调地址。程序采用MVVM模式,将OAuth2认证的页面为AuthenticationPage.xaml,登陆的逻辑都在ViewModel对应于AuthenticationViewModel,和QQ互联服务器交互的是AuthenticationProcess。交互的流程参照【QQ登录】开发攻略_Client-side。
AuthenticationViewModel::GetAccessCode封装了OAuth2的验证授权的逻辑。
private bool _isAuthenticating;
private Queue<Action<string,string>> _queuedRequests = new Queue<Action<string,string>>();
public void GetAccessCode(Action<string,string> callback)
{
lock (_sync)
{
if (_isAuthenticating)
{
_queuedRequests.Enqueue(callback);
}
else if (HasAuthenticated)
{
if (!_process.AuthResult.IsExpired)
{
callback(_process.AuthResult.AccessToken,_process.AuthResult.OpenId);
}
else
{
InvokeCallback(callback);
}
}
else
{
InvokeCallback(callback);
}
}
}
private void InvokeCallback(Action<string, string> callback)
{
_isAuthenticating = true;
_queuedRequests.Enqueue(callback);
((PhoneApplicationFrame)App.Current.RootVisual).Navigate(new Uri("/AuthenticationPage.xaml", UriKind.Relative));
AuthUri = _process.AuthUri;
}
1、如果正在认证过程中,把调用方法放到队列里,然后返回。
2、如果验证过了,并且票据还是有效的,直接回调方法。
3、如果没有认证过,或者票据已经失效了,转到验证页面,可以使用QQ号码登陆。
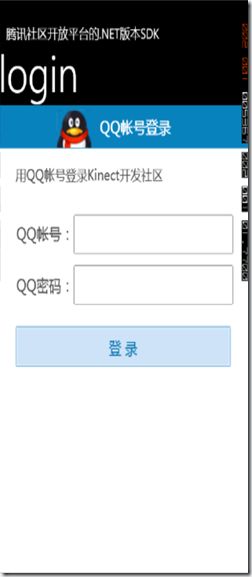
AuthenticationPage.xaml页面带了一个WebBrowser对象,将一个绑定是AuthenticationViewModel的AuthUri ,类似于
http://openapi.qzone.qq.com/oauth/show?which=Login&display=mobile&response_type=token&client_id=204134&redirect_uri=win8charm.com&scope=get_user_info,add_share,list_album,upload_pic,check_page_fans,add_t,add_pic_t,del_t,get_repost_list,get_info,get_other_info,get_fanslist,get_idolist,add_idol,del_idol,add_one_blog,add_topic,get_tenpay_addr&display=mobile
用户登陆后,如果是首次登陆还需要授权API的访问,然后会返回到redirect_uri参数指定的地址,这里可以拿到返回的用户的Access Token:
private void webBrowser1_Navigating(object sender, NavigatingEventArgs e)
{
if (e.Uri.Host.Equals("win8charm.com"))
{
webBrowser1.Visibility = Visibility.Collapsed;
e.Cancel = true;
// setting this text will bind it back to the view model
codeBlock.Text = e.Uri.Fragment.Replace("#", "");
}
}
把返回的AccessToken通过页面的一个CodeBlock的掩藏TextBlock将结果传递给View Model ,将Access Token和OpenID结果解析完成,完成整个验证过程。
private string _code;
public string Code
{
get
{
return _code;
}
set
{
_code = value;
_process.ExchangeCodeForToken(Code);
}
}
public void ExchangeCodeForToken(string code)
{
if (string.IsNullOrEmpty(code))
{
OnAuthenticationFailed(EventArgs.Empty);
}
else
{
OAuthToken response = this.restApi.GetUserAccessToken(code);
GetAccessToken(response);
}
}
void GetAccessToken(OAuthToken response)
{
Debug.Assert(response != null);
AuthResult = new Model.AuthResult()
{
AccessToken = response.AccessToken,
Expires = response.ExpiresAt
} ;
restApi.GetUserOpenIdAsync(AuthResult.AccessToken, GetUserOpenId, GetUserOpenIdFailure);
}
void GetUserOpenId(string response)
{
if (string.IsNullOrEmpty(response))
{
OnAuthenticationFailed(EventArgs.Empty);
}
AuthResult.OpenId = response;
OnAuthenticated();
}
在认证成功或者失败的时候引发认证成功或者失败的事件最终完成整个登陆过程。

