REST架构风格
REST的几条关键原则列举如下:
1.为所有“事物”定义ID
对事物使用一致的命名规则(naming scheme)最主要的好处就是你不需要提出自己的规则——而是依靠某个已被定义,在全球范围中几乎完美运行,并且能被绝大多数人所理解的规则。如果在一个类似于Amazon.com的在线商城中,没有用唯一的ID(一个URI)标识它的每一件商品,可想而知这将是多么可怕的业务决策。 下面是一些你可能想到的URI的例子:
http://example.com/customers/1234
http://example.com/orders/2007/10/776654
http://example.com/orders/2007/11
2.将所有事物链接在一起
任何可能的情况下,使用链接指引可以被标识的事物(资源)。也正是超链接造就了现在的Web。
3.使用标准方法
GET、POST、DELETE、PUT
4.资源多重表述
针对不同的需求提供资源多重表述,客户端可以请求返回指定格式的资源如xml
上面的内容来源于http://www.infoq.com/cn/articles/rest-introduction
英文地址http://www.infoq.com/articles/rest-introduction
还有一篇文章Build RESTful web services using Spring 3介绍了如何利用spring 3构建REST风格应用。
下面借用下上篇文章的例子介绍下如何在Spring3下搭建REST应用,首先在web.xml
配置contextConfigLocation
- <context-param>
- <param-name>contextConfigLocation</param-name>
- <param-value>
- /WEB-INF/rest-context.xml
- </param-value>
- </context-param>
- <!-- This listener will load other application context file in addition to
- rest-servlet.xml -->
- <listener>
- <listener-class>
- org.springframework.web.context.ContextLoaderListener
- </listener-class>
- </listener>
- <servlet>
- <servlet-name>rest</servlet-name>
- <servlet-class>
- org.springframework.web.servlet.DispatcherServlet
- </servlet-class>
- <load-on-startup>1</load-on-startup>
- </servlet>
- <servlet-mapping>
- <servlet-name>rest</servlet-name>
- <url-pattern>/service/*</url-pattern>
- </servlet-mapping>
下面是在rest-servlet.xml中配置Spring MVC
- <context:component-scan base-package="dw.spring3.rest.controller" />
- <!--To enable @RequestMapping process on type level and method level-->
- <bean class="org.springframework.web.servlet.mvc.annotation
- .DefaultAnnotationHandlerMapping" />
- <bean class="org.springframework.web.servlet.mvc.annotation
- .AnnotationMethodHandlerAdapter" />
- <!--Use JAXB OXM marshaller to marshall/unmarshall following class-->
- <bean id="jaxbMarshaller"
- class="org.springframework.oxm.jaxb.Jaxb2Marshaller">
- <property name="classesToBeBound">
- <list>
- <value>dw.spring3.rest.bean.Employee</value>
- <value>dw.spring3.rest.bean.EmployeeList</value>
- </list>
- </property>
- </bean>
- <bean id="employees" class=
- "org.springframework.web.servlet.view.xml.MarshallingView">
- <constructor-arg ref="jaxbMarshaller" />
- </bean>
- <bean id="viewResolver" class=
- "org.springframework.web.servlet.view.BeanNameViewResolver" />
Listing 3. EmployeeController控制器类
- @Controller
- public class EmployeeController {
- @RequestMapping(method=RequestMethod.GET, value="/employee/{id}")
- public ModelAndView getEmployee(@PathVariable String id) {
- Employee e = employeeDS.get(Long.parseLong(id));
- return new ModelAndView(XML_VIEW_NAME, "object", e);
- }
- }
Listing 4. EmployeeController in dw.spring3.rest.controller
- @RequestMapping(method=RequestMethod.POST, value="/employee")
- public ModelAndView addEmployee(@RequestBody String body) {
- Source source = new StreamSource(new StringReader(body));
- Employee e = (Employee) jaxb2Mashaller.unmarshal(source);
- employeeDS.add(e);
- return new ModelAndView(XML_VIEW_NAME, "object", e);
- }
- @RequestMapping(method=RequestMethod.PUT, value="/employee/{id}")
- public ModelAndView updateEmployee(@RequestBody String body) {
- Source source = new StreamSource(new StringReader(body));
- Employee e = (Employee) jaxb2Mashaller.unmarshal(source);
- employeeDS.update(e);
- return new ModelAndView(XML_VIEW_NAME, "object", e);
- }
- @RequestMapping(method=RequestMethod.DELETE, value="/employee/{id}")
- public ModelAndView removeEmployee(@PathVariable String id) {
- employeeDS.remove(Long.parseLong(id));
- List<Employee> employees = employeeDS.getAll();
- EmployeeList list = new EmployeeList(employees);
- return new ModelAndView(XML_VIEW_NAME, "employees", list);
- }
Listing 5. getAllEmployees in EmployeeController
- @RequestMapping(method=RequestMethod.GET, value="/employees")
- public ModelAndView getEmployees() {
- List<Employee> employees = employeeDS.getAll();
- EmployeeList list = new EmployeeList(employees);
- return new ModelAndView(XML_VIEW_NAME, "employees", list);
- }
Listing 6. EmployeeList class in dw.spring3.rest.bean
- @XmlRootElement(name="employees")
- public class EmployeeList {
- private int count;
- private List<Employee> employees;
- public EmployeeList() {}
- public EmployeeList(List<Employee> employees) {
- this.employees = employees;
- this.count = employees.size();
- }
- public int getCount() {
- return count;
- }
- public void setCount(int count) {
- this.count = count;
- }
- @XmlElement(name="employee")
- public List<Employee> getEmployees() {
- return employees;
- }
- public void setEmployees(List<Employee> employees) {
- this.employees = employees;
- }
- }
Listing 7. Define content negotiation
- <bean class="org.springframework.web.servlet.view
- .ContentNegotiatingViewResolver">
- <property name="mediaTypes">
- <map>
- <entry key="xml" value="application/xml"/>
- <entry key="html" value="text/html"/>
- </map>
- </property>
- <property name="viewResolvers">
- <list>
- <bean class="org.springframework.web.servlet.view
- .BeanNameViewResolver"/>
- <bean class="org.springframework.web.servlet.view
- .UrlBasedViewResolver">
- <property name="viewClass" value=
- "org.springframework.web.servlet.view.JstlView"/>
- <property name="prefix" value="/WEB-INF/jsp/"/>
- <property name="suffix" value=".jsp"/>
- </bean>
- </list>
- </property>
- </bean>
Listing 8. employees.jsp in /WEB-INF/jsp
- <table border=1>
- <thead><tr>
- <th>ID</th>
- <th>Name</th>
- <th>Email</th>
- </tr></thead>
- <c:forEach var="employee" items="${employees.employees}">
- <tr>
- <td>${employee.id}</td>
- <td>${employee.name}</td>
- <td>${employee.email}</td>
- </tr>
- </c:forEach>
- </table>
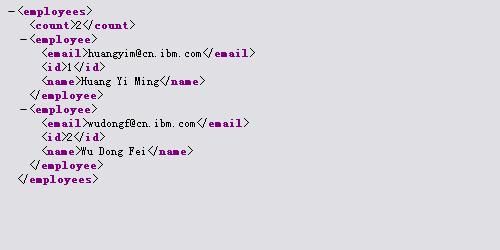
下面演示Clients如何与 REST services交互
curl –HAccept:application/xml http://localhost:8080/rest/service/employees
下面返回的xml包含employees


下面演示创建一个新的employee到服务端,
- curl -X POST -HContent-type:application/xml --data
- "<employee><id>3</id><name>guest</name><email>[email protected]</employee>"
- http://localhost:8080/rest/service/employee
这样一个新的employee注册好了. 可以用第一个例子的 employee 列表验证下.
PUT 和POST方法类似.
- curl -X PUT -HContent-type:application/xml --data
- "<employee><id>3</id><name>guest3</name><email>[email protected]</employee>"
- http://localhost:8080/rest/service/employee/3
上面代码更新了编号为3的 employee 数据。
现在spring3的mvc层以及完全支持REST了,你可以很轻松的用Spring APIs和注解去构建RESTful web services.