揭开 gcc 编辑器的面貌
目录
- 一、可执行程序是如何被组装的?
-
- 0)引言
- 1)生成静态库 .a 静态库
- 2)生成 .so 动态库
- 3)小结
- 二、探究 nasm 汇编器与 gcc 编译的区别
-
- 0)引言
- 1)用 nasm 汇编编辑器编译 .asm 文件
- 2)用 gcc 编译 .c 文件
- 3)小结
- 三、了解程序如何借助第三方库函数
-
- 0)引言
- 1)测试 telnet 协议
- 2)安装 curses 库
- 3)用 gcc 将 curses 库链接到 c 文件中
- 4)小结
- 四、参考资料
说明:本实验均在 Ubuntu 64 操作系统下进行的,有关 ubuntu 的安装请参考:VMware安装Ubuntu 18.04(必会)
一、可执行程序是如何被组装的?
①写三个 .c 文件并编译生成静态库,并用 ar 链接 main.c 文件,生成最终的可执行程序,记录文件的大小。
②将目标文件生成动态库文件, 然后用 gcc 将链接 main.c 函数生成可执行文件,记录文件的大小,并与之前做对比。
0)引言
gcc 可以将C文件编译成可执行文件,可是追根究底,C文件是如何被组装成可执行文件呢?接下来我们就一起探究一下,相信一定会见到另一番风景。
1)生成静态库 .a 静态库
第一步:准备4个C语言文件
创建一个文件夹 test1 用来储存C文件,再切换到该文件工作目录下。
mkdir test1
cd test1
注:若没有安装 nano 编辑器,可以输入命令:sudo apt install nano 进行安装。
//加法运算
#include <stdio.h>
void x2x(int x,int y){

	int m = x + y;
	printf("x+y=%d\n",m);
}
x2y.c
//减法运算
#include <stdio.h>
void x2y(int x,int y){

	int m = x + y;
	printf("x-y=%d\n",m);
}
xy.h
#ifndef XY_H
#define XY_H
void x2x(int,int);
void x2y(int,int);
#endif
main.c
#include "xy.h"
int main(){

	x2x(236,524);
	x2y(513,145);
}
第二步:生成 .a 静态库文件
先用 gcc 将三个 .c 文件编译为3个 .o 目标文件。
gcc -c x2x.c x2y.c main.c
ls

可见有个3个 .o 文件了。
然后将 x2x.o 和 x2y.o 目标文件用 ar 工具生成1个 .a 静态库文件。
静态库:静态库文件命名规范是以 lib 为前缀,紧接着跟静态库名,扩展名为 .a。例如:创建的静态库名为 afile ,则静态库文件名就是 libafile.a 。
ar -crv libafile.a x2x.o x2y.o
ls

可以看见有了一个 libafile.a 静态库文件了。
第三步:链接静态库文件
用 gcc 将 main 函数的目标文件(main.o)与此静态库文件(libafile.a)进行链接。
方法一:
gcc -o test main.c -L. -lafile
gcc main.c libafile.a -o test
方法三:
先生成 main.o :
gcc -c main.c
再生成可执行文件:
gcc -o test main.o libafile.a
执行结果:
./test

使用命令 ls -lht 或者 ll 可以查看文件夹内的所有文件大小,记下来。
size test
说明:即使删掉 libafile.a 静态库文件,test 可执行文件照常运行,说明静态库中的公用函数已经链接到 .o 目标文件中了
2)生成 .so 动态库
动态库文件名命名规范和静态库一样,只不过文件扩展名为 .so 了。例如:动态库名为 sofile ,则动态库文件名就是 libsofile.so 。
第一步:生成 .so 动态库文件
删除静态库文件和可执行文件,只保留目标文件。
rm -f libafile.a test
ls
gcc -shared -fpic -o libsofile.so x2x.o x2y.o (-o 不可少)

可以看见,生成了动态库文件 libsofile.so 。
第二步:链接动态库文件
生成可执行文件 test 。
gcc main.c libsofile.so -o test
./test

阿欧!出错了!别急,这是因为虽然 main.c 链接的是当前目录的动态库,但是运行时,是到 /usr/lib 文件下找库文件,所以将文件 libsofile.so 复制到目录 /usr/lib 中就 OK 啦。
首先切换到 root 用户。
su (输入密码后,敲回车)
注意:若第一次使用 root 用户,要先激活,使用命令:sudo passwd root
然后连续输入两个密码即可
mv libsofile.so /usr/lib
exit  (退出 root 用户)
./test

可以看见终于成功执行了,没有错误!
现在来看一下最终的可执行文件有多大?
![]()
可以看到 test 的大小,与之前用静态库链接生成的 test 可执行文件的大小差不太多。
3)小结
根据以上情况来说,函数库分为静态库和动态库两种。静态库在程序编译的时候会链接到目标代码中,但是运行的时候不再需要静态库了;动态库在程序编译的时候不会被链接到目标代码中,而是程序在运行的时候才会被载入。当动态库和静态库同时存在同一个文件夹中时,gcc 会优先链接动态库,所以最终的可执行文件的大小差不了多少,而在程序运行时还是需要动态库的存在。
二、探究 nasm 汇编器与 gcc 编译的区别
①as 汇编编译器针对的是 AT&T 汇编代码风格, Intel 风格的汇编代码则可以用 nasm 汇编编译器编译生成执行程序。
②在 ubuntu 中下载安装 nasm ,对示例代码“ hello.asm ”编译生成可执行程序,并与“ hello world ”C 代码的编译生成的程序大小进行对比。
0)引言
GCC(GNU C Compiler)是编译工具,其背后有多个编辑器和工具,分别介绍如下:
- addr2line:用来将程序地址转换成其所对应的程序源文件及所对应的代码行也可以得到所对应的函数。该工具将帮助调试器在调试的过程中定位对 应的源代码位置。
- as:主要用于汇编。
- ld:主要用于链接。
- ar:主要用于创建静态库。
- ldd:可以用于查看一个可执行程序依赖的共享库。
- objcopy:将一种对象文件翻译成另一种格式,譬如将 .bin 转换成 .elf 或者将.elf 转换成.bin 等。
- objdump:主要的作用是反汇编。
- readelf:显示有关 ELF 文件的信息。
- size:列出可执行文件每个部分的尺寸和总尺寸,代码段、数据段、总大小 等。
1)用 nasm 汇编编辑器编译 .asm 文件
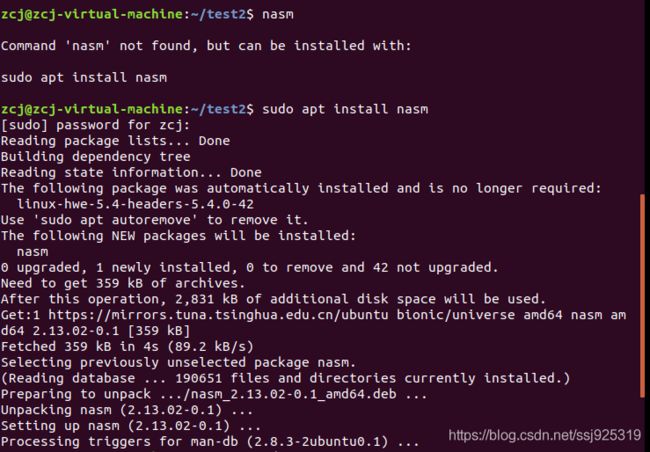
第一步:安装 nasm 汇编编译器。
sudo apt install nasm
nano hello.asm
![]()
hello.asm
; hello.asm
section .data            ; 数据段声明
        msg db "Hello, world!", 0xA     ; 要输出的字符串
        len equ $ - msg                 ; 字串长度
section .text            ; 代码段声明
global _start            ; 指定入口函数
_start:                  ; 在屏幕上显示一个字符串
        mov edx, len     ; 参数三:字符串长度
        mov ecx, msg     ; 参数二:要显示的字符串
        mov ebx, 1       ; 参数一:文件描述符(stdout)
        mov eax, 4       ; 系统调用号(sys_write)
        int 0x80         ; 调用内核功能
                         ; 退出程序
        mov ebx, 0       ; 参数一:退出代码
        mov eax, 1       ; 系统调用号(sys_exit)
        int 0x80         ; 调用内核功能
第三步:使用 nasm 编译
接下来我们就用 nasm 编译 hello.asm 文件生成 .o 目标文件,再用 ld 工具链接生成可执行文件并执行该文件。
nasm -felf64 hello.asm  (我们ubuntu是64位操作系统,如果你的是32位,则用 -felf)
ld -o hello -e _start hello.o
./hello
size hello

我天,这么小!比第一部分使用 ar 、gcc 编译成静态库、动态库,再链接成可执行文件都要小得多。
我们再来看看有没有链接动态库。
ldd hello
![]()
可以发现,并没有链接动态库。由链接器链接生成的最终文件为 ELF 格式的可执行文件,一个 ELF 可执行文件通常被链接为不同的段,常见的段譬如 .text 、.data 、.rodata 、.bss等段。若有兴趣深入了解 ELF 文件,可以阅读:ELF 文件格式的详解
asm 文件生成的可执行文件为什么这么小呢?如果有兴趣深入学习,可以参考:创建超小的ELF可执行文件(真是变态)
2)用 gcc 编译 .c 文件
第一步:新建一个 helloworld.c 文件。
nano helloworld.c
#include <stdio.h>
int main(void){

	printf("Hello World!\n");
	return 0;
}
第二步:预处理
问题:预处理都在做什么内容呢?
- 将所有的#define 删除,并且展开所有的宏定义,并且处理所有的条件预编 译指令,比如#if #ifdef #elif #else #endif 等。
- 处理#include 预编译指令,将被包含的文件插入到该预编译指令的位置。
- 删除所有注释“//”和“/* */”。
- 添加行号和文件标识,以便编译时产生调试用的行号及编译错误警告行号。
- 保留所有的#pragma 编译器指令,后续编译过程需要使用它们。
接下来就来开始使用预处理命令:
gcc -E helloworld.c -o helloworld.i
![]()
该 .i 文件可以打开看。
第三步:编译
编译过程就是对预处理完的文件进行一系列的词法分析,语法分析,语义分析及 优化后生成相应的汇编代码。
使用编译命令:
gcc -S helloworld.i -o helloworld.s
第四步:汇编
汇编过程调用对汇编代码进行处理,生成处理器能识别的指令,保存在后缀为.o 的目标文件中。
使用汇编命令:
gcc -c helloworld.s -o hello.o
或者
as -c helloworld.s -o hello.o
将 .o 文件链接生成可执行文件,并执行程序。
gcc helloworld.o -o helloworld
./helloworld
注:该链接语句默认链接动态库,如果要链接静态库,使用命令:gcc -static helloworld.c -o helloworld
size helloworld

相比于 nasm 编译 .asm 文件,gcc 编译链接生成的可执行文件要大得多。
再看看有没有链接动态库文件。
ldd helloworld

可以发现有链接动态库文件。
再来试试用 gcc 将静态库加入到可执行文件中去。
gcc -static helloworld.c -o helloworld  (链接)
./helloworld  (执行程序)
sieze helloworld  (查看文件大小)
ldd helloworld  (查看链接库文件情况)
3)小结
用 nasm 汇编 Intel 风格的汇编代码,再链接成可执行文件,可以发现文件是极小的,而用 gcc 链接到动态库是比较大的,更突然的是将静态库文件加入的最终的可执行文件是大得多的,这也是合理的,毕竟将那么多库文件加入到最终的可执行文件。
三、了解程序如何借助第三方库函数
0)引言
每一个程序背后都站着一堆优秀的代码库,了解实际程序是如何借助第三方库函数的。
1)测试 telnet 协议
TELNET 协议是 Internet 远程登录服务的标准协议和主要方式,是 TCP/IP 协议族中的一员。有关它的详细介绍请参考:TELNET协议
接下来就来了解下如何打开 telnet 协议。
首先,Win10系统下,打开 “ 控制面板 ” 后,点击 “ 程序 ”。

勾选上 “ Telent Client ” 功能。
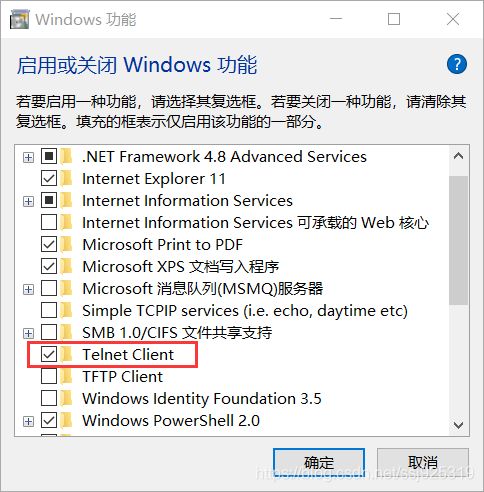
勾选 “ 适用于 Linux 的 Windows 子系统 ”。(后续要用到)
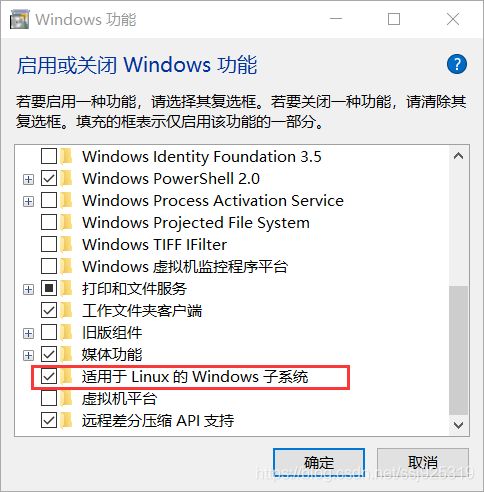
重新启动后,即可完成配置。
然后打开Windows 的 cmd 命令行执行命令:
telnet bbs.newsmth.net
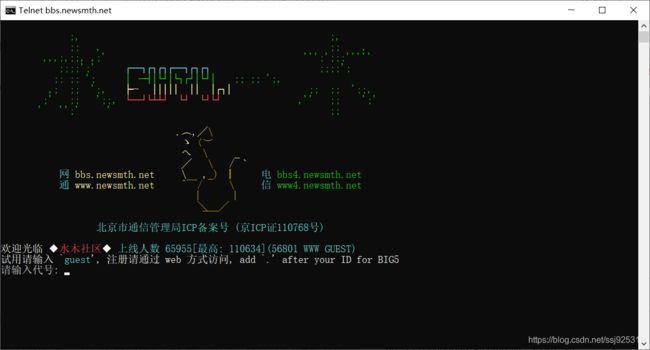
显示如上,说明 telnet 功能正常,这是一个命令行脚本的游戏,使用 telnet 协议远程访问上了。
2)安装 curses 库
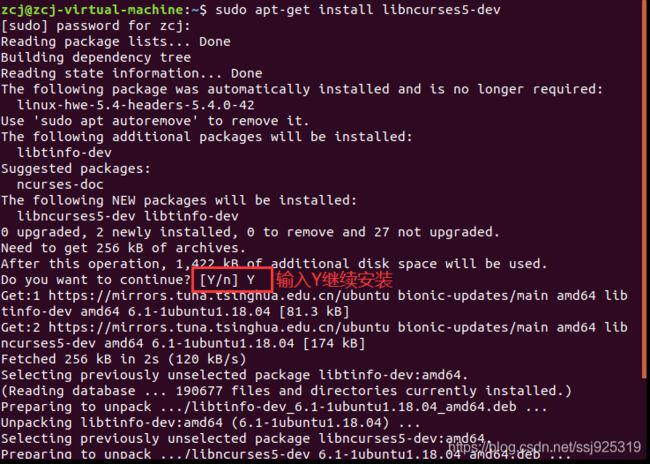
在 Ubuntu 系统使用命令行安装 curses 库
sudo apt-get install libcourses5-dev
whereis curses.h
whereis libncurses

可以看见头文件 curses.h 是在目录:/usr/include 下的,而静态库和动态库都是在目录:/usr/lib/x86_64-gnu 下的。
3)用 gcc 将 curses 库链接到 c 文件中
首先编写一个贪吃蛇游戏的 C 文件,代码如下。
snake.c
//mysnake1.0.c
//编译命令:cc mysnake1.0.c -lcurses -o mysnake1.0
//用方向键控制蛇的方向
#include <stdio.h>
#include <stdlib.h>
#include <curses.h>
#include <signal.h>
#include <sys/time.h>
#define NUM 60

struct direct                //用来表示方向的
{

    int cx;
    int cy;
};
typedef struct node            //链表的结点
{

    int cx;
    int cy;
    struct node *back;
    struct node *next;
}node;

void initGame();            //初始化游戏
int setTicker(int);            //设置计时器
void show();                //显示整个画面
void showInformation();        //显示游戏信息(前两行)
void showSnake();            //显示蛇的身体
void getOrder();            //从键盘中获取命令
void over(int i);            //完成游戏结束后的提示信息

void creatLink();                //(带头尾结点)双向链表以及它的操作
void insertNode(int x, int y);
void deleteNode();
void deleteLink();

int ch;                                //输入的命令
int hour, minute, second;            //时分秒
int length, tTime, level;            //(蛇的)长度,计时器,(游戏)等级
struct direct dir, food;            //蛇的前进方向,食物的位置
node *head, *tail;                    //链表的头尾结点

int main()
{

    initscr();
    initGame();
    signal(SIGALRM, show);
    getOrder();
    endwin();
    return 0;
}

void initGame()
{

    cbreak();                    //把终端的CBREAK模式打开
    noecho();                    //关闭回显
    curs_set(0);                //把光标置为不可见
    keypad(stdscr, true);        //使用用户终端的键盘上的小键盘
    srand(time(0));                //设置随机数种子
    //初始化各项数据
    hour = minute = second = tTime = 0;
    length = 1;
    dir.cx = 1;
    dir.cy = 0;
    ch = 'A';
    food.cx = rand() % COLS;
    food.cy = rand() % (LINES-2) + 2;
    creatLink();
    setTicker(20);
}

//设置计时器(这个函数是书本上的例子,有改动)
int setTicker(int n_msecs)
{

    struct itimerval new_timeset;
    long    n_sec, n_usecs;

    n_sec = n_msecs / 1000 ;
    n_usecs = ( n_msecs % 1000 ) * 1000L ;
    new_timeset.it_interval.tv_sec  = n_sec;
    new_timeset.it_interval.tv_usec = n_usecs;
    n_msecs = 1;
    n_sec = n_msecs / 1000 ;
    n_usecs = ( n_msecs % 1000 ) * 1000L ;
    new_timeset.it_value.tv_sec     = n_sec  ;
    new_timeset.it_value.tv_usec    = n_usecs ;
    return setitimer(ITIMER_REAL, &new_timeset, NULL);
}

void showInformation()
{

    tTime++;
    if(tTime >= 1000000)                //
        tTime = 0;
    if(1 != tTime % 50)
        return;
    move(0, 3);
    //显示时间
    printw("time: %d:%d:%d %c", hour, minute, second);
    second++;
    if(second > NUM)
    {

        second = 0;
        minute++;
    }
    if(minute > NUM)
    {

        minute = 0;
        hour++;
    }
    //显示长度,等级
    move(1, 0);
    int i;
    for(i=0;i<COLS;i++)
        addstr("-");
    move(0, COLS/2-5);
    printw("length: %d", length);
    move(0, COLS-10);
    level = length / 3 + 1;
    printw("level: %d", level);
}

//蛇的表示是用一个带头尾结点的双向链表来表示的,
//蛇的每一次前进,都是在链表的头部增加一个节点,在尾部删除一个节点
//如果蛇吃了一个食物,那就不用删除节点了
void showSnake()
{

    if(1 != tTime % (30-level))
        return;
    //判断蛇的长度有没有改变
    bool lenChange = false;
    //显示食物
    move(food.cy, food.cx);
    printw("@");
    //如果蛇碰到墙,则游戏结束
    if((COLS-1==head->next->cx && 1==dir.cx)
        || (0==head->next->cx && -1==dir.cx)
        || (LINES-1==head->next->cy && 1==dir.cy)
        || (2==head->next->cy && -1==dir.cy))
    {

        over(1);
        return;
    }
    //如果蛇头砬到自己的身体,则游戏结束
    if('*' == mvinch(head->next->cy+dir.cy, head->next->cx+dir.cx) )
    {

        over(2);
        return;
    }
    insertNode(head->next->cx+dir.cx, head->next->cy+dir.cy);
    //蛇吃了一个“食物”
    if(head->next->cx==food.cx && head->next->cy==food.cy)
    {

        lenChange = true;
        length++;
        //恭喜你,通关了
        if(length >= 50)
        {

            over(3);
            return;
        }
        //重新设置食物的位置
        food.cx = rand() % COLS;
        food.cy = rand() % (LINES-2) + 2;
    }
    if(!lenChange)
    {

        move(tail->back->cy, tail->back->cx);
        printw(" ");
        deleteNode();
    }
    move(head->next->cy, head->next->cx);
    printw("*");
}

void show()
{

    signal(SIGALRM, show);        //设置中断信号
    showInformation();
    showSnake();
    refresh();                    //刷新真实屏幕
}

void getOrder()
{

    //建立一个死循环,来读取来自键盘的命令
    while(1)
    {

        ch = getch();
        if(KEY_LEFT == ch)
        {

            dir.cx = -1;
            dir.cy = 0;
        }
        else if(KEY_UP == ch)
        {

            dir.cx = 0;
            dir.cy = -1;
        }
        else if(KEY_RIGHT == ch)
        {

            dir.cx = 1;
            dir.cy = 0;
        }
        else if(KEY_DOWN == ch)
        {

            dir.cx = 0;
            dir.cy = 1;
        }
        setTicker(20);
    }
}

void over(int i)
{

    //显示结束原因
    move(0, 0);
    int j;
    for(j=0;j<COLS;j++)
        addstr(" ");
    move(0, 2);
    if(1 == i)
        addstr("Crash the wall. Game over");
    else if(2 == i)
        addstr("Crash itself. Game over");
    else if(3 == i)
        addstr("Mission Complete");
    setTicker(0);                //关闭计时器
    deleteLink();                //释放链表的空间
}

//创建一个双向链表
void creatLink()
{

    node *temp = (node *)malloc( sizeof(node) );
    head = (node *)malloc( sizeof(node) );
    tail = (node *)malloc( sizeof(node) );
    temp->cx = 5;
    temp->cy = 10;
    head->back = tail->next = NULL;
    head->next = temp;
    temp->next = tail;
    tail->back = temp;
    temp->back = head;
}

//在链表的头部(非头结点)插入一个结点
void insertNode(int x, int y)
{

    node *temp = (node *)malloc( sizeof(node) );
    temp->cx = x;
    temp->cy = y;
    temp->next = head->next;
    head->next = temp;
    temp->back = head;
    temp->next->back = temp;
}

//删除链表的(非尾结点的)最后一个结点
void deleteNode()
{

    node *temp = tail->back;
    node *bTemp = temp->back;
    bTemp->next = tail;
    tail->back = bTemp;
    temp->next = temp->back = NULL;
    free(temp);
    temp = NULL;
}

//删除整个链表
void deleteLink()
{

    while(head->next != tail)
        deleteNode();
    head->next = tail->back = NULL;
    free(head);
    free(tail);
}
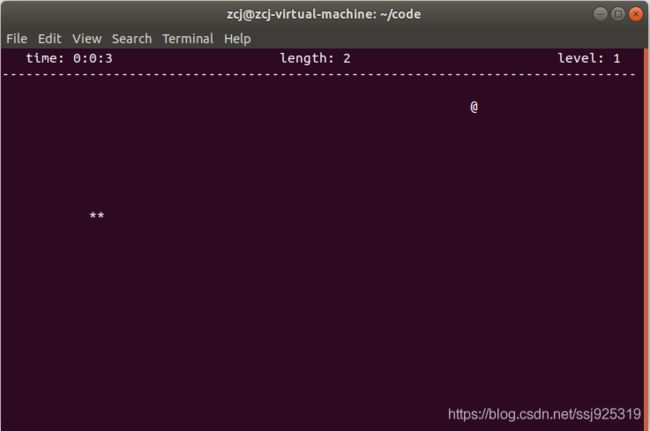
用 gcc 将 curses 库链接到可执行文件 snake 中。
gcc mysnake1.0.c -lcurses -o mysnake1.0
./snake
4)小结
该部分主要了解一下如何将一个 curses 库链接到 C 文件,然后生成可执行文件。总体来说,gcc 编译工具集还是十分强大的,专用于 C 语言的各种编译。
四、参考资料
1、Linux 环境下 C 语言编译实现贪吃蛇游戏
2、下面这个是我这篇文章的重要参考资料,有兴趣可以阅读。
链接:https://pan.baidu.com/s/1PrfV1s4QHNQViVCUbCB-iw
提取码:ukdm


